How to Crochet a Ripple Afghan, Free Crochet Pattern, Sun Room Afghan

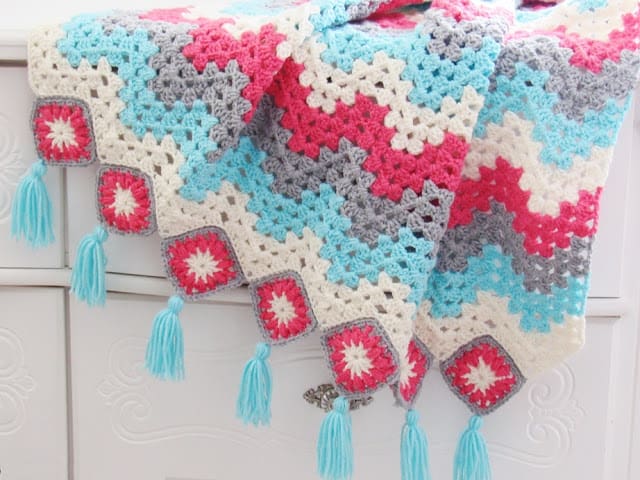
Choose the right colors for this crochet ripple afghan and turn this traditional crochet pattern into a contemporary piece to adorn any space. The granny ripple and granny squares have been combined to make this easy to work crochet afghan that brings spring right into your home.
I am absolutely in love with this color combination and cannot wait to see what colors my readers will make this pattern in.


Crochet Ripple Afghan
Materials
1. Worsted weight (size 4) yarn in 4 colors. I used colors Aran and Arbor Rose from Loops & Threads Impeccable and colors Cool Blue and Soft Grey from Bernat Super Value
2. Hook I (5.5mm)
3. Yarn needle to weave in the ends
Finished Size
The afghan is 34 inches wide and 37 inches long before adding the squares.
Yardage
410 yards of each color.
Gauge
Each peak measures 4 1/4 inches wide
Stitch Abbreviations
The pattern is in standard American terms.
sc- single crochet
hdc- half double crochet
dc-double crochet
tr- triple crochet
sl st- slip stitch
ch- chain
st- stitch
YO- Yarn over
Notes
1. To increase the width of your blanket add chains in multiples of 36. Each 36 chains will add around 8 inches to the width of your blanket.
2. When skipping your chains after making a peak, make sure you are not missing the one squished at the base of the previous st.
Row 1: With cream color yarn, ch 144, work into the back bumps of the chain throughout this row, 3 dc in 5th ch from hook, *[sk 2 chs, 3 dc in next, sk 2 chs, (3 dc, ch 3 and 3dc) in next ch to form a peak, sk 2 chs, 3 dc in next, sk 2 chs, 3 dc in next, sk 5 chs, 3 dc in next], repeat from * until you have 1 ch left, 1 dc in last ch, turn.—— 8 peaks

Row 2: Ch 4, work 3 dc in the gap between the first two 3 dc groups, 3 dc in next gap, (3dc, ch3, 3dc) into the ch-3 space at the peak, *[3 dc in next 2 gaps, sk the next big gap between the 3 dc groups forming the valley and work 3 dc into the next gap, 3 dc into the next gap once again, (3dc, ch3, 3dc) into the next ch-3 space at the peak], repeat from * to the last ch-3 space at the peak, 3 dc in next 2 gaps, sk 3 dc and 1 ch, 1 dc on top of beginning ch-3, turn.———-8 peaks
Repeat Row 2 changing colors every 3 rows. Fasten off every time you change colors. To join the new color at the end of your rows, start working the dc and when you have 2 loops on your hook, yarn over and pull through the new color to complete your dc. Then work the turning ch in the new color.
Keep repeating the pattern until you have 17 stripes. Weave in all the ends.
Granny Squares (Make 15)
Note: I have written the pattern for the granny square as a photo tutorial to make the steps clearer.
Finished Size
Each side of the square is 3 inches long
Stitch Explanation
Puff Stitch: [YO, insert hook into the st or space indicated and pull up a tall loop about the height of a dc st] repeat a total of 3 times, YO and pull through all 7 loops on hook, ch 1 to close the puff st.
Crochet Pattern
Note
1. Work over yarn tails to minimize weaving in later.
2. This is a picture tutorial as I thought it is best suited for a Granny square.
Round 1

Round 2


Round 3


Sewing the Squares onto the Ripple Afghan

Cream(Aran) color yarn is used to sew the squares onto the blanket on the wrong side. Keep both the blanket and the square with the wrong side facing up, place the square in one of the valleys at the edge, insert the yarn needle under both the loops of the blanket and only the back loop of the square, whip stitch them together along 2 sides of the square.
Tassels (Make 15)


Cut a piece of cardboard 4 1/4 inches long and 2 inches wide. Wrap the blue color yarn around the cardboard 13 times.
Pull an 18-inch piece of yarn through the winding and knot twice at the top.


Trim the tassel to level the edges. Use the 2 strands of yarn at the top to sew the tassel at the corners of the squares. The remaining yarn tail can be pulled into the tassel and trimmed to blend in with the rest of the tassel.
Enjoy the free pattern!
You might also like my Knit Look Chunky Afghan found here.
See our full collection of patterns here: Pattern Gallery.
This Ripple Crochet Afghan was featured on Allfreecrochetafghans.com.


ThankYou so much for sharing. Love This pattern so much.