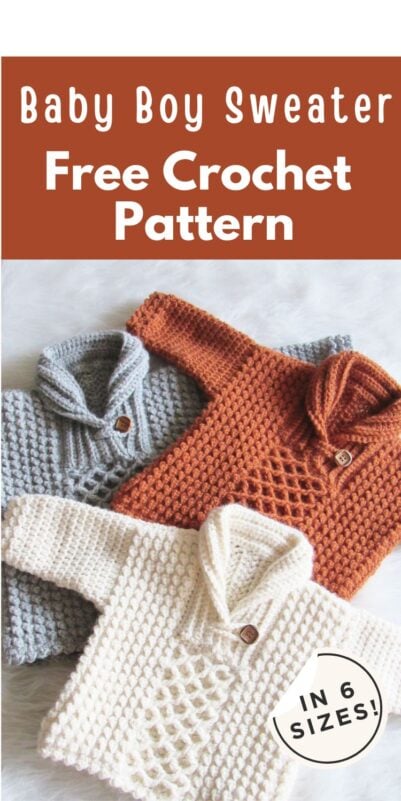
This crochet baby sweater pattern is one of my all-time favorites. Out of the hundreds of patterns I’ve designed, this one always wins hands down.

The inspiration came from a sweater I spotted at Target, but I decided to give it my own spin. To my delight, it turned out even more charming and stylish than the one in the store.

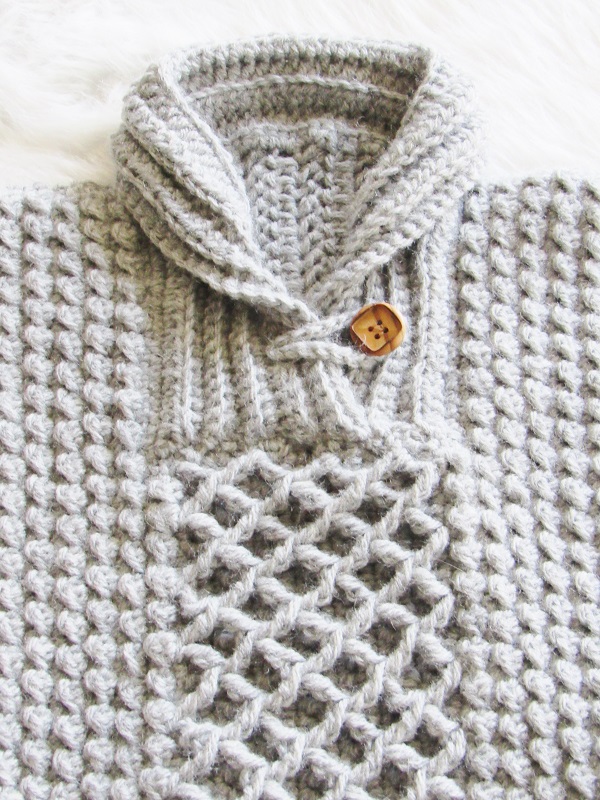
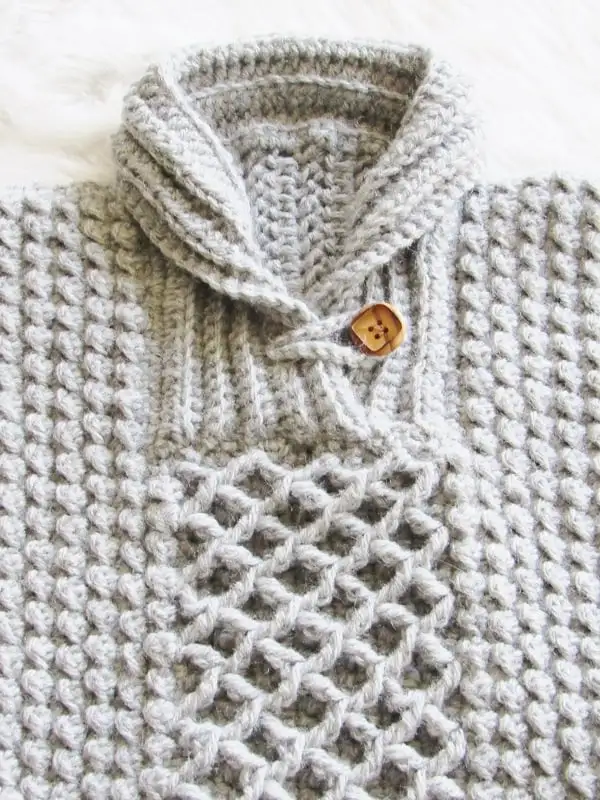
The beautiful texture makes it look both modern and timeless, and the little button detail adds just the right touch of charm. It’s the kind of sweater that will have people asking, “Did you really make that?”

The mix of textures combined with the cozy shawl collar makes this baby sweater truly unique. It has a timeless appeal that works beautifully for both boys and girls.
This is considered an intermediate to advanced pattern because of the diamond stitch, but don’t let that intimidate you. I’ve included a helpful video tutorial for the stitch, so you can follow along with ease.


Crochet Baby Sweater Free Pattern
”.
Pin it for later here.
Materials
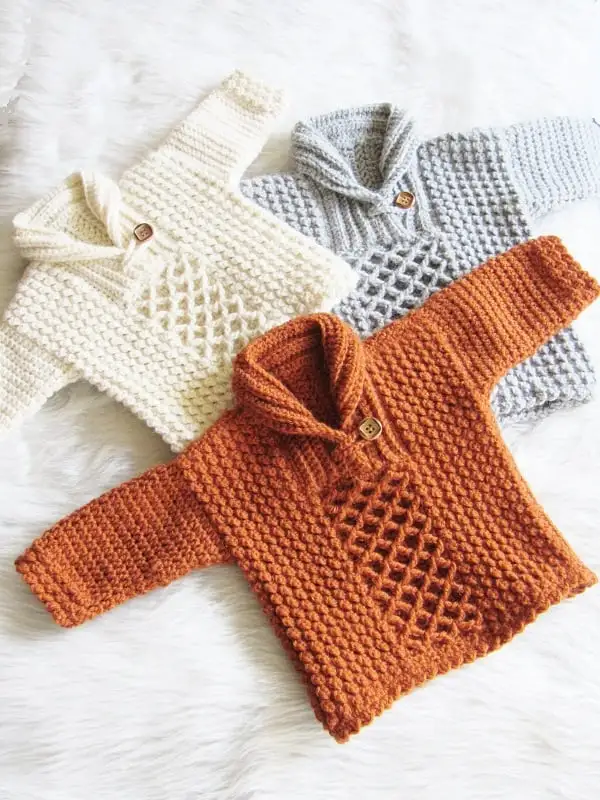
1. Worsted weight (size 4) yarn. Lion Brand Wool-Ease in colors Grey Heather, Pumpkin and Fisherman were used for the samples.
2. Hooks H (5mm).
3. Tapestry needle to weave in the ends
4.One 3/4”(19mm)button
Size
This sweater has been designed with 3 to 4 inches of positive ease.
0-3 months: Finished chest is 18″ (to fit 15″ chest) and length is 10.5″.
3 months: Finished chest is 19″ (to fit 16″ chest) and length is 10.75″.
6 months: Finished chest is 21″ (to fit 17″ chest) and length is 11.75″.
12 months: Finished chest is 22″ (to fit 18″ chest) and length is 12.75″.
18 months: Finished chest is 23″ (to fit 19″ chest) and length is 12.75″.
2T: Finished chest is 25″ (to fit 21″ chest) and length is 13.75″.
3/4T: Finished chest is 27″ (to fit 23″ chest) and length is 14.75″.
Yardage
The number of skeins is based on the Lion Brand Wool-Ease yardage of 197 yards per skein.
0-3 Months: 390 yards (2 skeins)
3-6 Months: 390 yards (2 skeins)
6-12 Months: 490 yards (2 ½ skeins)
12 & 18 Months: 590 yards (3 skeins)
2T- 780 yards: 780 yards (4 skeins)
3T-850 yards: 980 yards (5 skeins)
Gauge
Front
5 bumpy rows=2 inches
9 dc alternating with 9 sl sts/ 9 bumps= 4 inches long
Back
15 hhdc sts = 4 inches
Stitch Abbreviations
This pattern is written in US terms.
YO: yarn over
WS: Wrong Side of Sweater
RS: Right Side of Sweater
sc: single crochet
dc: double crochet
hdc: half double crochet
ch: chain
sl st: slip st
fptr: front post triple
hhdc: herringbone half double crochet
1. Stitch Explanations
1. Extended Single Crochet (esc): Insert your hook into the next st and pull up a loop, yarn over and pull through one loop, yarn over again and pull through the remaining 2 loops on the hook.
2. Herringbone Half Double Crochet (hhdc): YO, insert your hook into the next st and pull up a loop, pull the 3rd loop through the second loop on hook, YO and pull through the remaining 2 loops on the hook.
3. Front Post Triple (fptr): YO twice, insert your hook into the next st and pull up a loop, (YO, pull through 2 loops)3 times.
4. Front post triple decrease (fptr2tog): YO twice, insert your hook into the first st specified and pull up a loop, (YO, pull through 2 loops)twice, keeping the remaining 2 loops on hook, YO twice, insert your hook into the next st specified and pull up a loop, (YO, pull through 2 loops)twice, YO and pull through the remaining 3 loops on hook.
PATTERN
Pattern Notes
1. Stitch counts are given in the order 0-3 mos (3 mos, 6 mos, 12 mos) (18 mos, 2T, 3/4T)
2. The front and the back are worked separately and seamed at the shoulders. Then the shawl color is worked onto it. The sides are seamed leaving a slit for the armhole, and the sleeves are worked directly onto the body of the sweater. Finally, a thin border is added to the base of the sweater.
FRONT
The front is worked sideways from armhole to armhole so that your rows run vertically.
Right Panel
Ch 44 (46, 50, 54) (54, 58, 62)
Row 1: Working into the back bumps of the ch, 1 sc in 2nd ch from hook and each ch across to end, turn.——–43 (45, 49, 53) (53, 57, 61) sc
Row 2: Ch 1 ( does not count as a st here and throughout), 1 sl st in the same st as ch 1, *( 1 dc in next st, 1 sl st in next), repeat from * to end, turn.—–21 (22, 24, 26) (26, 28, 30) bumps
Note: The sl sts in the next row will be tiny and tight, while the dc sts will be loose and wide.
Row 3: Ch 1, 1 sc in the same st as ch 1, 2 sc in next dc, *(sk next sl st, 2 sc in next dc), repeat from * to last 2 sts, 1 sc in next dc, 1 sc in last sl st, turn.——43 (45, 49, 53) (53, 57, 61) sc
Row 4: Repeat Row 2
Row 5: Ch 1, 1 sc in the same st as ch 1, 1 sc in next dc, *(sk next sl st, 2 sc in next dc), repeat from * to last st, 1 sc in last sl st, turn.——43 (45, 49, 53) (53, 57, 61) sc
Repeat Rows 2-5 until you have 6 (7, 8, 8) (9, 10, 11) bumpy rows or until your work measures 3 (3.25, 3.5, 3.5) (3.75, 4, 4.25) inches. You should end in a sc row (Row 3 or 5).
Next Row (partial row): Ch 1( does not count as a st), 1 sl st in the same st as ch 1, *( 1 dc in next st, 1 sl st in next), repeat from * until you have 12 (13, 15, 16) (16, 17, 19) bumps, turn. ——– 25 (27, 31, 33) (33, 35, 39) sts
9 (9, 9, 10) (10, 11, 11) bumps are skipped for the collar.
Middle Panel
Pattern Notes
1. Unlike the bumpy rows of the right panel, you will not skip the sl sts except for the first one as we need an even distribution of sc sts to work our diamond pattern. The fptr sts should be worked tightly.
2. If you find the diamond st hard, you can watch a YouTube video by Hopeful Honey here. The only difference is that you will have a few extra sts at the end and the dc sts in the background will be replaced by esc sts.
Row 1: Ch 1, 1 sc in same st as ch 1, 2 sc in next dc, sk next sl st, 1 sc in each dc and sl st across to end. ——25 (27, 31, 33) (33, 35, 39) sc
Row 2: Ch 2 (does not count as a st), 1 esc in the same st as ch 2 and each st to end, turn.—- 25 (27, 31, 33) (33, 35, 39) sc
Note: To be able to count the tiny sc sts in Row 1, push your work up from under to stretch your fabric a little and then count.
Only for 3mos (6 mos, 2T, 3/4T)
1. Row 3 of the middle panel completed
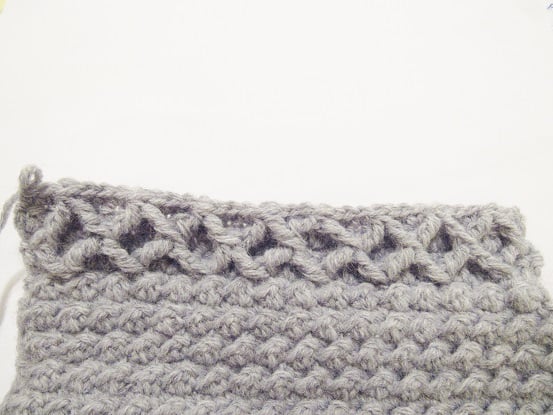
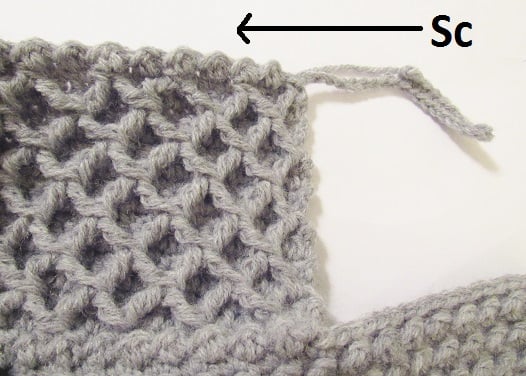
Row 3: Ch 1, 1 fptr in the 2nd sc from Row 1, which is one row below, 1 sc in the next 3 sts of Row 2, fptr2tog in the same sc as the first fptr and the 4th sc from it. You will have 3 sc skipped between the two legs of the fptr2tog now. Sk one st behind, 1 sc in the next 3 sts of Row 2, *(fptr2tog in the same sc as the previous fptr and the 4th sc from it, sk 1 st behind, 1 sc in next 3 sts of Row 2), repeat from * until you have 3 st left on Row 2, 1 fptr in the same st as the previous fptr, sk 1 sc behind, 1 sc in the last 2 sts of Row 2, turn (see pic 1 above).——27 (31, 35, 39) sts OR 6 ( 7, 8, 9) V’s formed by fptr sts
Row 4: Ch 2 (does not count as a st), 1 esc in the same st as ch 2 and each st to end, turn.—- 27 (31, 35, 39) sts
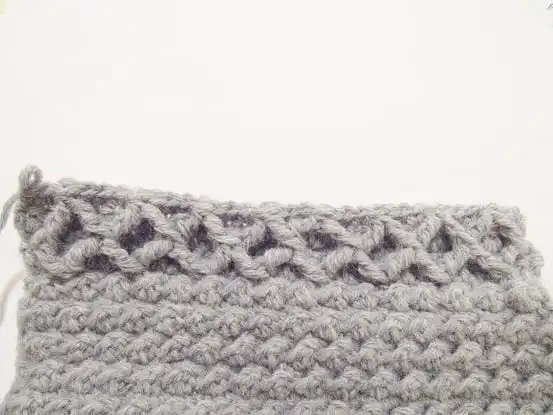
2. Row 5 of the middle panel is completed
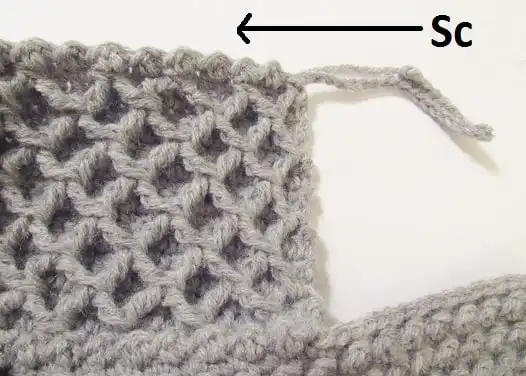
Row 5: Ch 1, 1 sc in the same st as ch 1, 1 sc in the next st, 1 fptr2tog in the first fptr below and the top of the next fptr2tog, sk 1 st behind, 1 sc in the next 3 ts of Row 4, *(1 fptr2tog in the top of the same fptr2tog as the previous fptr and the top of the next fptr2tog, sk 1 st behind, 1 sc in the next 3 ts of Row 4), repeat from * until 5 sts left on Row 4, sk 1 st behind, 1 sc in the last 4 sts, turn (see pic 2 above).——– 6 ( 7, 8, 9) inverted V’s
Row 6: Rep Row 4.
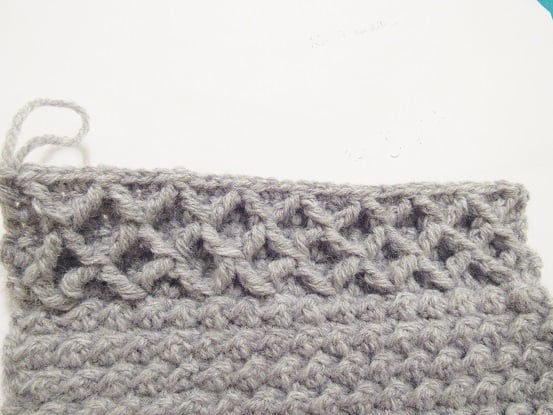
3. Row 7 of Middle Panel completed
Row 7: Ch 1, fptr on the top of the first fptr2tog below, 1 sc in the next 3 sts of Row 6, *(1 fptr2tog in top of the same fptr2tog where you worked your previous fptr and the top of the next fptr2tog, sk 1 st behind, 1 sc in the next 3 sts of Row 6), repeat from * until 3 sts are left on Row 6, sk 1 st behind, 1 sc in the last 2 sts, turn (see pic 3 above).——–6 ( 7, 8, 9) V’s formed by fptr sts
Repeat Rows 4-7 one more time if you are making size 3 Months to get a total of 5 frptr rows.
Repeat Rows 4-7 and then rows 4 and 5 once for size 6 Months to get a total of 6 fptr rows.
Repeat Rows 4-7 twice and then rows 4 and 5 once for size 2T to get a total of 8 fptr rows.
Repeat Rows 4-7 three times for size 3/4T to get a total of 9 fptr rows.
Jump to work the Left panel below.
Only for sizes 0-3 mos (12 mos, 18 mos)
Row 3: Ch 1, 1 fptr in the 2nd sc from Row 1 which is one row below, 1 sc in the next 3 sts of Row 2, fptr2tog in the same sc as the first fptr and the 4th sc from it. You will have 3 sc skipped between the two legs of the fptr2tog now. Sk one st behind, 1 sc in the next 3 sts of Row 2, *(fptr2tog in the same sc as the previous fptr and the 4th sc from it, sk 1 st behind, 1 sc in next 3 sts of Row 2), repeat from * until you have 1 st left on Row 2, start to work a fptr in the same st as the previous fptr until you have 2 loops left on your hook, insert your hook into the last st, pull up a loop and pull this third loop through the first 2 loops on your hook to complete the fptr and attach it to the last st, turn.——25 (33, 33) sts OR 6 (8, 8) V’s formed by fptr sts
Row 4: Ch 2 (does not count as a st), 1 esc in the same st as ch 2 and each st to end, turn.——-25 (33, 33) sts
Row 5: Ch 1, 1 sc in the same st as ch 1, 1 sc in the next st, 1 fptr2tog in the first fptr below and the top of the next fptr2tog, sk 1 st behind, 1 sc in the next 3 ts of Row 4, *(1 fptr2tog in the top of the same fptr2tog as the previous fptr and the top of the next fptr2tog, sk 1 st behind, 1 sc in the next 3 ts of Row 4), repeat from * until 3 sts left on Row 4, sk 1 st behind, 1 sc in the last 2 sts, turn.——– 6 (8, 8) inverted V’s
Row 6: Rep Row 4.
Row 7: Ch 1, fptr on the top of the first fptr2tog below, 1 sc in the next 3 sts of Row 6, *(1 fptr2tog in top of the same fptr2tog where you worked your previous fptr and the top of the next fptr2tog, sk 1 st behind, 1 sc in the next 3 sts of Row 6), repeat from * until you have 1 st left on Row 6, start to work a fptr in the same st as the previous fptr until you have 2 loops left on your hook, insert your hook into the last st, pull up a loop and pull this third loop through the first 2 loops on your hook to complete the fptr and attach it to the last st, turn.——6 (8, 8) V’s formed by fptr sts
Repeat Rows 4-7 one more time if you are making 0-3 to get a total of 5 fptr rows.
Repeat Rows 4-7 twice for size 12 Months and 18 Months to get a total of 7 fptr rows.
Continue to work the Left panel below.
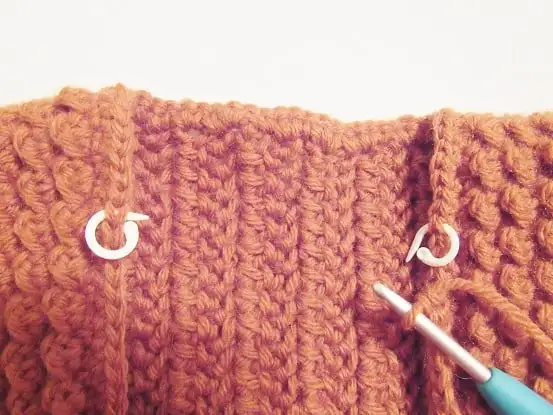
Left Panel
Row 1: Ch 1 ( does not count as a st), 1 sl st in the same st as ch 1, *( 1 dc in next st, 1 sl st in next), repeat from * to end, ch 19 (19, 19, 21) (21, 23, 23) and turn.——–12 (13, 15, 16) (16, 17, 19) bumps and a long chain
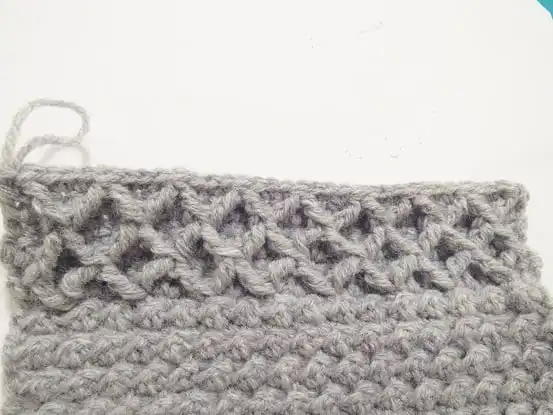
4. Starting Row 2 of the Left Panel by working into the long chain made
Row 2 (see pic 4 above): Working into the back bumps of the chain, 1 sc in the 2nd ch from hook and next 17(17, 17, 19, 19, 21, 21) sts, continue working into the previous row, 1 sc in the first sl st, 1 sc in next dc, *(sk next sl st, 2 sc in the next dc), repeat from * to last st. 1 sc in the last sl st, turn.—-43 (45, 49, 53) ( 53, 57, 61)sts
Row 3: Ch 1, 1 sl st in the same st as ch 1, *( 1 dc in next st, 1 sl st in next), repeat from * to end, turn.———21 (22, 24, 26) (26, 28, 30) bumps
Note: The gap left for the collar measured 3.25 (3.25, 3.75, 4.25) (4.25, 4.75, 5.25) inches wide.
Row 4: Ch 1, 1 sc in the same st as ch 1, 2 sc in next dc, *(sk next sl st, 2 sc in next dc), repeat from * to last 2 sts, 1 sc in next dc, 1 sc in last sl st, turn.——43(45, 49, 53) (53, 57, 61)sts
Row 5: Rep Row 3
Row 6: Ch 1, 1 sc in the same st as ch 1, 1 sc in next dc, *(sk next sl st, 2 sc in next dc), repeat from * to last st, 1 sc in last sl st, turn.——43 (45, 49, 53) (53, 57, 61)sts
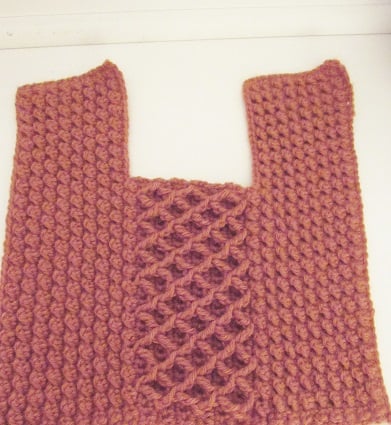

5. Finished front
Repeat Rows 3-6 until you have the same number of bumpy rows as on the right panel. Fasten off. See pic 5 for the finished front.
BACK
Check your gauge before you start the back, as it is worked in hhdc sts, and the stitch count won’t be the same as the front. The back is a plain rectangle and is also worked sideways from armhole to armhole. After making 4-5 rows, you should check to ensure the strip is the same height as the front.
Row 1: Ch 39 (40, 43, 47) (47, 50, 53), 1 hhdc in the 3rd ch from hook and each ch across to end, turn.——37 (38, 41, 45) (45, 48, 51)sts
Row 2: Ch 2 (does not count as a st), 1 hhdc in the same st as ch 2 and each st across to end, turn.——37 (38, 41, 45) (45, 48, 51)sts
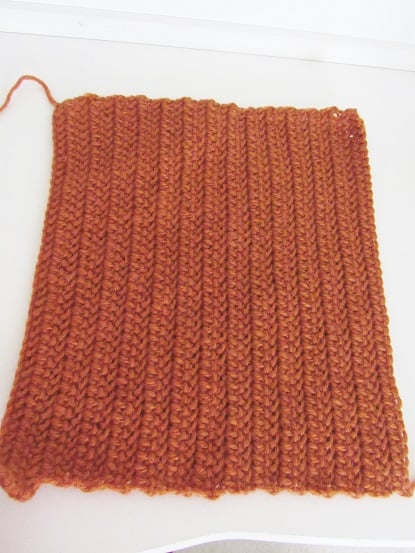

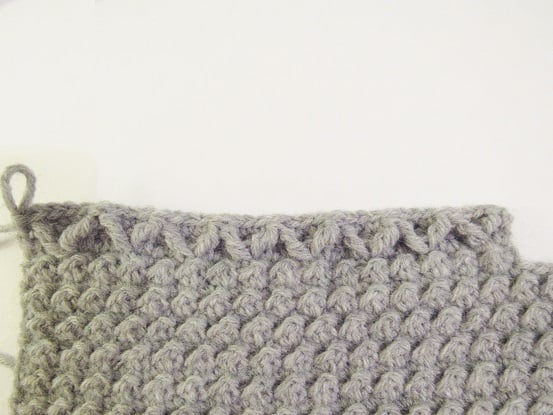
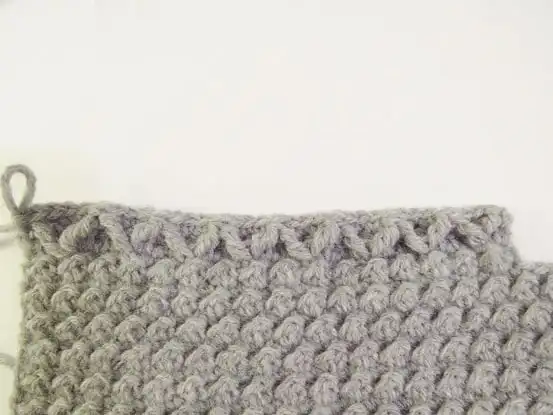
6. Finished back
Repeat Row 2 until your back piece measures the same width as your front. See pic 6 for the finished back.
JOINING THE SHOULDERS
Working on the WS or inside of the sweater, overlap the front and back pieces, align the shoulders, and seam them together with a whip stitch. The sides will be seamed only after making the shawl collar.
SHAWL COLLAR

7. Marker placed for widening collar

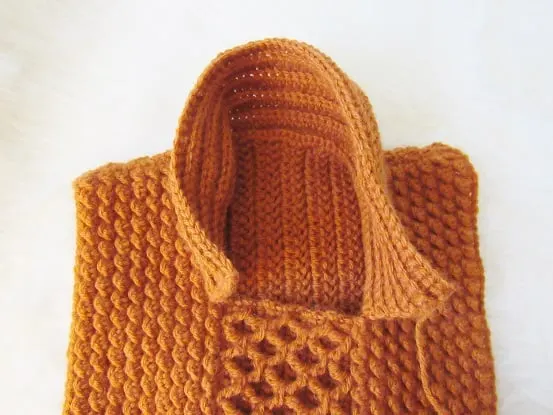
8. Collar completed
The collar is worked back and forth along the sides of the rectangular opening and the back of the sweater. The sides of the opening will have 1 st less than the total number skipped as it will now be obscured by the shoulder seam. For example, in size 3 M, you skipped 9 bumps or total 18 sts, but the sides will only have 17 visible sts. See pics 7 and 8 above.
0-3 (3 mos, 6 mos)
Row 1 (0-3 and 3-6 months): Sl st to the first st on the bottom left side of the rectangular opening in the front of your sweater, 1 sc in the same st as the sl st, 1 sc in next 11 sts, 2 sc, 1 sc, 2sc, 1 sc, 2 sc, 1 sc in the shoulder seam, 25 sc on back side until you reach the 2nd shoulder seam, the sts on the back will be crammed, 1 sc in the seam, 2 sc, 1 sc, 2sc, 1 sc, 2 sc, 1 sc in next 12 sts until you reach the bottom right of the rectangular opening, turn.———67 sc
Row 1 (6 months): Sl st to the first st on the bottom left side of the rectangular opening in the front of your sweater, 1 sc in the same st as sl st, 1 sc in next 9 sts, 2 sc, (1 sc, 2sc)3 times, 1sc in the shoulder seam, 27 sc on back side until you reach the 2nd shoulder seam, the sts on the back will be crammed, 1 sc in the seam, (2 sc,1 sc)3 times, 2 sc, 1 sc in next 10 sts until you reach the bottom right of the rectangular opening, turn.———71 sc
Notes
1. Place a marker in the 6 (7, 8)th st from the shoulder seam on either side. You will work hdc sts between these markers to make your collar wider in this part. The markers are placed in advance, even though they will only be used in the later rows, as it is easier to count from the shoulder seams now.
2. Move the marker up every time you work into a marked st.
3. All the rows of the collar from now on should be worked into the back loops only.
Row 2 (full sc row): Ch 1, 1 sc in the back loop of the same st and each st across to end, turn——67 (67, 71) sts
Repeat the above row one more time for size 6 mos
Next Row: Ch 1, 1 sc in the back loop of the same st and each st across to the marked st, 1 hdc in the marked st, 1 hdc in each st until you reach the marked st on the the other side, 1 hdc in the marked st, 1 sc in each st across to end, turn.—-67 (67, 71) sts
Repeat the above row 7 more times for all three sizes and fasten off.
12 mos (18 mos, 2T, 3/4T)
Row 1 (12 and 18 months): Sl st to the first st on the bottom left side of the rectangular opening in the front of your sweater, 1 sc in the same st as sl st, 1sc in next 9 sts, 2sc in next 2 sts, (1 sc, 2 sc)3 times, 2 sc in next, 1 sc in the shoulder seam, 30 sc across the back until you reach the next shoulder seam, the sts on the back will be crammed, 1 sc in seam, 2 sc in next st, *(2sc, 1 sc)3 times, 2 sc in next 2 sts, 1 sc in next 10 sts until you reach the bottom right of the rectangular opening, turn.———82 sts
Row 1 (2T only): Sl st to the first st on the bottom left side of the rectangular opening in the front of your sweater, 1 sc in the same st as sl st, 1sc in next 9 sts, 2sc in next 2 sts, (1 sc, 2 sc)4 times, 2 sc in next, 1 sc in the shoulder seam, 34 sc across the back until you reach the next shoulder seam, the sts on the back will be crammed, 1 sc in seam, 2 sc in next st, *(2sc, 1 sc)4 times, 2 sc in next 2 sts, 1 sc in next 10 sts until you reach the bottom right of the rectangular opening, turn.———92 sts
Row 1 (3/4T only): Sl st to the first st on the bottom left side of the rectangular opening in the front of your sweater, 1 sc in the same st as sl st, 1sc in next 9 sts, 2sc in next 2 sts, (1 sc, 2 sc)4 times, 2 sc in next, 1 sc in the shoulder seam, 38 sc across the back until you reach the next shoulder seam, the sts on the back will be crammed, 1 sc in seam, 2 sc in next st, *(2sc, 1 sc)4 times, 2 sc in next 2 sts, 1 sc in next 10 sts until you reach the bottom right of the rectangular opening, turn.———96 sts
Notes
-
Place a marker in the 8( 8, 9, 9)th st from the shoulder seam on either side. You will work hdc sts between these markers to make your collar wider in this part. The markers are placed in advance, even though they will only be used in the later rows, as it is easier to count from the shoulder seams now.
-
Move the marker up every time you work into a marked st.
-
All the rows of the collar from now on should be worked into the back loops only.
Row 2: Ch 1, 1 hdc in the back loop of the same st and each st across to the marked st, 1 hdc in the marked st, move the marker up, 1 hdc in each st until you reach the marked st on the the other side, 1 hdc in the marked st, 1 hdc in each st across to end, turn.—–82 (82, 92, 96)sts
Repeat the above row 1 more time for size 12 and 18 mos, 2 more times for size 2T and 3/4T
Row 4: Ch 1, 1 sc in the back loop of the same st and each st across to the marked st, 1 hdc in the marked st, 1 hdc in each st until you reach the marked st on the the other side, 1 hdc in the marked st, 1 sc in each st across to end, turn.—–82 (82, 92, 96)sts
For sizes 12 mos, 18 mos and 2T, repeat the above row 6 more times and fasten off.
For size 3/4T repeat the above row 7 more times and fasten off.
ATTACHING THE BASE OF THE COLLAR TO THE SWEATER
Now overlap the left side of the collar over the right side, stretching them slightly, the left side should be around 1 inch away from the right side for sizes 0-3 and 3months, 1 ½ inches away for sizes 6, 12 and 18 months and 2 inches away for 2T and 3/4T. You are free to overlap it more or less based on your preference.
Using a mattress, stitch seam the base of the collar to the sweater taking care to go through both the layers of the collar where they overlap. If you think you will find this difficult, use a contrasting color yarn first to overlap the left and right sides of the collar and make a running st along their bases to join them together before attaching it to the sweater. You can cut off the running st once the collar is attached. You can see a tutorial on working the mattress stitch here.
SEAMING THE SIDES
Skip 3.75 (4, 4.25, 4.5) (4.75, 5.25, 5.75) inches from the shoulder seam and seam the rest of the sides using a whip stitch. I worked the whip stitch over the yarn tail to weave it in.
SLEEVES
Notes
1.The stitch counts on the armhole may not match the number of sts needed for the sleeve as we are not using the same sts. So distribute the stitches as evenly as possible adding increases if needed to meet the required number of sts.
RIGHT SLEEVE
Row 1 (RS): Sl st to the base of the armhole, ch 1(not counted as a st), 1 hdc in the same point, hdc2tog in the next 2 sts, 14(15, 16, 17, 18, 20, 22)hdc until you reach the shoulder seam, 1 hdc in the seam, 14(15, 16, 17, 18, 20, 22) hdc until 1 st left, hdc2tog in the last st and the space right before the very first hdc, do not sl st and do not turn.———32 (34, 36, 38) (40, 44, 48) sts
Note: The sleeve will be worked in the round and you will mark the first st of the round. Every time you work into the marked st, move the marker up.
Row 2: 1 hdc in the next st (first hdc of Round 1), place a marker in this st, hdc2tog, 1 hdc in each st across to last 2 sts, hdc2tog in last 2, do not turn and do not sl st.—-30 (32, 34, 36) (38, 42, 46)sts
Row 3 (Even Row): 1 hdc in the marked st, move the marker up, 1 hdc in each st across to end, do not turn and do not sl st.——30 (32, 34, 36) (38, 42, 46)sts
Row 4: 1 hdc2tog in the marked st and the next st, move the marker up into this hdc2tog, hdc2tog again in next 2 sts, 1 hdc in each st across to end, do not turn and do not sl st.——28 (30, 32, 34) (36, 40, 44) sts
Repeat rows 3 and 4 two more times for sizes 0-3 (3 mos, 6 mos) to end in 24 (26, 28) sts.
Repeat rows 3 and 4 three more times for sizes 12 mos (18 mos, 2T, 3/4T), to end in 28 (30, 34, 38) sts
Repeat Row 3 (even row), until your sleeve measures 4.5 ( .75, 5.25, 5.75) (6.25, 6.75, 7.75) inches, sl st to the marked hdc, turn, and make the cuffs below.
CUFFS (All Sizes)
Row 1 (WS): ch 1 ( counts as the first sl st), 1 dc in next st, *(1 sl st in next, 1 dc in next), repeat from * to end and sl st to beginning ch 1, turn. ——– 24 (26, 28, 28) (30, 34, 38)sts
Row 2: Ch 1(not counted as a st), 1 sc in the same st as ch 1, 1 sc in next dc, *(sk next sl st, 2 sc in next dc), repeat from * to end, sl st to first sc, turn. —–24 (26, 28, 28) (30, 34, 38)sts
Repeat Rows 1 and 2 until you have 3 bumpy rows for sizes up to 18 months and 4 bumpy rows for sizes 2T and 3/4T
LEFT SLEEVE
Work just like the right sleeve. The only difference is that you will start from the back of the sweater.
BOTTOM EDGING
Row 1 (RS): Sl sl to the side seam, 1 sc in the seam, continue to work along the back of the sweater making around 3 sc across each stripe (formed by 2 hhdc rows), when you reach the second side seam, work a sc into the seam, and proceed to work on the front, work 1 sc on the base of each bumpy row and 1 sc in the junction between the bumpy rows. When working along the base of the diamond st pattern, I worked 4 sc along the base of each diamond. Once you have worked all around the bottom, sl st to the first sc, turn. You should end in an even number. If not, add an extra st.
Row 2 (WS): ch 1 (counts as a sl st), 1 dc in next, *(1 sl st in next, 1 dc in next), repeat from * to end, sl st to beginning ch 1. Fasten off.
ADDING THE BUTTON AND BUTTON LOOP
First, sew the button onto the right side of the collar.
Ch 19 (19, 20, 20) (20, 21, 22) and fasten off. Loop it over the button and determine where you should attach the loop. Keeping the bumpy side of the chain facing up, pull the 2 yarn tails together through the same point on the left side of the collar, knot each tail separately a couple of times to the back of the collar and weave in the remaining tails to secure.
FINIHSING
Weave in any tails left.
Pin it for later here: