Baby Boy Cardigan Pattern, Huckleberry Cardigan
This baby boy cardigan pattern is a simple design that will help you make an elegant cardigan for your little guy.

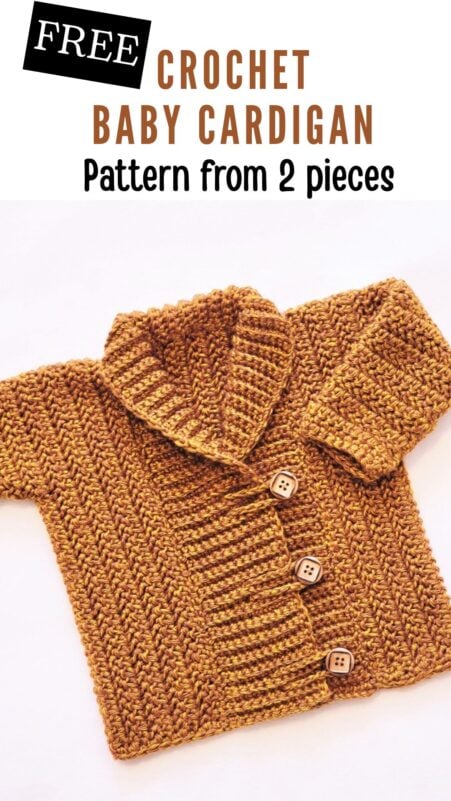
The pattern works up very quickly and is beginner-friendly. The cardigan is made from just 2 pieces and uses only easy stitches.


The pattern includes 7 sizes from 0-3 months to 3/4T. I hope you will enjoy making a few using this pattern.

Baby Boy Cardigan Pattern
Materials
1. Worsted weight size 4 yarn. I used Lion Brand Wool-Ease in color Fisherman and Lion Brand Heartland in color Bryce Canyon for the samples.
2. J(6mm)for the body of the sweater and H(5 mm) hook for the ribbed collar. Use any size hook to attain gauge.
3. Three or four 1/2-inch wooden buttons. I suggest 4 buttons for sizes bigger than 12 months.
4. Tapestry needle to weave in the ends.
5. Stitch markers. You can also use safety pins or paper clips in place of stitch markers.
Finished Size
This sweater has been designed with a 4 to 5 inch positive ease.
| Age | To Fit Chest | Finished Chest | Length |
|---|---|---|---|
| 0-3 Months | 15" | 19" | 10.5" |
| 3 Months | 16" | 20" | 10.75" |
| 6 Months | 17" | 22" | 11.75" |
| 12 Months | 18" | 23" | 12.75" |
| 18 Months | 19" | 24" | 12.75" |
| 2T | 21" | 25" | 13.75" |
| 3/4T | 23" | 27" | 14.75" |
Yardage
Each skein is 197 yards.
0-3 months– 2 skeins
3 months– 2 skeins
6 months– 2-1/2 skeins
12 months– 3 skeins
18 months– 3 skeins
2T– 4 skeins
3/4T– 4-1/2 skeins
Stitch Abbreviations
The pattern is written in US terms.
ch– chain
st- stitch
sc- single crochet
sl st– slip stitch
hhdc– herringbone half double crochet
YO– yarn over
Stitch Explanations
Herringbone half double crochet(hhdc): YO, insert your hook into the next st and pull up a loop through the st and the first loop on your hook, YO and pull through the remaining 2 loops on your hook.
hhdc2tog: It is a decrease worked across 2 sts. YO, insert your hook into the next st and pull up a loop through the st and the first loop on your hook, keep the remaining 2 loops on your hook, YO again, insert your hook into the next st and pull up a loop through the st and the first loop on your hook, YO pull through the remaining 3 loops on your hook.
BLO: Insert your hook only under the back loop of your stitch (see diagram below).

Gauge
Pattern for Gauge Swatch
Row 1: Ch 24, 1 hhdc in 3rd ch from hook (skipped 2 chs count as a st) and each ch across to end.—-23 hhdc
Row 2: Ch 2 (counts as a hhdc), 1 hhdc in next st and each st across to beginning ch 2, 1 hhdc on top of beginning ch-2, turn.——23 hhdc
Repeat Row 2 until you have 15 rows, and then measure for gauge.
Gauge
13 hhdc sts and 10 Rows= 4 inches
You might also like these cardigan patterns:
Baby cardigan crochet pattern free for girls
7 Hour easy crochet cardigan for beginners
Cropped cardigan crochet pattern
Crochet Pattern
Pattern Notes
1. The stitch counts for bigger sizes are given in the order 0-3 months (3 months, 6 months, 12 months) (18 months, 2T, 3/4T)
2. The body of the sweater is worked from side to side. The sleeves are then crocheted onto the body. Lastly, you make the ribbed collar and whip stitch it onto your cardigan.
Body of the Cardigan

Body- Left Part
With bigger hook J(6mm), ch 71( 73, 79, 85) (85, 91, 97).
Row 1: 1 hhdc in 3rd ch from hook (skipped 2 chains count as first st) and each ch across to end, turn ——–70( 72, 78, 84) (84, 90, 96)sts
Row 2: Ch 2( counts as first hhdc here and throughout), 1 hhdc in next st and each st across to beginning ch-2, 1 hhdc on top of beginning ch, turn.——70( 72, 78, 84) (84, 90, 96)sts
Repeat Row 2 until you have 7 (8, 9, 9) (10, 10, 12) rows in total. Do not fasten off.
Body- Middle Part
Row 8(9, 10, 10) (11, 11, 13): Ch 2 (counts as first hhdc), 1 hhdc in next 33 (34, 37, 40) (40, 43, 46) sts, leave the remaining sts unworked and turn. ————34 (35, 38, 41) (41, 44, 47) sts
Row 9(10, 11, 11) (12, 12, 14): Ch 2, 1 hhdc in next st and each st across to beginning ch-2, 1 hhdc on top of beginning ch, turn.———34 (35, 38, 41) (41, 44, 47)sts
Repeat the above row until you have a total of 9 (9, 11, 13) (13, 15, 15)rows in the short panel. Do not fasten off.
Body- Right Part

Row 17 (18, 21, 23) (24, 26, 28): Ch 37 (38, 41, 44) (44, 47, 50), 1 hhdc in 3rd ch from hook (skipped 2 chains count as first st) and each ch across, 1 hhdc in each st of the previous row to end, turn. See pic 2 above.————70( 72, 78, 84) (84, 90, 96)sts
Row 18 (19, 22, 24) (25, 27, 29): Ch 2( counts as first hhdc here and throughout), 1 hhdc in next st and each st across to beginning ch-2, 1 hhdc on top of beginning ch, turn.——70( 72, 78, 84) (84, 90, 96)sts
Repeat the above row until you have a total of 7 (8, 9, 9) (10, 10, 12) rows in the Right Panel. Fasten off. See pic 1 above for the completed body.
Adding Sleeves

Notes
1. Fold the front panels over the back panel, count 12 (13, 14, 15) (16, 17, 18) sts from the shoulder fold, and place a marker in the top and bottom layers (see pic 3 above). Once you open the fold you should have 24 (26, 28, 30) (32, 34, 36)sts marked. On the foundation chain side, you can count the free loops as there are no sts.
2. Sleeves are directly worked onto the body between the markers placed as shown in pic 4 below.

Sleeve Pattern
Note: Work the first row on the right side of the fabric. You can choose whichever side of the fabric you find more appealing as your right side.
Row 1: Sl st to the first marked st, 1 hhdc in the first st, 1 hhdc in each st across until you end with a hhdc in the next marked st, turn. ———-24 (26, 28, 30) (32, 34, 36)sts
Row 2: Ch 1 (does not count as a st), 1 hhdc in the first st, hhdc2tog across next 2 sts, 1 hhdc in each st across to last 3 sts, hhdc2tog across next 2 sts, 1 hhdc in last st, turn.——–22 (24, 26, 28) (30, 32, 34)sts
Row 3: Ch 1 (does not count as a st), 1 hhdc in first st and each st across to end, turn. ——–22 (24, 26, 28) (30, 32, 34)sts
Rows 4 and 5: Repeat Row 3.
Row 6: Repeat Row 2.———20 (22, 24, 26) (28, 30, 32)sts
Rows 7-11: Repeat Row 3.
Row 12: Repeat Row 2.———18 (20, 22, 24) (26, 28, 30)sts
Row 13: Repeat Row 3.
Repeat Row 13 until your sleeve is approximately 5.25 (5.5, 6, 6.5) (7, 8, 9)inches long.
Next Row: Ch 1(does not count as a st), 1 sc in first st and each st across to end, turn.
Last Row: Repeat the above row and fasten off.
Seaming the Sides

Fold the front over the back with the wrong side of the fabric facing out and seam the bottom of the sleeves and the sides of your cardigan with a whip stitch as shown in pic 5 above.
Leveling the Bottom Edge
Turn your cardigan right side out and work a row of sc along the base of the sweater. Distribute sc sts as evenly as possible. If you edge puckers, you have fewer sts than needed. If your edge waves, you have more sts than needed. Take your time perfecting this bottom edge.
Making the Collar

With the smaller H(5 mm) hook, ch 12(12, 15, 18) (18, 21, 21).
Row 1: 1 sc in 2nd ch from hook (skipped ch counts as a sc) and each ch across to end, turn.——12(12, 15, 18) (18, 21, 21)sts
Row 2: Ch 1( counts as first sc), 1 sc in BLO of next st and each st across to beginning ch, 1 sc on top of beginning ch, turn.———–12(12, 15, 18) (18, 21, 21)sts
Keep repeating the above row until your collar is long enough to run along the edge of the front opening plus a few extra rows. Do not fasten off, keep the skein attached so we can adjust the length of the collar later if need.
Attaching the Collar


Disclosure: You can place the button on the right side of the collar for a girl and on the left side for a boy. I had accidentally placed it on the right side even if I meant to make it for a baby boy.
Make sure your cardigan is right side out. If you are making a baby boy cardigan, place the foundation chain side of your collar on the left side of your front opening as shown in pic 7 above, and start whip stitching it to the front opening. When you reach the other end of the front opening, add or unravel rows to fit the length, and whip stitch all the way to the end.
If you are making it for a girl, make sure your cardigan is right side out, place the foundation chain side of your collar on the right side of your front opening as shown in pic 8 above, and start whip stitching it to the front opening. When you reach the other end of the front opening, add or unravel rows to fit the length, and whip stitch all the way to the end.
Adding Buttons and Button Loops
You can fold the collar down and sew on 3 or 4 wooden buttons based on the length of the cardigan you are making. Sew on the buttons to the left side for a boy and the right side for a girl.
Button Loops
Leave a 7-inch tail and with the smaller H(5mm)hook, ch 18 (18, 19, 20, 20, 22, 22), and fasten off. Make 3 or 4 depending on how many buttons you have. Keeping the bumpy side of the chain facing up, loop it over the button and determine where you should attach the loop. Pull the 2 yarn tails together through the same point on the other side of the collar, knot each tail separately a couple of times to the inside of the collar and weave in the remaining tails to secure.
Finishing
Weave in any tails left along the inside of the cardigan.
You can watch web story on this baby boy crochet cardigan pattern free tutorial here.
Pin it for later


This looks like an awesome pattern. Nice sweater patterns for boys are hard to find.
Hello,
I purchased this pattern and I made the first long panel and the body part. I am confused about how to make the last long panel. I did the chain stitches and the first row but then how does it attach to the body? Please help, I’m stuck! 😥
I just added an extra picture to clarify this part. YOu will receive an email with the updated pdf soon.
I made up this pattern for my son who is to arrive in October. Clear directions, easy to follow and a very attractive sweater. I might make a different colour in a larger size for later I like it so much. Thank you!
So glad you love it!
We have enjoyed making your pattern. How does the collar attach? Is it a whip stitch? Is it a whip stitch?
Yes, whip stitch. It is mentioned in the pattern.