Free Crochet Pattern for Baby Cardigan, Chloe Cardigan
Easy Raglan Cardigan-Free Crochet Baby Cardigan Pattern

After the huge popularity of my Evelyn Crochet Baby Sweater, I decided to design a free crochet pattern for a baby cardigan. This is my first free pattern for a baby cardigan and I have a few more ideas in my head.

The cardigan is worked top-down in one piece and has an easy raglan design which means there is no shaping involved for armholes. This makes it a very beginner-friendly pattern that anyone can enjoy.

This free baby cardigan pattern includes 6 sizes and runs up to a size 4T. I am sure you will enjoy making a few as your baby grows.

The smallest 2 sizes take only 2 skeins of yarn. I designed it using the readily available Vanna’s Choice yarn and it comes in an array of beautiful colors. So without further ado, let’s start making!

Free Crochet Pattern for Baby Cardigan
Materials
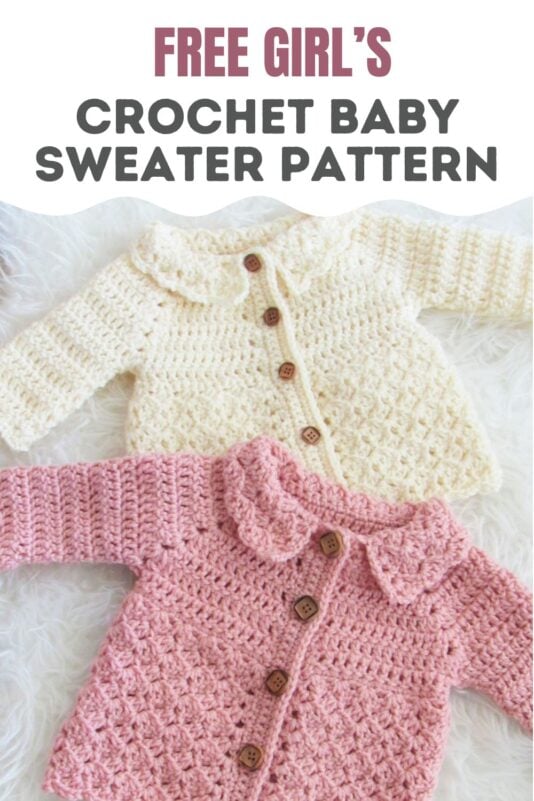
1. Worsted weight (size 4) yarn. Lion Brand Vanna’s Choice in colors Pink and Fisherman were used for the sample crochet baby cardigans pictured.
2. H (5mm) hook
3. Tapestry needle to weave in the ends
4. 5/8”(16mm)buttons: 4 buttons for 0-3 months
3/4”(19mm)buttons: 4 buttons for 3-6 months, 6-12 months, and 12-24 months. Five buttons for sizes 2T and 3/4T.
Finished Size
This coat has been designed with 3 to 4-inch positive ease. The finished measurements are as follows:
0-3 months: 9 inches chest and 11 inches long
3-6 months: 9 1/2 inches chest and 12 inches long
6-12 months: 10 1/2 inches chest and 13 inches long
12-24 months: 11 inches chest and 14 inches long
2T: 12 inches chest and 15 inches long
3T/4T: 13 inches chest and 15-1/2 inches long
Yardage
0-3 Months– 340 yards
3-6 Months– 340 yards
6-12 months– 450 yards
12-24 months– 510 yards
2T- 680 yards
3T/4T-680 yards
Gauge for Free Crochet Baby Cardigan Pattern
With H(5mm) hook, 13 dc sts= 4 inches
For skirt, 5 repeats= 4-3/4 inches
Stitch Abbreviations
This pattern is written in US terms.
WS-Wrong Side of Sweater
RS- Right Side of Sweater
ch-chain
sl st-slip st
sc-single crochet
dc– double crochet
cl– cluster (explained below)
YO– yarn over
sp-space
Stitch Explanations
Cluster (cl): YO, insert hook into the st indicated and pull up a loop, YO and pull through 2 loops, YO and insert hook into the same st, pull up a loop, YO and pull through 2 loops, YO and pull through the remaining 3 loops on hook.
Related Cardigan Patterns
Evelyn Crochet Baby Sweater Pattern
Bentley Crochet Baby Boy Sweater
Woman’s Crochet Long Cardigan Pattern
Free Baby Cardigan Crochet Pattern
Pattern Notes
1. Sizes 0-3 months and 3-6 months are grouped together. Sizes 6-12 and 12-24 months are grouped together, size 2T and 3/4T are grouped together. The headings are color-coded for each group.
0-3 and 3-6 MONTHS
YOKE- Both Sizes

Row 1: Ch 47, 1 dc in 4th ch from hook (the beginning ch 3 counts as the first dc here), 1 dc in next 4 chs, (cl, ch 2, cl) in next ch, 1 dc in next 7 chs, (cl, ch 2, cl) in next, 1 dc in next 15 chs, (cl, ch 2, cl) in next, 1 dc in next 7 chs, (cl, ch 2, cl) in next ch, 1 dc in remaining 6 chs, turn.——–41 dc + 8 cl+8 chs
Row 2: Ch 3 (does not count as a dc here and in the rest of the yoke rows), 1 dc in the same st as ch 3, 1 dc in next 6 sts, (cl, ch 2, cl) in next ch-2 sp, 1 dc in next 9 sts, (cl, ch 2, cl) in next ch-2 sp, 1 dc in next 17 sts, (cl, ch 2, cl) in next ch-2 sp, 1 dc in next 9 sts, (cl, ch 2, cl) in next ch-2 sp, 1 dc in next 6 sts, 1 dc on top of beginning ch 3, turn. ——-49 dc + 8 cl+ 8 ch
Row 3: Ch 3, 1 dc in the same st as ch 3, 1 dc in next 7 sts, (cl, ch 2, cl) in next ch-2 sp, 1 dc in next 11 sts, (cl, ch 2, cl) in next ch-2 sp, 1 dc in next 19 sts, (cl, ch 2, cl) in next ch-2 sp, 1 dc in next 11 sts, (cl, ch 2, cl) in next ch-2 sp, 1 dc in next 8 sts, turn. ——-57 dc + 8 cl+ 8 ch
Row 4: Ch 3, 1 dc in the same st as ch 3, 1 dc in next 8 sts, (cl, ch 2, cl) in next ch-2 sp, 1 dc in next 13 sts, (cl, ch 2, cl) in next ch-2 sp, 1 dc in next 21 sts, (cl, ch 2, cl) in next ch-2 sp, 1 dc in next 13 sts, (cl, ch 2, cl) in next ch-2 sp, 1 dc in next 9 sts, turn. ——-65 dc + 8 cl+ 8 ch
Row 5: Ch 3, 1 dc in the same st as ch 3, 1 dc in next 9 sts, (cl, ch 2, cl) in next ch-2 sp, 1 dc in next 15 sts, (cl, ch 2, cl) in next ch-2 sp, 1 dc in next 23 sts, (cl, ch 2, cl) in next ch-2 sp, 1 dc in next 15 sts, (cl, ch 2, cl) in next ch-2 sp, 1 dc in next 10 sts, turn. ——-73 dc + 8 cl+ 8 ch
Row 6: Ch 3, 1 dc in the same st as ch 3, 1 dc in next 10 sts, (cl, ch 2, cl) in next ch-2 sp, 1 dc in next 17 sts, (cl, ch 2, cl) in next ch-2 sp, 1 dc in next 25 sts, (cl, ch 2, cl) in next ch-2 sp, 1 dc in next 17 sts, (cl, ch 2, cl) in next ch-2 sp, 1 dc in next 11 sts, turn. ——-81 dc + 8 cl+ 8 ch
0-3 Months Only

Note: In the next row, we will close the chest and form the armholes.
Row 7: Ch 3, 1 dc in the same st as ch 3, 1 dc in next 11 sts, 1 dc in the ch-2 space between the clusters, sk all the 19 sts up to the next ch-2 loop (pic 2), 1 dc in the ch-2 space between the clusters, 1 dc in next 27 sts, 1 dc in the next ch-2 space, sk next 19 sts up to the next ch-2 loop, 1 dc in the ch-2 space, 1 dc in next 12 sts, turn. ——-55 dc
Row 8: Ch 3, 1 dc in the same st as ch 3, 1 dc in each st across to end, turn. ———55 dc
Continue to make SKIRT below.
3-6 Months Only
Row 7: Ch 3, 1 dc in the same st as ch 3, 1 dc in next 11 sts, (cl, ch 2, cl) in next ch-2 sp, 1 dc in next 19 sts, (cl, ch 2, cl) in next ch-2 sp, 1 dc in next 27 sts, (cl, ch 2, cl) in next ch-2 sp, 1 dc in next 19 sts, (cl, ch 2, cl) in next ch-2 sp, 1 dc in next 12 sts, turn. ——-89 dc + 8 cl+ 8 ch
Note: In the next row, we will close the chest and form the armholes. See pic 2 above.
Row 8: Ch 3, 1 dc in the same st as ch 3, 1 dc in next 12 sts, bring the next two ch-2 loops together, and work just 1 dc into both the ch-2 spaces at once to join them, there will be 21 sts skipped to form the armhole as shown in pic 2, 1 dc in the next 29 sts, bring the next two ch-2 loops together and work 1 dc into both the ch-2 spaces at once, 1 dc in the next 13 sts, turn. ——-57 dc
Continue to make SKIRT below.
SKIRT
Row 1 (0-3 Months Only): Ch 1 (does not count as a st), 1 sc in first st, 1 sc in next 4 sts, *(2sc in next st, 1 sc in next 3 sts), repeat from * to last 2 sts, 1 sc in remaining 2 sts, turn.—–67 sc
Row 1 (3-6 Months Only): Ch 1 (does not count as a st), 1 sc in first st, 1 sc in next 3 sts, *(2sc in next st, 1 sc in next 3 sts), repeat from * to last st, 1 sc in last st, turn.—–70 sc
Continue Skirt – Both Sizes
Note: Stitch count for 3-6 months is in parenthesis.
Row 2: Ch 3 (counts as a dc), (1 dc, ch 2, 1 sc ) all into the same st as beginning ch-3, *sk 2 sts, (2 dc, ch 2, 1 sc) all in next st, repeat from * to end, turn.——-23 (24) repeats
Row 3: Ch 3( counts as a dc here and throughout), (1 dc, ch 2, sc) into the first ch-2 space, (2dc, ch 2, sc) in each ch-2 space across until just one ch-2 space is left, (2dc, ch 2) in the last ch-2 space, 1 sc on top of beginning ch-3, turn.—–23 (24) repeats
Keep repeating Row 3 until your cardigan is approximately 11(12) inches long. Do not fasten off.
BUTTONHOLE BAND- Both Sizes
Note:
1. Turn your sweater right side (RS) out. You can choose the side which looks more appealing to you as your Right Side (RS).
2. The buttonhole band and button band are worked across the row ends of the front opening. The buttonhole band is worked on the left and the button band on the right.
3. After turning your sweater right side out, if your working yarn is on the left corner, continue to work your Buttonhole band with it. If it is on the right corner, sl st to the left corner of your sweater with another ball of yarn and proceed to work Row 1 of the buttonhole band.
Row 1: Ch 1 (counts as first sc), evenly distribute sc sts along the edge, and work your way up to the neck. I worked 2 sc across each dc st and 1 sc across each sc st, turn.
Row 2: Ch 1 ( not counted as a st here), 1 sc in same st as ch 1, 1 sc in each st across to end, turn
Notes:
1. The skipped stitches in the next row will form buttonholes. You can eyeball the position of your buttonholes or place markers before you start. Place markers for 4 buttonholes.
2. The number in brackets is the stitch count for 3-6 months. The buttonholes for 3-6 months are bigger.
Row 3 (Buttonhole Row): Ch 1 (not counted as a st), 1 sc in same st as ch 1, 1 sc in each st until you have completed close to 1/4 of the length, ch 1 (ch 2), sk 1 (2)sts, 1 sc in each st until you have completed close to 1/2 of the length, ch 1 (ch 2), sk 1 (2)sts, 1 sc in each st until you have completed close to 3/4th of the length, ch 1 (ch 2), sk 1 st (2)sts, 1 sc in each st until you have 2 (3) sts left, ch 1 (ch2), sk 1 (2)sts, 1 sc in last st, turn.
Row 4: Ch 1 (not counted as a st), 1 sc in same st as ch 1, 1 sc in each st, and ch across to end, turn.
Row 5: Pull up the loop on your hook to make it bigger, sl st loosely into the next st and each st across to end, fasten off at the neck.
BUTTON BAND-Both Sizes
After turning your sweater right side out, if your working yarn is on the right corner, continue to work your button band with it. If not, sl st to the right corner of your sweater and proceed to work Row 1 on the WS of the sweater.
Row 1: Ch 1 (counts as a st), evenly distribute sc sts along the edge, and work your way up to the neck. I worked 2 sc across each dc st and 1 sc across each sc st, turn.
Row 2: Ch 1( not counted as a st here), 1 sc in same st as ch 1, 1 sc in each st across to end, turn.
Repeat Row 2 two more times. Fasten off.
SLEEVES
0-3 Months Sleeves

Round 1: Sl st under the armhole, ch 2 (not counted as a st), work 1 dc2tog across the post of the dc and the next ch-2 space as shown in pic 3 above, 1 dc in next 19 sts, dc2tog across ch-2 space and the post of the next dc, sl st to first st, turn.——–21 dc
Round 2: Ch 3 (counts as a dc here and for the rest of the rounds), 1 dc in each st to end, sl st to beginning ch-3, turn.——-21 dc
Repeat Round 2 until your sleeve is 4.5 inches long from the base of the armhole.
Note: The last round should be worked on the RS of your sleeve, so if you are on the RS, work on the same side. If you are on the wrong side, turn and work the last round on the RS.
Last Round: Ch 3( counts as a dc), (1 dc, ch 2, 1 sc ) all into the same st as beginning ch-3, * sk 2 sts, (2 dc, ch 2, 1 sc)all in next st, repeat from * until 2 sts are left, sl st to top of beginning ch-3, fasten off.——7 repeats
3-6 Months Sleeves

Round 1: Sl st to the base of the armhole, ch 2 (does not count as st), 1 dc in next ch space (see pic 4 above), 1 dc in next 21 sts, 1 dc in next ch space, sl st to first dc, turn.——–23 dc
Round 2: Ch 3 ( counts as a dc here and for the rest of the rounds), 1 dc in each st to end, sl st to beginning ch-3, turn.——-23 dc
Repeat Round 2 until your sleeve is 4.5 inches long from the base of the armhole.
Next Round: Ch 3 (counts as a dc here and for the rest of the rounds), 1 dc in each st to last st, 2 dc in last st, sl st to beginning ch-3. ——-24 dc
Note: The last round should be worked on the RS of your sleeve, so if you are on the RS, work on the same side. If you are on the wrong side, turn and work the last round on the RS.
Last Round: Ch 3( counts as a dc), (1 dc, ch 2, 1 sc ) all into the same st as beginning ch-3, * sk 2 sts, (2 dc, ch 2, 1 sc)all in next st, repeat from * until 2 sts are left, sl st to top of beginning ch-3, fasten off.——8 repeats
COLLAR- Both Sizes
Notes: The first row of the collar is worked into the free loops of the foundation chain.
Row 1: Leave the buttonhole band free and sl st right after it, 1 sc in the same free loop and each free loop across until you reach the back of the neck, continue to sc but add 4 increases distributed evenly along the backside, 1 sc in each remaining loop until you hit the button band, turn.———-49 sc
Row 2: Ch 3 (counts as a dc), (1 dc, ch 2, 1 sc ) all into the same st as beginning ch-2, *sk 2 sts, (2 dc, ch 2, 1 sc)all in next st, repeat from * to end, turn.——-17 repeats
Row 3: Ch 3( counts as a dc here and throughout), (1 dc, ch 2, sc) into the first ch-2 space, (2dc, ch 2, sc) in each ch-2 space across until just one ch-2 space is left, (2dc, ch 2) in the last ch-2 space, 1 sc on top of beginning ch-3, turn.—–17 repeats
Repeat Row 3 one more time for size 0-3 months and 2 more times for size 3-6 months. Fasten off.
FINISHING
Sew on the buttons corresponding to the buttonholes and weave in any tails left.
6-12 and 12-24 MONTHS
YOKE- Both Sizes
Row 1: Ch 52, 1 dc in 4th ch from hook ( the beginning ch 3 counts as a dc), 1 dc in next 5 ch, (cl, ch 2, cl) in next ch, 1 dc in next 8 ch, (cl, ch 2, cl) in next, 1 dc in next 16 ch, ( cl, ch 2, cl) in next ch, 1 dc in next 8 ch, (cl, ch 2, cl) in next, 1 dc in remaining 7 ch, turn.———46 dc+ 8 Cl+ 8 ch
Row 2: Ch 3(does not count as a dc here and in the rest of the yoke rows), 1 dc in the same st as ch 3, 1 dc in next 7 sts, (cl, ch 2, cl) in next ch-2 sp, 1 dc in next 10 sts, (cl, ch 2, cl) in next ch-2 sp, 1 dc in next 18 sts, ( cl, ch 2, cl) in next ch-2 sp, 1 dc in next 10 sts, (cl, ch 2, cl) in next ch-2 sp, 1 dc in next 7 sts, 1 dc on top of beginning ch 3, turn.———54 dc+ 8 Cl+ 8 ch
Row 3: Ch 3, 1 dc in the same st as ch 3, 1 dc in next 8 sts, (cl, ch 2, cl) in next ch-2 sp, 1 dc in next 12 sts, (cl, ch 2, cl) in next ch-2 sp, 1 dc in next 20 sts, ( cl, ch 2, cl) in next ch-2 sp, 1 dc in next 12 sts, (cl, ch 2, cl) in next ch-2 sp, 1 dc in remaining 9 sts, turn.———62 dc+ 8 Cl+ 8 ch
Row 4: Ch 3, 1 dc in the same st as ch 3, 1 dc in next 9 sts, (cl, ch 2, cl) in next ch-2 sp, 1 dc in next 14 sts, (cl, ch 2, cl) in next ch-2 sp, 1 dc in next 22 sts, ( cl, ch 2, cl) in next ch-2 sp, 1 dc in next 14 sts, (cl, ch 2, cl) in next ch-2 sp, 1 dc in remaining 10 sts, turn.———70 dc+ 8 Cl+ 8 ch
Row 5: Ch 3, 1 dc in the same st as ch 3, 1 dc in next 10 sts, (cl, ch 2, cl) in next ch-2 sp, 1 dc in next 16 sts, (cl, ch 2, cl) in next ch-2 sp, 1 dc in next 24 sts, ( cl, ch 2, cl) in next ch-2 sp, 1 dc in next 16 sts, (cl, ch 2, cl) in next ch-2 sp, 1 dc in remaining 11 sts, turn.———78 dc+ 8 Cl+ 8 ch
Row 6: Ch 3, 1 dc in the same st as ch 3, 1 dc in next 11 sts, (cl, ch 2, cl) in next ch-2 sp, 1 dc in next 18 sts, (cl, ch 2, cl) in next ch-2 sp, 1 dc in next 26 sts, ( cl, ch 2, cl) in next ch-2 sp, 1 dc in next 18 sts, (cl, ch 2, cl) in next ch-2 sp, 1 dc in remaining 12 sts, turn.———86 dc+ 8 Cl+ 8 ch
Row 7: Ch 3, 1 dc in the same st as ch 3, 1 dc in next 12 sts, (cl, ch 2, cl) in next ch-2 sp, 1 dc in next 20 sts, (cl, ch 2, cl) in next ch-2 sp, 1 dc in next 28 sts, ( cl, ch 2, cl) in next ch-2 sp, 1 dc in next 20 sts, (cl, ch 2, cl) in next ch-2 sp, 1 dc in remaining 13 sts, turn.———94 dc+ 8 Cl+ 8 ch
Row 8: Ch 3, 1 dc in the same st as ch 3, 1 dc in next 13 sts, (cl, ch 2, cl) in next ch-2 sp, 1 dc in next 22 sts, (cl, ch 2, cl) in next ch-2 sp, 1 dc in next 30 sts, (cl, ch 2, cl) in next ch-2 sp, 1 dc in next 22 sts, (cl, ch 2, cl) in next ch-2 sp, 1 dc in remaining 14 sts, turn.———102 dc+ 8 Cl+ 8 ch
6-12 Months Only
In the next row, we will close the chest and form the armholes. See pic 6 above.
Row 9: Ch 3, 1 dc in the same st as ch 3, 1 dc in next 14 sts, bring the next two ch-2 loops together, and work just 1 dc into both the ch-2 spaces to join them, there will be 24 sts skipped to form the armhole now as shown in pic 6, 1 dc in the next 32 sts, bring the next two ch-2 loops together and work 1 dc into both the ch-2 spaces at once, 1 dc in next 15 sts, turn. ——-64 dc
12-24 Months Only
Row 9: Ch 3 ( does not count as a dc here and in the following rows), 1 dc in the same st as ch 3, 1 dc in next 14 sts, (cl, ch 2, cl) in next ch-2 sp, 1 dc in next 24 sts, (cl, ch 2, cl) in next ch-2 sp, 1 dc in next 32 sts, ( cl, ch 2, cl) in next ch-2 sp, 1 dc in next 24 sts, (cl, ch 2, cl) in next ch-2 sp, 1 dc in remaining 15 sts, turn.———110 dc+ 8 Cl+ 8 ch
In the next row, we will close the chest and form the armholes. See pic 6 above.
Row 10: Ch 3, 1 dc in the same st as ch 3, 1 dc in next 15 sts, bring the next two ch-2 loops together and work just 1 dc into both the ch-2 spaces at once to join, there will be 26 sts skipped to form the armhole now as shown in pic 2, 1 dc in the next 34 sts, bring the next two ch-2 loops together and work 1 dc into both the ch-2 spaces at once, 1 dc in next 16 sts, turn. ——-68 dc
SKIRT
Row 1(6-12 Months Only): Ch 1 (does not count as a st), 1 sc in first st, 1 sc in next 3 sts, *(2sc in next st, 1 sc in next 4 sts), repeat from * to end, turn.—–76 sc
Row 1 (12-24 Months Only): Ch 1 (does not count as a st), 1 sc in first st, 1 sc in next 3 sts, 2sc in next st, 1 sc in next 3 st, *(2sc in next st, 1 sc in next 5 sts) repeat from * to end, turn.—–79 sc
SKIRT- Both Sizes
Note: Stitch counts for 12-24 months is given in parenthesis.
Row 2: Ch 3 (counts as a dc), (1 dc, ch 2, 1 sc ) all into the same st as beginning ch-3, * sk 2 sts, (2 dc, ch 2, 1 sc)all in next st, repeat from * to end, turn.——-26 (27) repeats
Row 3: Ch 3( counts as a dc here and throughout), (1 dc, ch 2, sc) into the first ch-2 space, (2dc, ch 2, sc) in each ch-2 space across until just one ch-2 space is left, (2dc, ch 2) in the last ch-2 space, 1 sc on top of beginning ch-3, turn.—–26 (27) repeats
Keep repeating Row 3 until your cardigan is approximately 13 (14) inches long. Do not fasten off.
BUTTONHOLE BAND- Both Sizes
Notes
1. Turn your sweater right side (RS) out. You can choose the side which looks more appealing to you as your Right Side (RS).
2. The buttonhole band and button band are worked across the row ends of the front opening. The buttonhole band is worked on the left and the button band on the right.
3. After turning your sweater right side out, if your working yarn is on the left corner, continue working your Buttonhole band with it. If it is on the right corner, sl st to the left corner of your sweater with another ball of yarn and proceed to work Row 1 of the buttonhole band.
Row 1: Ch 1 (counts as a st), evenly distribute sc sts along the edge, and work your way up to the neck. I worked 2 sc across each dc st and 1 sc across each sc st, turn.
Row 2: Ch 1 ( not counted as a st here), 1 sc in same st as ch 1, 1 sc in each st across to end, turn
Notes:
1. The skipped stitches in the next row will form buttonholes. You can eyeball the position of your buttonholes or place markers before you start. Place markers for 4 buttonholes.
Row 3 (Buttonhole Row): Ch 1 (not counted as a st), 1 sc in same st as ch 1, 1 sc in each st until you have completed close to 1/4 of the length, ch 2, sk 2sts, 1 sc in each st until you have completed close to 1/2 of the length, ch 2, sk 2 sts, 1 sc in each st until you have completed close to 3/4th of the length, ch 2, sk 2sts, 1 sc in each st until you have 3 sts left, ch2, sk 2 sts, 1 sc in last st, turn.
Row 4: Ch 1 (not counted as a st), 1 sc in same st as ch 1, 1 sc in each st and ch across to end, turn.
Row 5: Pull up the loop on the hook to make it bigger, sl st loosely into the next st and each st across to end, fasten off.
BUTTON BAND-Both Sizes
After turning your sweater right side out, if your working yarn is on the right corner, continue to work your button band with it. If not, sl st to the right corner of your sweater and proceed to work Row 1 on the WS of the sweater.
Row 1: Ch 1 (counts as a st), evenly distribute sc sts along the edge, and work your way up to the neck. I worked 2 sc across each dc st and 1 sc across each sc st, turn.
Row 2: Ch 1( not counted as a st here), 1 sc in same st as ch 1, 1 sc in each st across to end, turn.
Repeat Row 2 two more times. Fasten off.
SLEEVES-Both Sizes

Note: Stitch cont for size 12-24 months is given in brackets.
Round 1: Sl st to the base of the armhole, ch 2 (not counted as a st), 1 dc2tog in next ch-space and first st as shown in pic 7 above, 1 dc in next 22(24) sts, 1 dc2tog across last st and next ch-space, sl st to the first dc, turn.——–24(26) dc
Round 2: Ch 3 ( counts as a dc ), 1 dc in each st to end, sl st to beginning ch-3, turn.——-24( 26) dc
Repeat Round 2 until your sleeve is 6 inches from the base of the armhole.
Continue Sleeves(6 to 12 months only)
Note: The last round should be worked on the RS of your sleeve, so if you are on the RS, work on the same side. If you are on the wrong side, turn and work the last round on the RS.
Last Round: Ch 3 (counts as a dc), (1 dc, ch 2, 1 sc ) all into the same st as beginning ch-3, * sk 2 sts, (2 dc, ch 2, 1 sc)all in next st, repeat from * until 2 sts are left, sl st to top of beginning ch-3, fasten off.——8 repeats
Continue Sleeves(12 to 24 months only)
Next Round: Ch 3 ( counts as a dc here and for the rest of the rounds), 1 dc in each st to last st, 2 dc in last st, sl st to beginning ch-3. ——-27 dc
Note: The last round should be worked on the RS of your sleeve, so if you are on the RS, work on the same side. If you are on the wrong side, turn and work the last round on the RS.
Last Round: Ch 3( counts as a dc), (1 dc, ch 2, 1 sc ) all into the same st as beginning ch-3, * sk 2 sts, (2 dc, ch 2, 1 sc)all in next st, repeat from * until 2 sts are left, sl st to top of beginning ch-3, fasten off.——9 repeats
COLLAR- Both Sizes
Notes: The first row of the collar is worked into the free loops of the foundation chain.
Row 1: Leave the buttonhole band free and sl st right after it, 1 sc in the same free loop and each free loop across until you reach the back of the neck, continue to sc but add 5 increases distributed evenly along the backside, 1 sc in each remaining loop until you hit the button band, turn.———-55 sc
Row 2: Ch 3 (counts as a dc), (1 dc, ch 2, 1 sc ) all into the same st as beginning ch-2, *sk 2 sts, (2 dc, ch 2, 1 sc) all in next st, repeat from * to end, turn.——-19 repeats
Row 3: Ch 3( counts as a dc here and throughout), (1 dc, ch 2, sc) into the first ch-2 space, (2dc, ch 2, sc) in each ch-2 space across until just one ch-2 space is left, (2dc, ch 2) in the last ch-2 space, 1 sc on top of beginning ch-3, turn.—–19 repeats
Repeat Row 3 two more times for size 6-12 months and 3 more times for size 12-24 months. Fasten off.
FINISHING
Sew on the buttons corresponding to the buttonholes and weave in any tails left.
2T & 3/4T
YOKE – Both Sizes
Row 1: Ch 55, 1 dc in 4th ch from hook (beginning ch 3 counts as a dc), 1 dc in next 5 ch, (cl, ch 2, cl) in next ch, 1 dc in next 9 ch, (cl, ch 2, cl), 1 dc in next 17 ch, (cl, ch 2, cl), 1 dc in next 9 ch, (cl, ch 2, cl), 1 dc in next 7 ch, turn.——-49 dc+ 8 cl+ 8 ch
Row 2: Ch 3(does not count as a dc here and in the rest of the yoke rows), 1 dc in the same st as ch 3, 1 dc in next 7 sts, (cl, ch 2, cl) in next ch-2 sp, 1 dc in next 11 sts, (cl, ch 2, cl) in next ch-2 sp, 1 dc in next 19 sts, ( cl, ch 2, cl) in next ch-2 sp, 1 dc in next 11 sts, (cl, ch 2, cl) in next ch-2 sp, 1 dc in next 7 sts, 1 dc on top of beginning ch 3, turn.———57 dc+ 8 Cl+ 8 ch
Row 3: Ch 3, 1 dc in the same st as ch 3, 1 dc in next 8 sts, (cl, ch 2, cl) in next ch-2 sp, 1 dc in next 13 sts, (cl, ch 2, cl) in next ch-2 sp, 1 dc in next 21 sts, ( cl, ch 2, cl) in next ch-2 sp, 1 dc in next 13 sts, (cl, ch 2, cl) in next ch-2 sp, 1 dc in next 9 sts, turn.———65 dc+ 8 Cl+ 8 ch
Row 4: Ch 3, 1 dc in the same st as ch 3, 1 dc in next 9 sts, (cl, ch 2, cl) in next ch-2 sp, 1 dc in next 15 sts, (cl, ch 2, cl) in next ch-2 sp, 1 dc in next 23 sts, ( cl, ch 2, cl) in next ch-2 sp, 1 dc in next 15 sts, (cl, ch 2, cl) in next ch-2 sp, 1 dc in next 10 sts, turn.———73 dc+ 8 Cl+ 8 ch
Row 5: Ch 3, 1 dc in the same st as ch 3, 1 dc in next 10 sts, (cl, ch 2, cl) in next ch-2 sp, 1 dc in next 17 sts, (cl, ch 2, cl) in next ch-2 sp, 1 dc in next 25 sts, ( cl, ch 2, cl) in next ch-2 sp, 1 dc in next 17 sts, (cl, ch 2, cl) in next ch-2 sp, 1 dc in next 11 sts, turn.———81 dc+ 8 Cl+ 8 ch
Row 6: Ch 3, 1 dc in the same st as ch 3, 1 dc in next 11 sts, (cl, ch 2, cl) in next ch-2 sp, 1 dc in next 19 sts, (cl, ch 2, cl) in next ch-2 sp, 1 dc in next 27 sts, ( cl, ch 2, cl) in next ch-2 sp, 1 dc in next 19 sts, (cl, ch 2, cl) in next ch-2 sp, 1 dc in next 12 sts, turn.———89 dc+ 8 Cl+ 8 ch
Row 7: Ch 3, 1 dc in the same st as ch 3, 1 dc in next 12 sts, (cl, ch 2, cl) in next ch-2 sp, 1 dc in next 21 sts, (cl, ch 2, cl) in next ch-2 sp, 1 dc in next 29 sts, ( cl, ch 2, cl) in next ch-2 sp, 1 dc in next 21 sts, (cl, ch 2, cl) in next ch-2 sp, 1 dc in next 13 sts, turn.———97 dc+ 8 Cl+ 8 ch
Row 8: Ch 3, 1 dc in the same st as ch 3, 1 dc in next 13 sts, (cl, ch 2, cl) in next ch-2 sp, 1 dc in next 23 sts, (cl, ch 2, cl) in next ch-2 sp, 1 dc in next 31 sts, ( cl, ch 2, cl) in next ch-2 sp, 1 dc in next 23 sts, (cl, ch 2, cl) in next ch-2 sp, 1 dc in next 14 sts, turn.———105 dc+ 8 Cl+ 8 ch
Row 9: Ch 3, 1 dc in the same st as ch 3, 1 dc in next 14 sts, (cl, ch 2, cl) in next ch-2 sp, 1 dc in next 25 sts, (cl, ch 2, cl) in next ch-2 sp, 1 dc in next 33 sts, ( cl, ch 2, cl) in next ch-2 sp, 1 dc in next 25 sts, (cl, ch 2, cl) in next ch-2 sp, 1 dc in next 15 sts, turn.———113 dc+ 8 Cl+ 8 ch
Size 2T Only
In the next row, we will close the chest and form the armholes. See pic 9 above.
Row 10: Ch 3, 1 dc in the same st as ch 3, 1 dc in next 15 sts, bring the next two ch-2 loops together and work 1 dc into both the ch-2 spaces at once to join, there will be 27 sts skipped to form the armhole now as shown in pic 9, 1 more dc into the same ch space, 1 dc in next 35 sts, 1 dc in next ch-2 space, bring the next ch-2 loop close to this ch-2 loop and work 1 dc into both the ch-2 spaces at once, 1 dc in next 16 sts, turn.———71 dc
Size 3T/4T Only
Row 10: Ch 3, 1 dc in the same st as ch 3, 1 dc in next 15 sts, (cl, ch 2, cl) in next ch-2 sp, 1 dc in next 27 sts, (cl, ch 2, cl) in next ch-2 sp, 1 dc in next 35 sts, ( cl, ch 2, cl) in next ch-2 sp, 1 dc in next 27 sts, (cl, ch 2, cl) in next ch-2 sp, 1 dc in next 16 sts, turn.———121 dc+ 8 Cl+ 8 ch
In the next row, we will close the chest and form the armholes. See pic 9 above
Row 11: Ch 3, 1 dc in the same st as ch 3, 1 dc in next 16 sts, bring the next two ch-2 loops together and work just 1 dc into both the ch-2 spaces at once to join them, there will be 29 sts skipped to form the armhole now as shown in pic 9, 1 more dc into the same ch space, 1 dc in next 37 sts, 1 dc in next ch-2 space, bring the next ch-2 loop closer and work 1 dc into both the ch-2 spaces at once, 1 dc in next 17 sts, turn.———75 dc
SKIRT
Row 1(2T Only): Ch 1 (does not count as a st), 1 sc in first st, 1 sc in next 2 sts, *(2sc in next st, 1 sc in next 3 sts), repeat from * to end, turn.——-88 sts
Row 1(3T/4T Only): Ch 1 (does not count as a st), 1 sc in first st, *(2sc in next st, 1 sc in next 3 sts), repeat from * to last 2 sts, 2 sc in next st, 1 sc in last st, turn.——-94
Continue for Both Sizes
Note: Stitch count for 3T/4T is given in parenthesis.
Row 2: Ch 3 (counts as a dc), (1 dc, ch 2, 1 sc) all into the same st as beginning ch-3, * sk 2 sts, (2 dc, ch 2, 1 sc)all in next st, repeat from * to end, turn.——-30 (32) repeats
Row 3: Ch 3( counts as a dc here and throughout), (1 dc, ch 2, sc) into the first ch-2 space, (2dc, ch 2, sc) in each ch-2 space across until just one ch-2 space is left, (2dc, ch 2) in the last ch-2 space, 1 sc on top of beginning ch-3, turn.—–30 (32) repeats
Keep repeating Row 3 until your cardigan is approximately 15 (15-1/2) inches long. Do not fasten off.
BUTTONHOLE BAND- Both Sizes
Notes
1. Turn your sweater right side (RS) out. You can choose the side which looks more appealing to you as your Right Side (RS).
2. The buttonhole band and button band are worked across the row ends of the front opening. The buttonhole band is worked on the left and the button band on the right.
3. After turning your sweater right side out, if your working yarn is on the left corner, continue working your Buttonhole band with it. If it is on the right corner, sl st to the left corner of your sweater with another ball of yarn and proceed to work Row 1 of the buttonhole band.
Row 1: Ch 1 (counts as a st), evenly distribute sc sts along the edge, and work your way up to the neck. I worked 2 sc across each dc st and 1 sc across each sc st, turn.
Row 2: Ch 1 ( not counted as a st here), 1 sc in same st as ch 1, 1 sc in each st across to end, turn
Notes:
1. The skipped stitches in the next row will form buttonholes. Place markers for 5 buttonholes.
Row 3 (Buttonhole Row): Ch 1 (not counted as a st), 1 sc in same st as ch 1, *(1 sc in each st until you have 1 st left to the marker, ch 2, sk 2, 1 sc in next st), repeat from * until you have made 4 buttonholes, 1 sc in each st until 3 sts are left, ch 2, sk 2 sts, 1sc in last st, turn.
Row 4: Ch 1 (not counted as a st), 1 sc in same st as ch 1, 1 sc in each st, and ch across to end, turn.
Row 5: Pull up the loop on the hook to make it bigger, sl st loosely into the next st and each st across to end, fasten off at the neck.
BUTTON BAND-Both Sizes
After turning your sweater right side out, if your working yarn is on the right corner, continue to make your button band with it. If not, sl st to the right corner of your sweater and proceed to work Row 1 on the WS of the sweater.
Row 1: Ch 1 (counts as a st), evenly distribute sc sts along the edge, and work your way up to the neck. I worked 2 sc across each dc st and 1 sc across each sc st, turn.
Row 2: Ch 1( not counted as a st here), 1 sc in same st as ch 1, 1 sc in each st across to end, turn.
Repeat Row 2 two more times. Fasten off.
SLEEVES-Both Sizes
Round 1: Sl st to the base of the armhole, ch 2( not counted as a st), 1 dc2tog in next ch-space and first st as shown in pic 10 above, 1 dc in next 25(27) sts, 1 dc2tog across last st and next ch-space, sl st to first dc, turn.——–27(29) dc
Round 2: Ch 3 ( counts as a dc here and for the rest of the rounds), 1 dc in each st to end, sl st to the first dc, turn.——-27( 29) dc
Repeat Round 2 until your sleeve is 7 ½ inches from the base of the armhole.
Continue for 2T Only
Note: The last round should be worked on the RS of your sleeve, so if you are on the RS work on the same side. If you are on the wrong side, turn and work the last round on the RS.
Last Round: Ch 3( counts as a dc), (1 dc, ch 2, 1 sc ) all into the same st as beginning ch-3, * sk 2 sts, (2 dc, ch 2, 1 sc)all in next st, repeat from * until 2 sts are left, sl st to top of beginning ch-3, fasten off.——9 repeats
Continue for 3T/4T Only
Next Round: Ch 3 ( counts as a dc here and for the rest of the rounds), 1 dc in each st to last st, 2 dc in last st, sl st to beginning ch-3. ——-30 dc
Note: The last round should be worked on the RS of your sleeve, so if you are on the RS work on the same side. If you are on the wrong side, turn and work the last round on the RS.
Last Round: Ch 3( counts as a dc), (1 dc, ch 2, 1 sc ) all into the same st as beginning ch-3, * sk 2 sts, (2 dc, ch 2, 1 sc)all in next st, repeat from * until 2 sts are left, sl st to top of beginning ch-3, fasten off.——10 repeats
COLLAR
Notes: The first row of the collar is worked into the free loops of the foundation chain.
Row 1: Leave the buttonhole band free and sl st right after it, 1 sc in the same free loop and each free loop across until you reach the back of the neck, continue to sc but add 5 increases distributed evenly along the backside, 1 sc in each remaining loop until you hit the button band, turn.———-58 sc
Row 2: Ch 3 (counts as a dc), (1 dc, ch 2, 1 sc ) all into the same st as beginning ch-2, * sk 2 sts, (2 dc, ch 2, 1 sc)all in next st, repeat from * to end, turn.——-20 repeats
Row 3: Ch 3( counts as a dc here and throughout), (1 dc, ch 2, sc) into the first ch-2 space, (2dc, ch 2, sc) in each ch-2 space across until just one ch-2 space is left, (2dc, ch 2) in the last ch-2 space, 1 sc on top of beginning ch-3, turn.—–20 repeats
Repeat Row 3 three more times for 2T and 4 more times for size 3T/4T. Fasten off.
FINISHING
Sew on the buttons corresponding to the buttonholes and weave in any tails left.
Final Thoughts on Free Crochet Pattern for Baby Cardigan
This free one-piece crochet baby cardigan is a great pattern to try if you have never made clothing before.
Patterns Similar to This Free Baby Cardigan Crochet Pattern
Crochet Baby Boy Sweater Pattern
Watch a web story on this crochet baby cardigan pattern here.
Pin it for later here:


This free crochet baby cardigan pattern is sooo pretty! I need to find a baby to make this for! Seriously, the next co-worker to have a baby girl is getting this.
This free crochet baby cardigan pattern was very easy to follow and worked up quickly . Will definitely become a favorite shower gift !
Thank you so much for this crochet baby cardigan free pattern. I have loved making this for my new niece xx
I love this pattern but in the instructions they say 13 inc for 6 – 12 m but I find it way to long. Could it be mistake in the pattern?
Thanks
You can easily reduce the length by crocheting fewer rows but 13″ should be fine as I based it out of long coats bought from the store.
Is there a pattern for a hat and booties to make this a set?
I do have a hat in the same stitch but unfortunately in bulky yarn. I will try to add a worsted weight version. Meanwhile, you can check it out here: https://crochetdreamz.com/diy-crochet-hat/
I do have booties on my site but most of them are paid ones. You can find them here: https://crochetdreamz.com/category/crochet-booties-sandals
Let me start by saying I LOVE this pattern! Thank you!
I’ve made this sweater twice using an H/5mm needle, once following the 3-6 months instructions and the finished size measures at the 6-12 month and then again using the 0-3 month instructions and the finished size measures at the 3-6 month size.
Should I try using a smaller needle to get more accurate sizing?
Yes, use a smaller hook. People tend to crochet tighter or looser than the designer and that is why we check gauge and switch hooks.