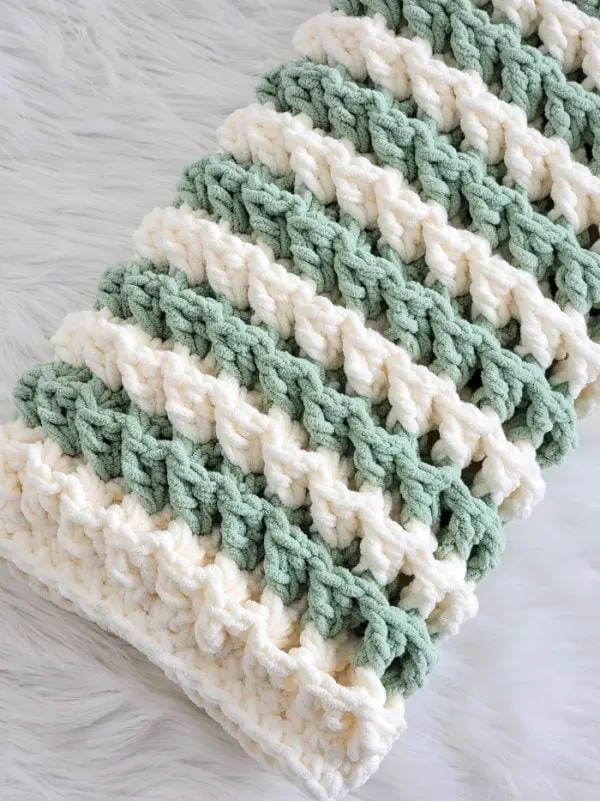
Introducing the Splashing Waves Blanket, a chunky crochet blanket free pattern that’s wonderfully warm and toasty. Its super-thick texture makes it feel soothing and cozy, almost like a lightweight weighted blanket.
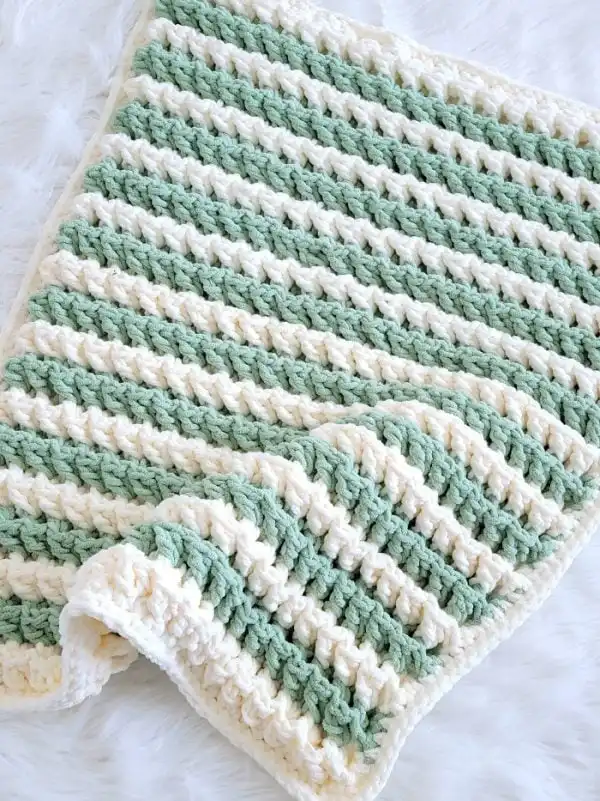

The stitch pattern is beautifully textured yet surprisingly easy to master. Even better, it uses a simple one-row repeat.

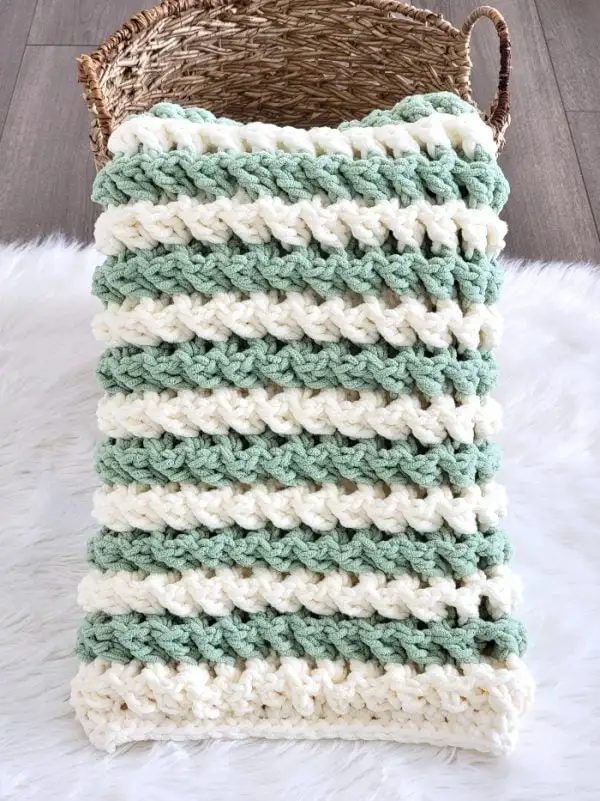
This pattern is perfect for using up your leftover Bernat Blanket yarn to create a gorgeous multicolor design. It also looks stunning in a simple monochrome palette.


It’s a relaxing, mindless project to work on while watching TV or unwinding in the evenings. So grab your hook, choose your colors, and let’s get started!

1 Row Repeat Crochet Blanket Pattern
Materials
1. Bernat Blanket yarn in colors Vanilla and Clary Sage. It is a size 6 super chunky chenille yarn.
2. An N/P (10mm) crochet hook
3. Tapestry needle to weave in the ends.
Finished Size
28-1/2″ wide and 33″ long
Yardage
2-1/2 skeins or 550 yards of the cream or Vanilla color and 2 skeins or 440 yards of Clary Sage
Stitch Abbreviations
The pattern is written in US terms.
ch: chain
sk: skip
sl st: slip st
sc: single crochet
dc: double crochet
YO: yarn over
fpdc: front post double crochet
Stitch Explanations
Front post double crochet (fpdc): A front post double crochet is just like a normal double crochet (dc), but instead of working into the top of the stitch, you work around the post of the stitch as given below.
Yarn over, insert your hook from front to back to front again around the post of the dc specified, the post should be sitting in front of your hook now, pull up a loop to get 3 loops on your hook, (YO, pull through 2 loops)2 times- fpdc made.
sc2tog: Pull up a loop in the next 2 sts specified, YO, and pull through all the 3 loops on your hook to complete your sc2tog.
Gauge
Pattern for Gauge Swatch
Chain 19 and follow rows 1 to 2 of the pattern. Repeat Row 2 until your piece measures 6 inches in height. Then measure for gauge.
Gauge
4 repeats = 4-3/4 inches long.
More Chunky Crochet Blanket Patterns:
3D Stitch Crochet Blanket Pattern
Chunky Crochet Blanket Free Pattern
Pattern Notes
1. You change colors every 2 rows, but you do not fasten off at the end of each stripe. You simply drop the yarn when switching colors and pick it back up when needed, carrying it neatly along the side of the blanket.
2. To join the new color seamlessly, start working your last dc as usual, and when you have 2 loops left on your hook, pull through the new color to complete your stitch. Start the next row with the new color joined.
With Cream color (Vanilla color) yarn, ch 70. The starting chain is a multiple of 3+4.
Row 1: 1 dc in 4th ch from hook (3 skipped chains count as first dc), 1 dc in each ch across to end, turn.
Row 2: Ch 2 (counts as a dc here and throughout), *(sk next 2 dc, 3 fpdc in next dc), repeat from * until just the beginning ch-2 is left, 1 dc on top of beginning ch-2 while joining the Sage color yarn, turn. (22 repeats+ 2dc)
Rows 3 & 4: Repeat Row 2 with Sage color joined and join the cream color yarn back while working the last dc of Row 4.
Rows 5 & 6: Repeat Row 2 with Cream color joined and join the Sage color yarn back while working the last dc of Row 6.
Keep repeating Row 2, changing colors every 2 rows, until you have a total of 21 stripes.
Border
Round 1: After completing Row 21, turn. Ch 1, 1 sc in the first st and sc in the next st, *(sc2tog over the next 2 sts, 1 sc in the next 2 sts), repeat from * until you reach the next corner, ending on top of the beginning ch-2. Work 2 more sc into the top of the beginning ch-2.
Continue along the left edge of the blanket, working 3 sc evenly across each stripe until you reach the next corner. Work 2 more sc in the corner.
Round 2: Ch 1, *(1 sc in next st and each st across to next corner, 3 sc in corner), repeat from * 2 more times, 1 sc in next st and each st across to next corner, 2 sc in corner, sk the next st (beginning ch 1) on top, sl st to the next st, fasten off.
Finishing
Weave in any tails left along the back side of the blanket. The front side is where you worked your border.
Pin it for later:
![]()
![]()