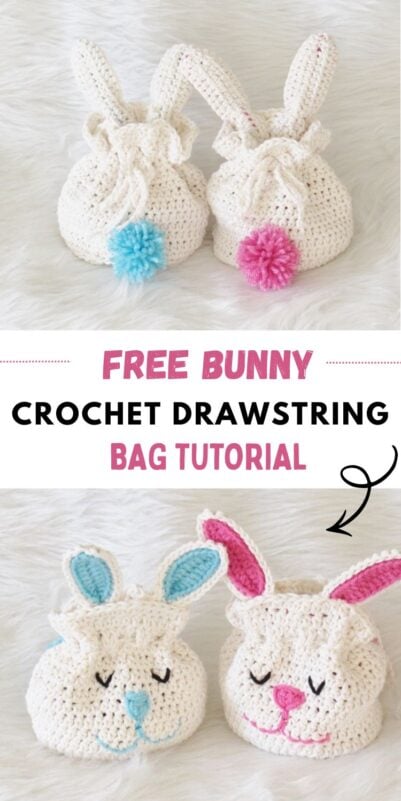
Crochet Bunny Treat Bag
What is cuter than a bunny? A crochet bunny treat bag! This drawstring bag can be made with just one skein of Lily Suran ‘n Cream cotton yarn.


I love cute little projects that whip up fast and don’t take a lot of time. Since people are mostly outdoors during spring and summer, small projects are great for satisfying their crojo.


I always get nervous while trying to make faces. I am not good with hand embroidery, and It took me several tries to make the bunny face look decent, lol! The first few ones I made looked really cruel, ahem, ahem!
My husband and daughter insist that my final attempt came out cute but I still like them more from the backside. So if you are like me, you can avoid doing the facial features and just keep the ears and it will still look cute.
Materials
- Worsted weight Lily Sugar ‘n Cream cotton yarn in color Ecru. Small amounts of worsted weight yarn in colors pink or blue.
- Hook G (4.25mm) for the base and H (5mm) for the sides.
- Tapestry needle to sew on the facial features and to weave in the tails.
Finished size
The base is 4-1/2 inches in diameter and the sides are around 5 inches tall.
Yardage
One bag takes around 100 yards.
Gauge
10-1/2 hdc sts and 8-1/2 Rows= 3 inch square
Stitch Abbreviations
The pattern is written in US terms.
sc- single crochet
hdc- half double crochet
dc- double crochet
sl st- slip stitch
ch- chain
beg- beginning
Crochet Pattern
Circular Base of the Bag
With smaller hook, ch 4, sl st to the first ch to form a chain ring.
Round 1: Ch 2( does not count as a st here and throughout), 8 hdc into the ring, sl st to the first hdc. Do not turn.——–8 hdc
Round 2: Ch 2, hdc in the same st as ch 2, 2 hdc in each st across to end, 1 hdc in same st as beg ch-2, sl st to the first hdc. Do not turn.——–16 hdc
Round 3: Ch 2, 1 hdc in the same st as ch 2, 1 hdc in next st, *(2 hdc in next st, 1 hdc in next), repeat from * to end, 1 hdc in same st as beg ch-2, sl st to the first hdc. Do not turn.——–24 hdc
Round 4: Ch 2, 1 hdc in the same st as ch 2, 1 hdc in next st, *(2 hdc in next st, 1 hdc in next 2 sts), repeat from * to end, 1 hdc in same st as beg ch-2, sl st to the first hdc. Do not turn.——–32 hdc
Round 5: Ch 2, 1 hdc in the same st as ch 2, 1 hdc in next st, *(2 hdc in next st, 1 hdc in next 3 sts), repeat from * to end, 1 hdc in same st as beg ch-2, sl st to the first hdc. Do not turn.——–40 hdc
Round 6: Ch 2, 1 hdc in the same st as ch 2, 1 hdc in next st, *(2 hdc in next st, 1 hdc in next 4 sts), repeat from * to end, 1 hdc in same st as beg ch-2, sl st to the first hdc. Do not turn.——–48 hdc
Making the Sides


Note: The first row is worked in the back loops only as shown in pic 1 above.
Round 1: With bigger hook, ch 1, 1 sc in the back loop only of the same st as ch 2, place a marker in this st, 1 sc in back loop only of each st across to end, do not sl st and do not turn.-——–48 sc.
Round 2: Work 1 hdc directly in the next marked st, move the marker up into this st, 1 hdc in each st across until you end in the st right before the marked one.——–48 hdc
Repeat Round 2 until you complete a total of 10 rows including the first sc row, 1 sc in next, sl st to next st to level the row. Do not turn.
Round 11: Ch 3( counts as a dc), 1 dc in the same st as ch 3, sk next st,*(2 dc in next, sk next st), repeat from * to end of the round, sl st to the top of beg ch-3.
Note: You will be inserting your string through the gaps in the above row.
Round 12: Ch 2 ( does not counts as a st), 1 hdc in the same st as beg ch-2, 1 hdc in each st across to end, sl st to the first hdc. Do not turn.—–48 hdc
Repeat the above round once more, fasten off and weave in the tails.
Crocheting the Bunny Ears
Inner Ear


Ch 18 with the bigger hook and pink or blue yarn, 1 sc in the 2nd ch from hook, 1 sc in next, 1 hdc in each ch across to last ch, 4 hdc in last ch, pivot your work and work into the free loops of the foundation ch as shown in pic 4, 1 hdc in each free loop across to last 2 loops, 1 sc in each of the last 2 loops, sl st to beg ch-1. Fasten off.
Outer Ear
Using cream color yarn, leave a 20-inch tail for sewing, Ch 18, and repeat the same steps as above to make the outer ear. Do not fasten off.
Joining the Outer and Inner Ears

Note: You will be able to hide the tails between the 2 layers.
Overlap both the inner and outer ears with the wrong sides touching each other. I actually missed this when I made my bags, so the ears don’t look very neat from the back. Continue with the cream color yarn and work a round of sc in the back loops only to join both the layers together, sl st to the first sc and fasten off.
Pinching the Ears

Pinch the ears about 2 inches above the base and sew it.
Make one more ear following the same pattern. Keep them aside for later.
Adding the Facial Features
Note: The nose should align with one of the dc clusters.
Making the Nose and Mouth


The top of the nose is on the 7th row from the base. First, sew the outline of a triangle and then fill it with yarn. The mouth is made using a back stitch. Watch the video at the end of the blog post to see how to sew a back stitch.
Making the Eyes
Make a simple V shape for closed bunny ears on the 8th row from the base. I made mine 1-3/8 inches apart.
Making and Adding the Drawstring Cord
With bigger hook, ch for a length of 23 inches and fasten off. Insert it in and out through the gaps between the dc round. The tails should be right at the back of the nose of the bunny to ensure that the face stays symmetrical when you pull the string.
Attaching the Bunny Ears

Place the bunny ears close to each other but slightly slanting.
Insert the ears in such a way that the pinched part won’t show and the base hits a little below the dc row. If you don’t insert it deep enough your ears will flop when you close the bag.
Whip stitch along the sides and the base of the inserted portion in a “U” leaving the top unstitched. Take care not to sew through the string while working along the dc round.
Making Pom Pom for Bunny Tail
I used a 2- 1/2 inches Clover pom pom maker for the bunny tails. I wound only one layer of yarn to keep the pom poms small. You can find Youtube videos on how to use the pom pom maker.
Finishing
Weave in any tails left.
You might also like my Free bunny basket crochet pattern which was featured on Allfreecrochet.com.


How can i save the pattern
You can bookmark this page or purchase the PDFfor $2.50.
I just made five bunny bags for my great grandchildren. All in different colors. They’re all off white with pink, blue, green, brown and dark blue ears and tails. So cute and fun to make! Now I give to their grandmother to fill them.
Hi Christine, that sounds wonderful. I wish I could see them.
Thank you for the share. This is adorable. My grand kids and great grand are getting these as a new Easter basket.
Thanks again.