Quick Bunny Basket Crochet Pattern (Free Pattern)

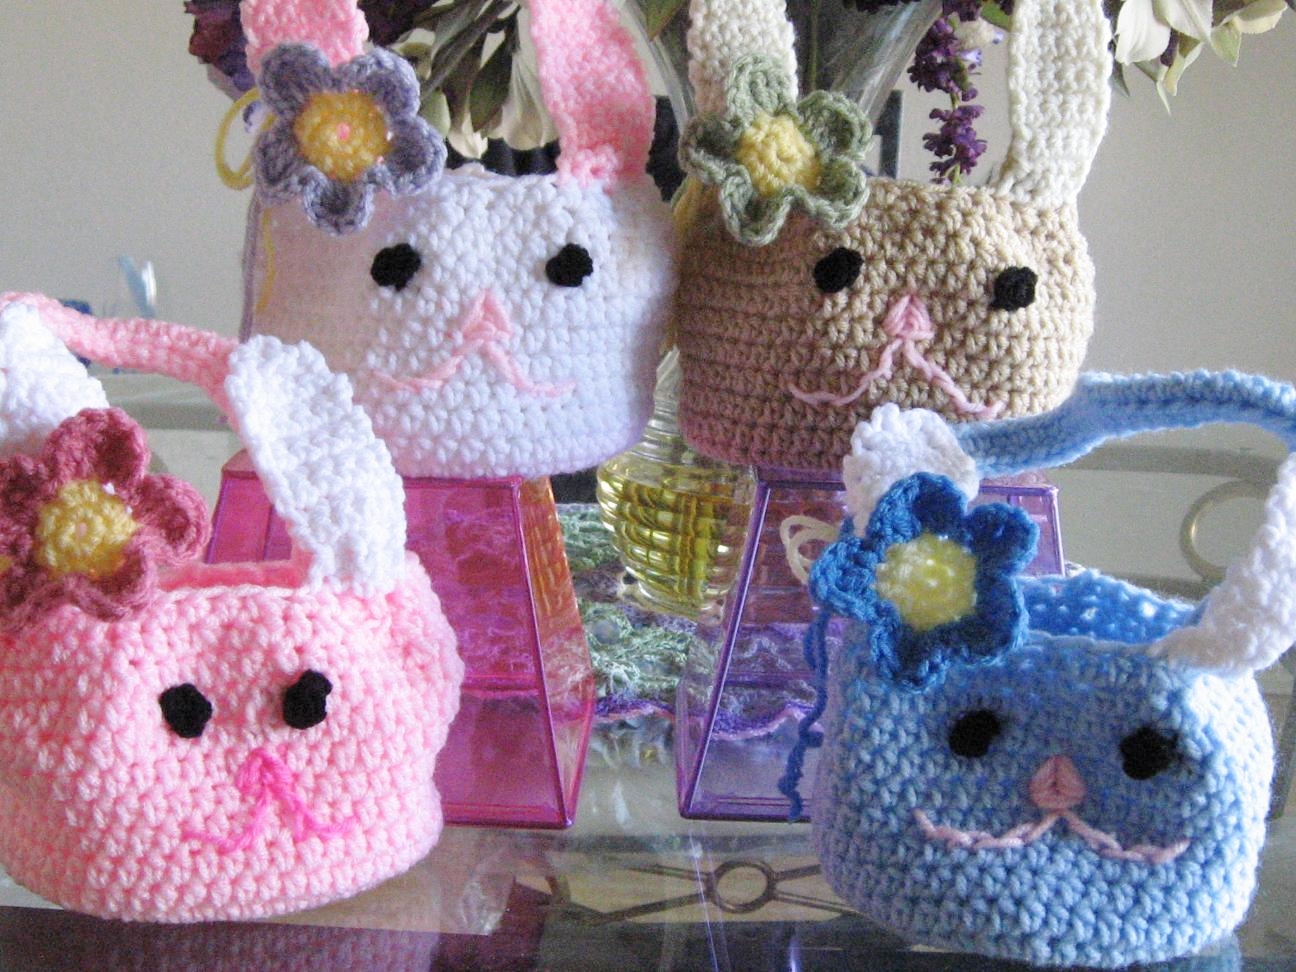
This is another one of my easy peasy patterns. I used just a single strand of worsted weight yarn and was surprised to see it hold its shape quite well. I guess the fact that the design is compact made it work. I am not an Amigurumi expert and had some trouble sewing the nose and mouth. I am guilty of making sad faces even when I used to paint and am glad this bunny came out pretty smiling. The jinx is finally broken.
The pattern is worked using an H hook and can be finished in less than 2 hours. You can even consider adding a pompom to the back as its tail. Don’t you think that is a lovely idea? So come up with your versions and don’t forget to share the pictures on my Facebook page. Enjoy the free pattern!
Bunny Basket Crochet Pattern
Materials
1.Worsted weight yarn in 3 colors. You need only a small amount of yarn for the ears and the flower
2. Hook- H (5mm)
3. Yarn needle (Blunt sewing needle with big eye) and matching thread.
Size
Fit for a kid. This basket is compact and I think that is what is helping it hold its shape even if worked using a single strand of yarn.
Dimensions of the finished bag: 5 inches in diameter at the bottom, 3 inches in diameter at the top and 4 inches in height.
Gauge
Using Hook H and working in hdc, 8 rounds measured 5 inches in diameter as shown in the picture below.

Stitch Abbreviations
The pattern is in standard American terms.
sc- single crochet
sl st- slip stitch
hdc- half double crochet
dc -double crochet
tr- triple crochet
ch- chain
Stitch Explanation
1.Triple crochet ( tr): Yarn over twice, insert hook into the next stitch and pull up a loop, (Yarn over and pull through 2 loops at a time) 3 times to complete the triple crochet stitch.
2. Hdc2tog ( decrease): [Yarn over, insert hook into next stitch and pull up a loop] twice to get 5 loops on the hook, yarn over and pull through all 5 loops on the hook.
3. Sc2tog: Insert hook into the 1st stitch and pull up a loop, insert hook into next st and pull up a loop to get 3 loops on the hook, yarn over and pull through all the 3 loops on the hook.
4. Sc3tog: To sc in all the 3 stitches, insert the hook into same st as ch 1 and pull up a loop, insert hook into the 2nd st and pull up a loop, insert hook into the 3rd st and pull up a loop, yarn over and pull through all the loops on the hook
The Base of the Basket
Note: The entire basket is worked in the round without turning.
Ch 4, sl st to 1st ch to form a ring.
Round 1: 6 sc in ring and sl st to 1st sc ——————-6 st
Round 2: Ch 2, 2 hdc in each st around, sl st to 1st hdc skipping the beginning ch 2———–12 st
Round 3: Ch 2, *( 2hdc in next st, 1 hdc in next), Repeat from * till the end of the round, sl st to 1st hdc skipping the beginning ch 2———————18 st
Round 4: Ch 2, *( 2hdc in next st, 1 hdc in next 2 st), Repeat from * till the end of the round, sl st to 1st hdc skipping the beginning ch 2———————24 st
Round 5: Ch 2, *( 2hdc in next st, 1 hdc in next 3 st), Repeat from * till the end of the round, sl st to 1st hdc skipping the beginning ch 2———————30 st
Round 6: Ch 2, *( 2hdc in next st, 1 hdc in next 4 st), Repeat from * till the end of the round, sl st to 1st hdc skipping the beginning ch 2———————36 st
Round 7: Ch 2, *( 2hdc in next st, 1 hdc in next 5 st), Repeat from * till the end of the round, sl st to 1st hdc skipping the beginning ch 2———————42 st
Round 8 ( Last Round of Base): Ch 2, *( 2hdc in next st, 1 hdc in next 6 st) , Repeat from * till the end of the round, sl st to 1st hdc skipping the beginning ch 2, do not fasten off———————48 st
The Side of the Basket


Side Pattern
The side is also worked without turning till the end.
Round 1: With the right side of the base facing up, work in back loops only, ch2, 1 hdc in each st around, sl st to 1st hdc——————48 st
Round 2 to 6 ( Total 5 Rows): Work even just like round 1 above but in both the loops
Round 7 (Increase Round) : Ch2, *( 2hdc in next st, 1 hdc in next 5 stitches) , repeat from * 8 times till the end of the round, sl st to top of beginning ch 2—————-57 St
Round 8 : Ch2, 1 hdc in each st around, sl st to 1st hdc——————57 st
Round 9 ( Decrease Row) : Ch 2, *(1 hdc in next 6 st , hdc2tog), repeat from * 7 times , 1 hdc in last st of the round, sl st to 1st hdc——————– 50 st
Round 10: Ch 2, *(1 hdc in next 3 st , hdc2tog), repeat from * 10 times till the end of the round, sl st to 1st hdc ——————– 40 st
Round 11: Ch 2, *(1 hdc in next 3 st , hdc2tog), repeat from * 8 times till the end of the round, sl st to 1st hdc, fasten off. ——————– 32 st
You can add a slip stitch round if you want before fastening off.
Bunny Ears
Note: The bunny ears are worked directly onto the basket.
Turn the basket front toward you, leaving the fasten-off line at the back.

Left Ear
Row 1: Count 5 stitches in the middle and sl st to the next st (as shown by the arrow in the picture), Ch1, 1 sc in the same st, 1 sc in next 4 stitches; Turn.—————5 sc not counting ch 1
Row 2 to 12: ch 1, 1 sc in same st as ch 1, 1 sc in next 4 st; Turn.———-5 sc
Row 13: Ch 1, sc2tog, 1 sc in middle st, sc 2tog; Turn. ————3 st
Row 14: Ch 1, sc3tog ( see stitch explanation) and fasten off.
Right ear
Work just like the left ear starting from the point as shown in the pic. You will have 5 free stitches between the 2 bunny ears.

Pinch the base of the ear and sew it to make the ears stand up
Finishing the Ear
Weave in the tails. Your bunny ears will now be floppy. Pinch the base of the bunny ears and sew as shown in the picture to make them stand up.
Facial Features

Using pink yarn and a yarn needle sew the outline of a triangle and fill it in for the nose. Add two curved line with a back stitch for the mouth.

For the eyes use 2 tiny black buttons. I didn’t have buttons, so I chained 3 and sl stitched to the 1st chain, pulled the 2 tails into the basket, knotted the 2 tails inside the basket and clipped it, then stitched the eyes down using black thread.
Handle Pattern
Leaving a long tail, chain as long as you want the handle and add another 8 chains to sew in later. Try not to make it too long.
Row 1: Ch 2, 1 hdc in same st as ch 2, 1 hdc in each ch across. Turn.
Row 2 and 3: Ch 2, 1 hdc in same st, 1 hdc in each st across. Turn.


Row 4: Sl st in 6 stitches, now start sl stitching both the sides together to turn it into a rod as shown in the picture, fasten off leaving a long tail when 6 stitches are left.

Using the tails on both the ends of the handle sew it to the inside of the basket right behind the bunny ears.
Sew the bunny ears with matching thread onto the handle only at one point, taking care the thread doesn’t show on the back of the handle. This will help the ears stay up.
Flower Pattern

Leaving a long tail Ch 4 using pink yarn and sl st to 1st chain to form a ring.
Round 1 : Work 5 sc into the chain ring and sl st to the 1st sc——– 5 sc

Round 2: Ch 2, 2 hdc in each stitch around, sl st to 1st hdc, fasten off leaving a long tail.——— 10 hdc
Using white yarn, leave a long tail and sl st into the stitch you just fastened off.

Note: Each petal is worked across 2 stitches. You work a sl st, ch 2, 1 dc, 1 tr all into 1 stitch to form one half of a petal and then work a tr, 1dc, ch 2 and sl st all into the next st to work the other half of a petal.
Round 3 : * ( Sl st to next st, ch 2, 1 dc and 1 tr in the same st, 1 tr, 1 dc, ch 2 and sl st in next st,) – a petal made. Repeat 5 times from *————- 5 petals

Sl stitch to the base of 1st petal. Fasten off leaving a long tail.
Finishing the Flower
- Now you have 4 long tails, 2 of each color. Use it to tie the flower onto the left bunny ear and the handle. You can tie in a bow behind the handle using the tails.
- You can also opt to weave in the tails and sew the flower on.


That is too cute!! Keep up the beautiful work!! 🙂
~Stay blessed!
So cute!! Keep it up!! 🙂
~Stay blessed!!
Chari
Etsy Entrepreneurs
thank you for all your hard work…. i enjoy looking for them and making something out of my day…
so cute– thanks so much for sharing this pattern. 🙂
i love this!!! i can't believe how cute it is! a lot of the other baskets that you can crochet aren't nearly as adorable! my little girl will love this for easter!!!
VERY CUTE!!.. and thanks for sharing how to make one… Have a great weekend! ~tina
very cute like to make one for all of my kids and grandkids
Adorable! Love it!
figured it out….got it printed…gonna try to make 2 of these for a baby shower for twins….thanks for sharing this pattern….