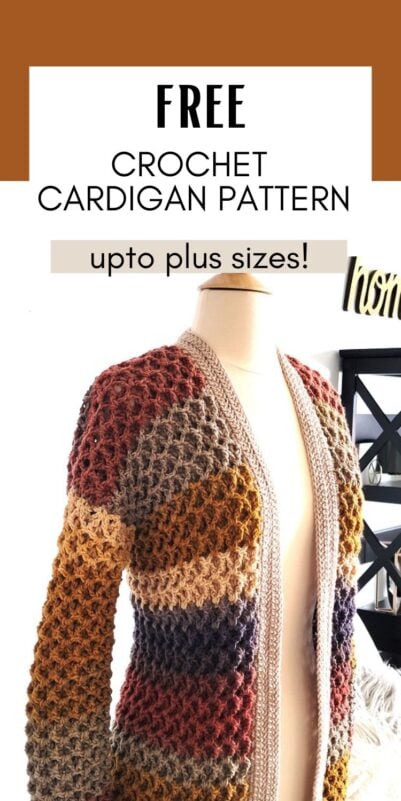
Easy Crochet Cardigan Pattern Free, Fall Vibes Cardigan
Free and Easy Crochet Cardigan Pattern with Texture.

This easy crochet cardigan pattern free tutorial is a joy to follow. The cardigan is made from just 3 pieces, the body worked in one piece, and 2 sleeves.

The body is worked with slits for the armholes and it is pretty much a straight piece with no shaping. The sleeves are the only parts that need shaping.

The texture might look intimidating but all you need to know besides the basic crochet stitches is a front post double crochet. The stitch pattern is a mindless one-row repeat that will be a perfect companion for your Netflix binge-watching sessions.

When I was about to start working on this cardigan, I went back and forth between choosing a neutral yarn or the colorful Lion Brand Mandala. I am really happy I finally settled for Mandala yarn in the colorway Centaur.
The texture really pops in this yarn and I couldn’t be happier. I started this easy crochet cardigan when I was feeling a little low and I must say, all the color changes really cheered me up.

I wish I had designed this a little earlier in the season, but better late than never. So without further ado, check out the free and easy crochet cardigan pattern below, enjoy!
Easy Crochet Cardigan Pattern Free
Materials
1. Lion Brand Mandala yarn in the color Centaur for the main body. It is a self striping yarn. You can substitute it with any DK size 3 yarn of the same gauge.
2. Premier Basix DK in color Taupe for the collar, hem, and cuffs
3. A size 7 (4.5mm) hook. Use any size hook to attain the gauge.
4. Stitch markers. You can also use a contrasting piece of yarn or a safety pin.
5. Tapestry needle to weave in the ends.
Finished Size
Notes
1. The sizing guide is given in the order S (M, L, XL) (2XL, 3XL)
2. The cardigan stretches by 4-5 inches in length when worn, The approximate finished length when worn is given below.
To fit bust: 34 (38, 42, 46) (50, 54)”
Back Width: 19 (21, 23, 25) (27, 29)”
Armhole: 7 (7, 8, 8) (9, 9)”
Sleeve Length (before attaching to body): 16-1/2″ for sizes S and M and 17″ for all the bigger sizes.
Length: 33 (33, 33, 34) (34, 34)” when worn
Yardage
We use 2 types of yarn for this easy crochet cardigan design, self-striping Mandala yarn for the body and sleeves, and a plain color yarn for the collar, hem, and cuffs.
Yardage for Body and Sleeves
S and M: 5 skeins of Mandala or 2800 yards
L and XL: 6 skeins of Mandala or 3250 yards
2XL and 3 XL: 6 skeins of Mandala or 3500 yards
Yardage for Hem, Collar, and Cuff
1 skein of Premier Basix DK for sizes S, M, and L (approximately 300 yards), and 2 skeins (approximately 500 yards) for the bigger sizes.
Stitch Abbreviations
The pattern is written in US terms.
ch: chain
st(sts): stitch (stitches)
sl st: slip stitch
sc: single crochet
dc: double crochet
YO: yarn over
fpdc: front post double crochet (explanation is given below)
hhdc: herringbone half double crochet (explanation is given below)
RS: right side of your crochet fabric
WS: wrong side of your crochet fabric
Stitch Explanations
fpdc (front post double crochet): See a tutorial for front post double crochet on my blog here: Front Post and Back Post Double Crochet Tutorial.
V-st: (dc, ch 1, dc) all worked into the same ch-1 space.
dc2tog: YO, insert your hook into the first st specified and pull up a loop, YO, pull through 2 loops, keep the remaining 2 loops on your hook and YO again, pull up a loop in the next st, YO and pull through 2 loops, YO pull through the remaining 3 loops on your hook.
sc2tog: YO, insert your hook into the first st and pull up a loop, insert your hook into the next st and pull up a loop, YO and pull through all the 3 loops on your hook.
hhdc: YO, insert your hook into the next st, pull up a loop through the st and the first loop on your hook, 2 loops left on your hook, YO and pull through the remaining 2 loops on your hook.
hhdc2tog: YO, insert your hook into the next st and pull up a loop through the st and the first loop on your hook, keep the remaining 2 loops on your hook, YO, insert your hook into the next st and pull up a loop through the st and the first loop on your hook, YO and pull through all the 3 loops on your hook.
More free cardigan patterns
Crochet Cropped Cardigan Pattern
Gauge
Pattern for Gauge Swatch
Row 1: Ch 38, 2 dc in 5th ch from hook (first 3 skipped chs count as a dc), ch 1, 2 dc in next st, *(sk next 3 chs, 2 dc in next ch, ch 1, 2 dc in next ch), repeat from * to last 2 chs, sk next ch, 1 dc in last ch, and turn.———- 7 repeats+ 2 dc
Row 2: Ch 3 (counts as first dc), sk next dc, *(1 fpdc in next dc, V-st in next ch-1 space, 1 fpdc in next dc, sk next 2 dc), repeat from * until just 1 dc and beginning ch-3 is left, sk next dc, 1 dc on top of beg ch-2, turn.———7 shells + 2 dc
Keep repeating Row 2 until your piece measures 7 inches tall and measure for gauge. Switch to a smaller or bigger hook to attain gauge.
Gauge
4 shells and 9 Rows= 4 inches
Easy Crochet Cardigan Pattern
Overview
1. The cardigan is made from just 3 pieces. The body is worked in one piece and the sleeves are worked separately and added to the body.
2. First keep aside 2 similar-looking yarn cakes for the sleeves. Write SLEEVE on the yarn label to avoid any confusion. Not all cakes of the same colorway are wound in the same order. Picking 2 skeins for the sleeves first will ensure that they both turn out the same color.
Cardigan Body
Pattern Notes
1. Front and back panels are worked at one time from the bottom up until dividing for armholes.
2. To make a longer or shorter cardigan, eliminate or work additional rows of the main cardigan body before dividing for the front.
3. Stitch counts for bigger sizes are given in the order S (M, L, XL) (2XL, 3XL)
4. Initial chain is a multiple of 5+3. This will determine the width of your cardigan.
5. Keep aside the 2 skeins for the sleeves and start working the body with the remaining skeins.
Ch 188 (208, 228, 248) (268, 288)
Row 1: 2 dc in 5th ch from hook (first 3 skipped chs count as a dc), ch 1, 2 dc in next st, *(sk next 3 chs, 2 dc in next ch, ch 1, 2 dc in next ch), repeat from * to last 2 chs, sk next ch, 1 dc in last ch, place a marker on this side of the fabric to indicate the RS and turn.———- 37 (41, 45, 49) (53, 57)repeats+ 2 dc
Note: At the end of every row from now on, you will work your last st into the top of the beginning ch-2 and not into the beginning ch-3 as this will keep your edges straight.
Row 2: Ch 3 (counts as first dc), sk next dc, *(1 fpdc in next dc, V-st in next ch-1 space, 1 fpdc in next dc, sk next 2 dc), repeat from * until just 1 dc and beginning ch-3 is left, sk next dc, 1 dc on top of beg ch-2, turn.———37 (41, 45, 49) (53, 57)shells + 2 dc

Keep repeating Row 2 until your piece measures 19.5 (19.5, 18.5, 19.5) (18.5, 18.5)” which will be approximately 44 (44, 42, 44) (42, 42) shell rows, and fasten off. You can easily count the rows at the edge of the fabric. Each turning chain or dc represents 1 row. This stitch pattern is really stretchy, so fold the fabric in half, hold it in the middle, give it a nice shake, and then lay it flat to measure the height.
If you want to adjust the length of your cardigan, you will add or eliminate rows here before proceeding to divide for the front below.
Dividing for Front
1. Now we will be diving our work into 2 front panels and a back panel. We will first make the 2 front panels to make sure it is worked in the same colors.
2. All 3 parts should be worked on the same side of the crochet fabric. So make a note of whether you are working the first front panel on the RS or the WS of the crochet fabric. We had placed a marker on the RS at the beginning of our work. If you forgot to place the marker, the side on which the beginning tail is in the left corner is the RS of the crochet fabric.
3. We will use the 2 skeins we kept aside for sleeves to make the front panels first and then use the leftover for the sleeves. When picking the colors from the skein for your front panels, take care to maintain the same color sequence as the lower body. You can pull out a bunch of colors easily from the middle of the yarn cake if you need to.
First Front Panel

Row 1: Using one of the skeins we kept aside for the sleeves, sl st to where we fastened off, ch 2 (counts as first dc), sk next dc, *(1 fpdc in next dc, V-st in next ch-1 space, 1 fpdc in next dc, sk next 2 dc), repeat from * until you have completed 9 (10, 11, 12) (13, 14)shells, sk next dc that is pushed behind, 1 dc in next dc, leave remaining sts unworked, and turn.——9 (10, 11, 12) (13, 14)shells + 2 dc
Row 2: Ch 3 (counts as first dc), sk next dc, *(1 fpdc in next dc, V-st in next ch-1 space, 1 fpdc in next dc, sk next 2 dc), repeat from * until just 1 dc and beginning ch-3 is left, sk next dc, 1 dc on top of beg ch-2, turn.———9 (10, 11, 12) (13, 14)shells + 2 dc
Keep repeating Row 2 until your front panel is 7 (7, 8, 8) (9, 9)inches tall, and fasten off. You will approximately have 14 (14, 16, 16) (18, 18)rows. You can easily count the rows at the edge of the fabric. Each turning chain or dc represents 1 row.
Second Front Panel

Note: The second front panel should be made using the same colors as the first front panel to keep them uniform. Use the second skein we kept aside for the sleeves to make this panel.
Row 1: Skip 18 (20, 22, 24) (26, 28)shells + 3 dc from the first front panel, sl st into the next dc (the last dc of the shell), ch 2 (counts as a dc), sk next dc, *(1 fpdc in next dc, V-st in next ch-1 space, 1 fpdc in next dc, sk next 2 dc), repeat from * until just 1 dc and beginning ch is left, sk next dc, 1 dc on top of beg ch-2, turn.———9 (10, 11, 12) (13, 14)shells + 2 dc
Row 2: Ch 3 (counts as first dc), sk next dc, *(1 fpdc in next dc, V-st in next ch-1 space, 1 fpdc in next dc, sk next 2 dc), repeat from * until just 1 dc and beginning ch-3 is left, sk next dc, 1 dc on top of beg ch-2, turn.———9 (10, 11, 12) (13, 14)shells + 2 dc
Keep repeating Row 2 until your panel is 7 (7, 8, 8) ( 9, 9)inches tall just like your first front panel, and has approximately 14 (14, 16, 16) (18, 18)rows, fasten off.
Back

Pattern Notes
1. Put aside the skeins for the sleeves now and work with the remaining skeins.
2. The back panel is worked between the 2 front panels.
Row 1: Make sure you are on the same side of the crochet fabric you started the front panels on and sl st to the 1st dc st right after the first front panel, ch 2 (counts as a dc), V-st in next ch-1 space, 1 fpdc in next dc, sk next 2 dc sts, *(1 fpdc in next dc, V-st in next ch-1 space, 1 fpdc in next dc, sk next 2 dc), repeat from * and after you work a V-st in the last ch-1 space, 1 dc in next dc, turn.————19 (21, 23, 25) (27, 29)shells + 2 dc
Row 2: Ch 3 (counts as first dc), *(1 fpdc in next dc, V-st in next ch-1 space, 1 fpdc in next dc, sk next 2 dc), repeat from * until you work a V-st in the last ch-1 space, 1 fpdc in next st, 1 dc on top of beginning ch-2, turn.——19 (21, 23, 25) (27, 29)shells + 2 dc
Row 3: Ch 3 (counts as first dc), sk next dc, *(1 fpdc in next dc, V-st in next ch-1 space, 1 fpdc in next dc, sk next 2 dc), repeat from * until just 1 dc and beginning ch-3 is left, sk next dc, 1 dc on top of beg ch-2, turn.———19 (21, 23, 25) (27, 29)shells + 2 dc
Repeat Row 3 until your panel is 7 (7, 8, 8) (9, 9)inches tall and has approximately 14 (14, 16, 16) (18, 18)rows just like your front panels, and fasten off.
Seaming the Shoulders

Keep the RS facing up and fold the front panels over the back panel, align the shoulders and join them with a sc seam. Don’t work into the sts at the top but insert the hook a 1/4 inch below the top edge and distribute sc sts in such a way that the shoulder doesn’t widen out. The shoulder should be approximately 9 (10, 11, 12) (13, 14)inches once seamed, equal to the width of the front panel.
Hem
1. The hem, collar, and sleeve cuffs are worked with beige color yarn to tie all the colors together.
2. Stitch counts are not provided for the rows as it is not important. We are just distributing stitches to get a hem that is not too wide or puckering. You can add or cancel hhdc2tog in Row 2 to adjust the hem.
Row 1: Working on the RS, sl st to the first st, 1 sc in the first st, 1 sc under each dc st across to end. Work inserting the hook into the post or leg of the dc sts as there are no actual stitches on this edge.
Row 2: Ch 1 (does not count as a st), 1 hhdc in first st, *(1hhdc in next 3 sts, hhdc2tog across next 2 sts), repeat from * to end. If your last st is a hhdc2tog, replace it with a regular hhdc.
Row 3: Ch 1 (does not count as a st), 1 hhdc in first st, 1 hhdc in each st across to end, turn.
Repeat Row 3 two more times and fasten off.
Collar
The collar is also worked in the same beige yarn as the hem.
Row 1: On the RS of the cardigan, start with a sl st at the left bottom corner of the front opening, distribute 6 sc sts across the hem, and continue to work 2 sc in each space under the beginning ch or stitch along the row ends until you hit the left shoulder seam, 1 sc in the shoulder seam, 1 sc in each st and ch-1 space along the back of the neck, 1 sc in right shoulder seam, 2 sc in each space under the beginning ch or stitch along the row ends until you hit the hem, distribute 6 sc sts along the hem, turn.
Row 2: Ch 1 (does not count as a st), 1 hhdc in first st, 1 hhdc in each st across to end, turn.
Row 3: Ch 1 (does not count as a st), 1 hhdc in first st, 1 hhdc in next 2 sts, *(hhdc2tog, 1 hhdc in next 2 sts), repeat from * 8 more times, 1 hhdc in each st across until 37 sts left, *(hhdc2tog across next 2 sts, 1 hhdc in next 2 sts), repeat from * to last st, 1 hhdc in last st, turn.
Row 4: Ch 1 (does not count as a st), 1 hhdc in first st, 1 hhdc in each st across to end, turn.
Repeat Row 4 one more time and fasten off.
Sleeves

Notes
1. The sleeves are worked flat from the top down to the cuff. It is then folded and seamed to form a tube.
2. Use the 2 skeins we kept aside for the sleeves, the leftover from making the front panels.
Ch 67 (67, 77, 77) (87, 87)
Row 1: 1 sc in 2nd ch from hook and each ch across to end, turn.—-66 (66, 76, 76) (86, 86)sc
Row 2: Ch 3 (counts as first dc), sk next st, 2 dc in next st, ch 1, 2 dc in next st, *(sk next 3 sts, 2 dc in next st, ch 1, 2 dc in next st), repeat from * to last 2 sts, sk next st, 1 dc in last st, place a marker on this side of the fabric to indicate the RS and turn.——-13 (13, 15, 15) (17, 17)repeats+ 2 dc
Row 3: Ch 3 (counts as first dc), sk next dc, *(1 fpdc in next dc, V-st in next ch-1 space, 1 fpdc in next dc, sk next 2 dc), repeat from * until just 1 dc and beginning ch-3 is left, sk next dc, 1 dc on top of beg ch-3, turn.———-13 (13, 15, 15) (17, 17)shells+ 2 dc
Row 4 & 5: Repeat Row 3———-13 (13, 15, 15) (17, 17)shells+ 2 dc
Row 6: Ch 3 (counts as first dc), sk next dc, 1 fpdc in next dc, 1 dc in next ch-1 space, 1 fpdc in next dc, sk next 2 dc, *(1 fpdc in next dc, V-st in next ch-1 space, 1 fpdc in next dc, sk next 2 dc), repeat from * until 1 shell is left, after skipping 2 dc, 1 fpdc in next dc, 1 dc in next ch-1 space, 1 fpdc in next dc, sk next dc, 1 dc on top of beginning ch, turn.———11 (11, 13, 13) (15, 15) shells + 8 dc (4 on each side)
Row 7, 8 & 9: Ch 3 (counts as first dc), 1 fpdc in next dc, 1 dc in next dc, 1 fpdc in next dc, sk next dc, *(1 fpdc in next dc, V-st in next ch-1 space, 1 fpdc in next dc, sk next 2 dc), repeat from * until 4 dc and beginning ch is left, sk next dc that is pushed behind the fpdc you just made, 1 fpdc in next dc, 1 dc in next dc, 1 fpdc in next dc, 1 dc on top of beginning ch, turn.———-11 (11, 13, 13) (15, 15) shells + 8 dc
Row 10: Ch 3 (counts as first dc), 1 fpdc in next dc, sk next dc, 1 fpdc in next dc, sk next dc, *(1 fpdc in next dc, V-st in next ch-1 space, 1 fpdc in next dc, sk next 2 dc), repeat from * until 4 dc and beginning ch is left, sk next dc, 1 fpdc in next dc, sk next dc, 1 fpdc in next dc, 1 dc on top of beginning ch, turn.—–11 (11, 13, 13) (15, 15) shells + 6 dc (3 on each side)
Row 11, 12 & 13: Ch 3, 1 fpdc in next 2 dc, sk next dc, *(1 fpdc in next dc, V-st in next ch-1 space, 1 fpdc in next dc, sk next 2 dc), repeat from * until 3 dc and beginning ch is left, sk next dc, 1 fpdc in next 2 dc, 1 dc on top of beginning ch-2, turn.———–11 (11, 13, 13) (15, 15) shells + 6 dc
Row 14: Ch 3, dc2tog across next 2 sts, sk next dc, *(1 fpdc in next dc, V-st in next ch-1 space, 1 fpdc in next dc, sk next 2 dc), repeat from * until 3 dc and beginning ch is left, sk next dc, dc2tog across next 2 sts, 1 dc on top of beginning ch-2, turn.——-11 (11, 13, 13) (15, 15) shells + 2 dc + 2 dc2tog
Row 15: Ch 3, 1 dc in next dc2tog, sk next dc, *(1 fpdc in next dc, V-st in next ch-1 space, 1 fpdc in next dc, sk next 2 dc), repeat from * until 1 dc, dc2tog and beginning ch is left, sk next dc, 1 dc in next dc2tog, 1 dc on top of beginning ch-2, turn.——11 (11, 13, 13) (15, 15) shells + 4 dc
Row 16, 17 & 18: Ch 3, 1 dc in next dc, sk next dc, *(1 fpdc in next dc, V-st in next ch-1 space, 1 fpdc in next dc, sk next 2 dc), repeat from * until 2 dc and beginning ch is left, sk next dc, 1 dc in next dc, 1 dc on top of beginning ch-2, turn.——11 (11, 13, 13) (15, 15) shells + 4 dc
Row 19: Ch 1 (not counted as a st here), dc2tog across first st and next dc, sk next dc, *(1 fpdc in next dc, V-st in next ch-1 space, 1 fpdc in next dc, sk next 2 dc), repeat from * until 2 dc and beginning ch is left, sk next dc, dc2tog across next dc and top of beginning ch-2, turn.——11 (11, 13, 13) (15, 15) shells+2 dc2tog (one on each side)
Row 20: Ch 3 (counts as a dc), sk next dc *(1 fpdc in next dc, V-st in next ch-1 space, 1 fpdc in next dc, sk next 2 dc), repeat from * until just 1 dc and dc2tog is left, sk next dc, 1 dc on top of dc2tog, turn.————11 (11, 13, 13) (15, 15) shells + 2 dc
Row 21: Ch 3 (counts as a dc), sk next dc *(1 fpdc in next dc, V-st in next ch-1 space, 1 fpdc in next dc, sk next 2 dc), repeat from * until just 1 dc and beginning ch is left, sk next dc, 1 dc on top of beginning ch, turn.———————11 (11, 13, 13) (15, 15) shells + 2 dc
Continue for Sleeve (S/M Only)
Keep repeating Row 21 until your sleeve measures 15-1/2 inches which will be around 36 shell rows. Fasten off. Jump to the cuff pattern below.
Cuff
Note: If you want to make your cuff narrower, you can evenly distribute a few hhdc2tog in Row 2 (see stitch explanations). 3 decreases will reduce the circumference approximately by an inch. Alternately you can also add some seam allowance near the cuff when you slip-stitch the sleeve into a tube.
Row 1: With the beige skein of yarn for the collar, work on the RS of the sleeve, sl st to the first st or beginning ch, 1 sc in same st, 1 sc in next dc, *(sc2tog across next 2 dc on either side of ch-1, 1 sc in next 2 dc), repeat from * to end until you work a sc on top of beginning ch, turn.——-35 sts
Row 2 & 3: Ch 1 (does not count as a st), 1 hhdc in first st, 1 hhdc in each st across to end, turn.——-35 sts
Fasten off and weave in the ends. Jump to Seaming the Sleeves below.
Continue for Sleeve (L/XL only)
Row 22 & 23: Repeat Row 21———-13 shells + 2 dc
Row 24: Ch 3 (counts as first dc), sk next dc, 1 fpdc in next dc, 1 dc in next ch-1 space, 1 fpdc in next dc, sk next 2 dc, *(1 fpdc in next dc, V-st in next ch-1 space, 1 fpdc in next dc, sk next 2 dc), repeat from * until 1 shell is left, after skipping 2 dc, 1 fpdc in next dc, 1 dc in next ch-1 space, 1 fpdc in next dc, sk next dc, 1 dc on top of beginning ch, turn.———11 shells + 8 dc (4 on each side)
Row 25 & 26: Ch 3 (counts as first dc), 1 fpdc in next dc, 1 dc in next dc, 1 fpdc in next dc, sk next dc, *(1 fpdc in next dc, V-st in next ch-1 space, 1 fpdc in next dc, sk next 2 dc), repeat from * until 4 dc and beginning ch is left, sk next dc that is pushed behind the fpdc you just made, 1 fpdc in next dc, 1 dc in next dc, 1 fpdc in next dc, 1 dc on top of beginning ch, turn.———–11 shells + 8 dc
Row 27: Ch 3 (counts as first dc), 1 fpdc in next dc, sk next dc, 1 fpdc in next dc, sk next dc, *(1 fpdc in next dc, V-st in next ch-1 space, 1 fpdc in next dc, sk next 2 dc), repeat from * until 4 dc and beginning ch is left, sk next dc, 1 fpdc in next dc, sk next dc, 1 fpdc in next dc, 1 dc on top of beginning ch, turn.—–11 shells + 6 dc (3 on each side)
Row 28: Ch 3, 1 fpdc in next 2 dc, sk next dc, *(1 fpdc in next dc, V-st in next ch-1 space, 1 fpdc in next dc, sk next 2 dc), repeat from * until 3 dc and beginning ch is left, sk next dc, 1 fpdc in next 2 dc, 1 dc on top of beginning ch-2, turn.—–11 shells + 6 dc
Keep repeating Row 28 until your sleeve is 16 inches long (approximately 37 shell rows), and jump to the cuff pattern below.
Cuff
Note: If you want to make your cuff narrower, you can evenly distribute a few hhdc2tog in Row 2 (see stitch explanations). 3 decreases will reduce the circumference approximately by an inch. Alternately you can also add some seam allowance near the cuff when you slip-stitch the sleeve into a tube.
Row 1: With the beige skein of yarn for the collar, work on the RS of the sleeve, sl st to the first st or beginning ch, 1 sc in same st, 1 sc in next 3 dc, *(sc2tog across next 2 dc on either side of ch-1, 1 sc in next 2 dc), repeat from * until just 1 dc and the beginning ch is left, 1 sc on top of the next dc and beginning ch, turn.——-39 sts
Row 2, 3 & 4: Ch 1 (does not count as a st), 1 hhdc in first st, 1 hhdc in each st across to end, turn.——-39 sts
Fasten off and weave in the ends. Jump to Seaming the Sleeves below.
Continue for Sleeve (2XL and 3XL only)
Row 22 & 23: Repeat Row 21———-15 shells + 2 dc
Row 24: Ch 3 (counts as first dc), sk next dc, 1 fpdc in next dc, 1 dc in next ch-1 space, 1 fpdc in next dc, sk next 2 dc, *(1 fpdc in next dc, V-st in next ch-1 space, 1 fpdc in next dc, sk next 2 dc), repeat from * until 1 shell is left, after skipping 2 dc, 1 fpdc in next dc, 1 dc in next ch-1 space, 1 fpdc in next dc, sk next dc, 1 dc on top of beginning ch, turn.———13 shells + 8 dc (4 on each side)
Row 25 & 26: Ch 3 (counts as first dc), 1 fpdc in next dc, 1 dc in next dc, 1 fpdc in next dc, sk next dc, *(1 fpdc in next dc, V-st in next ch-1 space, 1 fpdc in next dc, sk next 2 dc), repeat from * until 4 dc and beginning ch is left, sk next dc that is pushed behind the fpdc you just made, 1 fpdc in next dc, 1 dc in next dc, 1 fpdc in next dc, 1 dc on top of beginning ch, turn.———–13 shells + 8 dc
Row 27: Ch 3 (counts as first dc), 1 fpdc in next dc, sk next dc, 1 fpdc in next dc, sk next dc, *(1 fpdc in next dc, V-st in next ch-1 space, 1 fpdc in next dc, sk next 2 dc), repeat from * until 4 dc and beginning ch is left, sk next dc, 1 fpdc in next dc, sk next dc, 1 fpdc in next dc, 1 dc on top of beginning ch, turn.—–13 shells + 6 dc (3 on each side)
Row 28 & 29: Ch 3, 1 fpdc in next 2 dc, sk next dc, *(1 fpdc in next dc, V-st in next ch-1 space, 1 fpdc in next dc, sk next 2 dc), repeat from * until 3 dc and beginning ch is left, sk next dc, 1 fpdc in next 2 dc, 1 dc on top of beginning ch-2, turn.——-13 shells + 6 dc
Row 30: Ch 3, dc2tog across next 2 sts, sk next dc, *(1 fpdc in next dc, V-st in next ch-1 space, 1 fpdc in next dc, sk next 2 dc), repeat from * until 3 dc and beginning ch is left, sk next dc, dc2tog across next 2 sts, 1 dc on top of beginning ch-2, turn.—-13 shells + 2 dc + 2 dc2tog
Row 31: Ch 3, 1 dc in next dc2tog, sk next dc, *(1 fpdc in next dc, V-st in next ch-1 space, 1 fpdc in next dc, sk next 2 dc), repeat from * until 1 dc, dc2tog and beginning ch is left, sk next dc, 1 dc in next dc2tog, 1 dc on top of beginning ch-2, turn.——-13 shells + 4 dc
Row 32 & 33: Ch 3, 1 dc in next dc, sk next dc, *(1 fpdc in next dc, V-st in next ch-1 space, 1 fpdc in next dc, sk next 2 dc), repeat from * until 2 dc and beginning ch is left, sk next dc, 1 dc in next dc, 1 dc on top of beginning ch-2, turn.——-13 shells + 4 dc
Row 34: Ch 1 (not counted as a st here), dc2tog across first st and next dc, sk next dc, *(1 fpdc in next dc, V-st in next ch-1 space, 1 fpdc in next dc, sk next 2 dc), repeat from * until 2 dc and beginning ch is left, sk next dc, dc2tog across next dc and top of beginning ch-2, turn.—–13 shells + 2 dc2tog (one on each side)
Row 35: Ch 3 (counts as a dc), sk next dc *(1 fpdc in next dc, V-st in next ch-1 space, 1 fpdc in next dc, sk next 2 dc), repeat from * until just 1 dc and dc2tog is left, sk next dc, 1 dc on top of dc2tog, turn.———-13 shells + 2 dc
Row 36 & 37: Ch 3 (counts as a dc), sk next dc *(1 fpdc in next dc, V-st in next ch-1 space, 1 fpdc in next dc, sk next 2 dc), repeat from * until just 1 dc and beginning ch is left, sk next dc, 1 dc on top of beginning ch, turn.———-13 shells + 2 dc
The sleeve should be approximately 16″ long now. If not, repeat the last row.
Cuff
Note: If you want to make your cuff narrower, you can evenly distribute a few hhdc2tog in Row 2 (see stitch explanations). 3 decreases will reduce the circumference approximately by an inch. Alternately you can also add some seam allowance near the cuff when you slip-stitch the sleeve into a tube.
Row 1: With the beige skein of yarn for the collar, work on the RS of the sleeve, sl st to the first st or beginning ch, 1 sc in same st, 1 sc in next dc, *(sc2tog across next 2 dc on either side of ch-1, 1 sc in next 2 dc), repeat from * to end until you work a sc on top of beginning ch, turn.——-41 sts
Row 2, 3 & 4: Ch 1 (does not count as a st), 1 hhdc in first st, 1 hhdc in each st across to end, turn.——-41 sts
Fasten off and weave in the ends. Jump to Seaming the Sleeves below.
Seaming the Sleeves
Fold the sleeve in half, and slip stitch the edges of the sleeve together to form a tube. Make sure that you make the seam on the WS of the sleeve. Turn it inside out.
Using the second skein we kept aside, make one more sleeve following the same pattern. Weave in any tails on the sleeve right away.
Attaching the Sleeves to the Body

Place the cardigan with the wrong side out and the sleeve with the right side out. Insert the sleeve through the armhole, align the edges and join them together with a sc seam.
Make sure you grab about 1/4 inch of fabric when you sc and do not go through the very edge. This will make sure our heavy sleeve holds well onto the body of the cardigan.
Finishing the Easy Crochet Cardigan
Weave in any tails left.