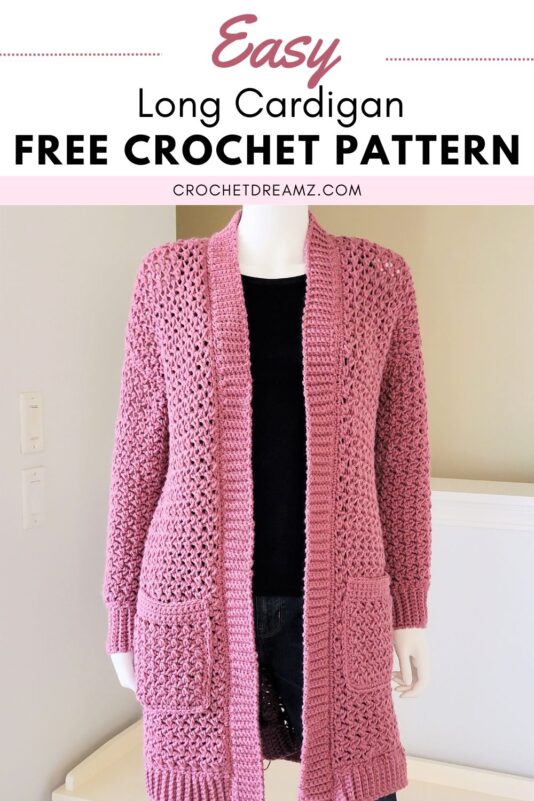
Crochet Long Cardigan Pattern, Chelsea Cardigan
Long Crochet Cardigan Pattern-includes a regular length version too.

This crochet long cardigan pattern has a simple construction that is easy enough for beginners. The body is worked in one piece and the sleeves, ribbing, and pockets are attached later.

I designed this to be a regular length but the stitch pattern stretched to give it a long coat length. So, I decided to write the pattern for two different lengths, a regular length that hits the upper thigh and a long version that hits above the knees.

This cardigan is comfortable for regular wear and the pockets make it even more functional. The pattern has just the right amount of ease for a classic fit.

If you have never tried making a cardigan before, this will be a great first pattern to try. The pattern includes plus size too, so women of all sizes can enjoy it. Gather your supplies and let’s get making!

Crochet Long Cardigan Pattern
Materials
1. Big Twist Soft yarn in color Rose. It is a worsted-weight size 4 medium-weight yarn.
2. K (6.5mm) hook for the main body and H (5)mm hook for the ribbing. Use any size hook to attain gauge.
3. Tapestry needle to weave in the ends
4. Stitch markers
Finished Sizes For Long Crochet Cardigan Pattern
Notes
1. The sizing guide is given in the order S (M, L) (XL, 2XL, 3XL)
2. The cardigan stretches by 4-6 inches in length when worn, The finished length when worn is given below.
To fit bust: 34 (38, 42) (46, 50, 54)”
Back Width: 20.5 (22.5, 24) (26, 28, 29.5)”
Armhole: 7 (7, 8) (8, 9, 9)”
Sleeve Length: 17″ for all the sizes
Length (Regular Version): 29.5 (29.5, 30.5) (31.5, 31.5, 31.5)” when worn
Length (Long Version): 36 (36, 36) (37, 37, 37)” when worn
Yardage
Each skein of Big Twist Soft yarn is 320 yards long. The yardage given is for the longer version. The regular length version will take 1/2 skein less than the longer version.
S: 5 skeins
M: 5.5 skeins
L: 6 skeins
XL: 7 skeins
2XL: 7 skeins
3XL: 7.5 skeins
Stitch Abbreviations
The pattern is written in US crochet terms.
ch: chain
sc: single crochet
sk: skip
YO: yarn over
RS: Right side of crochet fabric
WS: wrong side of crochet fabric
Stitch Explanations
SHD (single half double decrease): Insert your hook into the next st and pull up a loop, YO, and pull up a loop in the next st, YO, and pull through all the 4 loops on your hook to complete your SHD. It is like a single crochet and a half double crochet stitch joined together.
BLO (back loop only): You will insert your hook only under the back loop when working a st and not under both the loops as shown in the picture below.

Gauge
Pattern for Gauge Swatch
With K (6.5mm)hook, ch 23 and follow Rows 1-3 of the back panel. Keep repeating Row 3 until your piece measures 6-1/2 inches and then measure for gauge.
6 Repeats and 11 Rows= 4-1/4 inches
Each repeat is made up of one SHD and ch 1.
You might also like these free crochet cardigan patterns:
Easy 7 Hour Crochet Cardigan for Beginners
Crochet Blanket Cardigan Free Pattern
Easy Crochet Baby Cardigan Pattern Free
Long Cardigan Crochet Pattern
Pattern Overview
1. First, the back panel is worked bottom-up and the front panels are worked as a continuation of the back panel. We will then seam the sides leaving a gap for the armhole.
2. The sleeves are worked separately and stitched into a tube before attaching it to the body.
3. The bottom ribbing, collar, and pockets are all made separately and attached to the cardigan.
4. The smaller hook is only used for the ribbing and for working a sc row along the hemline and front opening before attaching the ribbing.
How to join a new skein of yarn
Note: You will have to join a new skein in the middle of your work. You can either choose to join a new skein at the end of a row or in the middle of a row.
Joining a new skein while working your last sc: Start working the sc as usual and when you have 2 loops left on your hook, YO and pull through the new skein of yarn.
Joining a new skein while working an SHD: Start the SHD as usual and once you have 4 loops on your hook, YO and pull through the new skein of yarn.
Back Panel
The back panel is worked bottom-up and is a simple rectangle. The length of your foundation chain will determine the width of the back panel.
Pattern Notes
The numbers given at the end of the rows in blue color are the end-of-row stitch counts. The stitch counts are given in the order S (M, L) (XL, 2XL, 3XL)
With the K (6.5mm)hook, ch 59 (65, 69) (75, 81, 83). The initial chain is a multiple of 2+1.
Row 1: SHD across 3rd and 4th ch from hook, *(ch 1, SHD over next 2 ch), repeat from * across to last ch, ch 1, 1 sc in last ch, turn. See Stitch Explanation above to learn how to work an SHD. 28 (31, 33) (36, 39, 40)repeats
Note: See the pic 1 below to learn where to insert your hook to work SHD in the following rounds.

Row 2: Ch 2 (does not count as a st here and throughout), SHD over first sc and next ch-1 space, *(ch 1, SHD over next SHD and next ch-1 space), repeat from * across to last SHD, ch 1, sk last SHD, sc on top of skipped ch 2, turn. 28 (31, 33) (36, 39, 40)repeats
Row 3: Ch 2, SHD over first sc and next ch-1 space, *(ch 1, SHD over next SHD and next ch-1 space), repeat from * across to last SHD, ch 1, sk last SHD, sc on top of beginning ch 2, turn. 28 (31, 33) (36, 39, 40)repeats
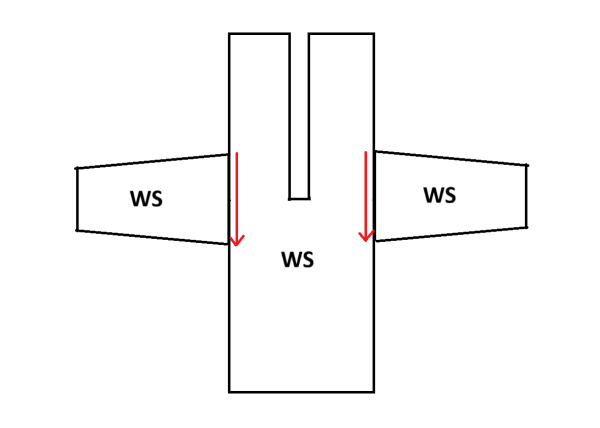
Keep repeating row 3 until you have 57 (57, 59), (61, 61, 61)Rows for the regular length version and 70 (70, 70), (72, 72, 72)Rows for the long version. The cardigan will stretch by 4-6 inches when worn, so your work may appear shorter now. Do not fasten off. See how to count rows in pic 2 given below.

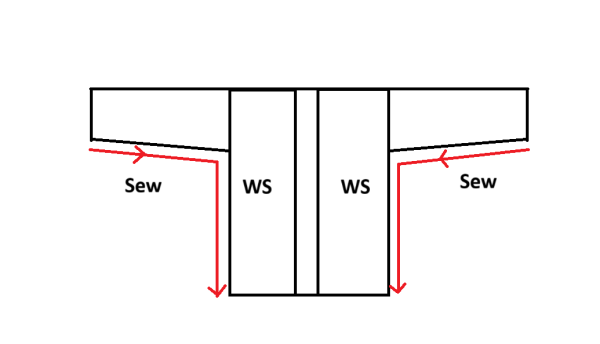
First Front Panel
Note: The front panel is worked as a continuation of the back panel as shown in pic 3 below.

Row 1: Ch 2, SHD over first sc and next ch-1 space, *(ch 1, SHD over next SHD and next ch-1 space), repeat from * until you have completed 12 (13, 14) (16, 17, 18) SHD, ch 1, sc into the space right after the next SHD, turn. 12 (13, 14) (16, 17, 18) SHD
Note: Place a marker anywhere on the first row you just completed. It will help you count the rows of the front panel.
Row 2: Ch 2, SHD over first sc and next ch-1 space, *(ch 1, SHD over next SHD and next ch-1 space), repeat from * across to last SHD, ch 1, sk last SHD, sc on top of beginning ch 2, turn. 12 (13, 14) (16, 17, 18) SHD
Repeat Row 2 above until your front panel measures the same length as the back panel. When you fold it over the back panel, the hemlines should match in length.
The front panel may have fewer rows compared to the back panel as it will stretch more than the back panel. Once you have made sure the front and back panels are the same length, you can fasten off.
Second Front Panel

Row 1: Look at the top of the Row and skip a total of 7 (9, 9) (7, 9, 7) sts and chs from the first front panel, sl st into the next st, ch 1, SHD across the first st and the next ch-1 space, *(ch 1, SHD over next SHD and next ch-1 space), repeat from * across to last SHD, ch 1, sk last SHD, sc on top of beginning ch 2, turn. 12 (13, 14) (16, 17, 18) SHD
Row 2: Ch 2, SHD over first sc and next ch-1 space, *(ch 1, SHD over next SHD and next ch-1 space), repeat from * across to last SHD, ch 1, sk last SHD, sc on top of beginning ch 1, turn. 12 (13, 14) (16, 17, 18) SHD
Repeat Row 2 above until your second front panel has the same number of rows as your first front panel. Fasten off and work on the sleeves.
Sleeves (Make 2)

Note: The sleeves are worked flat. You start working from the top of the sleeve to the wrist part and then work the ribbing as a continuation of the sleeves.
Ch 43 (43, 49) (49, 55, 55)
Row 1: SHD across 3rd and 4th ch from hook, *(ch 1, SHD over next 2 ch), repeat from * across to last ch, ch 1, 1 sc in last ch, turn. 20 (20, 23) (23, 26, 26) SHD
Row 2: Ch 2 (does not count as a st here and throughout), SHD over first sc and next ch-1 space, DO NOT ch 1, SHD over next SHD and next ch-1 space, DO NOT ch 1, SHD over next SHD and next ch-1 space, *(ch 1, SHD over next SHD and next ch-1 space), repeat from * until you have completed 18 (18, 21) (21, 24, 24) SHD in total, DO NOT ch 1, SHD over next SHD and next ch-1 space, DO NOT ch 1, SHD over next SHD and next ch-1 space, ch 1, sk last SHD, 1 sc on top of skipped ch 2, turn. 20 (20, 23) (23, 26, 26) SHD
Row 3: Ch 2, SHD over first sc and next ch-1 space, ch 1, SHD across next 2 sts, *(ch 1, SHD over next SHD and next ch-1 space), repeat from * until you have completed 17 (17, 20) (20, 23, 23) SHD, ch 1, SHD in next 2 sts, ch 1, sc on top of beginning ch 2, turn. 18 (18, 21) (21, 24, 24)SHD
Row 4: Ch 2, SHD over first sc and next ch-1 space, *(ch 1, SHD over next SHD and next ch-1 space), repeat from * across to last SHD, ch 1, sk last SHD, sc on top of beginning ch 2, turn. 18 (18, 21) (21, 24, 24) SHD
Repeat Row 4 until your sleeve measures 5.5 (5.5, 6.5) (6.5, 7, 7)” long. Then repeat Rows 2 and 3 once to end in 16 (16, 19) (19, 22, 22)SHD
Now keep repeating Row 4 until your sleeve measures approximately 13-1/2 inches.
Last Row: Ch 1, 1 sc in first sc, 1 sc in each st, and ch-1 space across to last SHD, sk last SHD, sc on top of beginning ch-2. Do not fasten off. 33 (33, 39) (39, 45, 45)sc
Sleeve Ribbing

Switch to the smaller H (5 mm) hook and continue with the working yarn.
Row 1 (see pic 6 above): Ch 11, 1 sc in 2nd ch from hook and next 9 chs, sl st into the same st where you started the long chain, sl st to the next free st on the sleeve edge, ch 1 and turn. (10 sc)
Row 2: Sk the first 2 sl sts, 1 sc in BLO of next 9 sts across to last st, 1 sc in both loops of last st, ch 1 and turn. (10 sc)
Row 3: 1 sc in BLO of first st, 1 sc in BLO of next 9 sts, sl st into the next 2 sts on the sleeve edge, ch 1 and turn. (10 sc)
Repeat Rows 2 and 3 until you end with a sl st in the very last st on the sleeve. Fasten off.
Attaching the Sleeve to the Body
Place the sleeves on either side of the shoulders, making sure the cardigan and the sleeves have the wrong side (WS) facing up (see pic 7 above). You can choose the side that is less appealing to you as your wrong side.
Make sure the center of the sleeve lines up with the point where the front panel begins, and that your sleeves are even on both the front and back panels. Use a few stitch markers to keep your sleeve in place as you join the sleeves to the body with a whip stitch.

When whip stitching, grab about 1/4 inch of fabric instead of sewing through the very edge. This will help the heavy sleeve hold securely to the body of the cardigan.
Finally, fold your cardigan so that the back and front panels are on top of each other, RS touching each other. Seam from the cuffs to the underarm and down the side of the cardigan with a slip stitch seam. You can also use a tapestry needle to whip stitch if you prefer.
Bottom Ribbing
Prepping for the Ribbing
1. Before adding the bottom ribbing, we will use the smaller hook H(5mm) to work a Row of sc along the base of the cardigan.
2. This sc row should be worked on the RS of the cardigan, where the seam is not visible.
3. You will work over any yarn tails left here to weave them in as you go.
4. The ribbing is worked as a strip and then whip-stitched onto the cardigan. This method is much easier than working it directly onto a heavy cardigan and turning after every few stitches.
Sc Row: The front panel edges will have actual sts and chs to work into. Start at the corner of the front panel and work 1 sc into each st or ch across until you hit the side seam, 1 sc in the seam. On the back panel, work 2 sc under each SHD across, 1 sc in the side seam, 1 sc in each st and ch of the front panel. Fasten off.
Bottom Ribbing Pattern
With H(5mm) hook, ch 9.
Row 1: 1 sc in 2nd ch from hook and across to end, turn.—-8 sc
Row 2: Ch 1, 1 sc in BLO of first st and next 6 sts, 1 sc in both loops of last st, turn. —–8 sc
Keep repeating Row 2 until your ribbing is almost as long as the hem of your cardigan, but keep the yarn attached.
Attaching the Ribbing to the Hem
A whip stitch is preferred for attaching the ribbing. Slightly stretch the ribbing and start attaching the ribbing from the first row of the ribbing, and not the end where you have the yarn attached. That way, you will be able to add or unravel rows at the end to make the ribbing fit. If you don’t stretch the ribbing, your hemline will look wider than the body of your cardigan. When you whip stitch, make sure your seam will be inside the cardigan.
Insert the needle 1/4 inch below the edge of the ribbing and into the sts on the hemline to whip stitch them together. Remember to slightly stretch the ribbing when you work each section. Add or unravel rows at the end as needed to make the ribbing fit. Fasten off.
Collar Ribbing
Prepping for Collar Ribbing
Note: We will work a sc row around the front opening using the smaller H (5mm) hook before attaching the ribbing.
Sc Row: On the RS of the cardigan, sl st to the bottom left of the front opening, 1 sc into each st of the bottom ribbing, 1 sc evenly distributed across the left side until you reach the back of the neck, work sc sts inserting your hook a 1/4 inch below the edge on the back of the neck to avoid leaving holes, 1 sc across the right edge until you reach the hem, fasten off.
Collar Ribbing Pattern
With H(5mm) hook, ch 8.
Row 1: 1 sc in 2nd ch from hook and across to end, turn.—-7 sc
Row 2: Ch 1, 1 sc in BLO of first st and next 5 sts, 1 sc in both loops of last st, turn. —–7 sc
Keep repeating Row 2 until your ribbing is almost as long as the front opening of your cardigan, but keep the yarn attached.
Attaching the Collar to the Front Opening
Again, a whip stitch is preferred for attaching the collar ribbing to the front opening. This time, do not stretch the ribbing. As before, start attaching the ribbing from the first row—not from the end where the yarn is still attached.
Insert the needle 1/4 inch below the edge of the ribbing and into the sts on the front opening to whip stitch them together. Add or unravel rows at the end as needed to make the ribbing fit. Fasten off.
Pockets (Make 2)
With K(6.5mm) hook, Ch 19 (19, 19) (21, 21, 21).
Row 1: SHD across 3rd and 4th ch from hook, *(ch 1, SHD over next 2 ch), repeat from * across to last ch, ch 1, 1 sc in last ch, turn. See Stitch Explanation above to learn how to work an SHD. 8 (8, 8) (9, 9, 9) SHD
Row 2: Ch 2 (does not count as a st here and throughout), SHD over first sc and next ch-1 space, *(ch 1, SHD over next SHD and next ch-1 space), repeat from * across to last SHD, ch 1, sk last SHD, sc on top of skipped ch 2, turn. 8 (8, 8) (9, 9, 9) SHD
Row 3: Ch 2, SHD over first sc and next ch-1 space, *(ch 1, SHD over next SHD and next ch-1 space), repeat from * across to last SHD, ch 1, sk last SHD, sc on top of beginning ch 2, turn. 8 (8, 8) (9, 9, 9) SHD

Keep repeating row 3 until you have completed 13 (13, 13) (15, 15, 15) Rows, ch 1 in the corner, distribute sc sts along the left edge of the pocket (see pic 10 above), ch 1 in the corner, distribute sc sts along the bottom of the pocket, ch 1 at the next corner, distribute sc sts along the right edge of the pocket, ch 1 at the corner, 1 sc in each st and ch across the top. Do not fasten off.
Now we will work back and forth just on the top of the pocket to add more sc rows as follows.
Row 1: Ch 1 at the corner and turn, 1 sc in next st and each st across the top to end, turn.
Row 2: Ch 1 (counts as a st), 1 sc in next st and each st across to end. Your last st will be on op of the beginning ch-1, turn.
Repeat Row 2 three more times and fasten off with a 2 yard tail for sewing.

Attaching the Pockets

For the regular-length version of the cardigan, attach the pockets right above the ribbing and the middle of the front panel.
For the longer version of the cardigan, attach the pockets aligning the bottom 25 to 26 inches away from the shoulder of the cardigan and the middle of the front panel.
Use the yarn tail left to sew the pocket onto the cardigan. I used a back stitch right inside the ‘V’ of the sts to leave the ‘V’ free and give the pockets a cleaner edge. You can look up YouTube videos if you have never done a backstitch or use your own preferred seaming method.
Finishing the long Crochet Cardigan Pattern
Weave in any tails left. Enjoy wearing your finished long crochet cardigan with jeans or a dress.
More Crochet Cardigan Free Patterns
Crochet Crop Cardigan with V-neck
Crochet Cardigan for Beginners
Easy and Free Crochet Baby Cardigan Pattern
Watch a web story on this long cardigan crochet pattern here.
Pin it for later: