
Brooklyn Boot Cuffs, Free Crochet Pattern


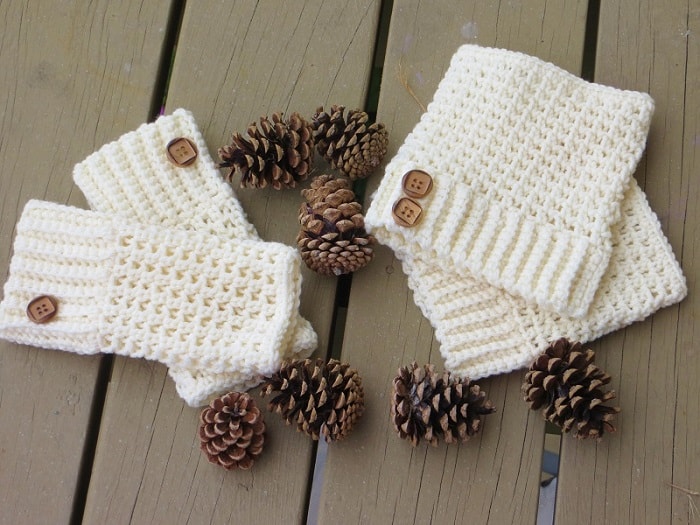


Fall is here and it is my favorite Season of the year when it is neither too hot nor too cold. I love how the leaves change colors and the gentle rustling of the winds play music in the air. I adore the sound of the word “Autumn”, as romantic as the Season itself.
Boots and cowls are my favorite accessory for Fall and what better way to jazz it up than with a pair of boot cuffs. Crochet yourself a pair and turn one pair of boots into many. They are quick to work up and can add variety to your wardrobe. The stitch used gives it a nice texture. Add to it two wooden buttons and you have a stylish accessory that can make your legs look longer.
These boot cuffs can be worked in a couple of hours. Make them with a matching pair of mittens and you have a wonderful Christmas Gift. I enjoyed photographing them as much as making them. The pine cones added the right measure of pizzazz. They looked so beautiful, I was tempted to focus more on the pine cones than the boot cuffs themselves. I hope you will enjoy sporting these boot socks as much as I did while designing them.
Crochet Pattern
Materials
1. Worsted weight ( size 4 medium) yarn
2. Hook – G (4.25mm) and F ( 3.75mm)
3. 2 Pairs of ¾ inch wooden buttons
Gauge
Using G hook, 17 sc rows worked in back loops = 4 inches
Size
Finished size:12.5 inches around and 6 inches high.
Stitch Explanation
Extended Single crochet (esc): Insert your hook into the next st and pull up a loop, yarn over and pull through one loop, yarn over again and pull through the remaining 2 loops on hook.—–1 esc completed
Work in Back loops or Front loops only: See the picture below to learn what it means to work into back loops only or front loops only. When making a regular stitch the hook is inserted under both loops as seen in 1st diagram below but inserted only into one of the loops in case you are working into the back or front loops.

Pic 1
Yardage
150 Yards for a pair of boot cuffs
Stitch Abbreviations
The pattern is in standard American terms.
sc- single crochet
esc- extended single crochet
sl st- slip stitch
ch- chain
sk- skip
sc- single crochet
esc- extended single crochet
sl st- slip stitch
ch- chain
sk- skip
All the pictures have been numbered sequentially and grouped at the end of the written pattern. You can avoid printing them if you want.
Pattern
With G hook chain 9.
Row 1: 1 sc in 2nd chain from hook and each chain across. Turn.————-8 sc
Row 2: Working in back loops only, ch 1 ( not counted as a st), 1 sc in back loop of the same st as ch 1, 1 sc in back loop of next 7 stitches. Turn.—————– 8 sc

Repeat Row 2 till your work measures 12 ½ inches. Do not stretch your band while measuring. Now slip stitch the two shorter ends together inserting your hook through the front loops of the stitches on your last row and the free loops on the very first row to form a circular band as shown in Pic 2 above. See Stitch explanation for working in front loops. I got 27 ridges in the band including the ridge formed by slip stitching the ends together. Now the rest of the boot cuff will be worked in the round.

Round 1: Ch 1( does not count as a st), proceed to work a round of sc all around the band, making 1 sc in each sc row end ( one in each ridge and trough). Sl st to the first sc. Do not turn. See Pic 3 above. ——— 54 sc
Round 2: Ch 3 ( counts as first esc and ch 1), skip 1 st, *(1 esc in next st, ch 1 , skip 1 st), repeat from * till end of the round. You would have reached the beginning ch 3, do not turn.—————- 27 esc in the round.
Note: Esc is the stitch right before it to the right and not the one right on top of it. See Pic 4 below to find out where to insert your hook to make an esc.

Round 3: Work 1 esc in to top of beginning chain 2 of previous round, place a marker in the esc you just made. The marker will show you where Round 3 started. Ch 1, *(1 esc in next esc, ch 1, sk 1 ch), repeat from * till you reach back near the marked st. Do not turn.—————- 27 esc
Round 4: 1 esc in marked st, move the marker up in to the esc you just made, ch 1, sk 1 ch, *(1 esc in next esc, ch 1, sk 1 ch), repeat from * till you reach back near the marked st. Do not turn.—————- 27 esc

Repeat round 4 till your work is 4 inches high including the ribbed band as shown in pic 5 above. Every time you reach back near the marked stitch you would have completed one round. Switch to hook F and repeat round 4 till your piece measures 6 inches.
Last Round: 1 regular sc in the next esc, sl st to the next st ( ch 1). This will even out the edges. Ch 1, 1 sc in next st and each st and ch across, sl st to beginning ch 1. Fasten off.
Make one more following the same pattern.
Finishing
Weave in any tails left and sew two wooden buttons onto the ribbed band for embellishment.
Find the matching pair of fingerless mittens here: Brooklyn Fingerless Mitts
If you love it, please share it using one of the social media buttons below. Thank you!
Check out more patterns from Crochet Dreamz: Pattern Gallery


Download site saysout of bandwidth not able to download is there another way of getting these patterns
I just fixed the bandwidth issue. You should be able to download it now. Sorry for the inconvenience.
Lovely!! My sister is asking for mitts AND boot cuffs for Christmas. These are PERFECT!!
These are so cute! Unfortunately, when I click on the link, it won't load. 🙁
-andi
Use my contact me form and I might be able to email you a copy.
Yes- These are cute :)…. BUT…Fustrating- where's the pattern???
I have a question for you. Once you are on row 3 and you are completely done with that row do you slip stitch it or do you just continue on? It doesn't tell you to slip stitch it. it just takes you into row 4.
No slip stitching at the end of rows. This is to avoid getting a seam.
I made these boot cuffs for my Granddaughter in Watertown, NY. I will be putting them in the mail today. Thank you for this great pattern.
These are very cute – but I an unable to click through to the pattern – I'm getting a "page not found" error. Can you fix this?
May be try another browser?
neat! thank-you for sharing 🙂
Hi, love the pattern! Just wondering, if you have large calves would you continue row 2 for longer than the 12.5inches? Or should it stretch enough?
It will stretch to fit but if you think your calves are extra big, add a few more rows.
great pattern!! Best boot cuff pattern ive used! Super cute too