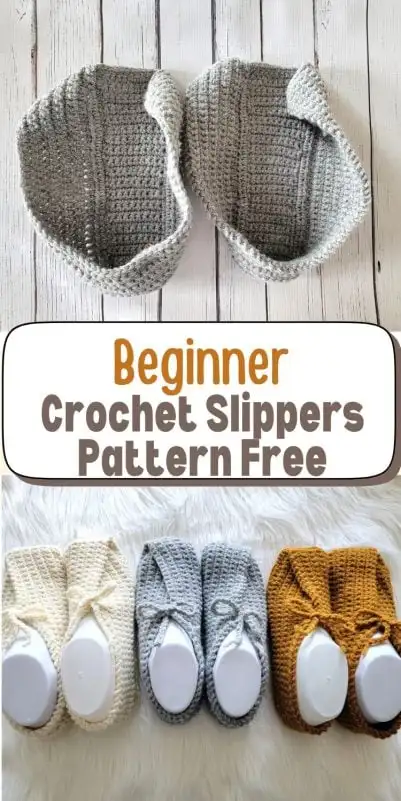
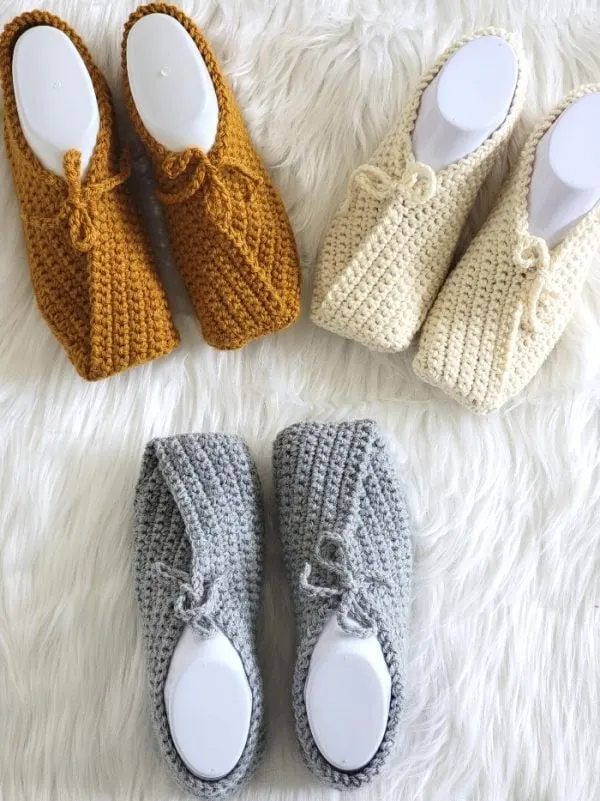
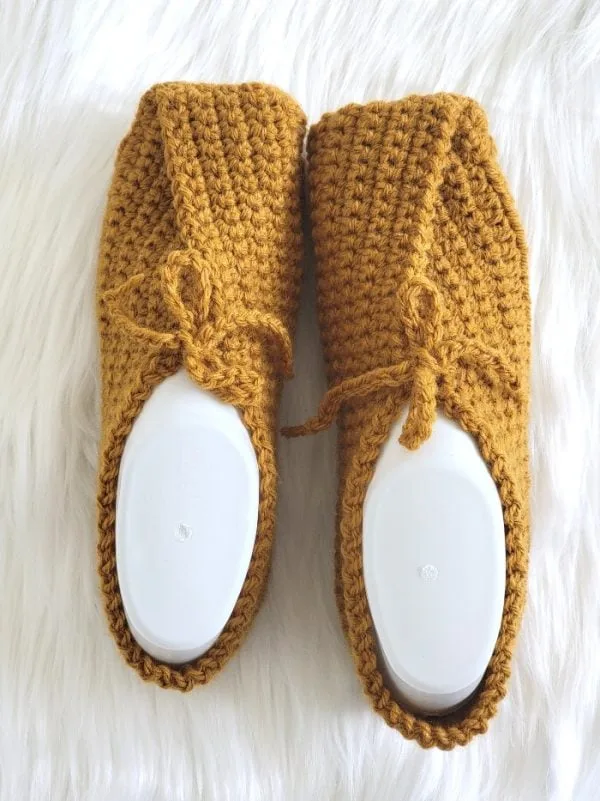
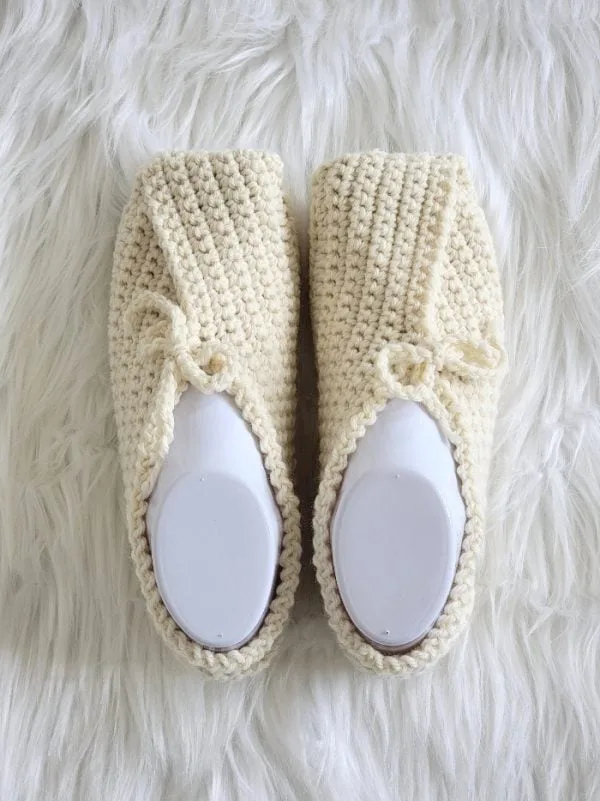
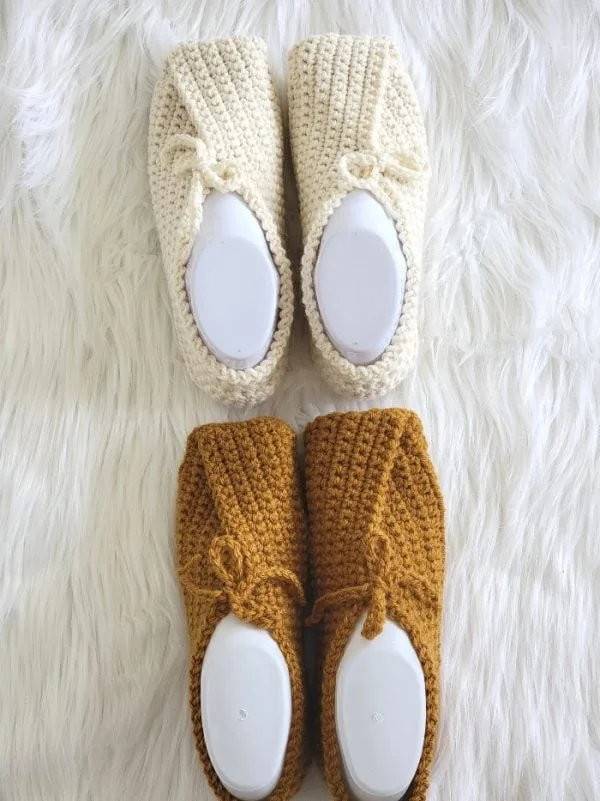
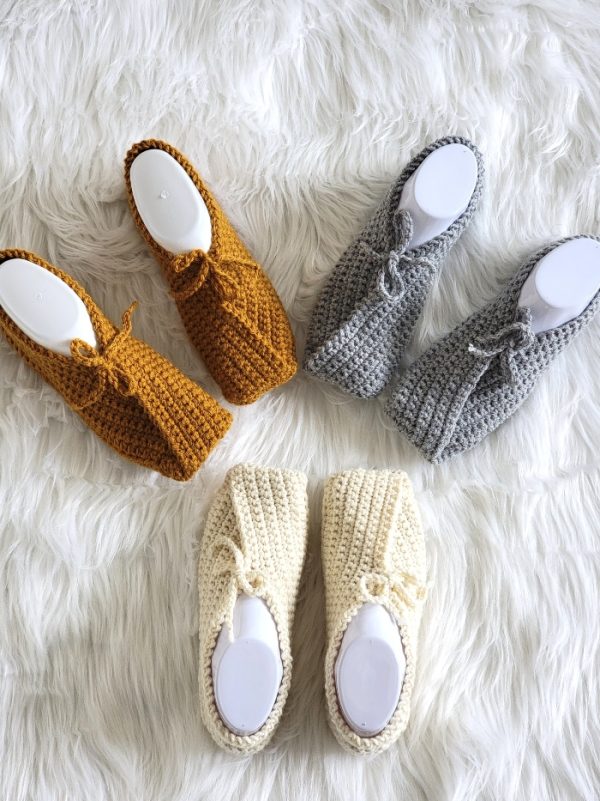
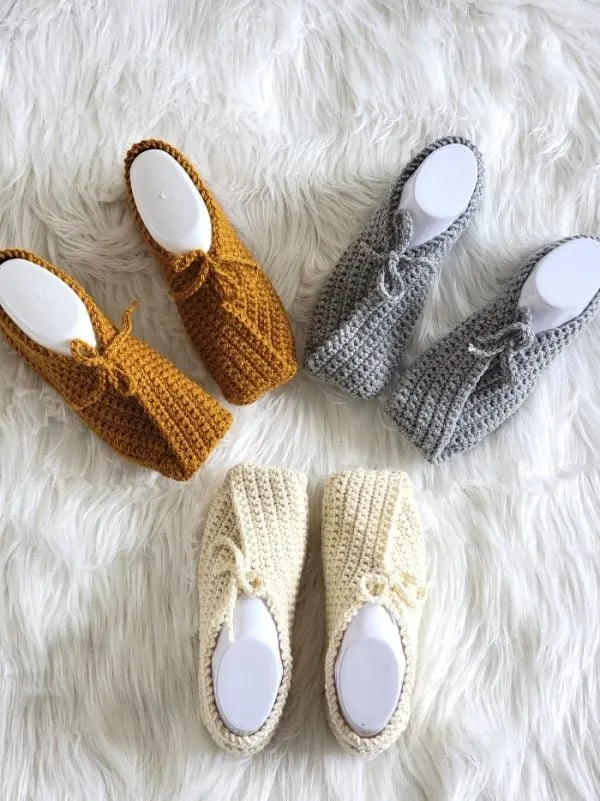
Introducing the beginner crochet slippers that makers of all skill levels can enjoy. With basic stitches and just one skein of yarn, this pattern is sure to become a favorite.


The slippers are worked flat, making the process simple and easy to follow. No complicated steps, just a relaxing project you can pick up anytime.

When the flat piece is finished, the toe side is folded and seamed. This creates a beautiful square toe design that looks both cozy and stylish.

Perfect for beginners or anyone wanting a quick project, these slippers are practical, comfortable, and fun to make. You may find yourself crocheting more than one pair.
Beginner Crochet Slippers
Pin it for later here.
Materials
1. Worsted weight (size 4 medium) yarn. Lion Brand Wool Ease in colors Arrowwood, Fisherman, and Grey Heather were used for the sample slippers.
2. Size 7 (4.5mm) hook
3. Tapestry needle to weave in the ends
4. A pair of stitch markers to mark the Right Side (RS) of the slipper. You can use a scrap piece of yarn or even a safety pin.
Finished Size
US size 5: 7-3/4″ in length
US size 6: 8″ in length
US size 7: 8-1/4″ in length
US size 8: 8-3/4″ in length
US size 9: 9″ in length
US size 10: 9-1/4″ in length
US size 11: 9-3/4″ in length
US size 12: 10″ in length
Since the sole is worked in rows, your slipper will stretch to give you wiggle room.
Gauge
15 sc X 18 rows = 4 inches
Yardage
All sizes require just 1 skein of Lion Brand Wool-Ease for a pair. Each skein has 197 yards.
Stitch Abbreviations
The pattern is in standard American terms.
ch: chain
st (sts): stitch (stitches)
sc: single crochet
sl st: slip stitch
hdc: half double crochet
YO: yarn over
RS: Right side or outside of the slipper
Stitch Explanations
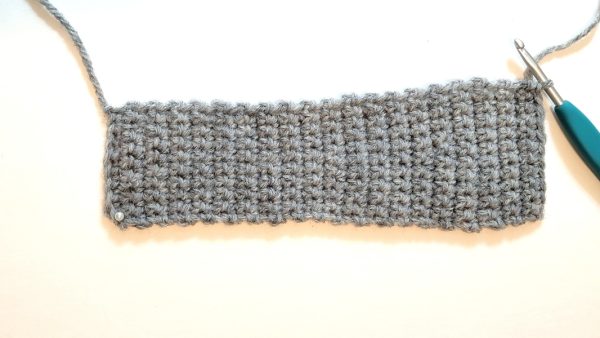
Working into the back bumps: Work your stitches into the back bumps behind the foundation chain as shown in the picture below.


sc2tog: It is a decrease worked across 2 sts to join them into one. Pull up a loop in the next 2 sts, YO, and pull through all the 3 loops on your hook to complete a sc2tog or decrease
Pattern Notes
Sizes 5, 6, 7, and 8 are grouped, and sizes 9, 10, 11, and 12 are grouped. The headlines are color-coded for ease of reading.
Sizes 5, 6, 7, and 8
Note: Stitch counts are given in the order Size 5 (6, 7, 8). If there is only one number, it pertains to all 4 sizes.
Sole Pattern

1. Finished sole
Chain 9 (9, 10, 10)
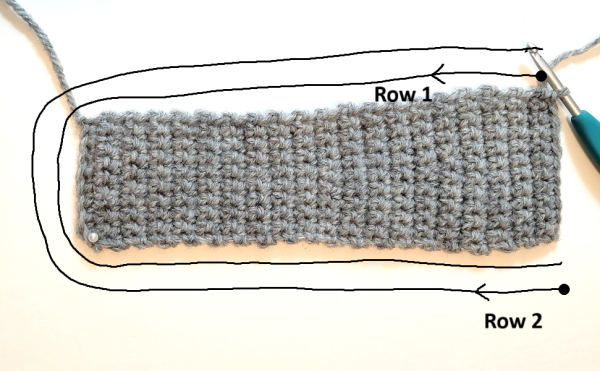
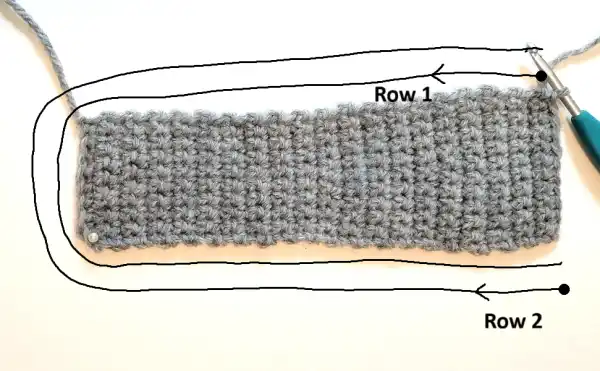
Row 1: Working into the back bumps of the chain (see stitch explanation above), 1 sc in 2nd ch from hook and each ch across to end, turn. ——-8 (8, 9, 9) sc
Row 2: Ch 1 (does not count as a st here and throughout), 1 sc in the first st and each st across to end, turn. ——8 (8, 9, 9) sc
Repeat Row 2 until you have 18 rows from the beginning or until the piece measures 4″ tall. If it is shorter or longer than 4″, add or remove a row.
Row 19 (increase Row): Ch 1, 1 sc in first 3 (3, 4, 4) sts, 2 sc in next st, 1 sc in remaining 4 sts, turn. ——-9 (9, 10, 10) sc
Row 20: Ch 1, 1 sc in the first st and each st across to the end, turn. ——-9 (9, 10, 10) sc
Repeat Row 20 until you have 28 rows from the beginning or until the piece measures 6″ tall. If it is shorter or longer than 6″, add or remove a row.
Row 29 (increase Row): Ch 1, 1 sc in first 4 sts, 2 sc in next st, 1 sc in remaining 4 (4, 5, 5) sts, turn. ——-10 (10, 11, 11) sc
Row 30: Ch 1, 1 sc in the first st and each st across to the end, turn.——-10 (10, 11, 11) sc
Repeat Row 30 until the sole measures 7-3/4 (8, 8-1/4, 8-3/4)”. DO NOT fasten off and DO NOT turn.
Upper
2. Work back and forth in a U-shape along the edge of the sole as shown
Notes
1. When working the first Row of the Upper, do not insert your hook into any big spaces along the sides, but into the body of the stitches to avoid leaving holes. It is okay to insert into tiny holes.
2. The upper is worked back and forth along the edge of the sole in a ‘U’ shape as shown in pic 2 above.
Row 1: Ch 1 at the corner and distribute 32 (33, 34, 36) sc sts along the row ends until you reach the corner at the back. You won’t have actual stitches to work into, so you can fold the sole, find the middle, and distribute about half the number of sts in each half to make distributing stitches easy, 1 sc in 8 (8, 9, 9) sc at the heel side, distribute 32 (33, 34, 36) sc sts along the row ends until you reach the corner at the front, leave the last row of sole unworked. Place a marker on this side of the slipper to indicate the RS and turn. ——72 (74, 77, 81) sts
Row 2: Ch 1, 1 sc in first st, 1 sc in next 3 sts, 1 hdc in each st until 4 sts are left, 1 sc in last 4 sts, turn. ——72 (74, 77, 81) sts
Row 3: Repeat Row 2.
Row 4: Ch 1, 1 sc in first st and each st across to end, turn. ——–72 (74, 77, 81) sts
Repeat Row 4 three more times.
Only for Sizes 5 (6)
Row 8 (decrease row): Ch 1, 1 sc in first 31 (32) sts, *(sc2tog across next 2 sts, 1 sc in next st, sc2tog across next 2 sts), repeat from * one more time, 1 sc in each remaining st across to end. ——-68 (70) sts
Only for Sizes 7 (8)
Row 8 (decrease row): Ch 1, 1 sc in first 34 (36) sts, (sc2tog across next 2 sts) 2 times, 1 sc in next st, (sc2tog across next 2 sts) 2 times, 1 sc in each remaining st across to end. ———-73 (77) sts
Continue for All 4 Sizes
Row 9: Ch 1, 1 sc in first st and each st across to end, turn. ——–68 (70, 73, 77) sts
Repeat Row 9 two more times if you are making sizes 5 or 6, and 3 more times if you are making sizes 7 and 8. You can fasten off if you are making sizes 5 and 6.
Edging
The edging should be worked on the RS of the slipper where you placed the marker earlier. For sizes 5–6, join a new yarn with a sl st in the first st of the last RS row. For sizes 7–8, simply turn and continue with the working yarn.
Edging (last row): *(Ch 1, sl st in next st), repeat from * to end, fasten off with a 25″ tail for sewing the toe side. See pic 3 below.
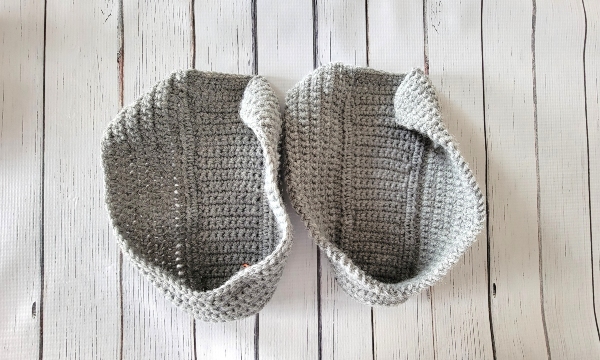
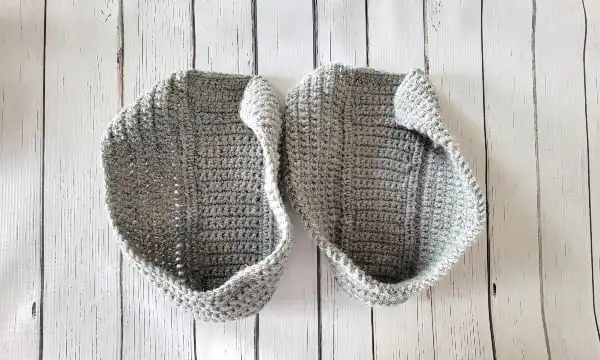
3. Soles and upper completed
Seaming The Toe
The toe should be seamed on the side where there is no marker.
Now fold your toe side into thirds and whipstitch through all 3 layers to close it. Make sure you go through the very tip of the inner middle layer. Make a second slipper following the same pattern, but fold the toe in the opposite direction when seaming as shown in pic 4 below.
4. Fold one to the left, the other to the right, and whip stitch.
Weave in the tails into this side. Insert your thumbs into the corners and turn the toe inside out.
Tie Pattern (Make 2)
Chain 54 and fasten off. Trim the beginning and ending tails to 1/2 inch.
Adding the Ties

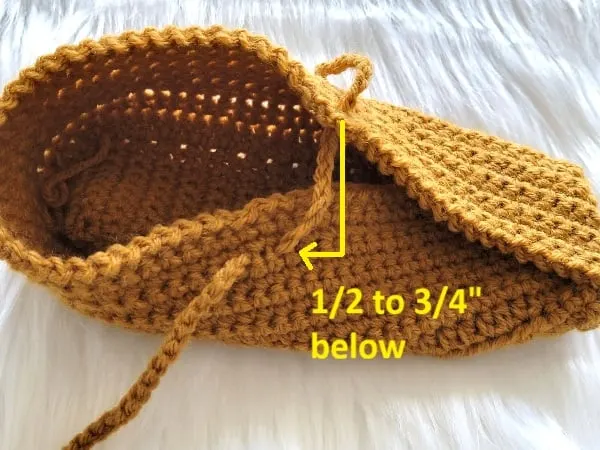
5. Insert the tie as shown
1. Measure about 4½” down from the toe side.
2. On the top layer, insert the tie from inside to outside, ¼” (1 sc row) below the edge.
3. On the bottom layer, make sure the insertion point is ½–¾” lower than the point on the top layer and insert the tie downward ½” (2 sc rows) below the edge, then bring it out after 2 sts. See pic 5 above.
Finishing
Ensure the tie is the same length on both ends and tie a little bow. Repeat on the other slipper.
Sizes 9, 10, 11, and 12
Note: Stitch counts are given in the order Size 9 (10, 11, 12). If there is only one number, it pertains to all 4 sizes.
Sole Pattern
6. Finished sole
Chain 11 (11, 12, 12)
Row 1: Working into the back bumps of the chain (see stitch explanation above), 1 sc in 2nd ch from hook and each ch across to end, turn. ———10 (10, 11, 11) sc
Row 2: Ch 1 (does not count as a st here and throughout), 1 sc in the first st and each st across to the end, turn. ——10 (10, 11, 11) sc
Repeat Row 2 until you have 20 rows from the beginning or until the piece measures 4-1/2″ tall. If it is shorter or longer than 4-1/2″, add or remove a row.
Row 21 (increase Row): Ch 1, 1 sc in first 4 (4, 5, 5) sts, 2 sc in next st, 1 sc in remaining 5 sts, turn. ——-11 (11, 12, 12) sc
Row 22: Ch 1, 1 sc in the first st and each st across to the end, turn. ——-11 (11, 12, 12) sc
Repeat Row 22 until you have 30 rows from the beginning or until the piece measures 6-1/2″ tall. If it is shorter or longer than 6-1/2″, add or remove a row.
Row 31 (increase Row): Ch 1, 1 sc in first 5 (5, 6, 6) sts, 2 sc in next st, 1 sc in remaining 5 sts, turn. ——-12 (12, 13, 13) sc
Row 32: Ch 1, 1 sc in the first st and each st across to the end, turn.——-12 (12, 13, 13) sc
Repeat Row 32 until the sole measures 9 (9-1/4, 9-3/4, 10)”. DO NOT fasten off and DO NOT turn.
Upper
7. Work back and forth in a U-shape along the edge of the soul as shown
Notes
1. When working the first Row of the Upper, do not insert your hook into any big spaces along the sides, but into the body of the stitches to avoid leaving holes. It is okay to insert into tiny holes.
2. The upper is worked back and forth along the edge of the sole in a ‘U’ shape as shown in pic 7 above.
Row 1: Ch 1 at the corner and distribute 37 (38, 40, 41) sc sts along the row ends until you reach the corner at the back. You won’t have actual stitches to work into, so you can fold the sole, find the middle, and distribute about half the number of sts in each half to make distributing stitches easy, 1 sc in 10 (10, 11, 11) sc at the heel side, distribute 37 (38, 40, 41) sc sts along the row ends until you reach the corner at the front, leave the last row of sole unworked. Place a marker on this side of the slipper to indicate the RS and turn. ——84 (86, 91, 93) sts
Row 2: Ch 1, 1 sc in first st, 1 sc in next 3 sts, 1 hdc in each st until 4 sts are left, 1 sc in last 4 sts, turn. ——84 (86, 91, 93) sts
Row 3: Repeat Row 3.
Row 4: Ch 1, 1 sc in first st and each st across to end, turn. ——–84 (86, 91, 93) sts
Repeat Row 4 four more times.
Only for Sizes 9 (10)
Row 9 (decrease row): Ch 1, 1 sc in first 37 (38) sts, *(sc2tog across next 2 sts, 1 sc in next st, sc2tog across next 2 sts), repeat from * one more time, 1 sc in each remaining st across to end. ——-80 (82) sts
Only for Sizes 11 (12)
Row 9 (decrease row): Ch 1, 1 sc in first 40 (41) sts, *(sc2tog across next 2 sts, 1 sc in next, sc2tog across next 2 sts, 1 sc in next st), repeat from * one more time, 1 sc in each remaining st across to end. ———-87 (89) sts
Continue for All 4 Sizes
Row 10: Ch 1, 1 sc in first st and each st across to end, turn. ——–80 (82, 87, 89) sts
Repeat Row 10 three more times if you are making sizes 9 or 10, and 4 more times if you are making sizes 11 or 12. You can fasten off if you are making sizes 9 or 10.
Edging
The edging should be worked on the RS of the slipper where you placed the marker earlier. For sizes 9 or 10, join a new yarn with a sl st in the first st of the last RS row. For sizes 11 and 12, simply turn and continue with the working yarn.
Edging (last row): *(Ch 1, sl st in next st), repeat from * to end, fasten off with a 25″ tail for sewing the toe side. See pic 8 below.
8. Soles and upper completed
Seaming The Toe
9. Fold one to the left, the other to the right, and whip stitch.
The toe should be seamed on the side where there is no marker.
Now fold your toe side into thirds and whipstitch through all 3 layers to close it. Make sure you go through the very tip of the inner middle layer. Make a second slipper following the same pattern, but fold the toe in the opposite direction when seaming as shown in pic 9 above.
Weave in the tails into this side. Insert your thumbs into the corners and turn the toe inside out.
Tie Pattern (Make 2)
Chain 54 and fasten off. Trim the beginning and ending tails to 1/2 inch.
Adding the Ties
10. Insert the tie as shown
1. Measure about 4-3/4″ down from the toe side.
2. On the top layer, insert the tie from inside to outside, ¼” (1 sc row) below the edge.
3. On the bottom layer, make sure the insertion point is ½–¾” lower than the point on the top layer and insert the tie downward ½” (2 sc rows) below the edge, then bring it out after 2 sts. See pic 10 above.
Finishing
Ensure the tie is the same length on both ends and tie a little bow. Repeat on the other slipper.
More Crochet Slipper Patterns:
1.5 Hour Chunky Crochet Slipper
Pin it for later: