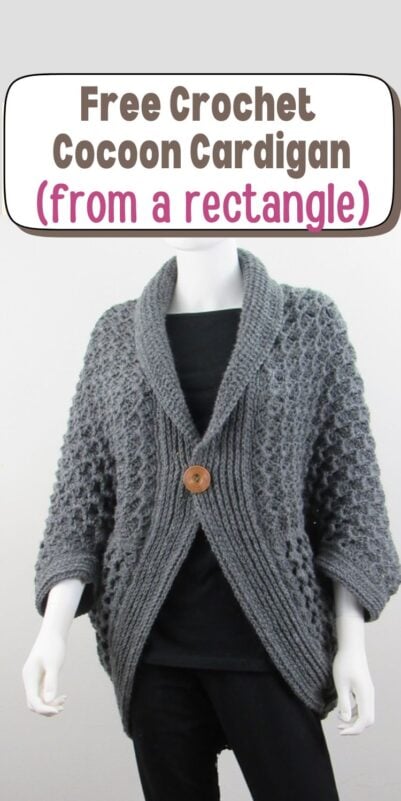
Crochet Blanket Cardigan Pattern, 2 Sleeve Options
Crochet blanket cardigan – with beginner-friendly shaping!

After the great response I received to my 7 Hour Cocoon Cardigan, I decided to design another Ccochet blanket cardigan pattern.

A textured bodice and a collar make this sweater classy. The pattern includes options for a 3/4th sleeve as well as a full sleeve.

I used the soft, luxurious, and affordable Wool-Ease yarn from Lion Brand in the color Oxford Grey for this pattern. It comes in so many stunning shades, you won’t have any trouble finding the one you like.

Lion Brand Wool-Ease comes in 2 thicknesses, a worsted weight one that I used here and a super bulky one called Wool-Ease Thick and Quick. Make sure you pick the one that is marked size 4 Medium.

Crochet Blanket Cardigan Pattern
Materials
1. Light worsted weight (size 4) yarn. The sample cardigan was made using Lion Brand Wool-Ease in the color Oxford Grey.
2. Hook J (6 mm) and a smaller hook H (5mm)for the collar
Use any size hook to attain gauge.
3. One large 1 ½ inch wooden button.
4. Yarn needle to weave in the tails.
Finished Size
Note: The width is measured from sleeve to sleeve without including the ribbed cuff for both the 3/4th and full sleeve versions.

The length is measured from the shoulder to the bottom of the cardigan when worn.
XS/S – 35″ long X 36″ wide
M – 36″ long X 38″ wide
L -36″ long X 39″ wide
XL – 38″ long X 40″ wide
XXL – 38″ long X 42″ wide
Pattern for Gauge
Chain 38 and follow rows 1 to 3 of the pattern. Keep repeating Row 3 until your piece measures 5 ½ inches. Then measure for gauge.
The length of the foundation chain will determine the height of your cardigan. Due to the stretchy nature of the stitch, it can be hard to measure the width of the fabric once you crochet many rows. So make sure you choose a hook that meets the gauge.
Measuring Gauge

Using J(6mm) Hook,
6 Bumps = 7 inches.
4 Bumpy lines(8 Rows)= 4 inches
Each couple of rows adds a bumpy line and 1 inch to your fabric. Use any size hook to attain gauge.
Yardage
Lion Brand Wool-Ease, worsted weight yarn in color Oxford Gray was used for the cardigan. Each skein is 197 yards. If you want to substitute this yarn with another, multiply the number of skeins by 197 to find the total yards required.
XS/S– 10 Skeins
M -11 Skeins
L -11 Skeins
XL -12 Skeins
2XL– 12 Skeins
Stitch Abbreviations
The pattern is written in Standard American terms.
ch-chain
sk– skip
sl st– slip st
fpsc– front post single crochet
sc– single crochet
dc– double crochet
Stitch Explanation
1.Front Post Single Crochet: It is worked as regular single crochet except for the way you insert your hook. See a tutorial for front post double crochet on my blog here, the hook is inserted in the same way for a front post single crochet: Front Post Double Crochet Tutorial.
2. Sc2tog: It is a decrease that joins 2 stitches into one. (Insert your hook into the next st and pull up a loop)twice, Yarn over and pull through all the 3 loops on your hook.—–sc2tog completed
Related Crochet Cardigan Patterns
7 Hour Beginner Crochet Cardigan Pattern Free
Free Lacy Cardigan Crochet Pattern
Crochet Blanket Cardigan Free Pattern
Notes
1. The pattern is worked sideways from sleeve to sleeve.
2. You will first make a big rectangle, fold and sew it to make holes for the sleeve. Then you will finish it by adding ribbing to the sleeves and to the collar.
3. Stitch counts for bigger sizes are given in brackets in the order XS/S( M, L, XL, 2XL).
4. It is crucial to check your gauge for this pattern as it is difficult to measure a stretchy fabric once it gets bigger.
Leave a 1 yard-tail for sewing and ch 110 (114, 114, 122, 122).
Row 1: Work all the sts of this row into the back bumps of your foundation chain. 1 sc in the 2nd ch from hook and each ch across.———109 (113, 113, 121, 121)sts
Row 2: Ch 3(counts as first dc here and throughout), 2 dc in the same st as ch 3, *[sk 3 sts, (1sc, ch 3, 3dc) all into the next st], repeat from * until 4 sts left, sk 3 sts, 1 sc in last st, turn. ————27(28, 28, 30, 30)projections or dc groups

Note: Once you work the fpsc, your ch-3 loop will get pushed behind as shown above. So look behind the fpsc to find the ch-3 loop adjacent to it.

Row 3: Ch 3, 2 dc in the same st as ch 3, *[sk 2 dc, fpsc in next dc, ch 3, 3 dc in the adjacent ch-3 space], repeat from * and after 3 dc in last ch-3 space, sk next 2 dc, fpsc around beginning ch 3, turn.———27(28, 28, 30, 30)projections or dc groups
The length of your strip will be 32(33, 33, 35, 35) inches. The ribbed border will add another 3 inches to the length.

Repeat Row 3 until you have 34(36, 37, 38, 40)bumpy lines not counting the first and the last dc rows which look flat. That is, you will have 70(74,76, 78, 82) rows in total. Each bumpy line is made up of 2 rows.

Leveling Row: Ch 3, 2 dc in the same st as ch 3, *(sk 1 dc, 1 sc in next 2 sts, 2 sc in next ch loop), repeat from * and after 2 sc in last ch loop, sk 1 dc, 1 sc in the last 2 sts. Fasten off with a 1 yard tail for sewing. ——–109 (113, 113, 121, 121)sts
Crochet Blanket Cardigan Pattern Shaping (All sizes)
Note: You should sew the seam on the wrong side of the cardigan. You can pick whichever side you want as your right side.


Place the rectangle flat with the wrong side up, and fold the shorter sides inwards until the ends touch each other as shown above. Leave a 7(7, 7.5, 8, 8)inch opening for the armholes and whip stitch the rest of the sides shut using the yarn tails left.
Collar Ribbing for Crochet Blanket Cardigan(All sizes)
Note:
1. It is worked on the right side of your work using the smaller hook H(5mm)
2. The collar will widen at the neck area after a few rows.
3. Use different colored markers or yarn scraps to avoid getting confused between the markers as you will be working in a spiral without slip stitching at the end of the rounds.


Round 1: Sl st the yarn at mid-back as shown in pic 9 above, *(work 3 sc in each of the big chain loop and 1 sc in each of the small ch loop across as shown in pic 10 above), repeat from *, when you reach the sleeve seam, work 2 sc into the seam and continue the repeat given in brackets to the end, sl st to the first sc.——–292 (308, 316, 324, 340) sts
Round 2: Ch 1, 1 hdc in same st as ch 1, 1 hdc in each st to last st, 2 hdc in last st, do not sl st and do not turn.

Note: The third loop of the hdc is a horizontal bar found behind the stitch. Working into this bar will push the “V” of your stitch to the front to create that knit look for your collar. See pic above to find out which loop to work into.
Round 3: 1 hdc in third loop of next hdc, place a marker in this st, 1 hdc in 3rd loop of each st across until you end in the st right before the marked st, do not sl st and do not turn.
Round 4: 1 hdc in third loop of marked st, move the marker up into the st you just made, 1 hdc in 3rd loop of each st across until you end in the st right before the marked st, do not sl st and do not turn.

Repeat Round 4 until your collar measures 2 1/2 inches from the base of the first hdc round. Now you will mark for the wider collar part and for the buttonhole. Fold the rectangle in half with the sleeve holes on either side as shown in pic above, place a marker at the midpoint of the neck side. It won’t align with the marker you placed at the back of the cardigan as that would have moved by now.
Measure 17( 17 1/2, 17 1/2, 18, 18)inches on either side of the midpoint and mark this point using a pair of different colored markers or yarn scraps. Your ribbing will be made wider with dc sts between these two markers to form a wide collar.
Now measure 2 inches from the left marker and place one more marker in a different color for the buttonhole. You can now take off the marker (red marker in the pic above) you placed in the middle. It was only placed to help you position the markers for the collar. You will now have 2 markers for the collar, one for the buttonhole and one you placed at the mid-back when you started.
Buttonhole Round: 1 hdc in third loop of marked st, move the marker up into the st you just made, 1 hdc in 3rd loop of each st across until you reach the marker for the buttonhole, ch 2, sk 3 sts, 1 hdc in 3rd loop of next st and each st across until you reach the first marker for the collar, 1 dc in 3rd loop of the marked st, move the marker up, 1 dc in 3rd loop of each st until you end in next marked st, move the marker up, 1 hdc in 3rd loop of each st until you end in the st right before the marked st at mid-back, do not sl st and do not turn.
Note: You can take out your marker for the buttonhole now. The 3rd loop of a dc st will be a small loop stuck behind the st on the left side.
Next Round: 1 hdc in third loop of marked st, move the marker up into the st you just made, 1 hdc in 3rd loop of each st across until you reach the ch 2 loop for the buttonhole, 3 hdc into the loop, 1 hdc in 3rd loop of next st and each st across until you reach the first marker for the collar, 1 dc in 3rd loop of the marked st, move the marker up, 1 dc in 3rd loop of each st until you end in the next marked st, move the marker up, 1 hdc in 3rd loop of each st until you end in the st right before the marked st at mid-back, do not sl st and do not turn.
Next Round: 1 hdc in third loop of marked st, move the marker up into the st you just made, 1 hdc in 3rd loop of each st across until you reach the first marker for the collar, 1 dc in 3rd loop of the marked st, move the marker up, 1 dc in 3rd loop of each st until you end in the next marked st, move the marker up, 1 hdc in 3rd loop of each st until you end in the st right before the marked st at mid-back, do not sl st and do not turn.
Note: The last round is a full sc round and has no dc sts in the collar area. So you can take out the markers for the collar now.
Last Round: 1 sc in 3rd loop of marked st, 1 sc in the third loop of each st across until you end in the st right before the marked st at the mid-back, sl st to the third loop of marked st, sl st to first sc, fasten off.
Sleeve Ribbing for 3/4th sleeves (All sizes)
Note: It is worked on the right side of your work using the smaller hook H(5mm).
Round 1: Sl st to the seam at the base of the armhole, ch 1, 1 sc in each st around the opening, sl st to first sc, do not turn.——48(48, 52, 55, 55)sts
Repeat Round 2-4 for the collar ribbing once. Then repeat Round 4 one more time.
Round 6: 1 sc in third loop of marked st, move the marker up into the st you just made, 1 sc in 3rd loop of each st across until you end in the st right before the marked st, sl st to third loop of marked st, sl st to next sc, fasten off. Repeat for the other sleeve.
Sleeve Ribbing for Full Sleeve( All Sizes)- Make 2
Notes
1. The ribbing for the full sleeve is worked separately and attached to the cardigan as I wanted the ribbing to run vertically.
2. The ribbing is made from a combination of sc and sl stitches. To make sure you work your sl sts loose, pull up the loop on your hook each time before you work your sl st. Alternatively, you can switch to the next size hook for only your sl st rows.
3. The finished cuff is 7(7, 7.5, 8, 8) inches long.
4. The sleeve hole left is first decreased in size before adding the cuff. This will give a nice shape to your sleeves.
5. Gauge: 15 sts in 4 inches
Row 1: Using J (6mm) hook, ch 27(27, 29, 31, 31), work all the sts of this row into the back bumps of the foundation chain, 1 sc in 2nd ch from hook and each ch across until 5(5, 6, 7, 7) sts are left, 1 hdc in the remaining 5 sts, turn.—–26 (26, 28, 30, 30)sts
Row 2: Do not ch 1, pull up the loop on your hook to loosen it, sl st into the very first st and each st across to end, turn.——-26 (26, 28, 30, 30)sts
Note: Look behind your work to find the sl st. The sl st will be stuck behind your work. It will be hard to see your last sl st, just stick your hook into one of the loops and complete your last sc.
Row 3: Ch 1 ( not counted as a st here and throughout), 1 sc in same st as ch 1, 1 sc in each st until 6 sts left, 1 hdc in last 5(5, 6, 7, 7) sts, turn.——–26 (26, 28, 30, 30)sts
Row 4: Repeat row 2.
Row 5: Ch 1 ( not counted as a st here and throughout), 1 sc in same st as ch 1, 1 sc in each st across to end, turn.———26 (26, 28, 30, 30)sts
Repeat rows 4 and 5 until your work on the narrower side measures 8(8, 9, 10, 10) inches and you end in a sl st row. The narrow side is the one that has no hdc.
Next Row (sc+hdc row): Ch 1 ( not counted as a st here and throughout), 1 sc in same st as ch 1, 1 sc in each st until 5 (5, 6, 7, 7) sts left, 1 hdc in these few sts left, turn.———-26 (26, 28, 30, 30)sts
Next Row( sl st row): Do not ch 1, pull up the loop on your hook to loosen it, sl st into the very first st and each st across to end, turn.———26 (26, 28, 30, 30)sts
Repeat the above sc+ hdc row one more time. Your piece will measure 9 (9, 10, 11, 11) inches on the narrow side, 10(10, 11, 12, 12) inches on the wide side and 7(7, 7.5, 8, 8)inches long
Fasten off with a 1 1/2 -yard long tail for sewing. Working on the wrong side, whip stitch the cuff into a tube with the yarn tail left. Do not trim the tail yet. Keep it aside and work on the sleeve hole.
Decreasing the Armhole for Attaching the Cuff for Full Sleeve
Round 1: Using I(6 mm) hook, working on the right side of the cardigan, sl st at the sleeve seam, ch 1, 1 sc at the seam, (sc2tog)5 times, 1 sc in next 9(9, 11, 12, 12) sts, (sc2tog)5 times, 1 sc in next 8(8, 10, 12, 12) sts, (sc2tog)5 times, sl st to first sc, do not turn.—–33 (33, 37, 40, 40) sc
Round 2: Ch 1, 1 sc in each st across, sl st to first sc, fasten off.
The armhole would now be 10(10, 11, 12, 12)inches in circumference.
Attaching the Cuff to DIY Crochet Blanket Cardigan


Make sure your sleeve cuff is right side out. With the wider side of the tube on top, insert the cuff into the armhole from the wrong side of the sweater, align the seams of the cuff and the cardigan, whip stitch them together all the way around using the yarn tail left on the cuff, knot to secure and trim the tail leaving 6 inches for weaving in. See pics 9 & 10.
Crochet Blanket Cardigan- Finishing
1. Weave in all the tails left.
2. Align the sleeve seams on both sides, position the button corresponding to the buttonhole and sew it down.
More Free Crochet Blanket Cardigan Patterns
7 Hour Crochet Cardigan Pattern
Easy Lacy Cardigan Crochet Pattern