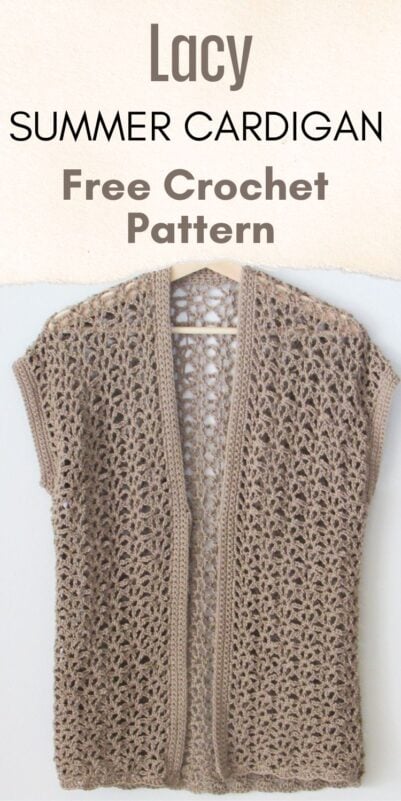
Lacy Crochet Cardigan Pattern, Wet Sand Cardigan
Free Lacy Cardigan Crochet Pattern- perfect for spring and summer.

Want light layering piece for warmer weather? This lacy crochet cardigan pattern will be a perfect fit.

This woman’s crochet cardigan uses an easy stitch and simple construction that is easy enough for beginners. I initially wanted to add a scoop neck but decided to keep it suitable for all skill levels.

The lacy stitch grows so quickly that you will be able to finish your crochet short sleeve cardigan in a day or two. How cool is that for a clothing item? Looking for a full sleeve cardigan? Check out my long crochet cardigan pattern here.


You can make this simple crochet cardigan with or without the ties depending on your taste. The ties are added at the very end, so it is easy to just snip them off if you don’t like the look.

Lacy Crochet Cardigan Pattern
Materials
1. Lion Brand 24/7 cotton in color Taupe. It is a 100% mercerized cotton worsted weight yarn. Yardage requirements are given below.
2. An H(5mm) crochet hook.
3. Tapestry needle to weave in the ends.
4. Stitch markers to markers.
5. Two wooden beads for the ties. You can opt not to add the ties.
Finished Sizes
Note: The cardigan will stretch and get longer by another 2 inches when worn.

Yardage
S and M: 4 skeins of Lionbrand 24/7 cotton or 740 yards if you are using any other yarn.
L and XL: 5 skeins of Lionbrand 24/7 cotton or 930 yards if you are using any other yarn.
2XL and 3XL: 6 skeins of Lionbrand 24/7 cotton or 1100 yards if you are using any other yarn.
Stitch Abbreviations
The pattern is written in US terms.
ch- chain
sc- single crochet
hdc- half double crochet
dc- double crochet
sk- skip
Stitch Explanations
Lacy Shell: (dc, ch 2, dc, ch 2, dc)all worked into the same ch or ch-space specified.
sc2tog: It is a single crochet decrease that is worked across 2 sts to join them into one. (Insert your hook into the next st and pull up a loop)twice, YO and pull through all the 3 loops on your hook to complete a sc2tog.
Gauge
Pattern for Gauge Swatch
Ch 34 and start working the front panel following the pattern for size S below. When your work measures around 6 inches, measure for gauge.
3 Lacy Shells= 4 inches
3 Shell Rows= 2-1/2″
More Crochet Cardigan Patterns:
Lacy Iris Cardigan Crochet Pattern
Grace Bell sleeve Cardigan(Paid Pattern)
Crochet Cardigan Pattern
Pattern Notes
1. The cardigan is worked as 3 separate parts, 2 front panels, and a back panel. They are then seamed at the shoulders and sides leaving a hole for the armhole. The sleeve edging, collar and hem are then added to finish the cardigan.
2. The stitch counts for bigger sizes are given in the order S(M, L, XL, 2XL, 3XL)
Front Panel of your Crochet Lacy Cardigan
Left Front Panel
Ch 34(34, 39, 44, 44, 49)
Row 1: 1 dc in 6th ch from hook (5 skipped chs counts as ch 2+1 dc), (ch 2, dc, ch 2, dc) in the same ch as first dc, *( sk next 4 chs, lacy shell in next ch), repeat from * to last 3 chs, sk next 2 chs, 1 dc in last ch, turn. —–6(6, 7, 8, 8, 9) Lacy shells
Note: At the end of Round 2, you place a marker before you turn. This is to indicate the RS of the fabric and will come in handy when you assemble the cardigan.
Row 2: Ch 5( counts as first dc plus ch 2), 1 sc in next ch-2 space of shell, ch 3, 1 sc in next ch-2 space, *(ch 4, 1 sc in next ch-2 space, ch 3, 1 sc in next ch-2 space)repeat from * across until you have worked a sc in the last ch-2 space of the shell, ch 2, sk next dc, 1 dc on top of beginning ch-3, place a marker anywhere on this side to indicate the Right Side(RS) of your fabric, turn.—–13(13, 15, 17, 17, 19) Ch loops
Row 3: Ch 3( counts as 1st dc), sk adjacent ch-2 space, lacy shell in next ch-3 space, *(sk next ch-4 space, lacy shell in next ch-3 space), repeat from * until just the beginning ch-5 is left, sk next 2 chs, 1 dc on top of beginning ch-3, turn. —–6(6, 7, 8, 8, 9) Lacy shells
Repeat Row 2 and 3 until you have completed 25(26, 27, 28, 29, 30) shell rows. Do not fasten off. The panel will stretch and get longer by approximately 2 inches when worn.
Shoulder Slant- Left Front Panel
We will now add a row to the top of the left panel to slant the shoulders for a better fit. The slant will be very slight but will take the shape of the shoulders when worn.

Last Row(See pic 1 above): Turn and continue with the working yarn, ch 2 (does not count as a st), 1 dc in same st, 1 dc in each dc and ch-2 space across until you have completed a total of 11(11, 11, 16, 16, 18)dc from start, 1 hdc in next dc, 1 hdc in next ch-2 space, 1 hdc in next dc, 1 sc in each ch-2 space and each dc across to end, your last sc will be on top of beginning ch, do not fasten off.——–32(32, 37, 42, 42, 47) sts
Note: When working along the side, you can work into the spaces under the beginning chs or dc sts. Do not miss the very last row end. The beginning chain of this row will be stuck on the side of the first shell and can be easily overlooked.
Side Row: Now continue with the working yarn and work a row of sc along the left side of the left panel. This will make it easy to seam the front panel to the back panel later. Ch 1, 1 sc in the same st as last st, 1 sc across first row end, 2 sc across each row end until you hit the hem. —–98(102, 106, 110, 114, 118) sc sts
Right Front Panel
Follow the pattern for the left front panel until you complete 25(26, 27, 28, 29, 30) shell rows, fasten off.
Side Sc Row and Shoulder Slant-Right Front Panel

After you finish your last shell row, turn so that the right side of your crochet fabric with the marker is facing up. Sl st to the bottom right corner of the right panel where you have the beginning tail, 1 sc in the corner, 1 sc across first row end, 2 sc across each row end across until you reach the top of the panel, continue to work the shoulder slant along the last shell row as mentioned below.
Ch 1 at corner, 1 sc in first st, 1 sc in each dc and each ch-2 space across until you have worked a total of 18(18, 23, 23, 23, 26) sc from start, 1 hdc in next dc, 1 hdc in next ch-2 space, 1 hdc in next dc, 1 dc in each ch-2 space and dc across to end, fasten off. ———32(32, 37, 42, 42, 47)sts
Back Panel for Woman’s Crochet Cardigan
Ch 69(74, 79, 89, 94, 104)
Row 1: 1 dc in 6th ch from hook (5 skipped chs counts as ch 2+1 dc), (ch 2, dc, ch 2, dc) in the same ch as first dc, *( sk next 4 chs, lacy shell in next ch), repeat from * to last 3 chs, sk next 2 chs, 1 dc in last ch, turn.——–13(14, 15, 17, 18, 20) Lacy shells
Row 2: Ch 5( counts as first dc plus ch 2), 1 sc in next ch-2 space of shell, ch 3, 1 sc in next ch-2 space, *(ch 4, 1 sc in next ch-2 space, ch 3, 1 sc in next ch-2 space)repeat from * across until you have worked a sc in the last ch-2 space of the shell, ch 2, sk next dc, 1 dc on top of beginning ch-3, place a marker anywhere on this side to indicate the Right Side(RS) of your fabric, turn.—–27(29, 31, 35, 37, 41) Ch loops
Row 3: Ch 3( counts as 1st dc), sk adjacent ch-2 space, lacy shell in next ch-3 space, *(sk next ch-4 space, lacy shell in next ch-3 space), repeat from * until just the beginning ch-5 is left, sk next 2 chs, 1 dc on top of beginning ch-3, turn. —–13(14, 15, 17, 18, 20) Lacy shells
Repeat Row 2 and 3 until you have completed 25(26, 27, 28, 29, 30) shell rows. Fasten off.
Side Sc Rows and Shoulder Slant-Back Panel

After you finish your last shell row, turn so that the right side of your crochet fabric with the marker is facing up. Sl st to the bottom right corner of the right panel where you have the beginning tail, 1 sc in the corner, 1 sc across first row end, 2 sc across each row end across until you reach the top of the panel, continue to work the shoulder slant along the last shell row as mentioned below.
Ch 1 at corner, 1 sc in first st, 1 sc in each dc and each ch-2 space across until you have worked a total of 18(18, 23, 23, 23, 26) sc from start, 1 hdc in next dc, 1 hdc in next ch-2 space, 1 hdc in next dc, 1 dc in each ch-2 space and dc across for a total of 11(11, 11, 16, 16, 18) dc, 1 hdc in each ch-2 space and dc across for a total of 3(8, 3, 3, 8, 8) hdc, 1 dc in each dc and ch-2 space across until you have completed a total of 11(11, 11, 16, 16, 18)dc, 1 hdc in next dc, 1 hdc in next ch-2 space, 1 hdc in next dc, 1 sc in each ch-2 space and each dc across to end, your last sc will be on top of beginning ch, do not fasten off.
Now continue with the working yarn and work a row of sc along the left side of the back panel. Ch 1, 1 sc in the same st as last st, 1 sc across first row end, 2 sc across each row end until you hit the hem. —–98(102, 106, 110, 114, 118) sc sts on this side
Seaming the Lacy Crochet Cardigan
Place the two front pieces on the back panel with the right sides touching and the shoulders at the top. Seam the shoulders with a whip stitch or loose slip sts.
Seam the sides shut leaving 31(33, 35, 37, 39, 41)sts from the shoulder free for the armhole.
The armhole gap should be approximately 7-1/2(8, 8-1/2, 9, 9-1/2, 10) inches deep.
Finishing the Sleeves
Round 1: Working on the Right Side of the cardigan, sl st to the armpit, ch 1, 1 sc in armpit joint, sc2tog in next 2 sts, 1 sc in next 29(31, 33, 35, 37, 39) sts to the shoulder seam, 1 sc in shoulder seam, 1 sc in next 29(31, 33, 35, 37, 39) sts, sc2tog in last 2 sts, sl st to 1st sc, turn.———-62(66, 70, 74, 78, 82)sts
Round 2: Ch 1( does not count as a st), 1 sc in same st as ch 1, sc2tog in next 2 sts, 1 sc in next st, sc2tog in next 2 sts, 1 sc in next 51(55, 59, 63, 67, 71)sts 1 sc in each st across to last 5 sts, sc2tog in next 2 sts, 1 sc in next st, sc2tog in next 2 sts, sl st to first sc, turn. —-58(62, 66, 70, 74, 78) sts
Round 3: Ch 1 ( does not count as a st), 1 sc in same st as ch 1 and each st across to end, sl st to first sc, turn.—-58(62, 66, 70, 74, 78) sts
Round 4:Ch 1( does not count as a st), 1 sc in same st as ch 1, sc2tog in next 2 sts, 1 sc in next st, sc2tog in next 2 sts, 1 sc in next 47(51, 55, 59, 63, 67)sts 1 sc in each st across to last 5 sts, sc2tog in next 2 sts, 1 sc in next st, sc2tog in next 2 sts, sl st to first sc, turn. —–54(58, 62, 66, 70, 74) sts
Collar for your Simple Crochet Cardigan

Row 1: With the your cardigan right side out, sl st to the inner corner of the left panel, ch 1, 2 sc across each row end until you reach the shoulder seam, 2 sc in the shoulder seam, 1 sc in each st along the back panel, continue down along the inner edge of the right panel, work 2 sc across each row end until you hit the hem, turn.
Row 2: ch 1, 1 sc in each sc across to end, turn.
Repeat Row 2 three more times to add width to your collar, do not fasten off. Continue to work the hem edging below.
Hem Edging

Ch 1 at corner, 5 dc in the middle of the sc collar you just made, 5dc under each lacy shell across to the side seam, 1 sc in side seam, 5 dc under each lacy shell across to the next side seam, 1 sc in the side seam, 5 dc under each lacy shell across, 5 dc in middle of the collar, sc to the corner, fasten off.
Optional Ties
Mark 2 sts on either side of the collar. They should be symmetrical and can be positioned as high or as low as you want. I feel like I placed it a little lower than needed.
Ch 64 for the tie and sl st to one of the marked sts, sl st back along the long chain inserting your hook into the back bumps of the chain, continue all the way to the end, and fasten off.
Thread the tails through a yarn needle and pull the end of the tie through a wooden bead, knot the tie to lock the bead in place. Weave in the rest of the tails.
Finishing the Lacy Crochet Cardigan Pattern
Weave in any tails left.
This Boho cardigan crochet pattern will be the perfect accessory to throw over a summer dress. Enjoy!
Related Lacy Crochet Cardigan Patterns:
Gorgeous Bell sleeve Cardigan(Paid Pattern)
Pin it for later: