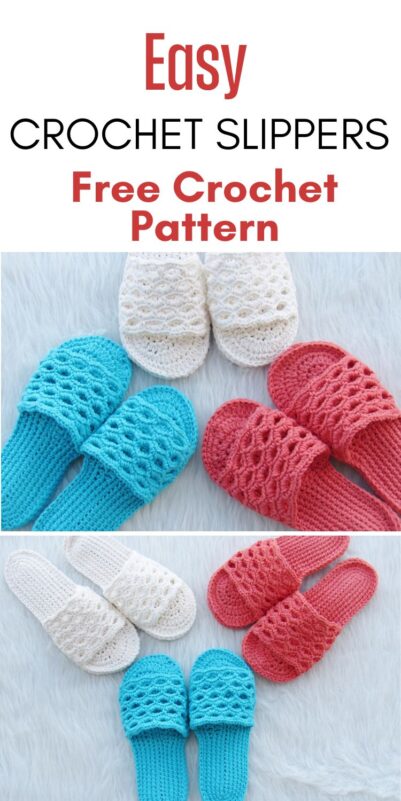
Crochet Sandals Free Pattern, Spa Day Slippers
Crochet Sandals Pattern for Women- a fun pattern!

I am really excited to present my crochet sandals free pattern for spring. Follow the pattern and you will get a sturdy and cushy sandal that will keep you comfortable all day long.

This crochet sandals pattern is perfect to make a pair for those lazy days where all you want to do is stay in your PJs and read a good book or watch some television.

The free crochet sandals pattern requires worsted weight cotton yarn and an F(3.75mm) hook. I used Lily Sugar n’ Cream yarn.

Just like a regular pair of sandals, the left and right soles for these crochet sandals are shaped differently.

Crochet Sandals Free Pattern
Materials
1. Worsted weight/ Aran yarn ( size 4 medium) cotton yarn. Lily Sugar n’ Cream yarn in colors Ecru, Mod Blue, and Tangerine were used for the samples.
2. Hooks F( 3.75 mm).
3. Yarn needle to weave in the tails and attach the top part.
4. ½ inch thick Quilter’s batting to sandwich between the soles
5. Plastic canvas to add stiffness to the sole. This is optional but it will make your slippers more comfortable to walk in.
Size
US sizes 5-6, 7-8, 9-10, and 11-12
Finished measurements for sole
Small (fits US sizes 5/6), Medium (fits US sizes 7/8), Large( fits US sizes 9/10) Extra Large (fits US sizes 11/12)
Small: 9 ½ inches long and 3 ½ inches wide
Medium: 10 inches long and 3 ¾ inches wide
Large: 10 ½ inches long and 3 ¾ inches wide
Extra Large: 11 inches long and 4 inches wide.
Gauge
With F(3.75mm) hook and worsted weight yarn, 16 sc stitches and 18 sc rows= 4 inches. Measure finished sizes of soles for gauge.
Related Crochet Sandals or Slippers Pattern:
Magic Slippers from a Rectangle
Yardage
Small/Medium: 200 Yards
Large/Extra Large: 250 Yards
Stitch Abbreviations
The pattern is written in standard American terms.
sc- single crochet
sl st- slip stitch
hdc- half double crochet
dc- double crochet
ch- chain
sk- skip
Sole Pattern
Tips for sole:
1. Count your stitches after every round.
2. Sole is worked in the round without turning at each round.
3. The last st of every round is worked into the same stitch as the beginning chain.
4. Stitch counts for bigger sizes are given in brackets in the order 5-6 (7-8, 9-10, 11-12). If there is only one number it pertains to all the sizes.
Right Sole

Round 1: Ch 28 (28, 30, 33), 2 sc in 2nd chain from hook (beginning ch counts as a st), 1 sc in each chain till you have 1 chain left, 4 sc in the last chain, do not turn, continue to work along the opposite side of the foundation chain into the free loops as shown in the pic above. 1 sc in next 25(25, 27, 30) free loops, 2 sc in last loop, sl st to beginning ch 1.—————-59 (59, 63, 69) st

Round 2: Ch 1, 2 sc in next st, 2 sc again in next st, 1 sc in next 15 (15, 16, 19) st, 1 hdc in next 10 (10, 11, 11) st, 2 hdc in each of the next 4 st, 1 hdc in next 5 st, 1 dc in next 6 st, 1 hdc in next 1( 1, 2, 2) st, 1 sc in next 15 (15, 16, 19) st, 2 sc in next st, sl st to beginning ch 1. ————– 67 (67, 71, 77) st
Round 3: Ch 1, 1 sc in next 31(31, 33, 36)st, 2 hdc in each of the next 6 st on the toe side, 1 hdc in next 4 st, 1 dc in next 7 st, 1 hdc in next 2(2, 3, 3) st, 1 sc in next 17(17, 18, 21)st, sl st to beginning ch 1.——–74 (74, 78, 84) st
Round 4: Ch 1, 1 sc in next 34 (34, 36,39)st, 2 sc in each of the next 3 sts, (1 sc and 1 hdc) into the next st, 2 dc in each of the next 4 st, 1 dc in next 6 st, 1 hdc in next 2 ( 2, 3, 3) st, 1 sc in next 24( 24, 25, 28)st, sl st to beginning ch 1.———-83( 83, 87, 93) st
Round 5 (for size Small only): Ch 1, 1 sc in next 24 st, 1 hdc in next 7 st, 1 sc in next 9 st, 1 hdc in next 3 st, (1 hdc and 1 dc) into the next st, (1 dc, 2 dc )2 times, 1 dc in next 3 st, 1 hdc in next 14 st, 1 sc in next 18 st, sl st to beginning ch 1.———–87 st
Round 5 (for size Medium only): Ch 2, 1 hdc in next 2 st, 2 hdc in next st, 1 hdc in next 10 st, 1 sc in next 5 st, 1 hdc in next 6 st, 1 dc in next 5 st, 1 hdc in next 2 st, 1 sc in next 9 st, 1 hdc in next 3 st, (1 hdc and 1 dc) in next st, ( 1 dc, 2 dc) 2 times, 1 dc in next 3 st, 1 hdc in next 14 st, 1 sc in next 15 st, 2 hdc in next st, 1 hdc in next 2 st, sl st to beginning ch 2.——-89 st
Round 5 (for size Large only): Ch 2, 1 hdc in next 2 st, 2 hdc in next st, 1 hdc in next 11 st, 1 sc in next 6 st, 1 hdc in next 6 st, 1 dc in next 5 st, 1 hdc in next 2 st, 1 sc in next 9 st, 1 hdc in next 3 sts, (1 hdc and 1 dc) in next st, ( 1 dc, 2 dc) 2 times, 1 dc in next 3 st, 1 hdc in next 15 st, 1 sc in next 16 st, 2 hdc in next st, 1 hdc in next 2 st, sl st to beginning ch 2.——-93 st
Round 5 (for size Extra Large only): Ch 2, 1 hdc in next 2 st, 2 hdc in next st, 1 hdc in next 24 st, 1 dc in next 11 st, 1 sc in next 7 st, 1 hdc in next 3 st, (1 hdc and 1 dc) in next st, ( 1 dc, 2dc) 2 times, 1 dc in next 3 st, 1 hdc in next 17 st, 1 sc in next 17 st, 2 hdc in next, 1 hdc in next 2 st, sl st to beginning ch 2.———99 st
Make two right soles as each slipper sole has two layers.
Left Sole
Note: Left sole will be a mirror image of the right.
Round 1: Ch 28 (28, 30, 33) , 2 sc in 2nd chain from hook, 1 sc in each chain till you have 1 chain left, 4 sc in last chain, do not turn, continue to work along the opposite side of the foundation chain in to the free loops ,1 sc in next 25(25, 27, 30) free loops, 2 sc in last loop, sl st to beginning ch 1.—————-59 (59, 63, 69) st
Round 2: Ch 1, 2 sc in next st, 2sc in next st again, 1 sc in next 13( 13, 14, 17) st, 1 hdc in next 1( 1, 2, 2) st , 1 dc in next 6 st, 1 hdc in next 5 st, 2 hdc in next 4 st, 1 hdc in next 12(12, 13, 13) st, 1 sc in next 15(15, 16, 19) st, 2 sc in next st, sl st to beginning ch 1—————67( 67, 71, 77) st
Round 3: Ch 1, 1 sc in next 18( 18, 19, 22) st, 1 hdc in next 2( 2, 3, 3) st, 1 dc in next 7 st, 1 hdc in next 4 st, 2 hdc in next 6 st, 1 sc in next 30(30, 32, 35) st, sl st to beginning ch 1————-74( 74, 78, 84)st
Round 4: Ch 1, 1 sc in next 26( 26, 27, 30) st, 1 hdc in next 2(2, 3, 3) st, 1 dc in next 6 st, 2 dc in next 4 st, (1 hdc and sc) in next st, 2 sc in next 3 st, 1 sc in next 32( 32, 34, 37) st, sl st to beginning ch 1.—————–83( 83, 87, 93)st
Round 5 ( for size Small only): Ch 1, 1 sc in next 18 st, 1 hdc in next 12 st, 1 dc in next 3 st , ( 2dc, 1 dc)2 times, (1 dc and 1 hdc) in next, 1 hdc in next 3 sts, 1 sc in next 9 st, 1 hdc in next 7 st, 1 sc in next 26 st, sl st to beginning ch 1.—————87 st.
Round 5 ( for size Medium only): Ch 2, 1 hdc in next 2 st, 2 hdc in next st, 1 sc in next 15 st, 1 hdc in next 12 st, 1 dc in next 3 st, ( 2dc, 1 dc) 2 times, (1 dc and hdc) in next, 1 hdc in next 3 st, 1 sc in next 9 st, 1 hdc in next 2 st, 1 dc in next 5 st, 1 hdc in next 8 st, I sc in next 5 st, 1 hdc in next 9 st, 2 hdc in next st, 1 hdc in next 3 st, sl st to top of beginning ch 2. ———–89 st
Round 5 ( for size Large only): Ch 2, 1 hdc in next 2 st, 2 hdc in next st, 1 sc in next 16 st, 1 hdc in next 13 st, 1 dc in next 3 st, ( 2dc, 1 dc) 2 times, (1 dc and 1 hdc) in next, 1 hdc in next 3 st, 1 sc in next 9 st, 1 hdc in next 2 st, 1 dc in next 5 st, 1 hdc in next 8 st, 1 sc in next 6 st, 1 hdc in next 10 st, 2 hdc in next st, 1 hdc in next 3 st, sl st to top of beginning ch 2. ———–93 st
Round 5 ( for size Extra Large only): Ch 2, 1 hdc in next 2 st, 2 hdc in next st, 1 sc in next 18 st, 1 hdc in next 16 st, 1 dc in next 3 st, (2dc, 1 dc) 2 times, (1 dc and 1 hdc) in next,1 hdc in next 3 st, 1 sc in next 7 st, 1 dc in next 11 st, 1 hdc in next 23 st, 2 hdc in next st, 1 hdc in next 3 st, sl st to beginning ch 2.———–99 st
Make two left soles as each slipper sole has two layers.
Joining the two Layers of the Soles and Adding the Batting
Hold the sole on top of the batting and cut around it. You can then trim it to make it ¼ inch smaller than the sole all around. Cut one more for the second sandal. If you are using plastic canvas, cut it out in the same way for both the sandals.
Note: When slip stitching the 2 soles together, make sure you are working on the right side of your soles, the side that would face up for your right and left sandals when you wear it. You want your slip stitches to show when you wear them.

Overlap one left and right sole with the wrong sides touching and start to slip stitch them together. Start slip-stitching from the middle of the heel and continue until half the sole is joined, open it like a book and place the plastic canvas and the ½ inch batting inside as shown above. The plastic canvas should be the bottom layer so you don’t feel it when you walk. Slip stitch to close the entire sole with the plastic canvas and the batting sandwiched within. Fasten off. Repeat the same for the second sandal making sure you work the sl st on the upward-facing side.
Toe Top (Make 2)
Notes
1.The toe top is made separately and sewn onto the soles to make a sturdy slipper. See pic 4 to see how it looks.
2.The toe top will taper slightly at the toe side.
3. The toe top is sewn onto the right side of the sole, the side where you can see the slip stitches running along the edge of the sole.
Sizes Small & Medium
The finished toe top will measure 5 ½ inches on the wider side and 4- 7/8 inches on the narrower side.
With F(3.75mm) hook, ch 20 very loosely. If you find it hard to chain loosely please use a bigger hook only for your foundation chain and then switch back to F hook.
Row 1: 1 sc in 2nd ch from hook, *(ch 3, skip the next 2 chs, 1 sc in next), repeat from *to end, turn.—–6 ch loops
Note
In the next row, the 5 sc in each chain loop will be tightly packed.
Row 2: Ch 1 ( not counted as a st), *(5 sc in the next ch-3 space), repeat from * across until 1 ch loop left, 4 sc in last ch-3 space, 1 sc in last sc, turn.
Row 3: Ch 5( counts as dc and ch 2), skip the next st, sc in next st, *(ch 3, sk the next 4 sts, 1 sc in next), repeat from * until you work a sc on the last peak, ch 2, sk next st, 1 dc in last sc, turn.
Row 4: Ch 1, 1 sc in the same st as ch 1, 2 sc in next ch-2 space, *(5 sc in the next ch-3 space), repeat from * 4 more times, 2 sc under the turning ch-5, 1 sc in the 3rd ch of the turning ch, turn.
Row 5: Ch 1, 1 sc in the same st as ch 1, *( ch 3, sk the next 4 sc, 1 sc in next st), repeat from * to end, turn.
Row 6: Repeat Row 2.
Row 7: Ch 4, skip next st, sc in next st, *(ch 3, sk the next 4 sts, 1 sc in next), repeat from * until you work a sc on the last peak, ch 1, sk next st, 1 dc in last sc, turn.
Row 8: Ch 1, 1 sc in next ch-1 space, *(5 sc in the next ch-3 space), repeat from * 4 more times, 1 sc under the turning ch-5, turn.
Row 9: Ch 1, 1 sc in the same st as ch 1, ch 2, sk the next 2 sts, 1 sc in next, *(ch 3, sk the next 4 sts, 1 sc in next), repeat from * until you work a sc on the last peak, ch 2, sk 2 sts, 1 sc in last st, turn.
Round 10: Ch 1, 2 sc in the first ch-2 space, *(5 sc in the next ch-3 space), repeat from * 3 more times, 2 sc in last ch-2 space, 1 sc in last sc. Fasten off with a half yard tail for sewing.
Jump to “Finishing the Foundation Chain Side”.
Sizes Large and Extra Large
The finished toe top for size Large will measure 6 inches on the wider side and 5 ¼ inches on the narrower side. The finished toe top for size Extra Large will measure 6 inches on the wider side and 5 1/2 inches on the narrower side.
With F(3.75mm) hook, ch 23 very loosely. If you find it hard to chain loosely please use a bigger hook only for your foundation chain and then switch back to F hook.
Row 1: 1 sc in 2nd ch from hook, *(ch 3, skip the next 2 chs, 1 sc in next), repeat from *to end, turn.—–7 ch loops
Note
In the next row, the 5 sc in each chain loop will be tightly packed.
Row 2: Ch 1 ( not counted as a st), *(5 sc in the next ch-3 space), repeat from * across until 1 ch loop left, 4 sc in last ch-3 space, 1 sc in last sc, turn.
Row 3: Ch 5( counts as dc and ch 2), skip the next st, sc in next st, *(ch 3, sk the next 4 sts, 1 sc in next), repeat from * until you work a sc on the last peak, ch 2, sk next st, 1 dc in last sc, turn.
Row 4: Ch 1, 1 sc in the same st as ch 1, 2 sc in next ch-2 space, *(5 sc in the next ch-3 space), repeat from * 5 more times, 2 sc under the turning ch-5, 1 sc in the 3rd ch of the turning ch, turn.
Row 5: Ch 1, 1 sc in the same st as ch 1, *( ch 3, sk the next 4 sc, 1 sc in next st), repeat from * to end, turn.
Repeat rows 2, 3 and 4 once. Then proceed to Row 9 below.
Row 9: Ch 1, 1 sc in the same st as ch 1, ch 2, sk next 4 sc, 1 sc in next, *( ch 3, sk the next 4 sc, 1 sc in next st), repeat from * 4 more times, ch 2, sk next 4 sc, 1 sc in last st, turn.
Row 10: Ch 1, 1 sc in same st as ch 1, 1 sc in next ch-2 space, *(5 sc in the next ch-3 space), repeat from * 4 more times, 1 sc in the last ch- loop, 1 sc in the last sc, turn.
Continue for Size Large Only
Row 11: Ch 1, 1 sc in the same st as ch 1, ch 2, sk the next 3 sts, 1 sc in next, *(ch 3, sk the next 4 sts, 1 sc in next), repeat from * until you work a sc on the last peak, ch 2, sk 3 sts, 1 sc in last st, turn.
Row 12: Ch 1, 1 sc in same st as ch 1, 3 sc in the first ch-2 space, *(5 sc in the next ch-3 space), repeat from * 3 more times, 3 sc in last ch-2 space, 1 sc in last sc. Fasten off with a half-yard tail for sewing.
Jump to “finishing the foundation chain side” below.
Continue for Size Extra Large
Row 11: Ch 1, 1 sc in the same st as ch 1, ch 3, sk the next 3 sts, 1 sc in next, *(ch 3, sk the next 4 sts, 1 sc in next), repeat from * until you work a sc on the last peak, ch 3, sk 3 sts, 1 sc in last st, turn.
Row 12: Ch 1, 1 sc in same st as ch 1, 4 sc in the first ch-2 space, *(5 sc in the next ch-3 space), repeat from * 3 more times, 4 sc in last ch-2 space, 1 sc in last sc. Fasten off with a half-yard tail for sewing.
Finishing The Foundation Chain Side- All sizes

Sl st to the corner of the foundation chain where you don’t have the beginning tail (See pic 4), 1 sc in the corner, 4 sc into the first ch-2 space, *(5 sc into the next ch-2 space), repeat from * until 1 ch loop is left, 4 sc in last ch-2 space, 1 sc in the corner. Fasten off with a half-yard tail for sewing. Barring the 2 long tails for sewing weave in the rest of the tails.
Make one more toe top following the same pattern.
Sewing the Toe Top onto the Soles- All sizes

Place 2 markers 2 inches away from the toe side for sizes Small/ Medium and 2 ¼ inches away for Large and Extra Large. See pic 5 above.
Thread the yarn needle with the long yarn tail left on the narrow side of the toe top.

Now, keep the narrow side of the toe top part right behind the marker in such a way that the edge of the toe top touches the edge of the sole, insert the needle vertically down through the side of the toe top and both the layers of the sole (see pic 6).

Then work your needle up through both the layers of the sole and through the side of the toe top (see pic 7). Repeat these two steps to reinforce the beginning end of the toe top. Continue in this fashion all the way to the end of the toe top. At the end again repeat these couple of steps to reinforce it. Make a couple of tight knots under the sole and hide the tail between the soles.
Now thread the second tail, make sure the toe top is aligned well and sew it from the backside towards the marker side. Knot and hide the yarn tails. Repeat with the second slipper.
Enjoy your new slipper!
More Crochet Sandals or Slippers Pattern:
Happy Feet Crochet Baby Sandals
Pin it for later:


Couldn’t you just use the bottoms of a pair of flip flops instead of the batting and plastic?
Yes, you can try that as well.
What would you suggest in order to connect to a flip flop?