
Crochet Blanket Free Pattern, Twinkling Stars Blanket
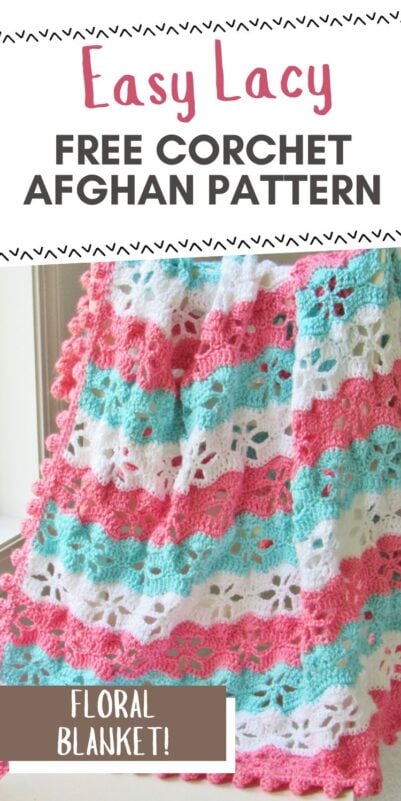
I have had the idea for this crochet blanket free pattern on my mind for quite some time. I was initially thinking of using a DK weight yarn but the impatient designer in me chose Caron Simply Soft yarn and it worked up beautifully.


I really love this color combination. Considering how many colors Caron Simply Soft comes in, I am sure you will find another great combo of your own.


This crochet blanket free pattern will be your go-to pattern for spring and summer. Lightweight and airy, it would make your perfect companion while crocheting on the porch.


Crochet Blanket Free Pattern
You can pin it for later here.
Materials
1.Worsted Weight yarn which is on the thinner side. I used Caron Simply Soft in colors Strawberry, Robins egg and White.
2. Hook H (5mm). If you crochet loose, you might want to go down to 4.5mm hook.
3. Tapestry needle to weave in the ends.
Finished Size
38 1/2 inches wide and 38 1/2 inches long.
Yardage
1 skein of the blue and white color and 2 skeins of the pink as it is used for the border as well. Each skein is 315 yards or 170g.
Stitch Abbreviations
beg- beginning
sk- skip
ch- chain
sc- single crochet
dc-double crochet
hdc- half double crochet
st- stitch
ch-loop- chain loop
Stitch Explanations
Shell: 5 dc worked into the same st.
Gauge
15 dc sts = 4 inches
With pink color yarn, Ch 164. You can chain any multiple of 16+20 if you want to make your blanket smaller or bigger.

Row 1: 2 dc in 4th ch from hook, sk 2 chs, sc in next, ch 1, sk 1, sc in next st, *( sk 2 chs, shell in next st, sk 2 chs, 1 sc in next, ch 1, sk 1, sc in next), repeat from * to last 3 chs, sk 2 chs, 3 dc in last ch. Turn.——19 shells+ 2 half shells

Row 2: Ch 3 (counts as a dc here and throughout), 1 dc in next 2 dc, 1 dc in next sc, 1 dc in next ch-1 space between the sc sts, ch 3, sk next sc and 2 dc, 1 dc in next dc in the middle of the shell, ch 3, sk 3 sts, 1 dc in next ch-1 space between sc sts, 1 dc in next sc, *(1 dc in next 5 dc of the shell, 1 dc in next sc, 1 dc in next ch-1 space, ch 3, sk 3 sts, 1 dc in next dc in the middle of the shell, ch 3, sk 3 sts, 1 dc in next ch-1 space, 1 dc in next sc), repeat from * to last 3 sts, 1 dc in next 2 sts, 1 dc on top of beginning ch-3. Turn.——101 dc
Notes
1. When you work sts into the chs, you will be inserting your hook into the back of the ch loops.
2. In the following rows, the first ch of each ch-loop will be squished and hardly visible from the back. Take care not to miss that.

Row 3: Ch 1 ( not counted as a st here and throughout), 1 sc in the same st as beg ch-1, 1 sc in next dc, ch 5, *(sk 3 dc and 2 chs, 1 sc in next ch, ch 1, sk 1 dc, 1 sc in next ch, ch 5, sk 2 chs and next 3 dc, 1 sc in next dc**, ch 1, sk 1 dc, 1 sc in next dc, ch 5), repeat from * and end your last repeat at ** when just the beg ch-3 is left, 1 sc on top of beg ch-3. Turn.——-20 ch-5 loops

Row 4: Ch 3, 1 dc in next sc, 1 dc in next 3 chs, ch 3, sk next 2 chs and 1 sc, 1 dc in next ch-1 space between sc sts, *(ch 3, sk next sc and 2 chs, 1 dc in next 3 chs, 1 dc in next sc, 1 dc in next ch-1 space, 1 dc in next sc, 1 dc in next 3 chs, now you have 9 dc sts worked in a row, ch 3, sk 2 chs and 1 sc, 1 dc in next ch-1 space), repeat from * until you work a dc in the last ch-1 space and only one ch-5 loop is left, ch 3, sk next sc and 2 chs, 1 dc in last 3 chs and last 2 sc. Turn.——101 dc

Row 5: Ch 3, 2 dc in the same st as beg ch-3, sk 2 dc, 1 sc in next, ch 1, sk 1 dc, 1 sc in next ch, *(sk 2 chs, shell on top of next dc, sk 2 chs, 1 sc in next ch, ch 1, sk 1 dc, 1 sc in next dc**, sk 2 dc, shell in next dc, sk 2 dc, 1 sc in next dc, ch 1, sk 1 dc, 1 sc in next ch), repeat from * and end last repeat at ** when you have 3 sts left, sk next 2 dc, 3 dc on top of beg ch-3, join white color yarn. Turn. ——-19 shells + 2 half shells

Row 6: Ch 1, 1 sc in the same st as beg ch-1, 1 sc in each st and ch-1 space across to end. Turn.—–161 sc
Row 7: Ch 6, sk next 3 sts, 1 dc in next 9 sts, *(ch 3, sk next 3 sts, 1 dc in next st, ch 3, sk next 3 sts, 1 dc in next 9 sts), repeat from * to last 4 sts, ch 3, sk 3 sts, 1 dc on top of last sc. Turn.——-101 dc

Row 8: Ch 1, 1 sc in same st as ch 1, 1 sc in next ch, *(ch 5, sk 2 chs and next 3 dc, 1 sc in next dc, ch 1, sk 1, 1 sc in next dc**, ch 5, sk 3 dc and 2 chs, 1 sc in next ch, ch 1, sk 1 dc, sc in next ch), repeat from * and end last repeat at **, ch 5, sk 3 dc and 2 chs, 1 sc in next 2 chs. Turn.———–20 ch-5 loops

Row 9: Ch 6, *(sk next sc and 2 chs, 1 dc in next 3 chs, 1 dc in next sc, 1 dc in next ch-1 space, 1 dc in next sc, 1 dc in next 3 chs, now you have 9 sts worked in a row**, ch 3, sk next 2 chs and 1 sc, 1 dc in next ch-1 space, ch 3), repeat from * and end last repeat at **, ch 3, sk 2 chs and 1 sc, 1 dc in very last sc. Turn.——-101 dc

Row 10: Ch 3, 2 dc in same st as ch 3, sk 2 chs, 1 sc in next ch, ch 1, sk 1 dc, 1 sc in next dc, *(sk 2 dc, shell in next dc, sk 2 dc, 1 sc in next dc, ch 1, sk 1 dc, 1 sc in next ch**, sk 2 chs, 1 shell in next dc, sk 2 chs, 1 sc in next ch, ch 1, sk 1 dc, 1 sc in next dc), repeat from * and end last repeat at **, sk 2 chs, 3 dc on next ch. Join the blue color yarn. Turn.—-19 shells + 2 half shells

Row 11: Ch 1, 1 sc in the same st as beg ch-1, 1 sc in each st and ch-1 space across to end. Turn.—–161 sc
Row 12: Ch 3, 1 dc in next 4 sts, ch 3, sk 3 sts, 1 dc in next, *( ch 3, sk 3 sts, 1 dc in next 9 sts, ch 3, sk 3 sts, 1 dc in next), repeat from * to last 8 sts, ch 3, sk 3 sts, 1 dc in last 5 sts. Turn. —-101 dc
Repeat Rows 3-12 for the pattern and end with Row 10 in pink color, do not fasten off and do not turn. Take care to follow the color sequence you want for your blanket by changing colors at the end of Rows 5 and 10.
Pom Pom Border for Your Crochet Blanket

Notes
1. You will first work a round of sc around the blanket without turning your work.
2. A video is included at the end showing you how to make the pom pom border.
Round 1 (Sc Row): With working yarn, ch 1 at the corner, 3 sc in corner, working along the edges of the stripes, evenly distribute sc. I worked around 8 sc across the end of each stripe.
3 sc at the next corner and work along the foundation ch side. I did not work into each free loop of the foundation ch but skipped one loop under each shell to get approximately 145 sts, 3 sc in next corner, work up along the stripe edges again.
3 sc in the corner and now proceed to work on top of your last row to level it out. 1 sc in beg ch-3, 1 sc in next 2 dc sts, 1 sc in next sc, 1 sc in next ch-1 space, 1 hdc in next st, *( 1 sc in next 2 dc of shell, sk next st on peak, 1 sc in last 2 dc of shell, 1 sc in next sc, 1 sc in next ch-1 space, 1 hdc in next st), repeat from * to last 3 sts, 1 sc in last 3 sts, sl st to the first sc in corner. Do not turn.
Notes
1. Along the edges of the stripes, I added one pom pom at the junction of 2 stripes and one at the middle of each stripe.
2. On the foundation ch side and the last row side, you have 4 sc between pom poms but you can adjust that number to suit your stitch count. In case you have only 4 sts left to the corner, work 3 sc instead of 4 and so on.
Stitch Explanation
Pom Pom: 1 sc in the specified st, ch 3, 1 dc3tog in the sc you just worked to make the first half of your pom pom, ch 1 to close, ch 4, dc3tog into the 4th ch from hook, take care to catch one extra loop behind the ch, close the top half over the bottom half and sl st to the sc at the very base of the pom pom.
Round 2 (Pom Pom Round): Ch 1, 1 pom pom in next st, *(1 sc in each st to reach the middle of a stripe, pop pom in the next st, 1 sc in each st to reach the junction of 2 stripes, pom pom in the junction), repeat from * to end of the side.
1 sc in corner, 1 pom pom in the same st, 1 more sc in the same corner st, *(1 sc in next 4 sts, 1 pom pom in the next st), repeat from * to end of this side.
1 sc in corner st, 1 pom pom in same corner st, 1 more sc in the corner st, work along the edges of stripes working a pom pom at the middle and end of each stripe like before.
1 sc in corner, 1 pom pom in the same st, 1 more sc in the same corner st, *(1 sc in next 4 sts, 1 pom pom in the next st), repeat from * to end of this side. Sl st to the base of the first pop pom and fasten off.
Finishing The Crochet Afghan
- Weave in all the tails left.
If you love making blankets, you can see all my free crochet blanket patterns here.
My 5 Hour Crochet Blanket pattern featured on Allfreecrochetafghanpatterns.com is another popular pattern on my blog.
Pin it for later:




This is absolutely lovely! Love the colors you chose. This is going in my “To Make” file. Thank you so much for sharing.
I love how pretty twinkling star blanket how pretty it is I’m just learning I can crochet the double Stitch the single stitch and slip stitch I can do little stitches and I’m learning to read a pattern I’m not sure how to do the half double crochet and the loop that you’re talking about but I’m going to give it a try thank you so much for sharing
Is row 5 wrote wrong because its not working.
Kindly watch my video at the end of the blog post. Row 5 starts from time 12:25.
Hi why is some things high lighted
So you pay attention to those :).
Thanks for sharing! Can’t wait to try it.
Would you have an idea of how many yds this blanket needs, by chance?
Hi Heather, I always include yardage in my patterns. If you missed it: 1 skein of the blue and white color and 2 skeins of the pink as it is used for the border as well. Each skein is 315 yards or 170g. Hope that helps.
I may have missed it somewhere, but what size blanket does this make?
Hi Trina, it is 38 1/2 inches wide and 38 1/2 inches long.
@Shehnaaz, TY so very much for this precious little pattern! I also have to say you have a great deal of patience for those that only look at pictures..🤷🤦
Hi Laura, thank you for your kind words.
I have ever so carefully counted, stitched, undone, recounted, stitched, and so on, and once I get to rows 9 and 10, it goes awry. I’m going to completely undo it and start over again from the beginning. If I can’t make it work a second time, I will be convinced your pattern is written wrong. It’s a shame to get this far and have to start over again, it takes so long to get these stitches this far, and it’s such a beautiful piece.
I have given pictures for each row because this is a hard pattern. Did you check your work to see if it matches the pictures?Also, there is a video included at the end of the blog post. I hope that helps.
I promise you her. Pattern is spot on i have made 3 useing her post and the pics and videos didnt even load up so i couldnt even refer it them but i do know this is not a blanket for beginners i been crocheting for 20 years and i had a little problem on 2 rolls in particular i cant remember witch ones dont give up just slow down and make sure you not misreading somthing or missing something i still have to this day problems with remembering the last stitch on every roll of every thing i make
Thank you very much for the Twinkling Stars pattern…..My grand daughter has always been fasinated with the stars, I think she will love this ! I will save it to Pintrest so I can watch your video if I have a problem! JOYCE
Hi Joyce, I am really glad you like the pattern. It is one of my personal favorites.
Thank you so much for the pattern I’ve just finished the blanket and have started the border but it has me completely confused my pom poms are open is this correct? Heidi
Yes, it will stay partly open on the sides.
Hi I have a lady who wants me to make this for her but she wants it 52×60. How much would you charge if someone was to ask you to make it for them? And how would I change the starting to accommodate the sizd change?
Hi Beth, if your gauge meets mine, you can start with a ch of 244 to start the blanket. I do not sell finished crochet items, so I may not be the best person to tell you how much to charge. I would suggest you take a look at how much Afghans on Etsy are priced and go from there.