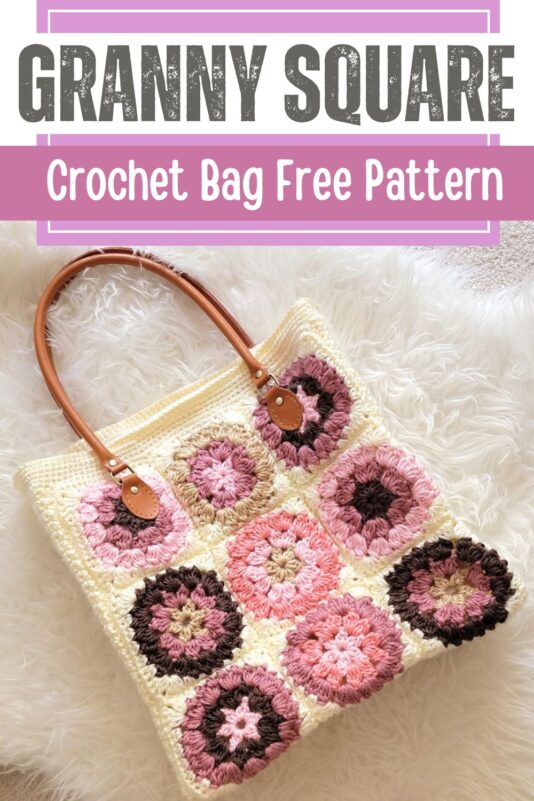
Granny Square Bag Pattern
Crochet Granny Square Bag Pattern- my take on an old classic.

Granny squares are everywhere now so I decided to design this granny square bag pattern for you. I love the square look of the bag.

Usually, granny square bags are rounded, so I used some plastic canvas to give mine this shape. I absolutely love how this turned out.


Honestly, I was never a granny square person and I totally underestimated the time it took to make squares. Now I have mad respect for anyone who can make enough squares for a blanket, haha!

So without further ado, let’s see how to make this lovely crochet granny square bag.
Disclosure: This post might contain affiliate links and I might earn a small commission if you purchase using my links. You can read my full Disclosure Policy here.
Granny Square Bag Free Pattern
Materials
1. Worsted weight size 4 yarn. Caron Simply Soft in 6 colors namely Plum wine, Bone, Strawberry, Soft Pink, Taupe, and Off white was used for the sample bag.
2. A 4.5mm crochet hook. Use any size to attain gauge.
3. Stitch Markers. You can also use a safety pin.
4. Plastic canvas to stiffen the sides and bottom of the bag.
5. Tapestry needle.
6. Leather Handles. I used 23.6″ handles for mine.
7. Lining fabric– 3/4th of a yard.
Finished Size
12-3/4 inches wide and 13-1/2 inch tall
Yardage
2 skeins of the Off white color and 1 skein of all the other colors. Each skein of Caron Simply Soft is 315 yards and there was about 1/2 a skein left of each color.
Stitch Abbreviations
The pattern is written in US terms.
ch: chain
st: stitch
sl st: Slip stitch
sc: single crochet
dc: double crochet
hdc: half double crochet
sk: skip
Stitch Explanations
dc2tog: YO, insert your hook into the next st and pull up a loop, YO and pull through 2 loops on your hook, keeping the remaining 2 loops on your hook, YO and pull up a loop in the next st, YO, pull through 2 loops, YO, pull through the remaining 3 loops on your hook. Now you have completed a dc2tog and joined 2 sts into one.
dc3tog: YO, insert your hook into the next st and pull up a loop, YO and pull through 2 loops on your hook, keeping the remaining 2 loops on your hook, YO and pull up a loop in the next st, YO, pull through 2 loops, keeping the remaining 3 loops on your hook, YO and pull up a loop in the next st, YO, pull through 2 loops, YO, pull through the remaining 4 loops on your hook. Now you have completed a dc3tog and joined 3 sts into one.
Gauge
One completed granny square measures 4-1/4 inches across each of the 4 sides. Use any size hook to attain the gauge.
Granny Square Bag Pattern
Granny Square Pattern
Notes
1. The colors to use for the squares and how many to make in each color combination are listed in the next section. All squares follow the exact same pattern.
2. All rounds are worked on the same side and you do not turn at the end of rounds.

Round 1: With the color for the center, ch 5, sl st to 1st ch to form a chain ring, ch 2 and work 1 dc into the ring (counts as first dc2tog), *(ch 2, dc2tog), repeat from * until you have completed a total of 6 dc2tog, ch 2 tightly, sk the beginning ch 2 and sl st to the next dc, fasten off. Use your hook to pull the yarn tail to the back through the next st. —–6 dc2tog
Note: For every following round you will work over the yarn tails to weave them in as you go.

Round 2: With the next color, sl st to the ch-2 space before the point of fastening off, (ch 2, dc2tog) in the same ch 2 space (counts as first dc3tog), (ch 2, dc3tog, ch 2) again in the same ch-2 space, *( dc3tog, ch 2, dc3tog, ch 2) in each ch-2 space across, skip beginning ch2 and sl st to the first dc2tog, fasten off. Use your hook to pull the yarn tail to the back through the next st.———12 dc3tog

Round 3: With the next color, sl st to the ch-2 space before the point of fastening off, (ch 2, dc2tog) in the same ch 2 space (counts as first dc3tog), (ch 1, dc3tog, ch 1) in the same ch-2 space, (dc3tog, ch 1, dc3tog, ch 1)in each ch-2 space across, skip beginning ch2 and sl st to the first dc2tog, fasten off. Use your hook to pull the yarn tail to the back through the next st.——-24 dc3tog

Round 4 (squaring round): With Off White color yarn, sl st to the ch-1 space before the point of fastening off, ch 2 (counts as first dc), (2dc, ch 1, 3 dc) in same ch-1 space, *(2 hdc in next ch-1 space, 2 sc in next three ch-1 spaces, 2 hdc in next ch-1 space**, ( 3dc, ch 1, 3dc) in next ch-1 space), repeat from * 3 more times and stop the last repeat at **, sk the beginning ch 2 and sl st to first dc, fasten off.
Now follow the above pattern to make a total of 18 squares in the colors mentioned below. Round 4 or the squaring rounds for all the squares is made in Off White color.
Colors and Number of Squares
Given below are the total number of squares to make in each color combination. The colors are listed from the center outward.

Soft Pink, Taupe, Plum Wine- make 4
Bone, Plum Wine, Taupe- make 4
Taupe, Plum Wine, Soft Pink- make 4
Soft Pink, Plum Wine, Bone- make 2
Bone, Soft Pink, Strawberry- make 2
Soft Pink, Strawberry, Plum Wine- make 2
Joining the Squares

1. Decide how you would like to arrange your squares. You can see how I arranged mine in pic 6 above.
2. First, use 3 squares each to make a long strip. Then join the 3 strips together to make the front or back panel. You will be using a sl st seam to join the squares together as follows.
3. Keep 2 squares with the right side touching each other, sl st the ch-1 spaces in the corner together, sl st to join each st across to the ch-1 spaces in the next corner, sl st the corner ch-1 spaces together, fasten off.
4. Now place the third square on top of it with the right sides touching and sl st to join as mentioned above.
5. Make 2 more strips from the remaining 6 squares taking care to arrange them in the right order. Repeat the same steps to make 3 strips for the back panel.
Joining the Strips Together
Overview: You will sl st the 2 strips together going through the ch-1 spaces and all the sts. You will also work a sl st at the seam between the squares even if there is no real st there. Here is a breakdown for beginners.
Place 2 strips with the right sides touching each other. Sl st the corner ch-1 spaces together, sl st to join each st across to the next ch-1 space of the square, sl st the corner ch-1 spaces together, sl st to join the seam line of the 2 squares, sl st the corner ch-1 spaces of the second square together, sl st to join each st across to the next ch-1 space of the square, sl st the corner ch-1 spaces together, sl st to join the seam line of the 2 squares, sl st the corner ch-1 spaces of the third square together, sl st to join each st across to the next ch-1 space of the square, sl st the corner ch-1 spaces together, fasten off.
Join the third strip in the same way to complete your front panel. Repeat the same steps to make a back panel just like the front.
Border Around the Squares
We will now add a border around the front and back panels to even out the edges. This should be worked on the right side.
With Off White color yarn, sl st to any corner ch-1 space, 3 sc in the same space, *(1 sc in each st across to next ch-1 space of the square, 1 sc in the ch-1 space in the corner of the square, 1 hdc in the junction between the squares, 1 sc in the ch-1 space of the next square, 1 sc in each st across to next ch-1 space of the square, 1 sc in ch-1 space, 1 hdc in the junction between the squares, 1 sc in the ch-1 space of the next square, 1 sc in each st across to next ch-1 space of the square, 3 sc in the corner ch-1 space), repeat from * until you have worked all around, sl st to the first sc, fasten off.
The edge still won’t be perfectly straight but it will even out once we join the sides.
Sides and Bottom of the Bag

The sides and bottom are made using one long strip of single crochet.
Row 1: Ch 15, 1 sc in 2nd ch from hook and across to end, turn.——–14 sc
Row 2: Ch 1v(not counted as a st), 1 sc in first st and each st across to end, turn.—-14 sc
Repeat Row 2 until your strip is long enough to go along the sides and bottom of the bag but do not fasten off. We will keep the yarn attached to adjust the length of the side to fit the bag later.
Attaching the Side to the Bag
Start attaching the side to the front panel with a sl st seam taking care to start at the foundation chain side of the side strip. When you reach the end, add or unravel rows to make the side strip fit the front panel. Fasten off and complete slip stitching the 2 pieces together.
Place the back panel on top of the side strip right side down and sl st them together. Take care to make sure the squares in the front and back panels align properly.
Top Border
We will now add a few rounds of sc to the top opening of the bag. This will be worked on the right side of the bag.
Note: On the foundation chain side of the side strip, you will not have actual stitches, so work a sc for each free loop you see.
Sl st to any st on the last row of the side strip, 1 sc in first st, place a marker in this st, *(1 sc in each st until you reach back near the marked st, do not sl st to join, directly work a sc in the marked st, move the marker up), keep repeating from * until you have a 1-inch border on top, sl st in each st around until you reach back near the marked st, fasten off.
Weaving in the Tails
Weave in all the tails before you proceed.
Preparing the Lining

Before we add the plastic canvas, we will prepare the lining. Fold your lining fabric and place the bag flat on it.
Trace around the bag leaving just a 1/4 inch gap for seam allowance along the bottom and sides, but when you are in the upper 2 inches of the bag, make the gap wider to almost 3/4 inches on each side (see pic 8 above). If the lining is narrower at the top, we will have a hard time sewing it to the bag. Also, leave an extra 3/4″ along the top of the bag. We will be folding this part down and it will give some extra thickness around the opening of the bag.
Sew the two lining pieces together along the sides and the bottom. Ideally, if you have a sewing machine you should be using a locking stitch like the zig-zag stitch. I used a backstitch with a 1/4 inch seam allowance to sew by hand but it is best to do an overlocking stitch so the fabric doesn’t fray on the edges.
You can learn how to do the overlock stitch by hand here. Watch from time stamp 0:40. You may not have to make the markings and might be able to just eyeball it.
Adding Plastic Canvas to Shape the Bag
Note: You will use Off White yarn and a yarn needle to attach the plastic canvas to the bag.
Cut 3 strips of plastic canvas to fit the base and 2 sides of the bag. The width of all the 3 pieces should be slightly smaller than the width of the single crochet strip. The base strip should be as long as the width of the front or back panel but the side strips have to be 3/4 inches shorter than the side of the bag.
First, turn the back wrong side out and attach the plastic canvas to the base using a whip stitch all around the edge. Start with a shorter side.

Then attach the side strips starting from the base of the bag. The edges of the plastic canvas strips on the bottom and sides should be placed close to each other (see pic 9 above). The side strips should end 3/4 inch below the top edge of the bag. This will leave enough space to sew our lining.
Adding the Lining
Note: You will need a regular needle and thread to attach the lining to the bag.
Now that you have the plastic canvas in place, it is time to add the lining. Fold the top of the prepared lining by an inch, insert it into the bag and make sure it is touching the bottom of the bag (see pic 10). Adjust the fold on top to ensure that there is a gap of approximately 1/2 inch between the lining and the top of the bag. Pin the lining in place and sew it down securely with a whip stitch (see pic 11).
Adding the Straps
You can now attach your leather handles to the bag. I first inserted my needle into the tiny holes to make them bigger and visible before attempting to sew it down or it was impossible to see the holes. You can also mark the back of the holes with a pen to make them easier to spot. Waxed thread or any leather sewing thread is best, but you can also get away with 2 strands of regular polyester sewing thread.
Pin it for later:


It’s a great tutorial. Thanks so much for all the work and time behind it! Your classic granny square bag looks super cool. I love to make crochet squares, it’s a relaxing task to me. But it isn’t so relaxing to join them at the end. Have a great summer weekend!
I look forward making this bag. The colors that were used are great, however I will use different colors.