
Bailey Boot Cuffs, Free Crochet Pattern
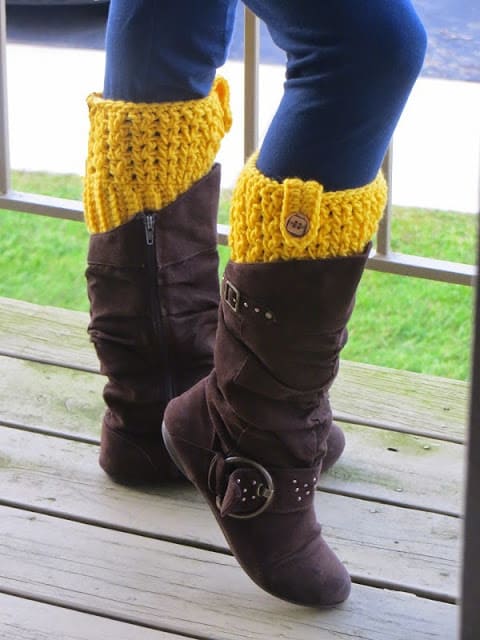


Boot cuffs are a very popular accessory for high school kids and they sell like hotcakes at craft fairs. They look stylish peeking out of your boots! It can go well with skinny jeans as well as a dress or a skirt. This is one fashion accessory you wouldn’t want to miss! Boot cuffs not only add warmth but also keep snow from getting into your boots. Whipping these up takes only a couple of hours and can make great Christmas gifts. This crochet pattern is simple, quick and yields elegant results. Crochet them in colors of your choice and add a new twist to your old boots.
PATTERN
Materials
1. Worsted weight ( size 4 medium) yarn
2. Hook – G (4.25mm)
3. A Pair of ¾ inch wooden buttons
Gauge
Using G hook, 16 sc rows worked in back loops = 4 inches
Size
Finished size:12.5 inches around and 6 inches high.
Stitch Explanation
Work in Back loops or Front loops only: See the picture below to learn what it means to work into back loops only or front loops only. When making a regular stitch the hook is inserted under both loops as seen in 1st diagram below but inserted only into one of the loops in case you are working into the back or front loops.

Yardage
150 Yards for a pair of boot cuffs
Stitch Abbreviations
Pattern is in standard American terms.
sc- single crochet
dc- double crochet
sl st- slip stitch
ch- chain
sk- skip
With G hook chain 10.
Row 1: 1 sc in 2nd chain from hook and each chain across. Turn.————-9 sc
Row 2: Working in back loops only, ch 1 ( not counted as a st) , 1 sc in back loop of the same st as ch 1, 1 sc in back loop of next 8 stitches. Turn.—————– 9 sc

Repeat Row 2 till your work measures 10 inches without stretching the band. Now slip stitch the two shorter ends together inserting your hook through the front loops of the stitches on your last row and the free loops on the very first row to form a circular band as show in Pic 1 above. See Stitch explanation for working in front loops. I got 18 ridges in the band including the ridge formed by slip stitching the ends together.

Round 1:Now the rest of the boot cuff will be worked in the round as shown in pic 2 above. Ch 1( does not count as a st), proceed to work a round of 36 sc distributed evenly all around the band, working one sc in each row end (each ridge and trough). Sl st to the first sc. Do not turn. ——— 36 sc
Round 2: Ch 3 ( counts as first dc), 1 dc in the same st, *( skip next st, 2 dc in next), repeat from * to end of the round, sl st to the top of beginning ch-3. Do not turn.—————- 36 dc in the round
Round 3: Sl st in the gap between beginning ch-3 and the next dc, ch 3 ( counts as first dc), 1 dc in to the same space, *(2 dc in to the gap between next two dc stitches), repeat from * till end of the round, sl st to the top of beginning ch-3. Do not turn.—————- 36 dc in the round
Repeat Round 3, three more times.
Note: Make sure the sc stitches of the next round are worked tight.
Round 4: Ch 1, 1 sc in next st and each st around, sl st to beginning ch1, fasten off.
On the bottom side of the boot cuff, work a round of 36 sc and fasten off. This will keep your ribbed band from stretching too much. Weave in all the ends.
Finishing Round: On the bottom side of the ribbed band, work 36 sc as evenly distributed as possible and fasten off.
Band for Embellishment

Ch 18, 1 hdc in 3rd ch from hook, 1 hdc in next 14 st, 4 hdc in last st, do not turn but continue to work in to the free loops of the foundation chain as shown in pic 3, 1 hdc in each free loop across. Fasten off. Weave in the tails. Fold the band over the top of the boot cuff, place the button and sew through both the layers.
Make one more following the same pattern.




What an adorable pattern 🙂 Thanks for sharing! I will surely be making a pair!!
http://www.the5cees.blogspot.com
And yet another wonderful pattern that you are sharing for free! So generous that I found I had to purchase your snow boot pattern to compensate you in a small way. I have made several of your free patterns already, so felt it was only fair. Thanks and DO keep on designing, you're fabulous!
How do I ge the pattern?
Please click on the link at the bottom of the blog post.
I think your boot cuffs are adorable. I do have one general question, if you stretch them to get them on your calf, does washing them return them to their original size? I guess the boots keep them from falling/sliding down. Thanks!
Most acrylic yarns are pretty elastic and stretching them should not alter their shape.
Thanks for the free pattern! Do you have any suggestions on how to make it a full leg warmer?
Hi Sonya, It would take a little tapering at the feet part. I haven't tried it yet, sorry!
Love them! Downloaded pattern & it states to ch 10. Is that for a size 10" calf? I need it for a 14" calf – do I chain 14? Wud like to make these for my granddaughters for Christmas. Also luv yr fingerless gloves. Yr patterns r awesome & the colours u choose r fantastic. I luv the blue u hv chosen – my one granddaughter's favourite colour is blue so will do hers in a colour similar to yrs. Tk u for sharing & yr help. I hv pinned u for this & others.
You do not have to add more chains. It will work fine for a 14 inch calf.
Love this pattern! They flew out of my shop. Thanks for sharing!
These are working up beautifully. The only issue I had was that when I first found this pattern, the description said it used a G or 4 mm hook. So, I used my 4 mm hook instead of the 4.25 the top of the pattern calls for (didn't bother re-checking the materials section at the top of the pattern becausebo had already read somewhere that it used a 4mm). It took 48 rows of sc using I Love This Yarn to get it to 10 inches. Then when I started crocheting in rounds, it was ridiculously big. I was bummed that I had to pull all of my work out. If the first linesbhad said to sc in the blo for 36 rows, that wouldn't have been perfect (I usually don't read ahead of patterns, needless to say by the time it was time to crochet in rounds, I was very confused why the pattern said 36 sc and I had 48 rows!
Thanks again for the pattern!
I have made several pair and it seems I can't make them fast enough The ladies are crazy about this pattern
Thank you for this pattern
Hi there – I looked at this pattern on Aug 27th, and now this morning I went to print it, and the link is no longer available. Will you be reposting it again?