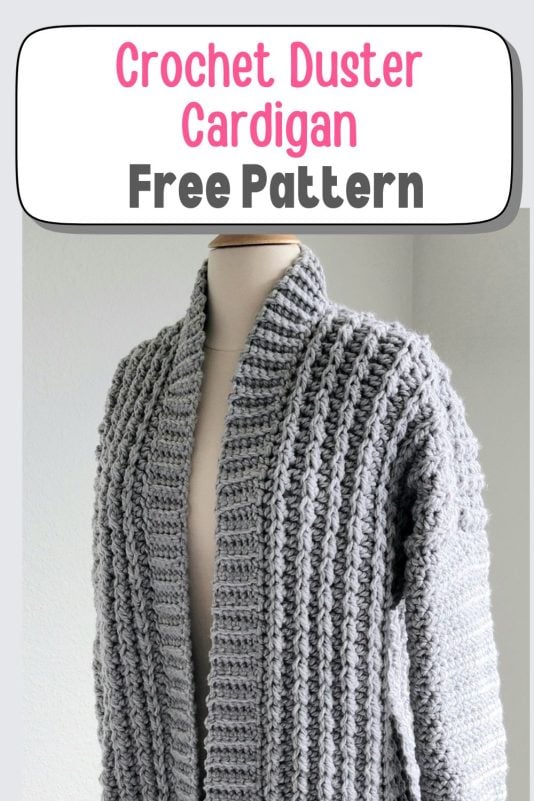
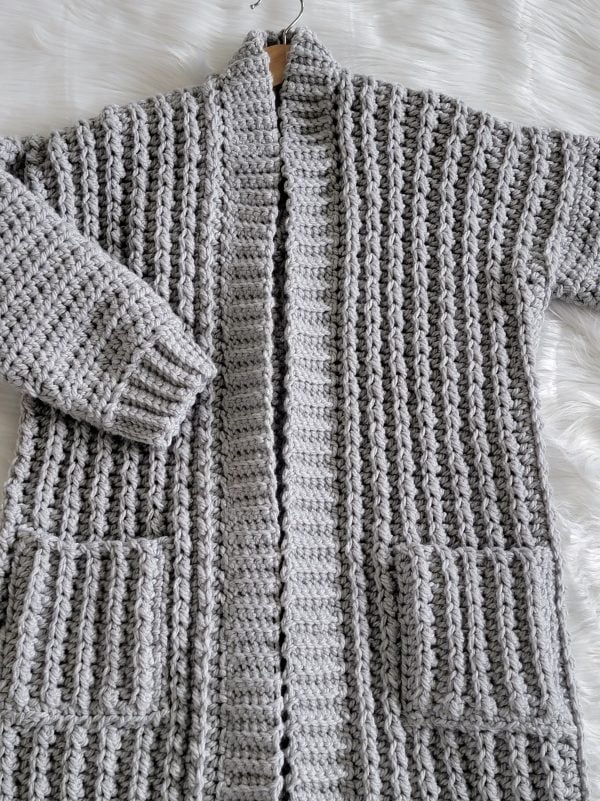
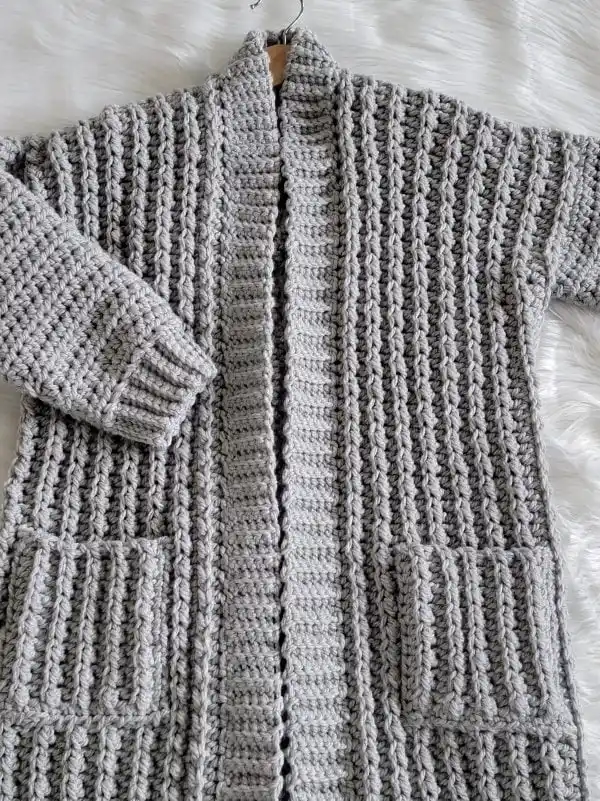
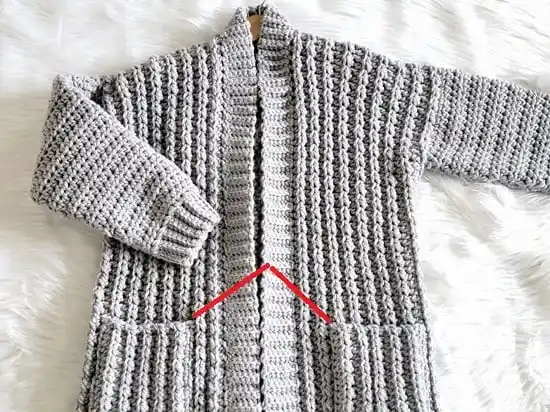
The Foggy Day Cardigan is a cozy, easy-to-wear crochet duster cardigan that feels just right for everyday comfort. The soft gray color gives it a calm, relaxed look that pairs well with anything.
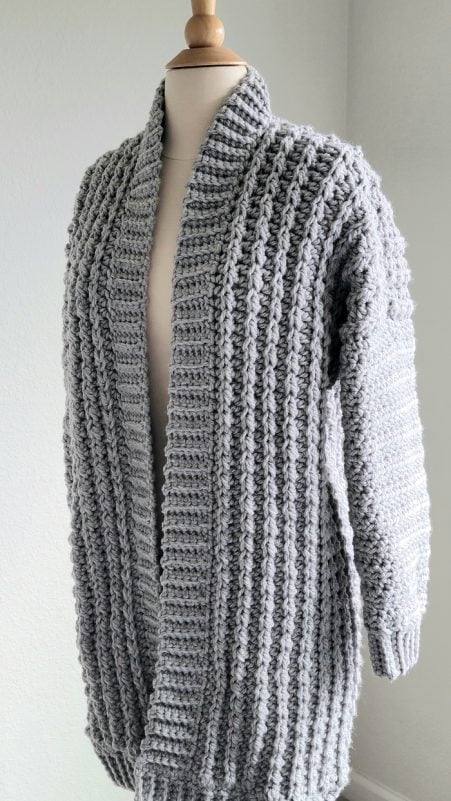
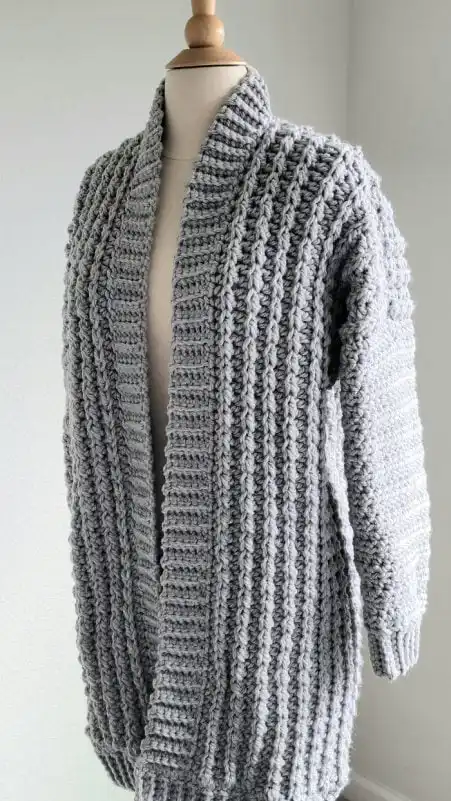
The free duster crochet pattern uses basic stitches that create a nice textured ridge throughout the cardigan. It works up quickly with chunky yarn, making it a fun and satisfying project.

The fit is loose and comfy, with an open front that’s perfect for layering over your favorite tops. You can wear it around the house or out on a cool day.

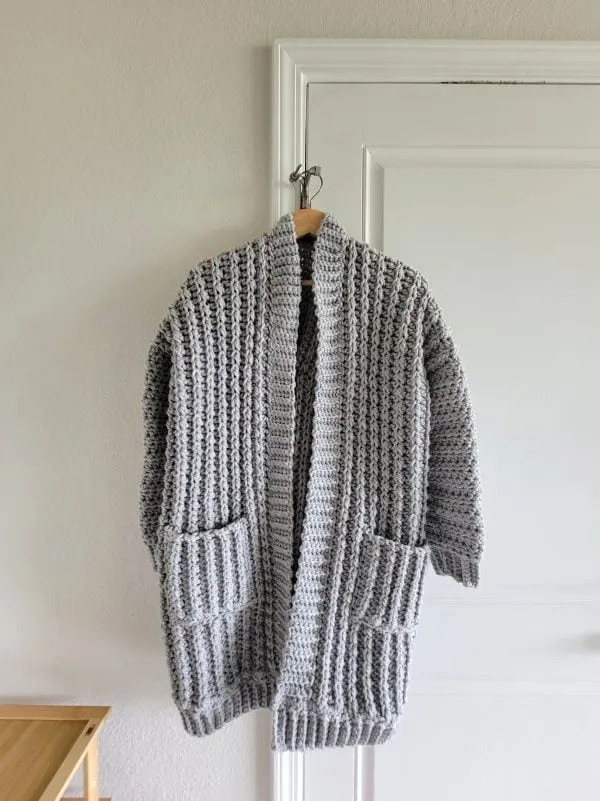
The cardigan is all about comfort, warmth, and simplicity. It’s one of those pieces you’ll find yourself reaching for again and again.
Crochet Duster Cardigan
Pin it for later here.
Materials
1. Bernat Sofy Chunky Yarn in color Grey Heather. It is size 6 Super Bulky yarn.
2. L (8mm) hook for the body of the cardigan and an I (5.5mm) hook for the ribbing
3. Tapestry needle to weave in the ends.
4. Locking stitch markers. You can also use safety pins.
Finished Sizes
1. The measurements for different sizes are written in the order (S, M) (L, XL) (2XL, 3XL).
2. The cardigan stretches by about 2″ when worn; the measurements given reflect the length when worn.
3. The finished length is measured from the back of the neck, just below the neck ribbing, to the hem.
Finished Chest: (39.5, 42) (45, 49) (53, 56)”
Back Width: (19.75, 21) (22.5, 24.5) (26.5, 28)”
Finished Length: (33.5, 33.5) (35, 35) (36, 36)”
Armhole Depth: (7, 7) (8, 8) (9, 9)”
Sleeve Length: (17, 17) (18, 18) (18.5, 18.5)” including the cuff
Yardage
Note: Err on the side of caution and purchase one additional skein.
Each skein is 108 yards.
S: 11 skeins
M: 11-1/2 skeins
L: 13-1/2 skeins
XL: 15 skeins
2XL: 17 skeins
3XL: 19 skeins
Stitch Abbreviations
The pattern is written in US terms.
st: stitch
ch: chain
sc: single crochet
hdc: half double crochet
sk: skip
sl st: slip stitch
RS: Right side of the cardigan with braid pattern
WS: Wrong side or inside of the cardigan
Stitch Explanations
BLO (Back loop only): You insert your hook only into the back loop of the stitch (the loop away from you). See pic below.


hdc2tog: (YO, pull up a loop in the next st)twice, YO and pull through all the 5 loops on your hook to complete your hdc2tog. It is a decrease that joins 2 sts into one.
Gauge
Pattern for Gauge Swatch
We will make the pockets first and use that as a gauge swatch.
Pocket Pattern (Make 2)
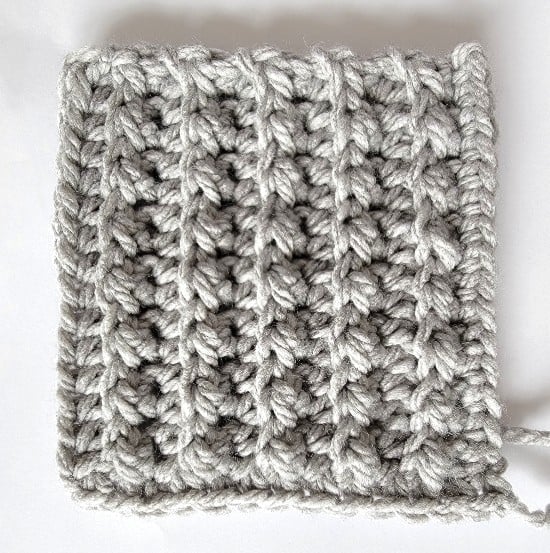
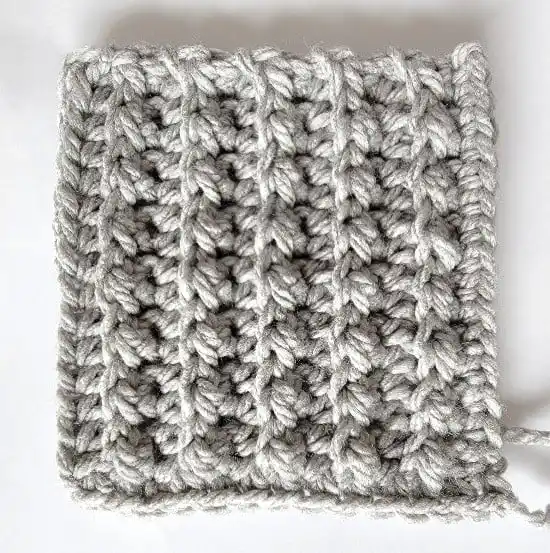
1. Finished pocket
Leave a 1-yard tail for sewing, and loosely ch 16 with the bigger hook.
Row 1: Working into the back bumps of the chain throughout, 1 sc in the 2nd from the hook and each ch across to end, turn. (15 sc)
Row 2: Ch 1 (does not count as a st here and throughout), 1 hdc in BLO of the first st, 1 sl st in BLO of the next st, (1 hdc in BLO of the next st, 1 sl st in the BLO of the next st), repeat from * to last st, 1 hdc in both loops of the last st, turn. (15 sts)
Row 3: Ch 1 (does not count as a st here and throughout), 1 hdc in BLO of first st and each st across to last st, 1 hdc in both loops of the last st, turn. (15 sts)
Repeat Rows 2 and 3 four more times, ch 1 at the corner, pivot, and work a row of sc along the top edge. You will be working into row ends where there are no actual stitches, so distribute sc sts as evenly as possible.
Do not insert your hook into any big holes, or it will make them larger; insert it into the body of the sts instead. Fasten off with a 1-1/2 yard tail.
You will now have 2 tails at the same corner. Make one more pocket following the same pattern.
Gauge
Using L (8mm) Hook,
10 sts X 7 Rows in pattern stitch = 4″
Use any size hook to attain the gauge.
Crochet Cardigan Pattern
Pattern Notes
1. The front and back panels are made in rows and are rectangular in shape. The two front panels are identical.
2. The front panels are joined to the back panel along the shoulder and sides, and the sleeves are worked directly onto the cardigan.
3. The length of your foundation chain determines the length of your cardigan. This is a long cardigan and can be made in the length as stated in the pattern, or you can choose to make yours shorter by starting with a smaller number of chains. You can chain any even number to start.
4. Patterns for sizes S and M are grouped, and L and XL are grouped, and 2XL and 3XL are grouped. Headings for the different sizes are color-coded for ease.
Small and Medium
Back Panel
Loosely Ch 70 with the bigger hook.
Row 1: Working into the back bumps of the chain throughout, 1 sc in the 2nd from the hook and each ch across to end, turn. (69 sc)
Row 2: Ch 1 (does not count as a st here and throughout), 1 hdc in BLO of first st, 1 sl st in BLO of next st, (1 hdc in BLO of the next st, 1 sl st in the BLO of the next st), repeat from * to last st, 1 hdc in both loops of the last st, turn. (69 sts)
Row 3: Ch 1 (does not count as a st here and throughout), 1 hdc in BLO of first st and each st across to last st, 1 hdc in both loops of the last st, turn. (69 sts)
Repeat Rows 2 and 3 until you have a total of 39 rows for size Small and 41 Rows for size Medium, including the first sc row. You will end in a repeat of Row 3. The back panel measured approximately 29″ in length.
Front Panel
Loosely Ch 70 with the bigger hook.
Row 1: Working into the back bumps of the chain throughout, 1 sc in the 2nd from the hook and each ch across to end, turn. (69 sc)
Row 2: Ch 1 (does not count as a st here and throughout), 1 hdc in BLO of the first st, 1 sl st in BLO of the next st, (1 hdc in BLO of the next st, 1 sl st in the BLO of the next st), repeat from * to last st, 1 hdc in both loops of the last st, turn. (69 sts)
Row 3: Ch 1 (does not count as a st here and throughout), 1 hdc in BLO of first st and each st across to last st, 1 hdc in both loops of the last st, turn. (69 sts)
Repeat Rows 2 and 3 until you have a total of 17 rows for size Small and 19 rows for size Medium, including the first single crochet row.
Joining the Front and Back Panels
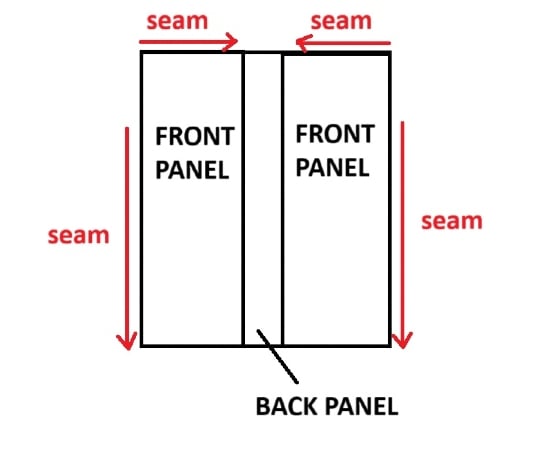

2. Join the front and back panels along the shoulders and sides
The side with the braid pattern is the RS of your cardigan. Place the front panels on the back panel with the RS touching each other. This will make sure the seam will be on the WS.
Align the braids as you go and seam the front panels to the back panel along the shoulders. Leave a 7″ gap from the shoulder for your armhole and seam the rest of the sides. While leaving the 7″ gap for the second armhole, ensure that you have the same number of stitches as your first armhole. I had 15 sts across the front panel and 15 along the back panel.
Sleeve Pattern
Round 1: Slip stitch to the underarm (where there is no stitch), ch 1 (sl st+ ch 1 counts as the first st), 1 hdc in each st across to end, sl st to top of the beginning ch, turn. (31 sts)
Round 2: Ch 2 (counts as a hdc here and throughout), 1 hdc in each st across to end, sl st to top of beginning ch 2, turn. (31 sts)
Repeat Round 2 for 5 more rounds, remembering to turn at the end of every round or your seam will not be straight.
Round 8: Ch 2, hdc2tog across the next 2 sts, 1 hdc in each st across to last 2 sts, hdc2tog in last 2 sts, sl st to top of beginning ch2, turn. (29 sts)
Rounds 9 to 12: Ch 2 (counts as a hdc here and throughout), 1 hdc in each st across to end, sl st to top of beginning ch2, turn. (29 sts)
Round 13: Ch 2, hdc2tog across the next 2 sts, 1 hdc in each st across to last 2 sts, hdc2tog in last 2 sts, sl st to top of beginning ch2, turn. (27 sts)
Round 14 to 17: Ch 2 (counts as a hdc here and throughout), 1 hdc in each st across to end, sl st to top of beginning ch2, turn. (27 sts)
Round 18: Ch 2, hdc2tog across the next 2 sts, 1 hdc in each st across to last 2 sts, hdc2tog in last 2 sts, sl st to top of beginning ch2, turn. (25 sts)
Round 19 to 23: Ch 2 (counts as a hdc here and throughout), 1 hdc in each st across to end, sl st to top of beginning ch2, turn. (25 sts)
Now your sleeve should be approximately 15 inches long for both sizes. If not, repeat the last round to add length. Do not fasten off.
Cuff
Notes
1. Switch to the smaller hook.
2. We will alternate between 2 and 3 sl sts to make the cuff tighter. If you want it to be looser, work 2 sl sts throughout.
3. Start Row 1 on the RS or outside of the sleeve.
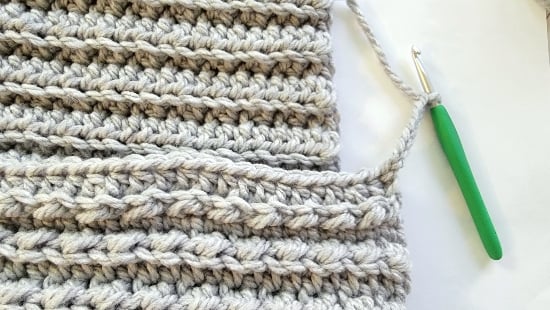
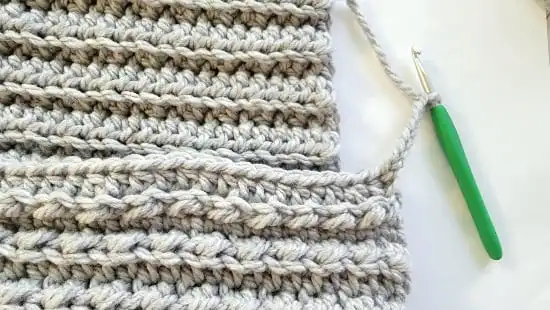
4. See pic 3 below for the steps involved in making the ribbing.
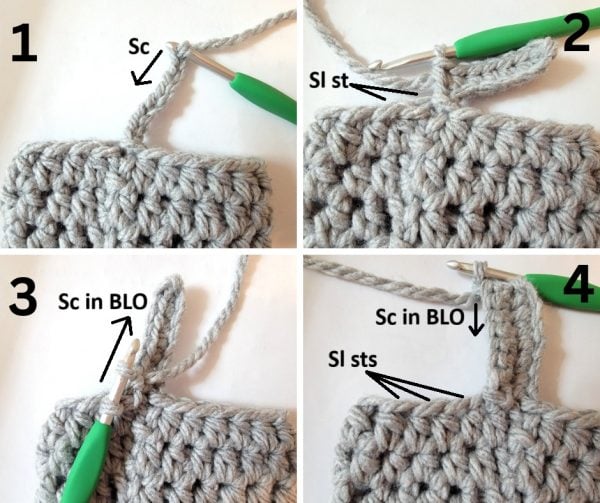

3. Steps for making the cuff ribbing
Row 1: Ch 8, 1 sc in 2nd ch from hook and next 6 chs, sl st to the next 2 free sts on the sleeve, turn. (7 sc)
Row 2: Skip the first 2 sts (the sl sts), 1 sc in BLO of the next 7 sc, ch 1, and turn. (7 sc)
Row 3: 1 sc in the BLO of the first 7 sts, sl st to the next 3 sts on the sleeve, turn. (7sc)
Row 4: Skip the first 3 sts (the sl sts), 1 sc in BLO of the next 7 sc, ch 1, and turn. (7 sc)
Row 5: 1 sc in the BLO of the first 7 sts, sl st to the next 2 sts on the sleeve, turn. (7sc)
Row 6: Skip the first 2 sts (the sl sts), 1 sc in BLO of the next 7 sc, ch 1, and turn. (7 sc)
Repeat Rows 3 to 6 until you work all around the sleeve opening. Sl st the 2 ends of the ribbing together, going under 1 loop on the foundation chain side and the outer loop of the stitches on the last row. Fasten off.
Collar
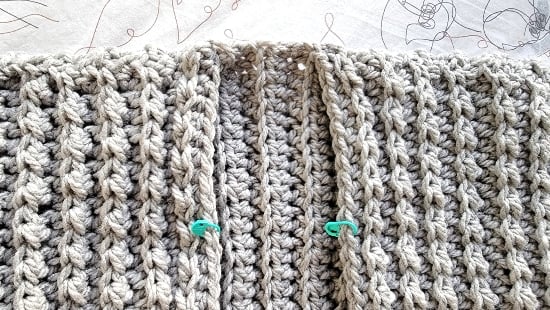
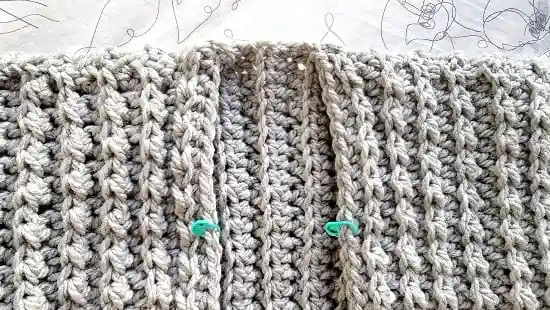
4. Mark the 15th st from the shoulder. This picture incorrectly shows the 11th stitch marked
Notes
1. We will now work a ribbing along the front opening, similar to the sleeve cuff.
2. Mark the 15th st from the shoulder seam on either side of the front opening (see pic 4 above). I marked the 11th stitch by mistake in the picture above, but that wasn’t enough, so I have asked you to mark the 15th stitch instead. Between these 2 markers, we will work more ribbing rows so it can comfortably go around your neck without the hem riding up.
5. Starting ribbing on the front opening
Row 1 (see pic 5 above): With the smaller hook, sl st to the bottom left corner of the front opening (sl st counts as the first ch here), ch 6, 1 sc in the 2nd ch from hook and next 5 chs, sl st to next 2 free sts on the cardigan, turn. (6 sc)
Row 2: Skip the first 2 sts (the sl sts), 1 sc in BLO of the next 6 sc, ch 1, and turn. (6 sc)
Row 3: 1 sc in the BLO of the first 6 sts, sl st to the next 2 sts on the sleeve, turn. (6 sc)
Repeat Rows 2 and 3 until you reach near the first marker.
Next Row: 1 sc in the BLO of the first 6 sts, sl st to the next free st on the sleeve, turn. (6 sc)
Next Row: Skip the first st (the sl st), 1 sc in BLO of the next 6 sc, ch 1, and turn. (6 sc)
Repeat the above 2 rounds until you hit the marker on the other side of the front opening. Along the back of the neck, you don’t have actual stitches, so just work sl st into the gaps along that edge. Now, continue as below to the end of the opening and fasten off.
Row 2: Skip the first 2 sts (the sl sts), 1 sc in BLO of the next 6 sc, ch 1, and turn. (6 sc)
Row 3: 1 sc in the BLO of the first 6 sts, sl st to the next 2 sts on the sleeve, turn. (6 sc)
Hem
Notes
1. We will now work a ribbing along the hem.
2. There are no actual sts along the hem, so we will first work a row of sc along the edge before we start the ribbing.
3. I like the ribbing to be a little smaller than the hem. So after every 16th row of the ribbing, I worked 3 sls sts instead of 2.
Row 1: Using the bigger hook and working along the inside of the cardigan, work a row of sc along the hem of the cardigan, and turn. You will have actual sts to work into only along the ribbing. (127 sc for size S and 137 sc for size M)
You might have a few sts more or less than 127 or 137 based on how you distributed your stitches, and that is fine.
Row 2: Switch to the smaller hook. Ch 7, 1 sc in the 2nd ch from hook and next 5 chs, sl st to next 2 free sts on the cardigan, turn. (6 sc)
Row 3: Skip the first 2 sts (the sl sts), 1 sc in BLO of the next 6 sc, ch 1, and turn. (6 sc)
Row 4: 1 sc in the BLO of the first 6 sts, sl st to the next 2 sts on the sleeve, turn. (6 sc)
Repeat Rows 3 and 4, but after every 16th row, work 3 sl sts instead of 2 to make your hem tighter.
Attaching the Pockets
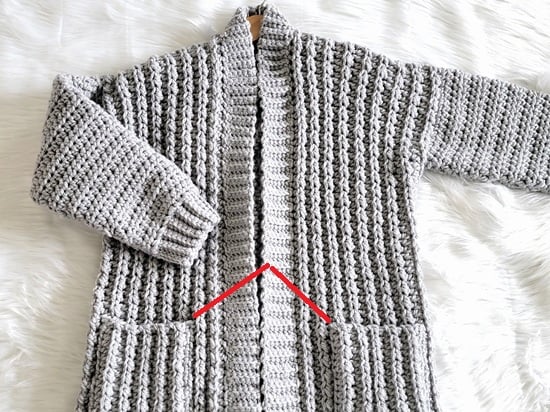
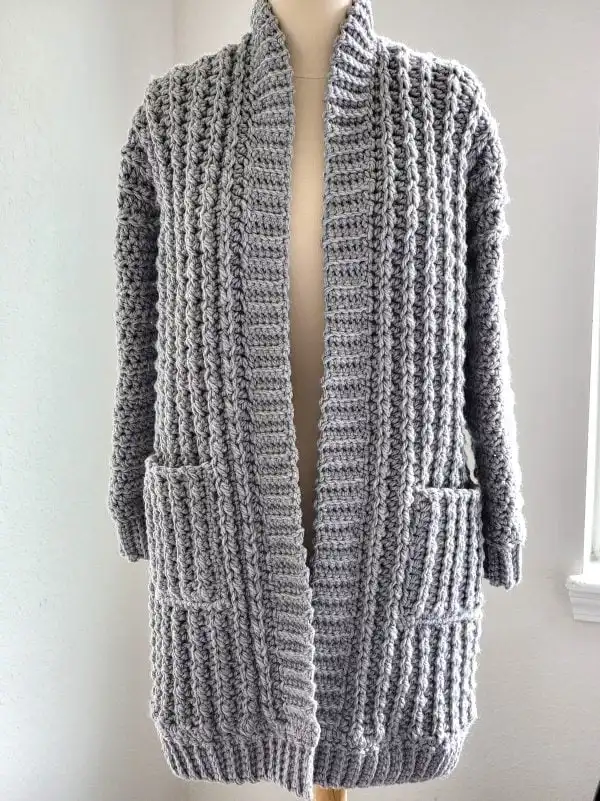
6. Pocket placed after the 2nd braid
Attach the pockets we made at the beginning. Try the cardigan on to decide the height placement that you prefer.
Using the 2 long tails left on the pocket, whip stitch the pocket to the cardigan right after the 2nd braided line from the collar (see pic 6 above). The sc row will be at the bottom. I used the smaller tail to whip stitch up along the right edge and the longer tail to stitch along the bottom and left edge of the pocket. Remember to reinforce with extra sts at the top 2 corners of the pocket.
Finishing
Weave in all the tails along the inside of the cardigan.
Large and XL
Back Panel
Loosely Ch 74 with the bigger hook.
Row 1: Working into the back bumps of the chain throughout, 1 sc in the 2nd from the hook and each ch across to end, turn. (73 sc)
Row 2: Ch 1 (does not count as a st here and throughout), 1 hdc in BLO of first st, 1 sl st in BLO of next st, (1 hdc in BLO of the next st, 1 sl st in the BLO of the next st), repeat from * to last st, 1 hdc in both loops of the last st, turn. (73 sts)
Row 3: Ch 1 (does not count as a st here and throughout), 1 hdc in BLO of first st and each st across to last st, 1 hdc in both loops of the last st, turn. (73 sts)
Repeat Rows 2 and 3 until you have a total of 43 rows for size Large and 47 Rows for size XL, including the first sc row. You will end in a repeat of Row 3. The back panel measured approximately 31.5″ in length.
Front Panel
Loosely Ch 74 with the bigger hook.
Row 1: Working into the back bumps of the chain throughout, 1 sc in the 2nd from the hook and each ch across to end, turn. (73 sc)
Row 2: Ch 1 (does not count as a st here and throughout), 1 hdc in BLO of the first st, 1 sl st in BLO of the next st, (1 hdc in BLO of the next st, 1 sl st in the BLO of the next st), repeat from * to last st, 1 hdc in both loops of the last st, turn. (73 sts)
Row 3: Ch 1 (does not count as a st here and throughout), 1 hdc in BLO of first st and each st across to last st, 1 hdc in both loops of the last st, turn. (73 sts)
Repeat Rows 2 and 3 until you have a total of 19 rows for size Large and 21 rows for size XL, including the first single crochet row.
Joining the Front and Back Panels
2. Join the front and back panels along the shoulders and sides
The side with the braid pattern is the RS of your cardigan. Place the front panels on the back panel with the RS touching each other. This will make sure the seam will be on the WS.
Align the braids as you go and seam the front panels to the back panel along the shoulders. Leave an 8″ gap from the shoulder for your armhole and seam the rest of the sides. While leaving the 8″ gap for the second armhole, ensure that you have the same number of stitches as your first armhole. I had 17 sts across the front panel and 17 along the back panel.
Sleeve Pattern
Round 1: Slip stitch to the underarm (where there is no stitch), ch 1 (sl st+ ch 1 counts as the first st), 1 hdc in each st across to end, sl st to top of the beginning ch, turn. (35 sts)
Round 2: Ch 2 (counts as a hdc here and throughout), 1 hdc in each st across to end, sl st to top of beginning ch 2, turn. (35 sts)
Repeat Round 2 for 5 more rounds, remembering to turn at the end of every round or your seam will not be straight.
Round 8: Ch 2, hdc2tog across the next 2 sts, 1 hdc in each st across to last 2 sts, hdc2tog in last 2 sts, sl st to top of beginning ch2, turn. (33 sts)
Rounds 9 to 12: Ch 2 (counts as a hdc here and throughout), 1 hdc in each st across to end, sl st to top of beginning ch2, turn. (33 sts)
Round 13: Ch 2, hdc2tog across the next 2 sts, 1 hdc in each st across to last 2 sts, hdc2tog in last 2 sts, sl st to top of beginning ch2, turn. (31 sts)
Round 14 to 17: Ch 2 (counts as a hdc here and throughout), 1 hdc in each st across to end, sl st to top of beginning ch2, turn. (31 sts)
Round 18: Ch 2, hdc2tog across the next 2 sts, 1 hdc in each st across to last 2 sts, hdc2tog in last 2 sts, sl st to top of beginning ch2, turn. (29 sts)
Round 19 to 25: Ch 2 (counts as a hdc here and throughout), 1 hdc in each st across to end, sl st to top of beginning ch2, turn. (29 sts)
Now your sleeve should be approximately 16 inches long for both sizes. If not, repeat the last round to add length. Do not fasten off.
Cuff
Notes
1. Switch to the smaller hook.
2. We will alternate between 2 and 3 sl sts to make the cuff tighter. If you want it to be looser, work 2 sl sts throughout.
3. Start Row 1 on the RS or outside of the sleeve.
4. See pic 3 below for the steps involved in making the ribbing.
3. Steps for making the ribbing
Row 1: Ch 8, 1 sc in 2nd ch from hook and next 6 chs, sl st to the next 2 free sts on the sleeve, turn. (7 sc)
Row 2: Skip the first 2 sts (the sl sts), 1 sc in BLO of the next 7 sc, ch 1, and turn. (7 sc)
Row 3: 1 sc in the BLO of the first 7 sts, sl st to the next 3 sts on the sleeve, turn. (7sc)
Row 4: Skip the first 3 sts (the sl sts), 1 sc in BLO of the next 7 sc, ch 1, and turn. (7 sc)
Row 5: 1 sc in the BLO of the first 7 sts, sl st to the next 2 sts on the sleeve, turn. (7sc)
Row 6: Skip the first 2 sts (the sl sts), 1 sc in BLO of the next 7 sc, ch 1, and turn. (7 sc)
Repeat Rows 3 to 6 until you work all around the sleeve opening. Sl st the 2 ends of the ribbing together, going under 1 loop on the foundation chain side and the outer loop of the stitches on the last row. Fasten off.
Collar
4. Mark the 18th st from the shoulder. This picture incorrectly shows the 11th stitch marked
Notes
1. We will now work a ribbing along the front opening, similar to the sleeve cuff.
2. Mark the 18th st from the shoulder seam on either side of the front opening (see pic 4 above). I marked the 11th stitch by mistake in the picture above, but that wasn’t enough, so I have asked you to mark the 18th stitch instead. Between these 2 markers, we will work more ribbing rows so it can comfortably go around your neck without the hem riding up.
5. Starting ribbing on the front opening
Row 1 (see pic 5 above): With the smaller hook, sl st to the bottom left corner of the front opening (sl st counts as the first ch here), ch 6, 1 sc in the 2nd ch from hook and next 5 chs, sl st to next 2 free sts on the cardigan, turn. (6 sc)
Row 2: Skip the first 2 sts (the sl sts), 1 sc in BLO of the next 6 sc, ch 1, and turn. (6 sc)
Row 3: 1 sc in the BLO of the first 6 sts, sl st to the next 2 sts on the sleeve, turn. (6 sc)
Repeat Rows 2 and 3 until you reach near the first marker.
Next Row: 1 sc in the BLO of the first 6 sts, sl st to the next free st on the sleeve, turn. (6 sc)
Next Row: Skip the first st (the sl st), 1 sc in BLO of the next 6 sc, ch 1, and turn. (6 sc)
Repeat the above 2 rounds until you hit the marker on the other side of the front opening. Along the back of the neck, you don’t have actual stitches, so just work sl st into the gaps along that edge. Now, continue as below to the end of the opening and fasten off.
Row 2: Skip the first 2 sts (the sl sts), 1 sc in BLO of the next 6 sc, ch 1, and turn. (6 sc)
Row 3: 1 sc in the BLO of the first 6 sts, sl st to the next 2 sts on the sleeve, turn. (6 sc)
Hem
Notes
1. We will now work a ribbing along the hem.
2. There are no actual sts along the hem, so we will first work a row of sc along the edge before we start the ribbing.
3. I like the ribbing to be a little smaller than the hem. So after every 16th row of the ribbing, I worked 3 sls sts instead of 2.
Row 1: Using the bigger hook and working along the inside of the cardigan, work a row of sc along the hem of the cardigan, and turn. You will have actual sts to work into only along the ribbing. (140 sc for size Large and 152 for size XL)
You might have a few sts more or less than 140 or 152 based on how you distributed your stitches, and that is fine.
Row 2: Switch to the smaller hook. Ch 7, 1 sc in the 2nd ch from hook and next 5 chs, sl st to next 2 free sts on the cardigan, turn. (6 sc)
Row 3: Skip the first 2 sts (the sl sts), 1 sc in BLO of the next 6 sc, ch 1, and turn. (6 sc)
Row 4: 1 sc in the BLO of the first 6 sts, sl st to the next 2 sts on the sleeve, turn. (6 sc)
Repeat Rows 3 and 4, but after every 16th row, work 3 sl sts instead of 2 to make your hem tighter.
Attaching the Pockets
6. Pocket placed after 2nd braid
Attach the pockets we made at the beginning. Try the cardigan on to decide the height placement that you prefer.
Using the 2 long tails left on the pocket, whip stitch the pocket to the cardigan right after the 2nd braided line from the collar (see pic 6 above). The sc row will be at the bottom. I used the smaller tail to whip stitch up along the right edge and the longer tail to stitch along the bottom and left edge of the pocket. Remember to reinforce with extra sts at the top 2 corners of the pocket.
Finishing
Weave in all the tails along the inside of the cardigan.
2XL and 3XL
Back Panel
Loosely Ch 76 with the bigger hook.
Row 1: Working into the back bumps of the chain throughout, 1 sc in the 2nd from the hook and each ch across to end, turn. (75 sc)
Row 2: Ch 1 (does not count as a st here and throughout), 1 hdc in BLO of first st, 1 sl st in BLO of next st, (1 hdc in BLO of the next st, 1 sl st in the BLO of the next st), repeat from * to last st, 1 hdc in both loops of the last st, turn. (75 sts)
Row 3: Ch 1 (does not count as a st here and throughout), 1 hdc in BLO of first st and each st across to last st, 1 hdc in both loops of the last st, turn. (75 sts)
Repeat Rows 2 and 3 until you have a total of 51 rows for size 2XL and 55 Rows for size 3XL, including the first sc row. You will end in a repeat of Row 3. The back panel measured approximately 32.5″ in length.
Front Panel
Loosely Ch 76 with the bigger hook.
Row 1: Working into the back bumps of the chain throughout, 1 sc in the 2nd from the hook and each ch across to end, turn. (75 sc)
Row 2: Ch 1 (does not count as a st here and throughout), 1 hdc in BLO of the first st, 1 sl st in BLO of the next st, (1 hdc in BLO of the next st, 1 sl st in the BLO of the next st), repeat from * to last st, 1 hdc in both loops of the last st, turn. (75 sts)
Row 3: Ch 1 (does not count as a st here and throughout), 1 hdc in BLO of first st and each st across to last st, 1 hdc in both loops of the last st, turn. (75 sts)
Repeat Rows 2 and 3 until you have a total of 23 rows for size 2XL and 25 rows for size 3XL, including the first single crochet row.
Joining the Front and Back Panels
2. Join the front and back panels along the shoulders and sides
The side with the braid pattern is the RS of your cardigan. Place the front panels on the back panel with the RS touching each other. This will make sure the seam will be on the WS.
Align the braids as you go and seam the front panels to the back panel along the shoulders. Leave a 9″ gap from the shoulder for your armhole and seam the rest of the sides. While leaving the 9″ gap for the second armhole, ensure that you have the same number of stitches as your first armhole. I had 19 sts across the front panel and 19 along the back panel.
Sleeve Pattern
Round 1: Slip stitch to the underarm (where there is no stitch), ch 1 (sl st+ ch 1 counts as the first st), 1 hdc in each st across to end, sl st to top of the beginning ch, turn. (39 sts)
Round 2: Ch 2 (counts as a hdc here and throughout), 1 hdc in each st across to end, sl st to top of beginning ch 2, turn. (39 sts)
Repeat Round 2 for 5 more rounds, remembering to turn at the end of every round or your seam will not be straight.
Round 8: Ch 2, hdc2tog across the next 2 sts, 1 hdc in each st across to last 2 sts, hdc2tog in last 2 sts, sl st to top of beginning ch2, turn. (37 sts)
Rounds 9 to 12: Ch 2 (counts as a hdc here and throughout), 1 hdc in each st across to end, sl st to top of beginning ch2, turn. (37 sts)
Round 13: Ch 2, hdc2tog across the next 2 sts, 1 hdc in each st across to last 2 sts, hdc2tog in last 2 sts, sl st to top of beginning ch2, turn. (35 sts)
Round 14 to 17: Ch 2 (counts as a hdc here and throughout), 1 hdc in each st across to end, sl st to top of beginning ch2, turn. (35 sts)
Round 18: Ch 2, hdc2tog across the next 2 sts, 1 hdc in each st across to last 2 sts, hdc2tog in last 2 sts, sl st to top of beginning ch2, turn. (33 sts)
Round 19 to 26: Ch 2 (counts as a hdc here and throughout), 1 hdc in each st across to end, sl st to top of beginning ch2, turn. (33 sts)
Now your sleeve should be approximately 16.5 inches long for both sizes. If not, repeat the last round to add length. Do not fasten off.
Cuff
Notes
1. Switch to the smaller hook.
2. We will alternate between 2 and 3 sl sts to make the cuff tighter. If you want it to be looser, work 2 sl sts throughout.
3. Start Row 1 on the RS or outside of the sleeve.
4. See pic 3 below for the steps involved in making the ribbing.
3. Steps for making the ribbing
Row 1: Ch 8, 1 sc in 2nd ch from hook and next 6 chs, sl st to the next 2 free sts on the sleeve, turn. (7 sc)
Row 2: Skip the first 2 sts (the sl sts), 1 sc in BLO of the next 7 sc, ch 1, and turn. (7 sc)
Row 3: 1 sc in the BLO of the first 7 sts, sl st to the next 3 sts on the sleeve, turn. (7sc)
Row 4: Skip the first 3 sts (the sl sts), 1 sc in BLO of the next 7 sc, ch 1, and turn. (7 sc)
Row 5: 1 sc in the BLO of the first 7 sts, sl st to the next 2 sts on the sleeve, turn. (7sc)
Row 6: Skip the first 2 sts (the sl sts), 1 sc in BLO of the next 7 sc, ch 1, and turn. (7 sc)
Repeat Rows 3 to 6 until you work all around the sleeve opening. Sl st the 2 ends of the ribbing together, going under 1 loop on the foundation chain side and the outer loop of the stitches on the last row. Fasten off.
Collar
4. Mark the 18th st from the shoulder. This picture incorrectly shows the 11th stitch marked
Notes
1. We will now work a ribbing along the front opening, similar to the sleeve cuff.
2. Mark the 18th st from the shoulder seam on either side of the front opening (see pic 4 above). I marked the 11th stitch by mistake in the picture above, but that wasn’t enough, so I have asked you to mark the 18th stitch instead. Between these 2 markers, we will work more ribbing rows so it can comfortably go around your neck without the hem riding up.
5. Starting ribbing on the front opening
Row 1 (see pic 5 above): With the smaller hook, sl st to the bottom left corner of the front opening (sl st counts as the first ch here), ch 6, 1 sc in the 2nd ch from hook and next 5 chs, sl st to next 2 free sts on the cardigan, turn. (6 sc)
Row 2: Skip the first 2 sts (the sl sts), 1 sc in BLO of the next 6 sc, ch 1, and turn. (6 sc)
Row 3: 1 sc in the BLO of the first 6 sts, sl st to the next 2 sts on the sleeve, turn. (6 sc)
Repeat Rows 2 and 3 until you reach near the first marker.
Next Row: 1 sc in the BLO of the first 6 sts, sl st to the next free st on the sleeve, turn. (6 sc)
Next Row: Skip the first st (the sl st), 1 sc in BLO of the next 6 sc, ch 1, and turn. (6 sc)
Repeat the above 2 rounds until you hit the marker on the other side of the front opening. Along the back of the neck, you don’t have actual stitches, so just work sl st into the gaps along that edge. Now, continue as below to the end of the opening and fasten off.
Row 2: Skip the first 2 sts (the sl sts), 1 sc in BLO of the next 6 sc, ch 1, and turn. (6 sc)
Row 3: 1 sc in the BLO of the first 6 sts, sl st to the next 2 sts on the sleeve, turn. (6 sc)
Hem
Notes
1. We will now work a ribbing along the hem.
2. There are no actual sts along the hem, so we will first work a row of sc along the edge before we start the ribbing.
3. I like the ribbing to be a little smaller than the hem. So after every 16th row of the ribbing, I worked 3 sls sts instead of 2.
Row 1: Using the bigger hook and working along the inside of the cardigan, work a row of sc along the hem of the cardigan, and turn. You will have actual sts to work into only along the ribbing. (164 sc for size Large and 175 for size XL)
You might have a few sts more or less than 164 or 175 based on how you distributed your stitches, and that is fine.
Row 2: Switch to the smaller hook. Ch 7, 1 sc in the 2nd ch from hook and next 5 chs, sl st to next 2 free sts on the cardigan, turn. (6 sc)
Row 3: Skip the first 2 sts (the sl sts), 1 sc in BLO of the next 6 sc, ch 1, and turn. (6 sc)
Row 4: 1 sc in the BLO of the first 6 sts, sl st to the next 2 sts on the sleeve, turn. (6 sc)
Repeat Rows 3 and 4, but after every 16th row, work 3 sl sts instead of 2 to make your hem tighter.
Attaching the Pockets
6. Pocket placed after 2nd braid
Attach the pockets we made at the beginning. Try the cardigan on to decide the height placement that you prefer.
Using the 2 long tails left on the pocket, whip stitch the pocket to the cardigan right after the 2nd braided line from the collar (see pic 6 above). The sc row will be at the bottom. I used the smaller tail to whip stitch up along the right edge and the longer tail to stitch along the bottom and left edge of the pocket. Remember to reinforce with extra sts at the top 2 corners of the pocket.
Finishing
Weave in all the tails along the inside of the cardigan.
Pin it for later: