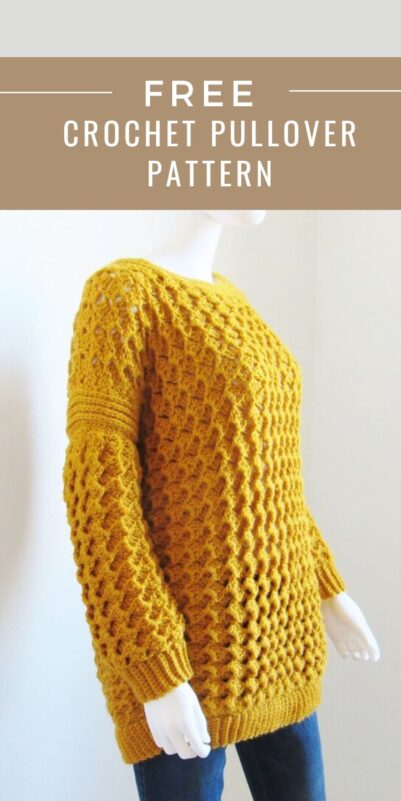
Easy Crochet Pullover Free Pattern, Vanessa Pullover
This easy crochet pullover free pattern will help you make a cozy crochet sweater for everyday use. This Crochet Sweater Pattern Free is perfect for beginners, with simple stitches and an oversized fit for extra comfort.

Whether you’re crafting a Cute Crochet Sweater Pattern Free for yourself or as a gift, this Easy Beginner Crochet Sweater Pattern is a must-try. The relaxed Pull Over Crochet Sweater design makes it a trendy, versatile piece.

Follow along with this Oversize Sweater Pattern and create a cozy, handmade Pullover Crochet sweater today!”

Crochet Pullover Free Pattern
This is a loose-fitting drop shoulder pullover with around 6 inches of positive ease.
Materials
1. Worsted weight (size 4) yarn. The sample cardigan was made using Lion Brand Wool-Ease in color Gold.
2. Hook J (6 mm) for the main body and a smaller hook I (5.5mm)for the ribbing
Use any size hook to attain the gauge.
3. Yarn needle to weave in the tails.
Size
When laid flat, the length is measured from the shoulder to the bottom of the finished crochet pullover. The elastic stitch pattern adds another 4-5 inches to the length when worn and this has been taken into account. So the length when worn would be approximately 26-28 inches.
XS/S: 42″ finished chest and 22″ long
M: 44″ finished chest and 22″ long
L: 48″ finished chest and 22″ long
XL: 50″ finished chest and 23″ long
2XL: 56″ finished chest and 23″ long
Yardage
Lion Brand Wool-Ease worsted weight yarn in color Gold was used for the cardigan. Each skein is 197 yards. If you want to substitute this yarn with another, multiply the number of skeins by 197 to find the total yards required.
XS/S: 8 skeins
M: 9 skeins
L: 10 skeins
XL: 10 skiens
2XL: 11 skeins
Pattern for Gauge
Chain 38 and follow rows 1 to 3 of the pattern. Keep repeating Row 3 until your piece measures 6 inches. Then measure for gauge.

Gauge
Using J (6mm) Hook,
6 Bumps = 7 inches.
4 Bumpy lines (8 Rows)= 4 inches
See pic 1 above.
Each couple of rows add a bumpy line and 1 inch to your fabric. Use any size hook to attain the gauge.
Stitch Abbreviations
The pattern is written in US terms.
ch: chain
sk: skip
fphdc: front post half double crochet
sl st: slip st
fpsc: front post single crochet
sc: single crochet
dc: double crochet
fsc: foundation single crochet
beg: beginning
Stitch Explanations
1. Front Post Single Crochet/Front post half double crochet (fpsc/fphdc): It is worked like a regular sc/hdc except for the way you insert your hook. See a tutorial for front post double crochet on my blog here, the hook is inserted in the same way for a fpsc or a fphdc: Front Post Double Crochet Tutorial.
2. Sc2tog: Insert your hook and pull up a loop in each of the next 2 sts, yarn over and pull through all the 3 loops on your hook.—–sc2tog completed
3. Foundation single crochet (Fsc): You work your foundation ch and first row of sc at the same time. You can see a video here.
4. Hdc2tog: (Yarn over and pull up a loop in the next st)twice, YO and pull through all the 5 loops on your hook
CROCHET PULLOVER PATTERN
NOTES
1. The front and the back are worked separately with neck shaping. There is no shaping involved in making the armholes as this is a drop shoulder design. The front and the back are then seamed at the shoulder and the sides after leaving a slit for the armhole. The sleeves are made separately and attached to the body.
2. Stitch counts are given in the order XS/S (M, L) (XL, 2XL)
FRONT
Row 1: Using J (6 mm) hook, Fsc 77 (81, 89) (93, 101), turn.—–77 (81, 89) (93, 101)sc
Row 2: Ch 3(counts as first dc here and throughout), 2 dc in the same st as ch 3, *[sk 3 sts, (1sc, ch 3, 3dc) all into the next st], repeat from * until 4 sts left, sk 3 sts, 1 sc in last st, turn. ————19 (20, 22) (23, 25) projections or dc groups
Note: While working the next row, once you work the fpsc, your ch-3 loop will get pushed behind. So look behind the fpsc to find the ch-3 loop adjacent to it. See pic 2 below.

Row 3 (pic 3): Ch 3, 2 dc in the same st as ch 3, *[sk 2 dc, fpsc in next dc, ch 3, 3 dc in the adjacent ch-3 space], repeat from * and after 3 dc in last ch-3 space, sk next 2 dc, fpsc around beginning ch 3, turn.——–19 (20, 22) (23, 25) projections or dc groups

The length of your strip will be 21 (22, 24) (25, 28) inches.
Repeat Row 3 until your work measures 17 (17, 17) (18, 18) inches, do not fasten off, but follow the pattern for neck shaping given below.
The stitch pattern will stretch to add another 4-5 inches to the length when worn and the ribbing will add an additional 2 inches. So your work might look really short to you now.
NECK SHAPING
From the end where you have your working yarn, skip 5 (5, 6) (6, 7) peaks and place a marker in the ch-3 loop of the next peak, skip the next 6 (7, 7, 8, 8) peaks and place a marker on the ch-3 loop of the next peak. See pic 4 below.

FIRST SHOULDER
Row 1: Starting at the outer edge where you have your working yarn, ch 3, 2 dc in the same st as ch 3, *[sk 2 dc, fpsc in next dc, ch 3, 3 dc in the adjacent ch-3 space], repeat from * 4(4, 5) (5, 6) more times, sk next 2 dc, 1 fpsc in next dc, dc2tog in the marked ch-3 loop, turn.
Row 2: Ch 2, 2 dc in the same st as ch 2, *[sk 2 dc, fpsc in next dc, ch 3, 3 dc in the adjacent ch-3 space], repeat from * 4 (4, 5) (5, 6) more times, sk next 2 dc, 1 fpsc around beginning ch 3, turn.
Row 3: Ch 3, 2 dc in the same st as ch 3, *[sk 2 dc, fpsc in next dc, ch 3, 3 dc in the adjacent ch-3 space], repeat from * 4 (4, 5) (5, 6) more times, sk the next 2 dc, fpsc around beginning ch-2, turn.
Row 4: Repeat Row 2.
Row 5: Repeat Row 3.
Row 6 (Leveling Row): Ch 2, 2 hdc in the same st as beginning ch-2, *( sk 1 dc, 1 sc in next 2 dc, 2 sc in the next ch-loop), repeat from * and after 2sc in the last ch-loop, sk 1 dc, 1 sc in next dc, 2 sc on top of beginning ch. Fasten off with a 2 ½ (2 ½, 3) (3, 4)yards long tail for seaming the shoulder.
SECOND SHOULDER
Row 1: Starting from the second marker in the neck area, work towards the edge (see Pic 4 above), join yarn with a sl st into the ch-3 space of the marked peak, ch 2, dc2tog in the ch-3 space, *[sk 2 dc, fpsc in next dc, ch 3, 3 dc in the adjacent ch-3 space], repeat from * 4 (4, 5) (5, 6) more times, sk the next 2 dc, fpsc around beginning ch-3, turn.
Row 2: Ch 3, 2 dc in the same st as ch 3, *[sk 2 dc, fpsc in next dc, ch 3, 3 dc in the adjacent ch-3 space], repeat from * 4 (4, 5) (5, 6) more times, sk the next fpsc and the next st (the dc2tog of the previous row), 1 fpsc around beginning ch-2, turn.
Row 3: Ch 3, 2 dc in the same st as ch 3, *[sk 2 dc, fpsc in next dc, ch 3, 3 dc in the adjacent ch-3 space], repeat from * 4 (4, 5) (5, 6) more times, sk the next 2 dc, fpsc around beginning ch-3, turn.
Row 4: Ch 3, 2 dc in the same st as ch 3, *[sk 2 dc, fpsc in next dc, ch 3, 3 dc in the adjacent ch-3 space], repeat from * 4 (4, 5) (5, 6) more times, sk the next 2 dc, fpsc around beginning ch-3, turn.
Row 5: Repeat Row 3 to the edge of the shoulder.
Row 6 (Leveling Row): Ch 2, 2 hdc in the same st as beginning ch-2, *( sk 1 dc, 1 sc in next 2 dc, 2 sc in the next ch-loop), repeat from * and after 2sc in the last ch-loop, sk 1 dc, 1 sc in next dc, 2 sc on top of beginning ch. Do not fasten off.
Continue to work along the neck edge to level it. Ch 1, work 9 sc evenly distributed until you reach the marker and the stitch repeats start, *(1 sc in each of the next 3 dc, 1 sc in the next fpsc, sk the first ch of the ch-3 loop, 1 sc in next ch, sk next ch), repeat from * to the next marker, 9 sc along the rest of the neck edge. Fasten off. Do not take the markers out yet. They can be used as a guide when making your neck edging.
BACK
Row 1: Using J (6 mm) hook, Fsc 77 (81, 89) (93, 101), turn.—–77 (81, 89) (93, 101)sc
Row 2: Ch 3(counts as first dc here and throughout), 2 dc in the same st as ch 3, *[sk 3 sts, (1sc, ch 3, 3dc) all into the next st], repeat from * until 4 sts left, sk 3 sts, 1 sc in last st, turn. ————19 (20, 22) (23, 25) projections or dc groups
Row 3: Ch 3, 2 dc in the same st as ch 3, *[sk 2 dc, fpsc in next dc, ch 3, 3 dc in the adjacent ch-3 space], repeat from * and after 3 dc in last ch-3 space, sk next 2 dc, fpsc around beginning ch 3, turn.——–19(20, 22) (23, 25) projections or dc groups
Repeat Row 3 until your work measures 18 (18, 18) (19, 19) inches, do not fasten off and proceed to work neck shaping as given below.
NECK SHAPING
Note: Place markers just like you did for the front. From the end where you have your working yarn, skip 5 (5, 6) (6, 7) peaks and place a marker in the ch-3 loop of the next peak, skip the next 6 (7, 7) (8, 8) peaks and place a marker on the ch-3 loop of the next peak. See pic 4 above again if needed.
FIRST SHOULDER
Your back neck will be less deep compared to the front neck.
Row 1: Starting at the outer edge where you have your working yarn, ch 3, 2 dc in the same st as ch 3, *[sk 2 dc, fpsc in next dc, ch 3, 3 dc in the adjacent ch-3 space], repeat from * 4(4, 5) (5, 6) more times, sk next 2 dc, 1 fpsc in next dc, dc2tog in the marked ch-3 loop, turn.
Row 2: Ch 2, 2 dc in the same st as ch 2, *[sk 2 dc, fpsc in next dc, ch 3, 3 dc in the adjacent ch-3 space], repeat from * 4 (4, 5) (5, 6) more times, sk next 2 dc, 1 fpsc around beginning ch 3, turn.
Row 3: Ch 3, 2 dc in the same st as ch 3, *[sk 2 dc, fpsc in next dc, ch 3, 3 dc in the adjacent ch-3 space], repeat from * 4 (4, 5) (5, 6) more times, sk the next 2 dc, fpsc around beginning ch-2, turn.
Row 4 (Leveling Row): Ch 2, 2 hdc in the same st as beginning ch-2, *( sk 1 dc, 1 sc in next 2 dc, 2 sc in the next ch-loop), repeat from * and after 2sc in the last ch-loop, sk 1 dc, 1 sc in next dc, 2 sc on top of beginning ch. Fasten off with a 2 ½ (2 ½, 3) (3, 4)yards long tail for seaming the shoulder.
SECOND SHOULDER
Row 1: Starting from the second marker in the neck area, work towards the edge (see Pic 4), join yarn with a sl st into the ch-3 space of the marked peak, ch 2, dc2tog in the ch-3 space, *[sk 2 dc, fpsc in next dc, ch 3, 3 dc in the adjacent ch-3 space], repeat from * 4 (4, 5) (5, 6) more times, sk the next 2 dc, fpsc around beginning ch-3, turn.
Row 2: Ch 3, 2 dc in the same st as ch 3, *[sk 2 dc, fpsc in next dc, ch 3, 3 dc in the adjacent ch-3 space], repeat from * 4 (4, 5) (5, 6) more times, sk the next fpsc and the next st (the dc2tog of the previous row), 1 fpsc around beginning ch-2, turn.
Row 3: Ch 3, 2 dc in the same st as ch 3, *[sk 2 dc, fpsc in next dc, ch 3, 3 dc in the adjacent ch-3 space], repeat from * 4 (4, 5) (5, 6) more times, sk the next 2 dc, fpsc around beginning ch-3, turn.
Row 4 (Leveling Row): Ch 2, 2 hdc in the same st as beginning ch-2, *( sk 1 dc, 1 sc in next 2 dc, 2 sc in the next ch-loop), repeat from * and after 2sc in the last ch-loop, sk 1 dc, 1 sc in next dc, 2 sc on top of beginning ch. Do not fasten off.
Continue to work along the neck edge to level it. Ch 1, work 5 sc evenly distributed until you reach the marker and the stitch repeats start, *(1 sc in each of the next 3 dc, 1 sc in the next fpsc, sk the first ch of the ch-3 loop, 1 sc in next ch, sk next ch), repeat from * to the next marker, 5 sc along the rest of the neck edge. Do not take the markers out yet.
RIBBING FOR FRONT AND BACK (MAKE 2)
Row 1: With a smaller hook I (5.5mm) hook, ch 11, 1 sc in 2nd ch from hook and each st to end, turn.—-10 sc
Row 2: Ch 1 ( not counted as a st here and throughout), working in the back loops only, 1 sc in the same st as beg ch-1, 1 sc in each st to end, turn,——10 sc
Repeat Row 2 until your work measures 18 (19, 21) (22, 25) inches without stretching.
Using a J(6mm) hook and a sl st seam, slightly stretch to fit, and join the ribbing to the base of the front and back pieces of your sweater. You can also use a whip stitch. If you are working a slip stitch seam, take special care to ensure that you are not working them tight.
JOINING FRONT AND BACK
With a J hook(6mm), sl st the shoulders together with the yarn tails left. The stitch pattern looks the same on both sides, so you can pick whichever side you want as your right side.
Slip stitch the side seams leaving an 8 (8, 9) (9 ½, 10) inch opening for the armhole.
ARMHOLE EDGING
Note: Turn your pullover inside out and work the armhole edging on the right side of your sweater.
Round 1: Sl st to the base of the armhole where you have the side seam, ch 2(counts as the first hdc here and throughout), 52 (52, 60) (64, 68) hdc evenly distributed around the armhole opening, sl st to beg ch-2, do not turn.——— 53 (53, 61) (65, 69)hdc
Rounds 2, 3 & 4: Ch 2, 1 hdc in the 3rd loop of next hdc, 1 hdc in the third loop of each hdc to end, sl st to beg ch-2, do not turn.
Round 5: Ch 1, 1 sc in the 3rd loop of next hdc, 1 sc in the third loop of each hdc to end, sl st to beg ch-1, do not turn.
Round 6: Ch 1, 1 sc in each stitch around, sl st to beg ch-1, fasten off.
NECK EDGING
Note: Neck edging is worked on the right side of your sweater.
Round 1: Use the smaller hook I (5.5mm) and sl st at the shoulder seam, ch 2, 1 hdc at the seam, 1 hdc in each st around, sl st to beg ch-2, do not turn. Take care to work your hdc tight.
Notes
1. In the next round you will work 2 decreases in each of the 4 corners where the neck turns, see pic 5 below.

2. All the stitches of rows 2-4 including the hdc2tog will be worked into the 3rd loop of the hdc sts. Third loop of the hdc is a horizontal bar found behind the stitch (see pic 6 below). Working into this bar will push the “V” of your stitch to the front to create that knit look for your edging.

Round 2: Ch 2, 1 hdc in each hdc until you reach near the marker, (hdc2tog in the next 2 sts)twice, place a marker in the first hdc2tog, *[ 1 hdc in each st until you reach the next marker, (hdc2tog in next 2 sts)twice, place a marker in the first decrease]*, repeat from * 2 more times, 1 hdc in each st to end, sl st to beg ch-2, do not turn.
Note: Now you will have 4 markers indicating where you worked the decreases.
Round 3: Ch 2, *(1 hdc in each hdc until you reach the marker, hdc2tog in the marked st and next st), repeat from * 3 more times, 1 hdc in each st to end, sl st to beg ch-2.
Round 4: ch 1, 1 sc in each st to end, sl st to first sc, do not turn.
Round 5: Ch 1, work 1 sl st loosely into each sc st around, sl st to beg ch-1, fasten off.
SLEEVES (MAKE 2)
Row 1: Fsc 53 (53, 61) (65, 69), ch 3(counts as first dc here and throughout), 2 dc in the same st as ch 3, *[sk 3 sts, (1sc, ch 3, 3dc) all into the next st], repeat from * until 4 sts left, sk 3 sts, 1 sc in last st, turn. ——–13(13, 15) (16, 17) projections or dc groups
This row will be 15 (15, 17) (18, 19) inches long
Row 2: Ch 3, do not work any dc in the same st, *(sk next 2 dc, 1 fpsc in next dc, ch 3, 3 dc in the adjacent ch-3 space], repeat from * 11(11, 13, 14, 15) more times, sk next 2 dc, fpsc around beginning ch 3, turn.—-12 (12, 14) (15, 16) projections or dc groups
Row 3: Ch 3, do not work any dc in the same st,* (sk next 2 dc, 1 fpsc in next dc, ch 3, 3 dc in the adjacent ch-3 space], repeat from * 11(11, 13, 14, 15) more times, fpsc around beginning ch 3, turn.——12 (12, 14) (15, 16) projections or dc groups
Row 4: Ch 3, do not work any dc in the same st, sk next 2 dc, 1 fpsc in next dc, ch 3, 2 dc in the adjacent ch-3 space, *(sk next 2 dc, 1 fpsc in next dc, ch 3, 3 dc in the adjacent ch-3 space], repeat from * 9 (9, 11) (12, 13) more times, sk 2 dc, fpsc in next dc, ch 3, 2 dc in adjacent ch-3 space, 1 fpsc around beginning ch 3, turn.—–12 (12, 14) (15, 16) projections, the one on either ends will be smaller
Row 5: Ch 3, do not work any dc in the same st, sk 1 dc, 1 fpsc in next dc, ch 3, 1 dc in the adjacent ch-3 space, *(sk next 2 dc, 1 fpsc in next dc, ch 3, 3 dc in the adjacent ch-3 space], repeat from * 9( 9, 11) (12, 13) more times, sk 1 dc, fpsc in next dc, ch 3, 1 dc in adjacent ch-3 space, 1 fpsc around beginning ch-3, turn.——-10(10, 12) (13, 14) prominent projections
Row 6: Ch 3, sk the next dc which is slanting, 1 dc in next ch-loop, *(sk next 2 dc, 1 fpsc in next dc, ch 3, 3 dc in the adjacent ch-3 space], repeat from * 9(9, 11) (12, 13) more times, sk next dc,1 dc in next ch- loop, 1 fpsc around beginning ch, turn.—–10(10, 12) (13, 14) projections
Row 7: Ch 3, sk next slanting dc, *(sk next 2 dc, 1 fpsc in next dc, ch 3, 3 dc in the adjacent ch-3 space], repeat from * 8 (8, 10) (11, 12) more times, sk 2 dc, fpsc in next dc, ch-3, 2 dc in adjacent ch-3 space, sk next dc, 1 fpsc around beginning ch, turn.——10(10, 12) (13, 14) projections
Row 8: Ch 3, sk 1 dc, 1 fpsc in next dc, ch 3, 3 dc in adjacent ch-3 space, (sk next 2 dc, 1 fpsc in next dc, ch 3, 3 dc in the adjacent ch-3 space], repeat from * 8(8, 10) (11, 12) more times, 1 fpsc around beginning ch-3, turn.——-10(10, 12) (13, 14) projections
Row 9: Ch 3, *(sk next 2 dc, 1 fpsc in next dc, ch 3, 3 dc in the adjacent ch-3 space], repeat from * 9(9, 11, 13, 14) more times, 1 fpsc around beginning ch-3, turn. ——-10(10, 12) (13, 14) projections
Continue for Sizes Small and Medium Only
Repeat Row 9 until your sleeve measures 11 (11.5 for Medium) inches and work the leveling row below.
Leveling Row: ch 3, 1 dc in the same st as ch 3, *(sk next dc, 1 sc in next 2 dc, 2 sc in next ch-loop), repeat from * and after 2 sc in last ch-loop, 1 fphdc around beginning ch. Fasten off.
Continue for sizes L, XL and 2XL
Note: Stitch counts for this part of the sleeve is given in the order L ( XL, 2XL)
Repeat Row 9 four more times.
Row 13: Ch 3, sk 2 dc, fpsc in next, ch 3, 2 dc in adjacent space, *(sk next 2 dc, 1 fpsc in next dc, ch 3, 3 dc in the adjacent ch-3 space], repeat from * 9( 10, 11) more times, sk 2 dc, 1 fpsc in next, ch 3, 2 dc in adjacent ch-space, fpsc around beginning ch, turn. —-12(13, 14)projections, the ones on either end will be smaller.
Row 14: Ch 3, sk 1 dc, 1 fpsc in next dc, ch 3, 2 dc in adjacent ch-3 space, *(sk next 2 dc, 1 fpsc in next dc, ch 3, 3 dc in the adjacent ch-3 space], repeat from *9( 10, 11) more times, sk 1 dc, fpsc in next dc, ch 3, 2 dc in adjacent ch-3 space, fpsc around beginning ch, turn.—-12(13, 14)projections, the ones on either end will be smaller.
Row 15: Ch 3, sk 1 dc, 1fpsc in next dc, ch 3, 1 dc in adjacent ch-3 space, *(sk next 2 dc, 1 fpsc in next dc, ch 3, 3 dc in the adjacent ch-3 space], repeat from *9( 10, 11) more times, sk 1 dc, 1 fpsc in next dc, ch 3, 1 dc in adjacent ch-3 space, fpsc around beginning ch, turn.——–10 (11, 12) prominent projections, one on either end would have flattened out.
Row 16: Ch 3, 1 dc in next dc which will be slanting, 1 dc in adjacent ch-3 space, *(sk next 2 dc, 1 fpsc in next dc, ch 3, 3 dc in the adjacent ch-3 space], repeat from *9( 10, 11) more times, 1 dc in next dc, 1 dc in adjacent ch-3 space, fpsc around beginning ch.——10 (11, 12) prominent projections
Row 17: Ch 3, dc2tog in next 2 dc, *(sk next 2 dc, 1 fpsc in next dc, ch 3, 3 dc in the adjacent ch-3 space], repeat from * 9(10, 11) more times, dc2tog in next 2 dc, fpsc around beginning ch, turn.——-10 (11, 12) prominent projections
Row 18: Ch 3, 1 dc in next dc, *(sk next 2 dc, 1 fpsc in next dc, ch 3, 3 dc in the adjacent ch-3 space], repeat from * 9(10, 11) more times, 1 dc in next dc, fpsc around beginning ch, turn.——-10 (11, 12) prominent projections
Repeat Round 18 until your sleeve measures 11 1/2( 11, 10 ½) inches and work the leveling row below.
Leveling Row: Ch 3, 1 hdc in next dc, *(sk 1 dc, 1 sc in next 2 dc, 2 sc in next ch-3 loop), repeat from * and after 2 sc in last ch-3 loop, 1 hdc in next dc, fphdc around beginning ch. Fasten off.
RIBBING FOR SLEEVE CUFF( All sizes)
Row 1: With I (5.5mm) hook, ch 11, 1 sc in 2nd ch from hook and each st to end, turn.—-10 sc
Row 2: Ch 1 ( not counted as a st here and throughout), working in back loops only, 1 sc in the same st as beg ch-1, 1 sc in each st to end, turn,——10 sc
Repeat Row 2 until your work measures 8.5 (8.5, 9.5) (10.5, 11.5) inches without stretching.
Using J(6mm) hook and a sl st seam, slightly stretch to fit, and join the ribbing to the base of the sleeve. Now fold the sleeve and use the same hook to seam the sides to form a tube.
ATTACHING THE SLEEVE TO THE BODY
Place the sweater with the wrong side out and the sleeve with the right side out, see pics 7 & 8 below, insert the sleeve in through the armhole, align the edges, and join with a sl st seam and J(6 mm) hook. Keep your sl sts loose.


I hope you enjoyed this Crochet Cozy Sweater Pattern Free Tutorial.
Pin it for later: