Crochet Poncho Pattern, Free Calming Waves Poncho
I absolutely loved the wave stitch I used to make the Kylie Kimono and decided to come up with a crochet poncho pattern with the same stitch. It looked gorgeous with just the wave stitch but I added a pineapple border for extra pizzazz.


This is my first time trying the pineapple stitch and I was surprised by how easy and quick it was. I am in awe of anyone who can come up with stitch patterns like these.
When I first started designing this crochet poncho pattern, my intention was to make a V-st one with an asymmetrical hem. It didn’t quite drape the way I wanted it to. So I gave it a spin and came up with this new design. I hope you like the result.

The poncho has a simple construction and is made up of 2 rectangles seamed to leave a hole for the neck. That is all the shaping it needs. Simple, right?


Calming Waves Crochet Poncho Pattern
You can pin it for later here.
Materials
- DK weight ( size 3) yarn. I used Snuggly Wuggly Dip Dye yarn in color Wavelength for the main body and Snuggly Wuggly in color Cool Baby for the hem.
- Hook K(6.5mm)
- Tapestry needle to weave in the ends.
Finished Size
The length given is measured when laid flat and includes the lacy hem. The poncho stretches about 4 more inches in length when worn.
S/M: 23 inches long and 40 1/2 inches wide
L/XL: 26 inches long and 45 inches wide
2XL/3XL: 27 1/2 inches long and 53 1/2 inches wide
Yardage
If you would like to substitute with any other yarn, know that each skein of Snuggly Wuggly yarn is 446 yards each.
S/M : 3 skeins of Snuggly Wuggly Dip Dye yarn for the main body and 1 skein of Snuggly Wuggly for the hem.
L/XL: 4 skeins of Snuggly Wuggly Dip Dye yarn for the main body and 1- 1/2 skeins of Snuggly Wuggly for the hem.
2XL/3XL: 5 skeins of Snuggly Wuggly Dip Dye yarn for the main body and 2 skeins of Snuggly Wuggly for the hem.
Stitch Abbreviations
The pattern is written in US terms. You can find a US to UK Crochet Conversion Chart here.
ch-chain
sc-single crochet
dc-double crochet
tr- triple crochet
RS- Right side
WS- Wrong Side
beg- beginning
Stitch Explanations
Shell: (2dc, ch 1, 2dc)worked in the same st.
Gauge
1 wave measured from a sc to a sc = 4- 1/4 inches long
4 wave rows with sc rows on either side= 3-1/4 inches.
1 wave row+ 1sc row adds about 3/4 inch to the length of your poncho.
Notes
1. The poncho is made up of 2 rectangular panels, one for the front and one for the back.
2. Variation in stitch counts are given in the order S/M( L/XL, 2XL/3XL). If only 1 number is given, it applies to all the sizes.
Front Panel
Ch 146 (162, 194). The initial chain is a multiple of 16+2.
Row 1: Working into the back bumps of the foundation chain, 1 sc in 2nd ch from hook and across. Turn.—–145 (161, 193) sc
Row 2: Ch 2 ( counts as a sc + ch 1), sk next st, 1 sc in next, *( ch 1, sk next st, 1 sc in next), repeat from * to end.———-73 (81, 97) sc
Row 3: Ch 1 ( counts as a sc), 1 sc in adjacent ch-1 space, *(ch 1, sk next st, 1 sc in next ch-1 space), repeat from * until you work a sc in the space under beg ch-2, 1 sc on top of beg ch-1. Turn.———74 (82, 98) sc
Note: In the next Row, when it says “sk 1” you will be skipping a ch.
Row 4(Wave Row): Ch 1 ( does not count as a st here and throughout), 1 sc in the same st as beg ch-1, 1 sc in next st, ch 1, sk 1, 1 hdc in next, ch 1, sk 1, 1 dc in next, ch 1, sk 1, 1 tr in next, ch 1, sk 1, 1 tr in next, ch 1, sk 1, 1 dc in next, ch 1, sk 1, 1 hdc in next, *( ch 1, sk 1, 1 sc in next, ch 1, sk 1, 1 sc in next, ch 1, sk 1, 1 hdc in next, ch 1, sk 1, 1 dc in next, ch 1, sk 1, 1 tr in next, ch 1, sk 1, 1 tr in next, ch 1, sk 1, 1 dc in next, ch 1, sk 1, 1 hdc in next), repeat from * to last 3 sts, ch1, sk 1, 1 sc in last 2 sts. Turn.——–9(10, 12) waves
Row 5 (RS): Ch 1, 1 sc in the same st as ch 1, 1 sc in next st, *( 1 sc in next ch-1 space, 1 sc in next st), repeat from * to last st, 1 sc in last st. Turn.——–145 (161, 193) sc
Notes:
- For the first tr, ch 3 is used as the turning chain and not ch4. This will help to keep the gap between the turning ch and the next tr small. If you chain tight, ch-4 might work better for you.
- To keep track of your wave rows, check if the 2 sc sts are aligned on top of the 2 tr sts of the previous wave row as shown in pic 1 below.

Row 6(Wave Row): Ch 3 ( counts as a tr here and throughout), 1 tr in next st, ch 1, sk 1, 1 dc in next, ch 1, sk 1, 1 hdc in next, ch 1, sk 1, 1 sc in next, ch 1, sk 1, 1 sc in next, ch 1, sk 1, 1 hdc in next, ch 1, sk 1, 1 dc in next *(ch1, sk 1, 1 tr in next, ch 1 sk 1, 1 tr in next, ch 1, sk 1, 1 dc in next, ch 1, sk 1, 1 hdc in next, ch 1, sk 1, 1 sc in next, ch 1, sk 1, 1 sc in next, ch 1, sk 1, 1 hdc in next, ch 1 sk 1, 1 dc in next), repeat from * to last 3 sts, ch 1, sk 1, 1 tr in last 2 sts. Turn.——8 (9, 11) full waves+ 1/2 wave on each side
Row 7: Ch 1, 1 sc in the same st as ch 1, 1 sc in next st, *( 1 sc in next ch-1 space, 1 sc in next st), repeat from * to last st ( beginning ch), 1 sc on top of beg ch-3. Turn.——–145 (161, 193) sc
Repeat Rows 4-7 until you have 22 (26, 28) waves in total. Your last row should be a wave row.
Note: In the next row we will increase the stitches to make it a multiple of 15+1 to prep it for our Pineapple hem. The distribution of the sc increases doesn’t have to be perfect, just try the best you can and work the increases in the valleys between the waves.
Next Row: Repeat Row 7 but with 6(5, 3) sc increases evenly distributed. Fasten off. ——-151 (166, 196) sc
Making the Hem for the Front Panel
Notes:
1. The pineapple stitch border is worked across a multiple of 15+1 stitches.
2. The RS of your fabric is the side you work your single crochet rows on. It will look smoother. You can choose whichever side you find more appealing as your RS.
Row 1: Working on the WS of your wave fabric, sl st to the first st, ch 3 (counts as a dc here and throughout), 2 dc in the same st as ch 3, ch 5, sk 5 sts, 1 sc in next, ch 3, sk 2 sts, 1 sc in next, ch 5, sk 5, *(shell in next st, ch 5, sk 5 sts, 1 sc in next, ch 3, sk 2 sts, 1 sc in next, ch 5, sk 5 sts), repeat from * to last 6 sts, ch 5, sk 5, 3dc in last st. Turn. — 9(10, 12) full shells

Row 2: Ch 3, 2 dc in the same st as ch 3, ch 3, sc in next ch-5 loop, ch 5, sk next ch-3 loop, sc in next ch-5 loop, ch 3, *(shell in ch-1 space of next shell, ch 3, sc in next ch-5 loop, ch 5, sk next ch-3 loop, sc in next ch-5 loop, ch 3), repeat from * to last 3 dc, sk next 2 dc, 3 dc on top of beg ch-3. Turn.

Row 3: Ch 3, 2 dc in the same st as ch 3, sk next ch-3 loop, 11 tr in next ch-5 loop, sk next ch-3 loop, *(shell in ch-1 space of next shell, sk next ch-3 loop, 11 tr in next ch-5 loop, sk next ch-3 loop), repeat from *, sk last ch-3 loop and next 2 dc sts, 3 dc on top of beg ch-3. Turn.

Row 4: Ch 3, 2 dc in the same st as ch 3, ch 2, sc in next tr, (ch 3, sk next tr, 1 sc in next tr)5 times to end in last tr, ch 2, *[shell in ch-1 space of next shell, ch 2, 1 sc in next tr, (ch 3, sk next tr, 1 sc in next tr)5 times to end in last tr, ch 2], repeat from * to last 3 dc, sk next 2 dc, 3 dc on top of beg ch-3. Turn.

Row 5: Ch 3, 2 dc in same st as ch 3, ch 3, sk next ch-2 loop, 1 sc in first ch-3 loop on top of the tr sts, (ch 3, 1 sc in next ch-3 space)4 times, ch 3,*(shell in ch-1 space of next shell, ch 3, sk next ch-2 loop, sc in first ch-3 loop on top of the tr sts, (ch 3, 1 sc in next ch-3 space)4 times, ch 3), repeat from *, sk last ch-2 loop and next 2 dc sts, 3 dc on top of beginning ch-3. Turn.
Row 6: Ch 3, 2 dc in same st as ch 3, ch 4, sk next ch-3 loop, 1 sc in next ch-3 space, (ch 3, 1 sc in next ch-3 space)3 times, ch 4, *(shell in ch-1 space of next shell, ch 4, sk next ch-3 loop, 1 sc in next ch-3 space, (ch 3, 1 sc in next ch-3 space) 3 times, ch 4), repeat from *, sk last ch-3 loop and next 2 dc sts, 3 dc on top of last st.

Row 7: Ch 3, 2 dc in the same st as ch 3, ch 5, sk next ch-4 loop, 1 sc in next ch-3 space, (ch 3, 1 sc in next ch-3 space)2 times, ch 5, *(shell in ch-1 space of next shell, ch 5, sk next ch-4 loop, 1 sc in next ch-3 space, (ch 3, 1 sc in next ch-3 space)2 times, ch 5), repeat from *, sk last ch-4 loop and next 2 dc sts, 3 dc on top of beg ch-3. Turn.

Note: Shell for the next row is (2dc, ch 2, 2 dc) worked into the same ch space.
Row 8: Ch 3, 2 dc in same st as ch-3, ch 6, sk next ch-5 loop, 1 sc in next ch-3 space, ch 3, sl st to the second ch from hook, ch 1, 1 sc in next ch-3 space, ch 6, *(shell in ch-1 space of next shell, ch 6, sk next ch-5 loop, 1 sc in next ch-3 space, ch 3, sl st to the second ch from hook, ch 1, 1 sc in next ch-3 space, ch 6), repeat from *, sk last ch-5 loop and next 2 dc sts, 3 dc on top of beg ch-3. Fasten off.
Back panel
Follow the same pattern for the Front Panel and add the Pineapple hem as above.
Joining the Front and the Back Panel

Overlap the 2 rectangles with the right side touching, leave a 12 1/2 ( 13, 14) inch gap in the middle for the neck, and seam the sides together on the wrong side (see pic).
You can also see my Uptown Crochet Poncho Pattern and my Elise Ponch Crochet Pattern featured on Allfreecrochet.com.
Pin it for later: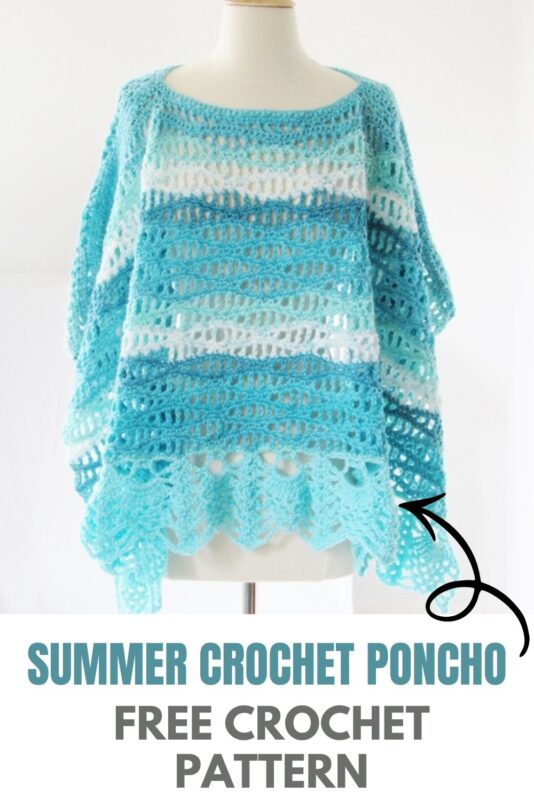


Looks lovely! I would make it if it were done in the round and didn’t have to be stitched tog.
I love it! Thank you! I am going to make it. I love the colors you used.
You are very welcome. I am glad you like it.
Did you really use a size K hook. The pictures make it appear to be a tighter stitch than a K would make.
The stitch might be appearing tighter because of the thin yarn. Check your gauge and feel free to use any hook that meets the gauge.
Hey. I’m a little confused about the single crochet increases. I’m doing a medium size poncho. Thanks for any help! I love your patterns, I’ve done two Kylie kimonos already. Thanks again.
Hi Sydney, which Row are you talking about?
When you do a sc or dc or other sts, Like sc,chl, skl, dc, ch1, – when you insert hook into a st and draw thru a loop ( 2 loops on hook), then draw thru the 2 loops you have l loop that remains on the hook. Does the remaining loop on the hook count as a ch 1?
The last loop on your hook never counts as a stitch or a chain.
I would love to make this for my grand daughter, she’s 9 years old. Size 9/10. Would the small be too big? Or just about right size?
Thanks
I am assuming that would be too big on her. What can do is take her shoulder measurement, add 6 inches to it. Then make a foundation chain that is close to that measurement and a multiple of 16+2. I hope that helps.
Yes, thank you
Thank you very much the beautiful patterns.
This one (the lightblue) is a little too flamboyent for me, sorry…
But all the others are cute and I like them, thank you!
Best
Marianne