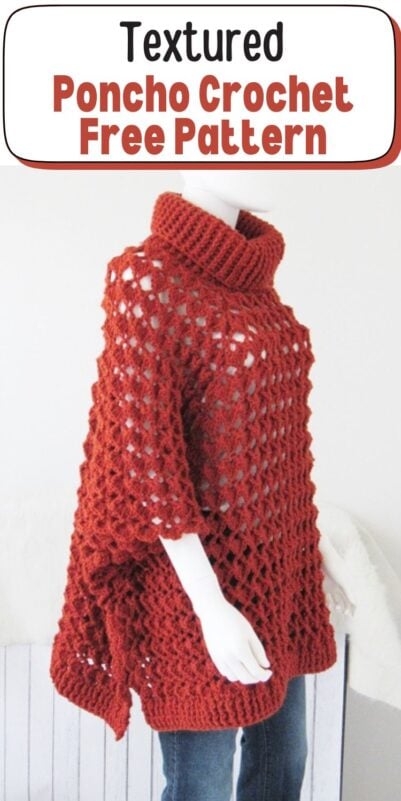
Free Crochet Poncho Pattern, Elise Poncho
If you have been looking for a stunning how to crochet a poncho pattern, your search ends here. Okay, that was way too cheesy, sorry! I really hope you will love this free crochet pattern though :).


I am super excited to publish this pattern as this would be my very first free clothing pattern. I designed this in response to the requests I got from my blog readers which makes it even more special.


This crochet poncho is designed with the same stitch I used for my Falling Petals Afghan, Rose Petals Scarf and Sea Shells Cowl. I might as well design another afghan where the same stitch is worked in the round.


I had initially intended to make this a triangle poncho but I didn’t quite like how short it turned out. So, I decided to add extensions to the front and the back and turn it into a Kaftan style poncho. I hope you like the result. Enjoy the free pattern.
You can pin it for later here.
Crochet Poncho Pattern
Materials
- Worsted weight yarn. The sample poncho was made using Sprightly Acrylic Wool Worsted yarn in color Flame.
- Hook I(5.5 mm).
- Tapestry needle to weave in the ends.
Finished Size
Size Small(S): 25 inches long and 31 1/2 inches wide when laid flat.
Size Medium and Large (M/L): 26 inches long and 35 1/2 inches wide when laid flat.
Gauge
4 Pattern Repeats= 5 inches
Yardage
10 skeins of Sprightly Acrylic Wool Worsted yarn of 216 yards each.
Stitch Abbreviations
ch-chain
dc-double crochet
fpdc-front post double crochet
bpdc- back post double crochet
beg- beginning
RS- Right side of your crochet fabric
WS– wrong side of your crochet fabric
Stitch Explanations
V st: (1 dc, ch 2, 1 dc) worked into the same st.
Shell St worked into a V-st: 1 fpdc in the first dc (first leg of the V-st), (3 dc, ch 2, 3dc) into ch-2 space of the V-st, 1 fpdc in the next dc ( second leg of the V-st).
Front post double crochet (fpdc) and Back Post double crochet(bpdc): You can see a tutorial here.
Crochet Pattern
Neck Ribbing
Row 1: Ch 82, sl st to the first ch, ch 3 ( counts as 1st dc), 1 dc in next ch and each ch across to end, sl st to top of beg ch-3, do not turn.———82 dc
Row 2: Ch 3 ( counts as a bpdc here and throughout), 1fpdc in next dc, *( 1 bpdc in next dc, 1 fpdc in next), repeat from * to end, sl st to top of beg ch-3, do not turn.———82 sts
Row 3: Ch 3, 1 fpdc in next fpdc, *(1 bpdc in next bpdc, 1 fpdc in next fpdc), repeat from * to end, sl st to top of beg ch-3, do not turn.———82 sts
Repeat Row 3 until your ribbing is around 8 1/4 inches high. You can make it as tall or as short as you want it to be. The choice is yours.
Body of the Poncho
Notes
1. The body of the poncho will now be worked around the neck in a square shape with 4 corners.
2. The body is worked on the wrong side of the ribbed neck.
3. Every time the pattern says to move the marker up, move the marker from the previous ch-2 space to the ch-2 space you just made. The markers indicate the 4 corners.
Row 1: Turn the neck inside out, ch 1 (not counted as a st here), 1 sc in the same st as ch 1, 1 sc in next 19 sts, sc2tog, 1 sc in next 40 sts, sc2tog, 1 sc in the remaining 19 sts to end, sl st to the first sc. ——80 sc

Note: After every 4 V-sts, you will make a corner formed by a (V-st, ch 2 and a V-st) in the same st.
Row 2: Ch 5 ( counts as dc+ ch 2), 1 dc in the same st (first V-st made), ch 2, work one more V-st in the same st, place a marker in the ch-2 between the 2 V-sts, *[sk 3 sts, 1 V-st in next st] 4 times, sk 3 sts, (V-st, ch 2, V-st)all in the next st to make a corner, place a marker in the ch-2 between the 2 V-sts, repeat from * 2 more times, [sk 3 sts, 1 V-st in next st] 4 times, sl st to beg ch-3. Do not turn. —-24 V-sts


Note: If you have worked any of my other patterns with the same stitch, kindly be advised that the shell in this pattern include the 2 fpdc sts on either side. See stitch explanation for details.
Row 3: Sl st to the next ch-2 space, ch 3, 2 dc, ch 2, 3 dc in same ch-2 space, 1 fpdc in next dc, (2 dc, ch 2, 2 dc) all in the marked ch-2 space, move the marker up into the ch-2 between the dc.
*shell in each V-st across to the next marked ch-2 space, (2 dc, ch 2, 2 dc) in the marked ch-2 space, move the marker up into the ch-2 space you just made), repeat from * 2 more times, shell in each V-st to end of the round, 1 fpdc in next dc ( the first leg of the very first V-st), sl st to beg ch-3. Do not turn.——-24 shells + 4 corners formed by (2dc, ch 2, 2 dc)

Row 4: Sl st loosely into the next 2 dc, sl st into next ch-2 space, ch 5, 1 dc in same ch-2 space ( first V-st made), (V-st, ch 2, V-st) in next marked ch-2 space, move the marker up, *1 V-st in the ch-2 space of each shell across to the next marked ch-2 space, (V-st, ch 2, V-st) in next marked ch-2 space, move the marker up, repeat from * 2 more times, 1 V-st in the ch-2 space of each shell across to end, sl st to beg ch-3, do not turn. ————32 V-sts
Row 5: Sl st into the next ch-2 space, ch 3, 2 dc, ch 2, 3 dc in the same ch-2 space, 1 fpdc in next dc (the second leg of the V-st), shell in next V-st, (2 dc , ch 2, 2 dc ) in the next marked ch-2 space, * shell in each V-st across to the next marked ch-2 space, (2 dc , ch 2, 2 dc ) in the next marked ch-2 space, repeat from * 2 more times, shell in each V-st across to end of the round, 1 fpdc in next dc ( the first leg of the very first V-st), sl st to beg ch-3. Do not turn.——–32 shells + 4 corners
Row 6: Sl st loosely into the next 2 dc, sl st into next ch-2 space, ch 5, 1 dc in same ch-2 space ( first V-st made), 1 V-st in the ch-2 space of next shell, (V-st, ch 2, V-st) in next marked ch-2 space, move the marker up, *1 V-st in the ch-2 space of each shell across to the next marked ch-2 space, (V-st, ch 2, V-st) in next marked ch-2 space, move the marker up, repeat from * 2 more times, 1 V-st in the ch-2 space of each shell across to end, sl st to beg ch-3, do not turn. ————40 V-sts
Row 7: Sl st into the next ch-2 space, ch 3, 2 dc, ch 2, 3 dc in same ch-2 space, 1 fpdc in next dc (the second leg of the V-st), shell in each V-st across to next marked ch-2 space, (2 dc , ch 2, 2 dc ) in the next marked ch-2 space, * shell in each V-st across to next marked ch-2 space, (2 dc , ch 2, 2 dc ) in the next marked ch-2 space, repeat from * 2 more times, shell in each V-st to end of the round, 1 fpdc in next dc ( the first leg of the very first V-st), sl st to beg ch-3. Do not turn.——–40 shells+ 4 corners
Row 8: Sl st loosely into the next 2 dc, sl st into next ch-2 space, ch 5, 1 dc in same ch-2 space ( first V-st made), 1 V-st in the ch-2 space of each shell across to the next marked ch-2 space, (V-st, ch 2, V-st) in next marked ch-2 space, move the marker up, *1 V-st in the ch-2 space of each shell across to the next marked ch-2 space, (V-st, ch 2, V-st) in next marked ch-2 space, move the marker up, repeat from * 2 more times, 1 V-st in the ch-2 space of each shell across to end, sl st to beg ch-3, do not turn. ————48 V-sts
Repeat Rows 7 and 8 until you have completed a total of 23 rounds for size Small and 25 rounds for sizes Medium/Large. You will end in a shell round, fasten off.
Every time you repeat Rows 7 and 8 you will add 8 shells and 8 V-sts respectively. For example, Row 9 will end in 48 shells and Row 10 will end in 56 V-sts.
At end of Round 23 you will have 104 shells around and at end of Round 25, you will have 112 shells around not including the marked corners.
Front and Back Extension

Notes
1. Now you will stop working in the round and add an extension to the front and the back. That way, your poncho will increase in length while the width stays the same.
2. Stitch counts for bigger sizes are given in the order Small(Medium/Large).
Row 1: Working on the WS, sl st into one of the marked ch-2 spaces, ch 4 (counts as dc+ch1), 1 V-st in ch-2 space of the next 26( 28) shells, ch 1, 1 dc in the next marked ch-2 space, turn.——-26(28) V-sts
Row 2: Ch 3, shell in each V-st across to end, 1 dc on top of beg ch-3, turn.—–26(28) shells
Row 3: Ch 4, 1 V-st in the ch-2 space of each shell across to end, ch 1, 1 dc on top of beg ch-3, turn.—-26(28) V-sts
Repeat rows 2 and 3 until you have added a total of 4 shell rows.
Next Row: Ch 3, 1 dc in the next st, sk 1 st, 1 dc in the next 2 sts, 1 dc in the next ch-2 space of shell, 1 dc in next 2 sts, *(sk 4 sts, 1 dc in the next 2 sts, 1 dc in the next ch-2 space of shell, 1 dc in next 2 sts), repeat from * until 2 sts left, sk next st, 1 dc in next st, 1 dc on top of beg ch-3, turn.—- 134(144) sts
Bottom Ribbing
Row 1: Ch 3, *( 1 fpdc in next st, 1 bpdc), repeat from * to last st, 1 dc in last st, turn.——–134(144) sts
Row 2: Ch 3, * (1 fpdc in next fpdc, 1 bpdc in next bpdc), repeat from * to last st, 1 dc in last st, turn.
Repeat Row 2 until your ribbing is 2 inches wide. Fasten off.
Adding Shells to the Side of the Extension
Now you will add shells to the sides to make the edges of the poncho look more uniform. The shells will start only from the top of the bottom ribbing.

Right side: Sl st to the top of the ribbing and work upwards, *( 3dc, ch 2, 3dc) all into the next big ch-space, sl st to the side of the shell, repeat from * 2 more times, (3dc, ch 3, 3dc) in the last big ch-space, 1 sc in the marked ch-2 space, sl st in the next 2 sts, fasten off.

Left side: Sl st 2 sts before the marked st on the side of the poncho, sl st in next st, sl st into marked ch-2 space, *( 3dc, ch 2, 3dc) all into the next big ch-space, sl st to the side of the shell, repeat from * 2 more times, (3dc, ch 3, 3dc) in the last big ch-space, sl st to the top of the ribbing, fasten off.
Repeat the same steps to extend the back of your poncho and add the bottom ribbing.
Seaming the Sides of the Poncho

The poncho is sewn on the right side to form the armholes and the slits. Fold the poncho at the neck, align the sides and bottom, sew 4 inches away from the side edges leaving a 7 1/2 inch gap for the armhole at the top and another 7 1/2 inches for the side slits at the bottom.
Finishing
Weave in any tails left.
If you love this stitch, check out my crochet afghan, crochet scarf and crochet cowl made in the same st.
You can find more free patterns on Allfreecrochet.com. Signup for their newsletter here.
Pin it for later:


i really love this pattern. In fact, i already finished the project except for the side seam. I’m kind of afraid to make a mistake. I don’t know how to do it. Could you please help? Thank you very much.
You can use a running stitch or a backstitch to make the seam. If you are really nervous, I would suggest you first make it in a contrasting color. Once you get confident, you can cut that off and redo it with matching yarn.
This is gorgeous. I’m still trying to learn to read patterns and find i learn better with video tutorials too. Do you have any plans to make a video tutorial for this one please?
I don’t find enough time to make videos for all my patterns, sorry!