Easy Crochet Bag form 4 Rectangles, Spring Fling Bag
Pattern for Easy Crochet Bag, beginner-friendly

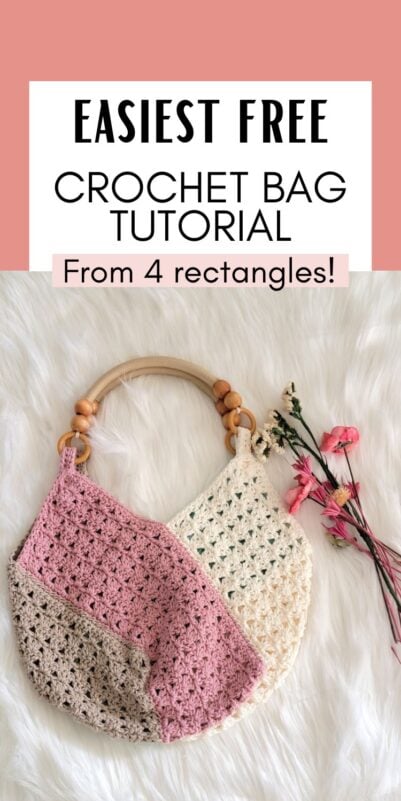
Looking for a fun and colorful crochet project perfect for spring? This easy crochet bag is beginner-friendly and uses bright, cheerful colors.

The bag is made by joining four simple crochet rectangles, making it a great project for those new to crocheting.

Choose your favorite store-bought beaded handle for a touch of glam, or follow the included instructions for a sturdy crochet handle that won’t stretch out over time.

For added structure and to prevent the bag from becoming unmanageably droopy, the pattern includes optional instructions for a lining, making it perfect for carrying all your essentials.
So without further ado, let’s get started!
Easy Crochet Bag
Materials
1. Worsted weight 100% cotton yarn. One bag used Lily Sugar ‘n Cream in the hues Soft Ecru, Seabreeze, Jute, and Rose Pink, while the second bag used Camomile, Coral Rose, and Jute.
2. US 7 (4mm) hook and a G (4mm) hook
3. A tapestry needle to weave in the ends
4. A pair of beaded wooden handles from Amazon
5. 1/2 yard 100% cotton lining fabric of your choice if you want to line the bag
6. Pins to hold the lining in place if you are adding one.
Finished Size
14-1/2″ wide inches and 14″ tall without the handle
Yardage
Each one of the 4 rectangular panels takes 75 yards of yarn. If you plan to add a crochet strap you will need another 85 yards for it.
Gauge
5 pattern repeats = 4.5″
Stitch Abbreviations
The pattern is written in US terms.
sc: single crochet
ch: chain
dc: double crochet
sl st: slip stitch
RS: Right side of the crochet fabric
WS: Wrong side of the crochet fabric
More Easy Crochet Bag Patterns
Water Bottle Holder for Summer
Free Crochet Bag Pattern (Easy)
Pattern Notes
1. This bag is made by seaming together 4 rectangles of the same size.
2. You can make it using a single color, 3 colors, or 4 colors. I made the peach bag with 3 colors and the pink one with 4 colors.
With the 4.5 mm hook and any one of the colors, chain 52. The initial chain is a multiple of 3 +1
Row 1: While working this row, go under 2 loops of the foundation ch. 3 dc in the 5th ch from hook (3 skipped chs count as first dc, *( sk next 2 chs, 3 dc in next ch), repeat from * to last 2 sts, sk next ch, 1 dc in last st, turn.——–16 dc groups + 2 dc
Row 2: Ch 3, sk the next dc, 3 dc in next, *(sk the next 2 dc, 3 dc in next), repeat from * until 1 dc and beginning ch is left, sk the next dc, sk the next ch of beginning ch, 1 dc on top of next ch, turn.—–16 dc groups + 2 dc
Note: The last dc is worked into the beginning ch-2 and not into the top of the beginning ch-3. This will keep the edges straight.
Row 3: Ch 3, sk the next dc, 3 dc in next, *(sk the next 2 dc, 3 dc in next), repeat from * until 1 dc and beginning ch is left, sk the next dc, sk the next ch of beginning ch, 1 dc on top of next ch (the beginning ch-2), turn.—–16 dc groups + 2 dc
Repeat Row 3 until you complete 8 rows in total, do not fasten off.
Border
Switch to the 4mm hook. Once 8 rows are completed, turn to work across the last row, ch 1, 3 sc in the first st, 1 sc in each st across until just the beginning ch is left, sk the next ch of beginning ch and work 3 sc into the next ch (beginning ch-2), switch back to 4.5mm hook.
Now distribute 16 sc along the shorter side until you hit the beginning tail, 2 sc under the first st on the foundation ch side, 1 sc in the ch-1 space before the first 3 dc group, 3 sc in each of the big spaces between the 3 dc groups, 1 sc in the last ch-1 space after the last 3 dc group, 3 sc in beginning ch-2, distribute 15 sc across the shorter side until you hit the first sc, sl st to the first sc, fasten off with a 25″ tail.
The finished panel is approximately 6 inches wide and 15-1/2″ long. Make 3 more panels in the colors of your choice. If you are only using 3 colors, make 2 panels in the same color.
Assembling the Bag


Note: The side on which you worked the sc border around the rectangle is the RS and the back side of it is the WS. The sc and dc stitches will look flat and neater on the RS.
With the wrong sides of the rectangles facing up, arrange the panels as shown in pic 1 or 2 above. All the 4 tails you left when you fastened off the panels will be at the center. Using the tails left, whip stitch center-out as shown by the arrows. Make a knot to secure and leave the remaining tail to weave in later.

Now use a 60″ strand of yarn and whip stitch each panel to the adjacent one as shown in pic 3a above. Take care to securely knot your yarn strand at the beginning and end. When you sew 2 panels together, one of the panels will be shorter and that is how it is supposed to be.
Adding the Wooden Handles
Using any one of the colors of the panels and the 4.5mm hook, ch 20.
Row 1: 1 sc in 2nd ch from hook and each ch across to end, do not turn. Ch 1 and work a round of sl sts around the strap, sl st to the first sl st. Fasten off and weave in the tails.
Make 3 more bands matching the colors of your panels.
Attaching the Wooden Handles to the Bag
Notes
1. While attaching the band to the bag, go through all three 3 layers, 2 layers of the band and one layer of the bag.
2. Use the band and yarn that match each panel of the bag.
Fold the band you made in half, and loop the ring of the handle through the fold. Make sure your bag is right side out, and place the folded band inside with 5 sts showing outside (counted from the top of the fold).
Using a 30″ strand of yarn, first sew along the top of the ‘/\’ shape of the bag to secure the strap in position. Then take the yarn inside the bag and whipstitch the strap down along its edge. Make a couple of knots to secure and pull the yarn tail in between the 2 layers of the band and trim. It will stay hidden between the layers and there is no need to weave it in.
Bring the beginning tail inside the bag, make a couple of knots to secure and hide it between the 2 layers of the band as well.
Adding Crochet Straps- 2nd Option
Note: If you don’t have a store-bought handle, pick one of the neutral colors in your palette to make 2 crochet straps.
With 4.5mm hook, ch 69.
Row 1: 1 sc in the back bump of the 2nd ch from hook and each ch across to end, turn.—-69 sts
Row 2: Ch 1, sl st in 1st st and each st across to end, turn.——69 sts
Note: In the next row, You are working into the gaps between the sc sts of the first row to encase the sl sts inside for a sturdy handle.
Row 3: Ch 1, 1 sc into the first gap under your sl st row. 1 sc in each gap under the sl st row to end, 1 sc into the leg of the very last stitch, turn.—-69 sts
Repeat Rows 2 and 3 and fasten off with a long 30″ tail for sewing. Make one more.
Attaching the Crochet Strap to the Bag

Insert 2″ of the strap inside and sew it down to your bag using whip stitches along the edge of the strap and a running stitch along the top as shown in pic 3b above.
Adding a Lining (Optional)
Note: Before you add the lining, clean up your bag by weaving in the ends inside the bag.

Fold the lining fabric to fit the bag with around 1 inch of space all around it. The bag should be as flat as possible. Trace around the bag leaving a 1/2″ seam allowance all around as shown in pics 4 and 5 above. You will have to leave a gap where there are bands or straps.

Draw a horizontal line to close the gap at the top and cut out the lining fabric as shown in pic 6. Fold the remaining lining fabric to get 2 layers, and trace just the top part of the lining as shown in pic 7 without any seam allowance at all. You should use the same color fabric, I am using blue fabric only for visibility.

The top part traced should be should be 6.5″ deep. Draw a line along the base to close it and cut this shape out as shown in pic 8.
First, we will sew the narrow top pieces we cut out to the big lining pieces as shown in pic 9. Place it to match the shape on top, place pins to hold it in place, and sew along the edge with a 1/2″ seam allowance that tapers at the ends and leaves 1/2″ free at the ends as shown by the red arrows. You can sew by hand or use a sewing machine. Repeat with the other 2 pieces.

Make slits on the seam allowance at the points shown in pic 10. Now turn the top right side out to get your seam hidden as shown in pic 11.

Place the prepared lining pieces on top of each other with the right sides touching. On the outside, you should see the extra top piece. Place pins along the sides and the bottom to hold the pieces in place, and sew them together using a 1/2-inch seam allowance leaving the top triangle part free.

Iron the lining to make the top edge nice and flat. You can also top stitch along the top if you want. Now insert the lining into the bag and whip stitch the top to the bag using a sewing needle and matching thread for each section. Start at the side and work your way up. This is tricky, so be patient. If you don’t have a thread in all the colors, try to go through just the inside of the stitches of the bag.
You can work some extra stitches to attach the bands or straps to the lining too. This will make your handles more sturdy.
Finishing
Weave in any tails left inside the bag.
Pin it for later: