
5 Hour Blanket, Free Crochet Baby Blanket Pattern
Who wouldn’t love making a free crochet baby blanket pattern that works up super fast and is super squishy to boot? I absolutely love quick projects, do you?

If are a lover of quick blankets, you can see my collection of 13 Crochet Baby Blanket Patterns than can be worked in 3-6 hours.


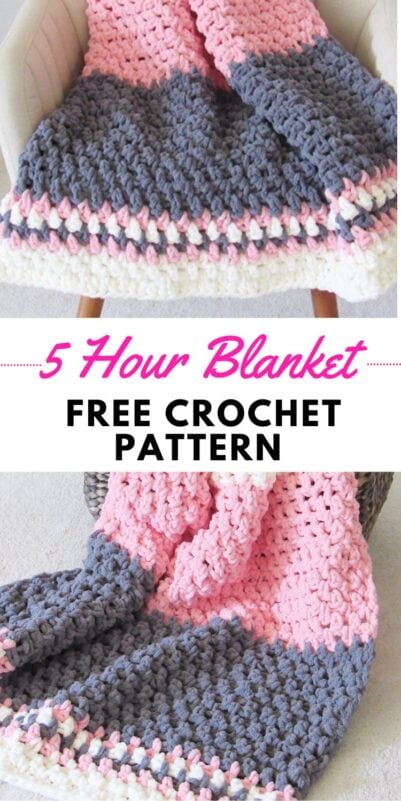
Using thick yarn and a quick stitch, you will be able to work this beauty up in under 5 hours. And no, this isn’t your regular Moss stitch. See that texture? I used extended single crochet stitches for this blanket and loved it.
For someone who thought crocheting a baby blanket was boring, I cannot believe I am on my sixth blanket already. I am quite enjoying the ride. 2019 is going to be the year of Afghans on my blog :). Of course, you will see other patterns too.
Crochet Baby Blanket Pattern
You can pin it for later here.
Materials
- Super Bulky, Size 6 Chenille yarn. Bernat Blanket yarn in colors Dark Grey, Vintage White and Bernat Baby Blanket in color Shell Pink was used for the sample blanket.
- Size N/P(10mm) hook
- Size K(6.5 mm) hook to weave in the ends.
Finished Size
32 X 39 inches when laid flat.
Yardage
1 skein each of the 3 colors. Each skein had 220 yards. I used almost all of the cream color and 170 yards of the grey and pink.
Stitch Abbreviations
ch-chain
ch space- chain space
sc-single crochet
esc- extended single crochet
beg ch- beginning chain
Stitch Explanations
Extended Single crochet (esc): Insert your hook into the next st and pull up a loop, yarn over and pull through one loop, yarn over again and pull through the remaining 2 loops on hook.—–1 esc completed
Gauge
5 esc sts= 5 inches
With the cream color yarn, Ch 60. You can ch any even number to increase the width of your blanket.
Row 1 ( work this row tight): 1 sc in 2nd ch from hook and each ch across. Turn.—-59 sc
Row 2: Ch 3 (counts as an esc+ ch 1), sk next st, esc in next, *(ch 1, sk next st, esc in next), repeat from * to end. Turn.——-30 esc
Note: At the end of Row 3, I found that working your last st into the beginning ch 1 gave a straighter edge compared to working into beg ch-2.
Row 3: Ch 2 ( counts as esc), esc in adjacent ch-space, *( ch 1, sk next esc, esc in the next ch-space), repeat from * until you work an esc in the ch-space under beg ch-3, esc on top of beg ch-1. Turn.—-31 esc
Row 4: Ch 3 (counts as esc+ ch 1), sk next st, 1 esc in next ch-space, *( ch 1, sk next st, 1 esc in next ch-space), repeat from * to last 2 sts (esc+beg ch), ch 1, sk next esc, 1 esc on top of beginning ch-2, join pink color yarn, fasten off the cream color. Turn.——-30 esc
Note: You will alternate between Rows 3 and 4 with color changes in between.
Row 5: Repeat Row 3 in color pink, join color grey at the end of the row, and fasten off the pink. Turn.
Row 6: Repeat Row 4 in color grey, join color cream at the end of the row and fasten off the grey. Turn.
Row 7: Repeat Row 3 in color cream, join color pink at the end of the row, and fasten off the cream. Turn.
Row 8: Repeat Row 4 in color pink, join color cream at the end of the row, and fasten off the pink. Turn.
Row 9- 23: Repeat Rows 3 and 4 alternately in color cream, join color pink at the end of Row 23, and fasten off the color cream. Turn.
Notes
1. If you want to adjust the length of your blanket, you can crochet more or fewer rows here, but remember to write the number of rows down for the remaining two panels.
2. My cream panel now measured approximately 9 1/2 inches from the top of the pink row.
Row 24-38: Repeat Rows 4 and 3 in color pink for the next 15 rows, join color grey at the end of Row 38, fasten off the color pink. Turn.
Row 39-53: Repeat Rows 3 and 4 in color grey for the next 15 rows, join color pink at the end of Row 53, fasten off the color grey. Turn.
Row 54: Repeat Row 4 in color pink, join color cream at the end of the row and fasten off the color pink. Turn.
Row 55: Repeat Row 3 in color cream, join grey at the end of the row and fasten off the color cream. Turn.
Row 56: Repeat Row 4 in color grey, join pink at the end of the row and fasten off the color grey. Turn.
R0w 57: Repeat Row 3 in color pink, join cream at the end of the row and fasten off the pink. Turn.
Row 58-60: Repeat Row 4, 3 and 4 again in color cream. Turn
Row 61: Continuing with cream color, ch 2 (counts as a hdc), 1 hdc in each ch and st across to end, fasten off.—-60 hdc
Note: The last Row is a hdc row and not a single crochet row like the first row because the hdc made it the same width as the first colorful panel.
Finishing
Using the smaller hook, weave in all the tails left. Take care to weave in through the top part of your esc sts to avoid your tails showing through the gaps.
If you love making blankets, you might also like my 3 Hour Crochet Afghan and my Textured Crochet Afghan.
This 5 Hour Baby Blanket pattern was featured on AllFreeCrochetAfghans.com.
Watch a web story on this Crochet Chenille Baby Blanket here.
Pin it for later:




Love the stitch, can you tell me the multiply to make it larger? Thanks
Hi Anne, It is already mentioned at the beginning of the pattern. You can chain any even number.
Your blanket is beautiful. Thanks for the pattern 😃
I just finished this blanket with blue instead of pink. So pretty. ThNks for sharing the pattern.
Hi Joyce, I am so glad to hear that. I wish I could see your blanket.
Is there a way to print the pattern? Or am I overlooking it. I saw email, pin, tweet and Facebook.
Love the pattern super easy to follow I am doing just one color. Hope to post when I am finished.
There is a small fee for the pdf and you can find it in red color.
I just made this with pink, cream, and yellow for my cousin’s little girl. Very cute! Thanks from sharing!
Hi Jamie, I am so happy to hear you love how it turned out. Thank you for commenting. I love hearing from my readers.
Is there a video?
I’m feeling frustrated, on row two followed exactly and still have a spare stitch at the end! At the beginning of the row do I skip two stitches?
At the beginning of Row 2, you skip the very first st and the next one. Hope that helps.
Is there a pattern I could get I do better with written instructions. I also want instructions for 3 hr. Afghan. What do I do to get these?
There are links to purchase the PDF included in the blog posts. Scroll a little beyond the blanket pictures at the top and you will find the link in red.
@Cassie, there is a video – it’s attached here.
This blanket is lovely. I’ve already made your 3 hour blanket for a new baby boy! Can’t wait to give it to him.
One quick question…instead of using #6 bulky yarn, I’m thinking of trying this by using two or perhaps. Three strangers of yarn held together. What do you think?
Hi Chris, I am so glad to hear that. Yes, absolutely, you can try working with three strands of lighter weight yarn.
I’m sort of new at crocheting after making many blankets for family and friends with plain stitching. I’ve fallen in love with this pattern and have all the yarn, but can’t figure out the different colors in the edging. My friend has a new granddaughter who is in U.K. And she is leaving April 2nd. Help. I want her to take this blanket with her.
Hi Christine, try following the pattern and let me know which part you find hard.
Hi,
I am currently trying to follow the pattern, but am getting lost in two areas:
1. At the end of row 3, it says to do an esc under the beginning ch3, and then add another esc at the top of veg ch1 – I cant figure out where to put this second esc.
2. When I add the second esc where I think it should go, I end up with 31 esc in row 4 instead of 30 as it says, I’m not sure if I’m missing where I skip a stitch or if I’m confusing something.
Any help on this would be great, I tried to just continue on the pattern how I thought and at the 16 row I somehow ended up with only 29 esc, so I know I’m doing something wrong I just can’t figure out where or how to fix it!
Hi Sarah, I think you might be missing a st somewhere. At the end of Row 3, you work your esc on top of the beginning ch of the previous row. Just go a little deeper for a straighter edge. In Row 4, make sure you skipped a st at the beginning.
So at the end of row 3 there are two esc?
And I’m skipping the first esc and going into the next chain space, is that not correct?
Your turning chain is on top of the first esc, then you skip the second esc and work esc into the next ch-space.
Ok that makes sense I think!
Sorry – I’m pretty new to crochet so I can get lost easily!
Thank you!
I’m still really new with only using patterns. Please clarify how the last stitch in row 3. What do you mean by “esc on top of beg ch-1” .
So, not the space but the actual ch-1?
I get myself easily turned around. I appreciate any help.
I love this pattern and can’t wait to make it for my granddaughter. Thank you.
Erica
Hi Erica, yes, you are right.
I love this pattern , but have tried over and over and it never comes out correct. Always ends up curving , I am not a beginner but just don’t get it. I get the extended single crochet but the confusion comes at ends and beginning of the rows. Thanks anyway, I love the stitch, maybe I will figure something out.
Hi Betty, Is it likely that your gauge is tight? Did you try going up a hook size?