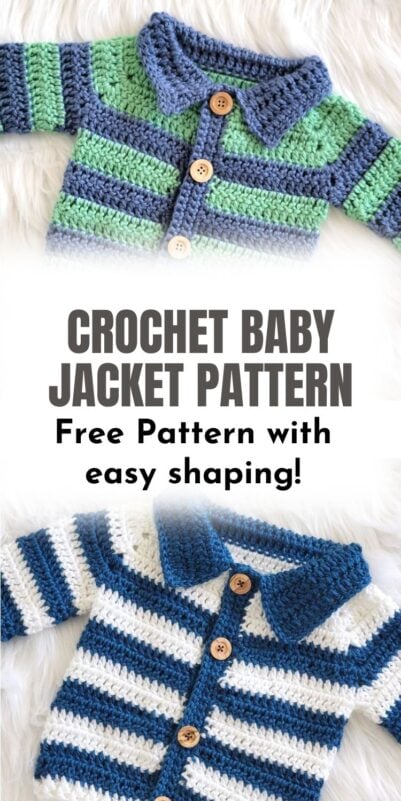
Crochet Baby Jacket Free Pattern, Little Oliver Baby Jacket
Crochet Jacket for Baby- Easy Raglan Shaping
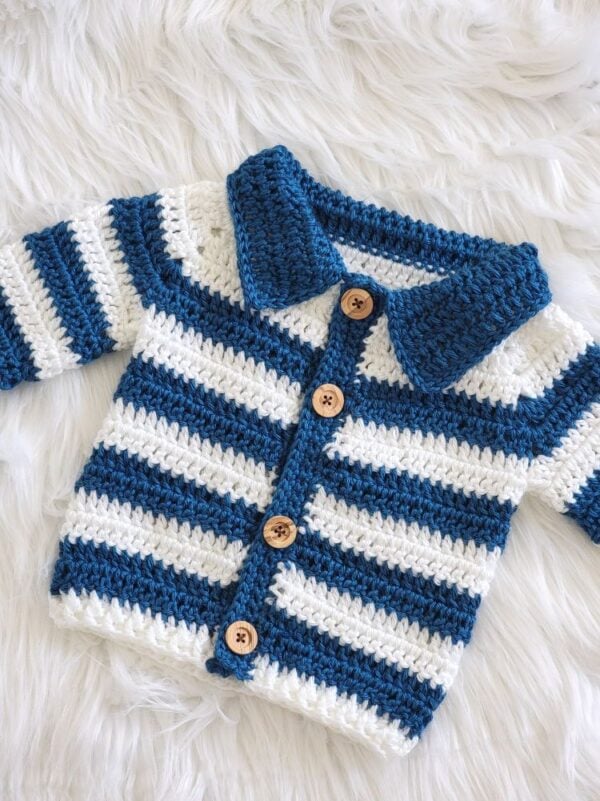
This is one of the easiest crochet baby jackets you will make. The Raglan shaping and the double crochet stitches make it a breeze even for beginners.
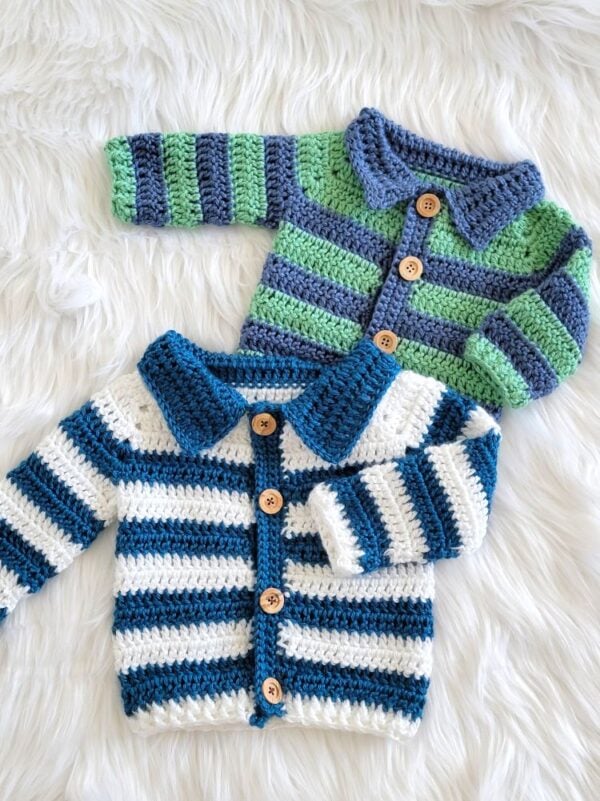
What is Raglan shaping? It means the sweater is worked top-down without any shaping for the armholes.
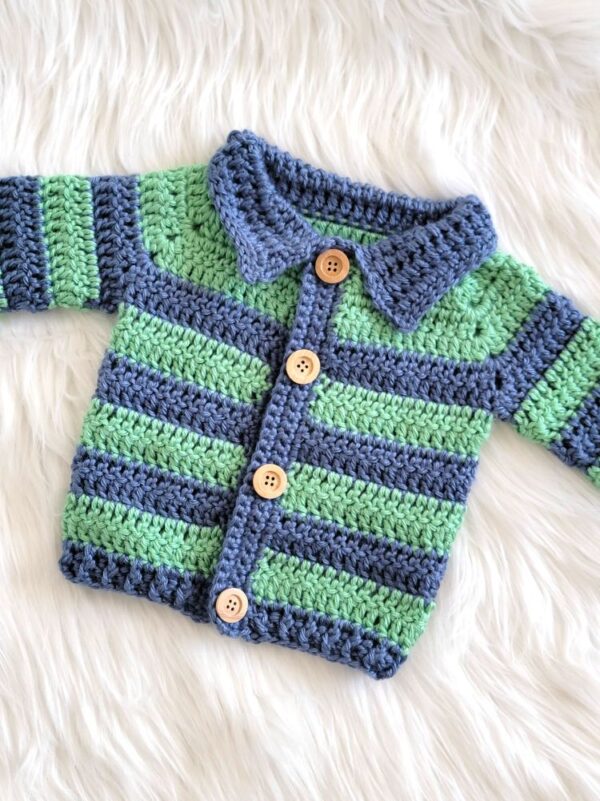
You can make it with or without a collar, as shown below. Both options are included in the pattern.
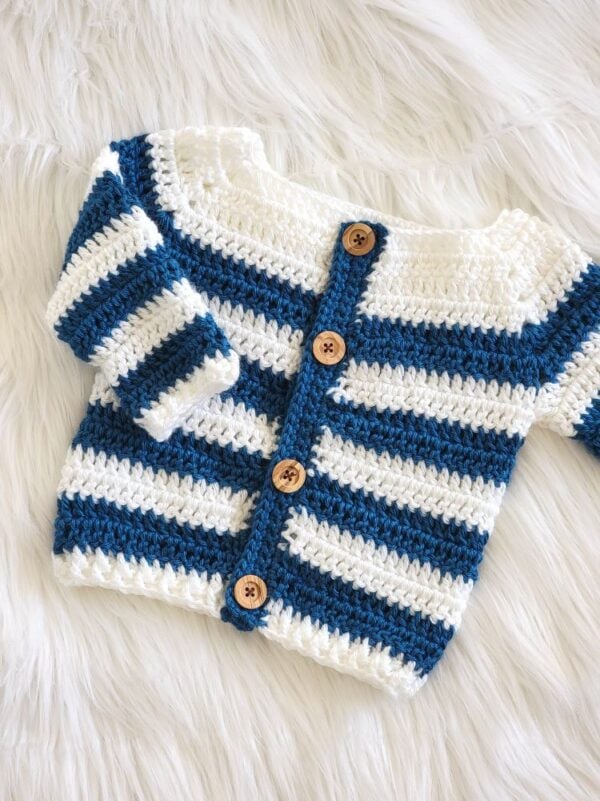
The pattern comes in 4 sizes. If you want larger sizes, let me know.
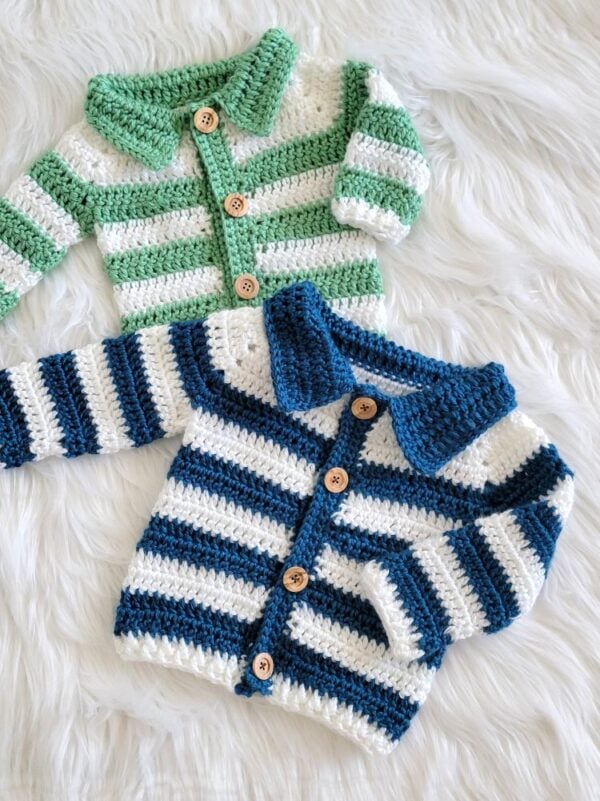
This will make a quick baby gift. I hope you enjoy the pattern.
Crochet Baby Jacket Free Pattern
Pin it for later.
Materials
1. Worsted weight (size 4) yarn, which is on the thinner side. Caron Simply Soft yarn in Sage, Ocean, and Country Blue was used for the jackets pictured. You need 2 colors to make one crochet jacket.
2. H (5mm) hook for the main body and size 7 (4.5mm) hook for the ribbing.
3. Tapestry needle to weave in the ends
4. 4 to 5 wooden buttons. I used 20 mm or 3/4″ ones. You can use buttons between 5/8″ to 3/4″.
5. Sewing needle and thread to sew on the buttons
Finished Size
This sweater has been designed with 3 to 4 inches of positive ease.
0-3 months: Finished chest is 18″ (to fit 15″ chest) and length is 11″.
3 months: Finished chest is 19″ (to fit 16″ chest) and length is 11″.
6 months: Finished chest is 21″ (to fit 17″ chest) and length is 12″.
12-24 months: Finished chest is 22″ (to fit 18″ chest) and length is 13″.
Yardage
0-3 Months: 150 yards of each color.
3-6 Months: 190 yards of each color
6-12 months: 250 yards of each color.
12-24 months: 280 yards of each color.
Gauge
With H (5mm) hook, 14 dc sts= 4 inches
Stitch Abbreviations
This pattern is written in US terms.
WS: Wrong Side of Jacket
RS: Right Side of Jacket
ch: chain
sl st: slip st
sc-single crochet
dc: double crochet
cl: cluster (explained below)
YO– yarn over
sp: space
sk: skip
Stitch Explanations
1. Cluster (cl): YO, insert hook into the space indicated and pull up a loop, YO and pull through 2 loops, YO and insert hook into the same space, pull up a loop, YO and pull through 2 loops, YO and pull through the remaining 3 loops on the hook.
2. dc2tog: Worked just like the cl above, but across 2 sts or 2 points specified.
3. sc2tog: Pull up a loop in the 2 sts or points specified, YO, and pull through all 3 loops on your hook.
4. Front post double crochet (fpdc): YO, and insert your hook from front to back through the gap before the post of the stitch specified, then back to the front through the gap after the post, YO, and pull up a loop, 3 loops on the hook now (YO and pull through 2 loops on your hook) twice.
5. Front post half double crochet (fphdc): YO, and insert your hook from front to back through the gap before the post of the stitch specified, then back to the front through the gap after the post, YO, and pull up a loop, 3 loops on the hook now, YO and pull through all 3 loops on your hook.
Related Baby Crochet Jackets:
Crochet Baby Jacket Pattern
1. Sizes 0-3 months and 3-6 months are grouped, and sizes 6-12 and 12-24 months are grouped. The headings are color-coded for each group.
2. The colors in the pattern refer to the green crochet jacket.
3. To join a new color at the end of the row, start working your dc as usual, and when you have 2 loops on your hook, YO and pull through the new color. Start the next row by making the beginning ch with the new color joined.
4. You do not have to fasten off after each color change while making the yoke and body. You can drop the previous color and join it back when working the next stripe. For the sleeves, it is better to fasten off after each color change.
0-3 and 3-6 MONTHS
YOKE & BODY- Both Sizes
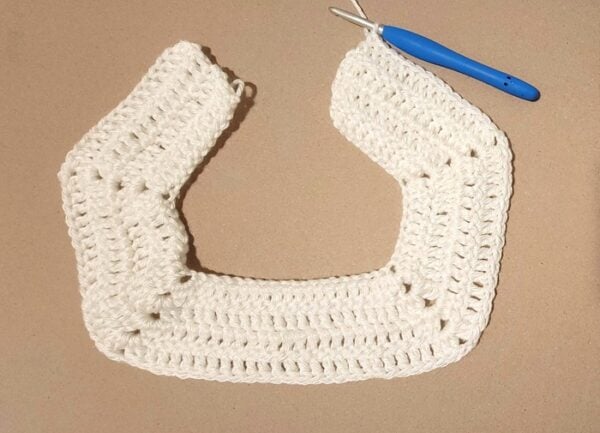
Row 1: With white color yarn, ch 52, 1 dc in 4th ch from hook (the beginning ch 3 counts as the first dc here), 1 dc in next 7 chs, (cl, ch 2, cl) in next ch, 1 dc in next 6 chs, (cl, ch 2, cl) in next, 1 dc in next 16 chs, (cl, ch 2, cl) in next, 1 dc in next 6 chs, (cl, ch 2, cl) in next ch, 1 dc in remaining 9 chs, and turn.——–46 dc + 8 cl+8 chs
Row 2: Ch 2 (does not count as a dc here and in the rest of the yoke rows), 1 dc in the same st as ch 2, 1 dc in next 9 sts, (cl, ch 2, cl) in next ch-2 sp, 1 dc in next 8 sts, (cl, ch 2, cl) in next ch-2 sp, 1 dc in next 18 sts, (cl, ch 2, cl) in next ch-2 sp, 1 dc in next 8 sts, (cl, ch 2, cl) in next ch-2 sp, 1 dc in next 9 sts, 1 dc on top of beginning ch 3, turn. ——-54 dc + 8 cl+ 8 ch
Row 3: Ch 2, 1 dc in the same st as ch 2, 1 dc in next 10 sts, (cl, ch 2, cl) in next ch-2 sp, 1 dc in next 10 sts, (cl, ch 2, cl) in next ch-2 sp, 1 dc in next 20 sts, (cl, ch 2, cl) in next ch-2 sp, 1 dc in next 10 sts, (cl, ch 2, cl) in next ch-2 sp, 1 dc in next 11 sts, turn. ——-62 dc + 8 cl+ 8 ch
Row 4: Ch 2, 1 dc in the same st as ch 2, 1 dc in next 11 sts, (cl, ch 2, cl) in next ch-2 sp, 1 dc in next 12 sts, (cl, ch 2, cl) in next ch-2 sp, 1 dc in next 22 sts, (cl, ch 2, cl) in next ch-2 sp, 1 dc in next 12 sts, (cl, ch 2, cl) in next ch-2 sp, 1 dc in next 12 sts, join green color yarn, turn. ——-70 dc + 8 cl+ 8 ch
Row 5: Ch 2, 1 dc in the same st as ch 2, 1 dc in next 12 sts, (cl, ch 2, cl) in next ch-2 sp, 1 dc in next 14 sts, (cl, ch 2, cl) in next ch-2 sp, 1 dc in next 24 sts, (cl, ch 2, cl) in next ch-2 sp, 1 dc in next 14 sts, (cl, ch 2, cl) in next ch-2 sp, 1 dc in next 13 sts, turn.——-78 dc + 8 cl+ 8 ch
For 0-3 Months Only
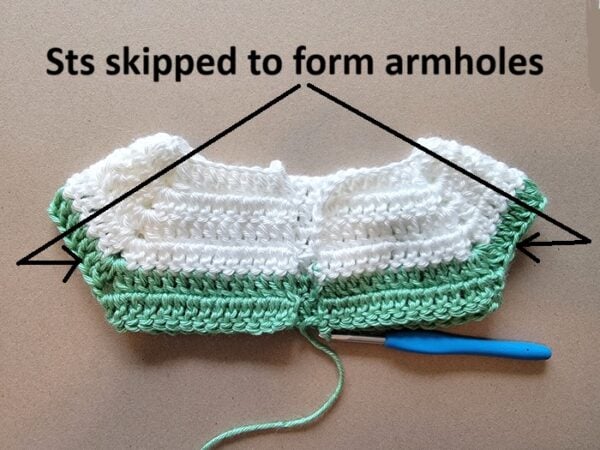
Note: We will close the chest and form the armholes in the next row.
Row 6: Ch 2, 1 dc in the same st as ch 2, 1 dc in next 13 sts, 1 dc in the ch-2 space between the clusters, sk all the 16 sts up to the next ch-2 loop, 1 dc in the ch-2 space between the clusters to form armhole (see pic 2 above), 1 dc in next 26 sts, 1 dc in the next ch-2 space, sk next 16 sts up to the next ch-2 loop, 1 dc in the ch-2 space, 1 dc in next 14 sts, join white color yarn, turn. ——-58 dc
Row 7: Ch 2, 1 dc in same st as ch 2, 1 dc in each st across to end, turn.——–58 dc
Row 8: Repeat Row 7 one more time, then join the green yarn.
Repeat Row 7, changing colors every 2 rows, until your jacket is about 10″ inches from the highest point of the shoulder. Then work the bottom ribbing
Bottom Ribbing (0-3 months)
Next Row: Switch to the smaller 4.5 mm hook, Ch 2, 1 dc in same st as ch 2, 1 dc in each st across to end, turn.——–58 dc
Last Row: Ch 2, 1 dc in same st as ch 2, *(1 fpdc in next st, 1 bpdc in next st), repeat from * to last st, 1 dc in last st. Fasten off and Jump to Button Band.
3-6 Months Only
Row 6: Ch 2, 1 dc in the same st as ch 2, 1 dc in next 13 sts, (cl, ch 2, cl) in next ch-2 sp, 1 dc in next 16 sts, (cl, ch 2, cl) in next ch-2 sp, 1 dc in next 26 sts, (cl, ch 2, cl) in next ch-2 sp, 1 dc in next 16 sts, (cl, ch 2, cl) in next ch-2 sp, 1 dc in next 14 sts, join white color yarn and turn.—-86 dc + 8 cl+ 8 ch
Note: We will close the chest and form the armholes in the next row.
Row 7: Ch 2, 1 dc in the same st as ch 2, 1 dc in next 14 sts, 1 dc in the ch-2 space between the clusters, sk all the 18 sts up to the next ch-2 loop, 1 dc in the ch-2 space between the clusters to form armhole (see pic 2 above), 1 dc in next 28 sts, 1 dc in the next ch-2 space, sk next 18 sts up to the next ch-2 loop, 1 dc in the ch-2 space, 1 dc in next 15 sts, turn. ——-62 dc
Row 8: Ch 2, 1 dc in same st as ch 2, 1 dc in each st across to end, join green color yarn, turn.——–62 dc
Repeat Row 8, changing colors every 2 rows, until your jacket is about 10″ inches from the highest point of the shoulder.
Bottom Ribbing (3 to 6 months)
Next Row: Switch to the smaller 4.5 mm hook, Ch 2, 1 dc in same st as ch 2, 1 dc in each st across to end, turn.—62 dc
Last Row: This row should be worked on the RS or outside of the jacket. Fasten off and rejoin yarn with a sl st to work on the RS if needed, ch 2, 1 dc in same st as ch 2, *(1 fpdc in next st, 1 bpdc in next st), repeat from * to last st, 1 dc in last st. Fasten off and Jump to Button Band.
Button Band for Both Sizes
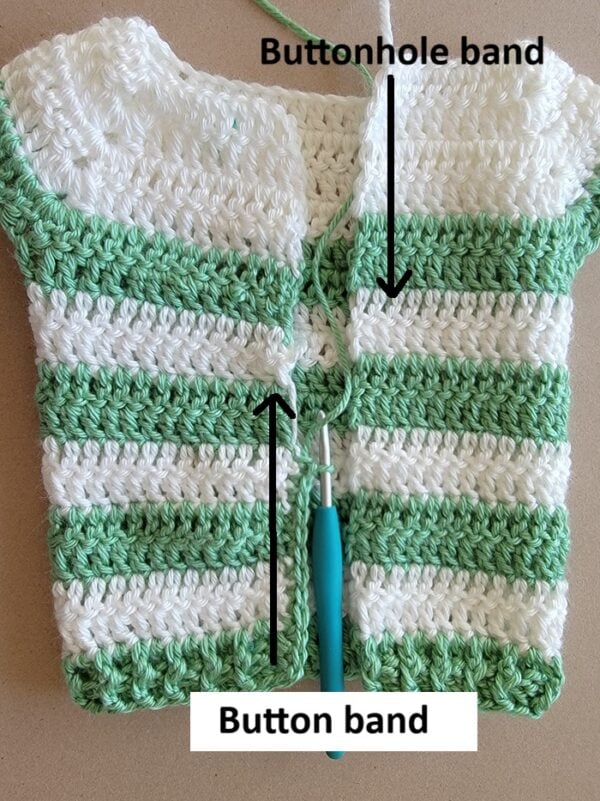
Pattern Notes
1. The first Row of both the button band and the buttonhole band is worked on the RS.
2. The button band is worked from the bottom up along the left side of the front opening as shown in pic 3 above.
Row 1: Join green yarn with a sl st at the bottom left corner of the front opening. Working along the edge of the opening, evenly distribute sc sts all the way up to the neckline. Turn.
Row 2: Ch 1 (does not count as a st), 1 sc in the same st as the beginning ch1, 1 sc in each st across to end, turn.
Row 3 & 4: Repeat Row 2 and fasten off.
Buttonhole Band for Both Sizes
Weave in any tails left along this edge and work the buttonhole band on the right side of the front opening from the neck down.
Row 1: Sl st to the top-right corner of the front opening at the neck, evenly distribute sc sts down to the hem, and turn.
Row 2: Ch 1 (does not count as a st), 1 sc in the same st as the beginning ch 1, 1 sc in each remaining st across to end, turn.
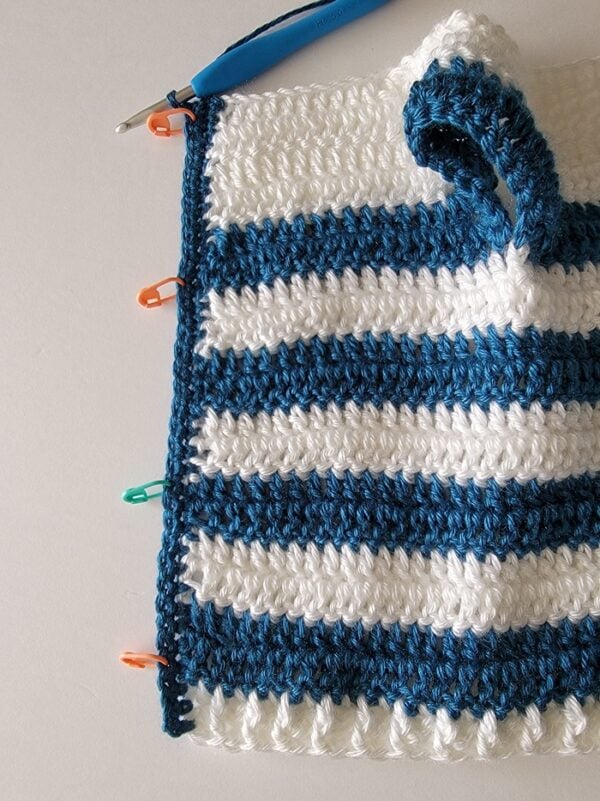
Note: Place markers where you want your buttonholes (see pic 4 above). Place the top marker in the second stitch from the top and the bottom marker in the 4th or 5th st from the bottom. Space the remaining buttons evenly apart. You can add a total of 3 to 5 buttons based on the size of the buttons you choose.
Row 3: Ch 1 (does not count as a st), 1 sc in the same st as beginning ch1, ch 1 and sk 1 st for buttonhole (ch 2 and skip 2 sts if your button is big), *(1 sc in each st until the next marker, ch 1 or ch 2 for buttonhole, sk 1 or sk 2 sts), repeat from * to make all your buttonholes, 1 sc in remaining sts to end, turn.
Row 4: Ch 1 (does not count as a st), 1 sc in the same st as beginning ch1, 1 sc in each st and ch across to end, turn.
Note: For the next row, you can switch to a bigger hook if you are someone who sl stitches very tight.
Row 5: Do not ch 1, 1 sl st in next st and each st across to end, fasten off.
Sleeves (Both sizes)
Pattern Notes
1. Stitch count for bigger size is given in the order 0-3 months (3 to 6 months).
2. Each armhole is made up of 16 (18) stitches that you skipped, plus one extra dc stitch that gives more depth to each side.
3. Round 1 of the sleeve is worked on the RS.
4. Change colors every 2 rows for the sleeves, even if it is not mentioned in the pattern. The rows where you change colors will vary depending on the size, which is why they are not specified.
5. To change colors, after your joining sl st at the end of the round, YO and pull the new color through the loop on your hook; tug the previous color to make the loop disappear. Make beginning ch in the new color and start the next round.
6. When making the sleeves, fasten off after each color change.
Sleeves for Both Sizes
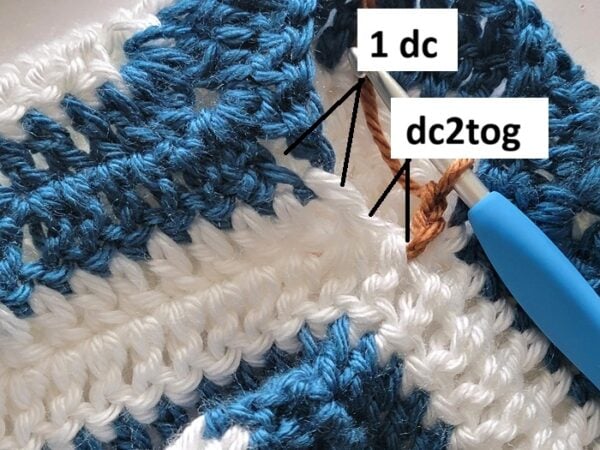
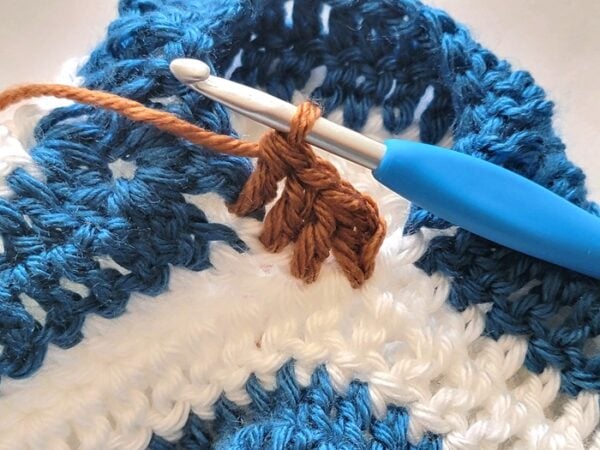
Round 1: With green color yarn and the H (5mm) hook, sl st under the armhole, ch 2 (not counted as a st), work 1 dc2tog across the same point as the beginning ch and the post of the adjacent dc as shown in pics 5 & 6 above, 1 dc in the post of the same dc, 1 dc in the next ch-space, 1 dc in each of the next 16 (18) sts you skipped for armhole, 1 dc in the next ch-space, 1 dc in the post of the next dc st, 1 dc2tog across the post of the same dc and gap before beginning ch-2, sl st first dc2tog, turn.———22 (24) sts
Round 2: Ch 2 (does not count as a st), 1 dc in next st and each st across to end, 1 dc in the same st as beginning ch-2, sl st to first dc, join the white color yarn, turn.——–22 (24) sts
Repeat Round 2, changing colors every 2 rows until your sleeve is approximately 5-1/4 (6-1/4) inches long from the base of the armhole.
Note: For 3 to 6 months, substitute the dc in the next round with hdc sts.
Next Round: Switch to the smaller 4.5mm hook. Ch 1, 1 dc in same st and each st across to end, sl st to first dc.
Last Round: This round should be worked on the outside or RS of the jacket. Ch 2, *(1 fphdc in next st, 1 bphdc in next st), repeat from * to end, sl st to top of beginning ch-2. Fasten off.
Collar for Both Sizes
Notes
1. Row 1 is worked into the free loops of the foundation chain under each st. We will work sc2tog near the clusters to round the neck.
2. If you prefer not to add a collar, you can work Row 1 in the same color as the neckline and fasten off.
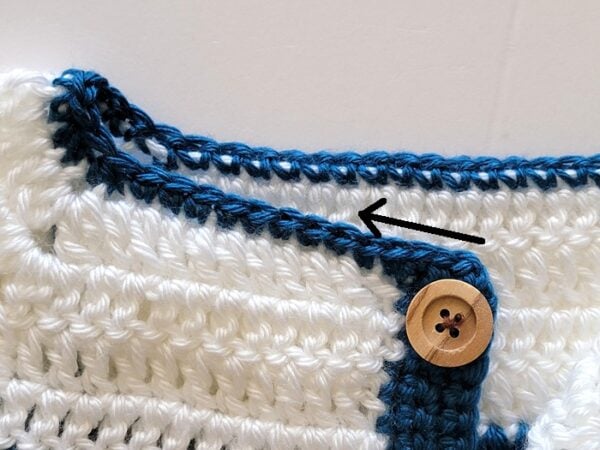
Row 1: Working on the outside or RS, sl st to the corner of the button band on the left as shown in pic 7 above, work 3 sc across the top of the button band, 1 sc in each loop until there is 1 loop before the clusters, sc2tog across the next loop and the big gap under the clusters, sc2tog across next 2 loops, *(1 sc in each loop to the next cluster, sc2tog across the gap under the cluster and the next loop), repeat from * once more, 1 sc in each loop until there is 1 loop before the clusters, sc2tog across the next loop and the big gap under the clusters, sc2tog across next 2 loops, 1 sc in each remaining loop, 3 sc on top of buttonhole band, turn.
Row 2: Ch 1, sl st into next 4 sts, Ch 3, 1 dc in same st, 1 dc in each st across to last 5 sts, 2 dc in next st, leave the remaining 4 sts unworked and turn.
Rows 3 & 4: Ch 3, 1 dc in first st, 1 dc in gap between the second and third dc, *(1 dc in the gap between next 2 dc), repeat from * until 1 dc and beginning ch is left, 2 dc on top of beginning ch-3, turn.
Row 5: Ch 2, 1 hdc in first st, 1 hdc in gap between the second and third dc, *(1 hdc in the gap between next 2 dc), repeat from * until 1 dc and beginning ch is left, 2 hdc on top of beginning ch-3, fasten off.
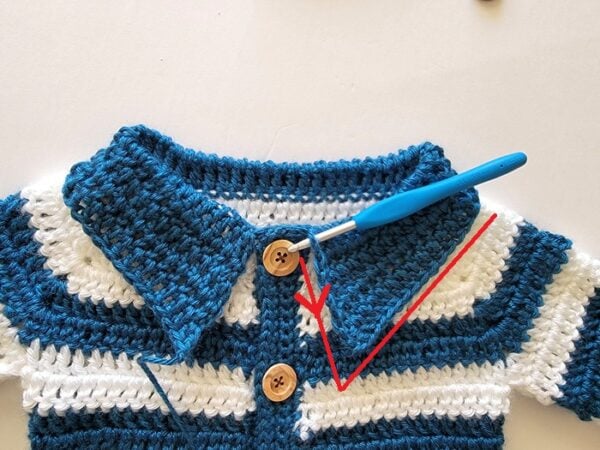
Row 6 (see pic 8 above): Sl st to the top of the right edge of the collar near the neckline, work sl sts evenly along the right edge until you reach the corner, ch 1 at the corner, then sl st into each st along the outer edge of the collar until you reach the next corner, ch 1 at the second corner, then work sl sts evenly along the left edge of the collar up to the neckline. Fasten off.
Finishing
Sew the buttons, aligning them with the buttonholes, and weave in any yarn tails left along the inside of the crochet baby jacket.
6-12 and 12-24 MONTHS
Yoke and Body- Both Sizes
Row 1: With white color yarn, ch 58, 1 dc in 4th ch from hook (the beginning ch 3 counts as the first dc here), 1 dc in next 8 chs, (cl, ch 2, cl) in next ch, 1 dc in next 7 chs, (cl, ch 2, cl) in next, 1 dc in next 18 chs, (cl, ch 2, cl) in next, 1 dc in next 7 chs, (cl, ch 2, cl) in next ch, 1 dc in remaining 10 chs, and turn.——–52 dc + 8 cl+8 chs
Row 2: Ch 2 (does not count as a dc here and in the rest of the yoke rows), 1 dc in the same st as ch 2, 1 dc in next 10 sts, (cl, ch 2, cl) in next ch-2 sp, 1 dc in next 9 sts, (cl, ch 2, cl) in next ch-2 sp, 1 dc in next 20 sts, (cl, ch 2, cl) in next ch-2 sp, 1 dc in next 9 sts, (cl, ch 2, cl) in next ch-2 sp, 1 dc in next 10 sts, 1 dc on top of beginning ch 3, turn. ——-60 dc + 8 cl+ 8 ch
Row 3: Ch 2, 1 dc in the same st as ch 2, 1 dc in next 11 sts, (cl, ch 2, cl) in next ch-2 sp, 1 dc in next 11 sts, (cl, ch 2, cl) in next ch-2 sp, 1 dc in next 22 sts, (cl, ch 2, cl) in next ch-2 sp, 1 dc in next 11 sts, (cl, ch 2, cl) in next ch-2 sp, 1 dc in next 12 sts, turn. ——-68 dc + 8 cl+ 8 ch
Row 4: Ch 2, 1 dc in the same st as ch 2, 1 dc in next 12 sts, (cl, ch 2, cl) in next ch-2 sp, 1 dc in next 13 sts, (cl, ch 2, cl) in next ch-2 sp, 1 dc in next 24 sts, (cl, ch 2, cl) in next ch-2 sp, 1 dc in next 13 sts, (cl, ch 2, cl) in next ch-2 sp, 1 dc in next 13 sts, join green color yarn, and turn. ——-76 dc + 8 cl+ 8 ch
Row 5: Ch 2, 1 dc in the same st as ch 2, 1 dc in next 13 sts, (cl, ch 2, cl) in next ch-2 sp, 1 dc in next 15 sts, (cl, ch 2, cl) in next ch-2 sp, 1 dc in next 26 sts, (cl, ch 2, cl) in next ch-2 sp, 1 dc in next 15 sts, (cl, ch 2, cl) in next ch-2 sp, 1 dc in next 14 sts, turn. ——-84 dc + 8 cl+ 8 ch
Row 6: Ch 2, 1 dc in the same st as ch 2, 1 dc in next 14 sts, (cl, ch 2, cl) in next ch-2 sp, 1 dc in next 17 sts, (cl, ch 2, cl) in next ch-2 sp, 1 dc in next 28 sts, (cl, ch 2, cl) in next ch-2 sp, 1 dc in next 17 sts, (cl, ch 2, cl) in next ch-2 sp, 1 dc in next 15 sts, join white color yarn, and turn. ——-92 dc + 8 cl+ 8 ch
For 6-12 Months Only
Note: We will close the chest and form the armholes in the next row.
Row 7: Ch 2, 1 dc in the same st as ch 2, 1 dc in next 15 sts, 1 dc in the ch-2 space between the clusters, sk all the 19 sts up to the next ch-2 loop, 1 dc in the ch-2 space between the clusters to form armhole (see pic 10 above), 1 dc in next 30 sts, 1 dc in the next ch-2 space, sk next 19 sts up to the next ch-2 loop, 1 dc in the ch-2 space, 1 dc in next 16 sts, turn. ——-66 dc
Row 8: Ch 2, 1 dc in same st as ch 2, 1 dc in each st across to end, join green color yarn, and turn.——–66 dc
Repeat Row 8, changing colors every 2 rows, until your jacket is about 11″ inches from the highest point of the shoulder.
Bottom Ribbing
Next Row: Switch to the smaller 4.5 mm hook, Ch 2, 1 dc in same st as ch 2, 1 dc in each st across to end, turn.——–66 dc
Last Row: This row should be worked on the RS or outside of the jacket. Fasten off and rejoin yarn with a sl st to work on the RS if needed, ch 2, 1 dc in same st as ch 2, *(1 fpdc in next st, 1 bpdc in next st), repeat from * to last st, 1 dc in last st. Fasten off and jump to Button Band.
12-24 Months Only
Row 7: Ch 2, 1 dc in the same st as ch 2, 1 dc in next 15 sts, (cl, ch 2, cl) in next ch-2 sp, 1 dc in next 19 sts, (cl, ch 2, cl) in next ch-2 sp, 1 dc in next 30 sts, (cl, ch 2, cl) in next ch-2 sp, 1 dc in next 19 sts, (cl, ch 2, cl) in next ch-2 sp, 1 dc in next 16 sts, turn. ——-100 dc + 8 cl+ 8 ch
Note: We will close the chest and form the armholes in the next row.
Row 8: Ch 2, 1 dc in the same st as ch 2, 1 dc in next 16 sts, 1 dc in the ch-2 space between the clusters, sk all the 21 sts up to the next ch-2 loop, 1 dc in the ch-2 space between the clusters to form armhole (see pic 10 above), 1 dc in next 32 sts, 1 dc in the next ch-2 space, sk next 21 sts up to the next ch-2 loop, 1 dc in the ch-2 space, 1 dc in next 17 sts, turn. ——-70 dc
Row 9: Ch 2, 1 dc in same st as ch 2, 1 dc in each st across to end, turn.——–70 dc
Repeat Row 9, changing colors every 2 rows, until your jacket is about 12″ inches from the highest point of the shoulder.
Bottom Ribbing
Next Row: Switch to the smaller 4.5 mm hook, Ch 2, 1 dc in same st as ch 2, 1 dc in each st across to end, turn.——–70 dc
Last Row: Ch 2, 1 dc in same st as ch 2, *(1 fpdc in next st, 1 bpdc in next st), repeat from * to last st, 1 dc in last st. Fasten off and Jump to Button Band.
Button Band for Both Sizes
Pattern Notes
1. The first Row of both the button band and the buttonhole band is worked on the RS.
2. The button band is worked from the bottom up along the left side of the front opening as shown in pic 11 above.
Row 1: Join green yarn with a sl st at the bottom left corner of the front opening. Working along the edge of the opening, evenly distribute sc sts all the way up to the neckline. Turn.
Row 2: Ch 1 (does not count as a st), 1 sc in the same st as beginning ch1, 1 sc in each st across to end, turn.
Row 3 & 4: Repeat Row 2 and fasten off.
Buttonhole Band for Both Sizes
Weave in any tails left along this edge and work the buttonhole band on the right side of the front opening from the neck down.
Row 1: Sl st to the top-right corner of the front opening at the neck, evenly distribute sc sts down to the hem, and turn.
Row 2: Ch 1 (does not count as a st), 1 sc in the same st as the beginning ch1, 1 sc in each remaining st across to end, turn.
Note: Place markers where you want your buttonholes (see pic 12 above) . Place the top marker in the second stitch from the top and the bottom marker in the 4th or 5th st from the bottom. Space the remaining buttons evenly apart. You can add a total of 3 to 5 buttons based on the size of the buttons you choose.
Row 3: Ch 1 (does not count as a st), 1 sc in the same st as beginning ch1, ch 1 and sk 1 st for buttonhole (ch 2 and skip 2 sts if your button is big), *(1 sc in each st until the next marker, ch 1 or ch 2 for buttonhole, sk 1 or sk 2 sts), repeat from * to make all your buttonholes, 1 sc in remaining sts to end, turn.
Row 4: Ch 1 (does not count as a st), 1 sc in the same st as beginning ch1, 1 sc in each st and ch across to end, turn.
Note: For the next row, you can switch to a bigger hook if you are someone who sl stitches very tight.
Row 5: Do not ch 1, 1 sl st in next st and each st across to end, fasten off.
SLEEVES (both sizes)
Pattern Notes
1. Stitch counts for bigger sizes are given in the order 6-12 months (12 to 24 months).
2. Each armhole is made up of 19 (21) stitches that you skipped, plus one extra stitch that gives more depth to each side.
3. Round 1 of the sleeve is worked on the RS.
4. Change colors every 2 rows for the sleeves, even if it is not mentioned in the pattern. The rows where you change colors will vary depending on the size, which is why they are not specified.
5. To join the next color, after your joining sl st at the end of the round, YO and pull the new color through the loop on your hook; tug the previous color to make its loop disappear. Make beginning ch in the new color and start the next round.
6. When making the sleeves, fasten off after each color change.
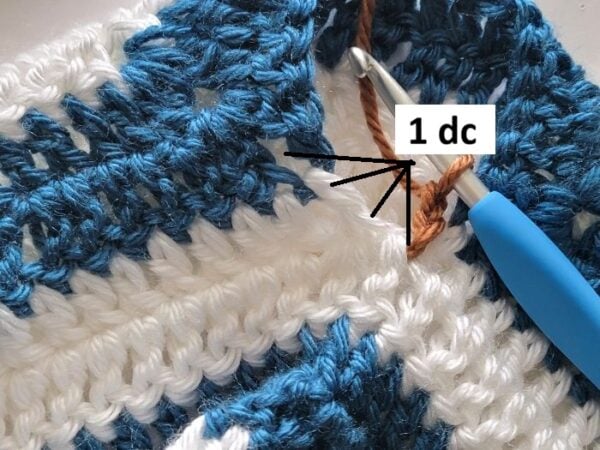
Sleeves for Both Sizes
Round 1: With the bigger H (5mm hook), Sl st under the armhole, ch 2 (not counted as a st), 1 dc in same point as the ch 2, 2 dc across the post of the adjacent dc as shown in pics 13 & 14 above, 1 dc in the next ch-space, 1 dc in each of the next 19 (21) sts you skipped for armhole, dc2tog across the ch-space and post of the next dc st, 1 dc across the post of the same dc, 1 dc in the gap before beginning ch-2, sl st first dc, turn.———26 (28) sts
Round 2: Ch 2 (does not count as a st), 1 dc in next st and each st across to end, 1 dc in the same st as beginning ch-2, sl st to first dc, turn.———26 (28) sts
Repeat Round 2, changing colors every 2 rounds, until you have completed a total of 6 rows for the sleeve.
Round 7: Ch 2 (does not count as a st), dc2tog across next 2 sts, 1 dc in each st across to last 2 sts, dc2tog in last 2 sts, sl st to first dc, turn. ———-24 (26) sts
Round 8: Ch 2 (does not count as a st), 1 dc in next st and each st across to end, 1 dc in the same st as beginning ch-2, sl st to first dc, turn.———24 (26) sts
Round 9: Repeat Round 7 to add 2 more decreases.—–22 (24) sts
Round 10: Ch 2 (does not count as a st), 1 dc in next st and each st across to end, 1 dc in the same st as beginning ch-2, sl st to first dc, turn.———22 (24) sts
Repeat Round 2 (3) more times.
Next Round: Switch to the smaller 4.5mm hook. Ch 1, 1 dc in same st and each st across to end, sl st to first dc.
Last Round: This round should be worked on the outside or RS of the jacket. Ch 2, *(1 fphdc in next st, 1 bphdc in next st), repeat from * to end, sl st to top of beginning ch-2. Fasten off.
COLLAR- Both Sizes
Notes
1. Row 1 is worked into the free loops of the foundation chain under each st. We will work sc2tog near the clusters to round the neck.
2. If you prefer not to add a collar, you can work Row 1 in the same color as the neckline and fasten off.
Row 1: Working on the outside or RS, sl st to the corner of the button band on the left as shown in pic 17 above, work 3 sc across the top of the button band, 1 sc in each loop until there is 1 loop before the clusters, sc2tog across the next loop and the big gap under the clusters, sc2tog across next 2 loops, *(1 sc in each loop to the next cluster, sc2tog across the gap under the cluster and the next loop), repeat from * once more, 1 sc in each loop until there is 1 loop before the clusters, sc2tog across the next loop and the big gap under the clusters, sc2tog across next 2 loops, 1 sc in each remaining loop, 3 sc on top of buttonhole band, turn.
Row 2: Ch 1, sl st into next 4 sts, Ch 3, 1 dc in same st, 1 dc in each st across to last 5 sts, 2 dc in next st, leave the remaining 4 sts unworked and turn.
Rows 3 to 6: Ch 3, 1 dc in first st, 1 dc in gap between the second and third dc, *(1 dc in the gap between next 2 dc), repeat from * until 1 dc and beginning ch is left, 2 dc on top of beginning ch-3, turn.
Row 7: Fasten off and sl st to the top of the right edge of the collar near the neckline as shown in pic 18, work sl sts evenly along the right edge until you reach the corner, ch 1 at the corner, then sl st into each st along the outer edge of the collar until you reach the next corner, ch 1 at the second corner, then work sl sts evenly along the left edge of the collar up to the neckline. Fasten off.
FINISHING
Sew the buttons, aligning them with the buttonholes, and weave in any yarn tails along the inside of the crochet baby jacket.
Pin it for later: