Crochet Turtle Pattern Free, Flippy the Turtle
This free crochet turtle pattern free tutorial marks my first venture into Amigurumi. I’ve designed it to be easy, simple, and perfect for beginners.


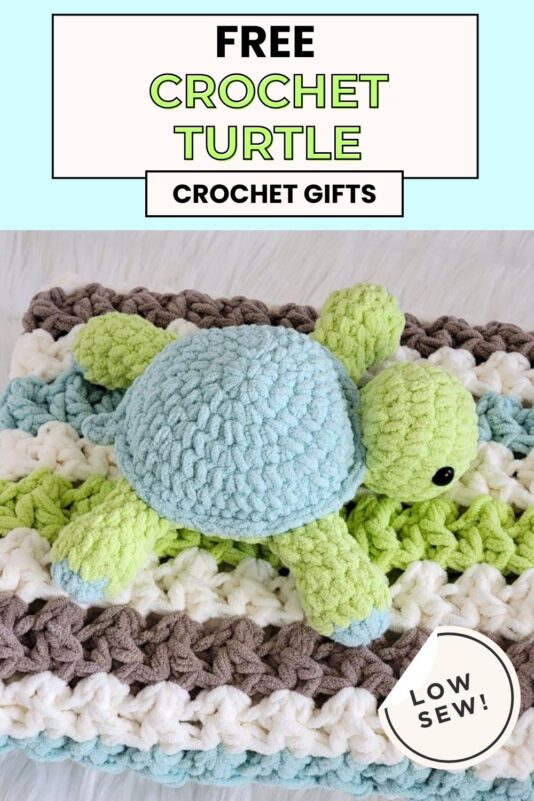
I’m creating plushies to match my baby blankets, so you can give a coordinated blanket and plushie set as a thoughtful baby shower gift.


The best part? This is a low-sew crocheted turtle pattern. You’ll only need to attach the head, as the legs and tail are worked into the design as you crochet.

Crochet Turtle Pattern Free
Materials
1. Bernat Baby Blanket yarn in Seafoam Sparkle and Lemon Lime colors. It is a size 6 super chunky chenille yarn.
2. K (6.5mm) hook.
3. Tapestry needle to weave in the ends
4. Stitch markers
5. Polyfill
6. A pair of 15mm safety eyes
7. Small pieces of cross-stitch fabric to secure the eyes.
Finished Size
11 inches long from head to tail
Yardage
Approximately 60 yards of color Seaform Sparkle and 100 yards of the color Lime green.
Stitch Abbreviations
The pattern is written in US terms.
st: stitch
ch: chain
sc: single crochet
YO: yarn over
dec: invisible decrease for Amigurumi (explained below)
Stitch Explanations
dec (invisible decrease or sc2tog): Insert hook into the front loop of the first st, insert hook into the front loop of the second st, YO, and pull through first 2 loops on your hook, YO and pull through remaining 2 loops on your hook.
Invisible join: After your last stitch, do not fasten off, just cut your yarn and pull the tail out through the stitch. Thread the tail through a yarn needle, sk the next st, and pass the needle under the next st, now insert it under the back loop of the same st from which the tail is emerging, and pull until it is the size of the rest of the stitches. You can now knot the yarn inside your work and weave it in or leave it to be hidden inside the stuffing.
Crochet Turtle Pattern
Pattern Notes
1. Overview: The body is made in two parts: the top blue shell and the bottom lime green part. The four legs are made separately and attached to the body as you connect the two pieces. Lastly, the head is made separately and sewn onto the body.
2. Every time you work into the marked stitch, move the marker up into the first stitch you worked into the marked stitch. This will help you keep track of the rounds.
3. You do not turn at the end of the rounds.
4. For convenience, we will call the colors blue and Lime green.
Blue Shell (Top part of the body)
Round 1: 8 sc in magic ring (8 sc)
Round 2: 2 sc in next st, mark the first st you made to indicate the first st of the round, 2 sc in next 7 sts. (16 sc)
Round 3: *(2 sc in next st, 1 sc in next st), repeat from * to end of the round. (24 sc)
Round 4: *(2 sc in next st, 1 sc in next 2 sts), repeat from * to end of the round. (32 sc)
Round 5: *(2 sc in next st, 1 sc in next 3 sts), repeat from * to end of the round. (40 sc)
Round 6: *(2 sc in next st, 1 sc in next 4 sts), repeat from * to end of the round. (48 sc)
Round 7: 1 sc in next st and each st across to end. Finish with an invisible join. (48 sc)
Lime Green Belly (Bottom half of the body)
Using lime green yarn, follow Rounds 1 to 6 for the Blue Shell above and end with an invisible join. So, the only difference is that this part does not have Round 7.
Legs (Make 4)
Round 1: With blue yarn, 8 sc in magic ring, sl st to the first st. (8sc)
Round 2: Pull lime green yarn through the blue loop on your hook, tug the blue yarn to make the blue loop disappear, trim the blue yarn, and knot inside your work. Continue with the green yarn and work 2 sc in the same st you made the last sl st in, mark the first st you made, 1 sc in next st, *(2sc in next st, 1 sc in next st), repeat from * to last st, 2 sc in last st. (14 sc)
Round 3: 1 sc in next st and each st across to end. (14 sc)
Turn your work inside out now. Trim all yarn tails except the working yarn and tuck it inside to keep it out of the way.
Round 4: *(1 sc in next st, dec across next 2 sts), repeat from * to last 2 sts, 1 sc in last 2 sts. (10 sc)
Start stuffing as you go. Stuff lightly and do not add any stuffing to the end of the legs, so you can attach it to the body easily.
Round 5: 1 sc in next st and each st across to end. (10 sc)
Round 6: *(1 sc in next st, 1 sc in next 2 sts, dec across next 2 sts). repeat from * to end. Finish with an invisible join. (8 sc)
Knot the yarn tail inside your legs and trim the yarn. Tuck it inside.
Attaching the Body and Legs
Note: All markers are placed on the blue shell.
Place the first marker for the head at the point of invisible join. Mark the 5th st on either side of this marker for the forelegs. Fold the shell in half and place a marker opposite the head marker for the tail. Mark the 4th st on either side of this tail marker for the hind legs.
Sl st into next st after the tail marker, place the green half of the body under the shell, and make a sc going through both layers in the same st and next st, place a leg at the marker and make 4 sl sts going through the top shell, both layers of the leg and the bottom body.
Once the leg is attached, sl st in next st going through both layers, sc both layers together until 4 sts left before the next marker, and now attach the first foreleg with 4 sl sts, sl st in next st going through both the layers, sc both layers together until your cross the head marker and reach the marker for the 2nd foreleg.
Attach the second foreleg with 4 sl sts, sl st in next st going through both the layers, start stuffing the body, sc both layers together until 4 sts left before the next marker, and attach the second hind leg with 4 sl sts, sc through both layers until you work a sc in the st with the tail marker, ch 3, 1 sc in 2nd ch from hook, 1 sc in next ch, 1 sc in marked st, sl st to first sc. Fasten off, pull the tail under your turtle, weave it in, and hide the remaining tail in the stuffing.
Head Pattern
Round 1: With lime green yarn, 8 sc in magic ring (8 sc)
Round 2: 2 sc in next st, mark the first st you made to indicate the first st of the round, 2 sc in next 7 sts to end of the round. (16 sc)
Round 3: *(2 sc in next st, 1 sc in next st), repeat from * to end of the round. (24 sc)
Rounds 4 to 6: 1 sc in next st and each st across to end. (24 sc)
Attach eyes in the groove between the 4th and the 5th rounds 10 sts apart. You will first insert the screw, then place a rectangular piece of cross-stitch fabric (2-1/4″ X 1-1/4″) on the back before adding the backing for the safety eyes. The fabric will add an extra layer of security to the eyes and keep them from pulling out through the sts. For younger children, embroider eyes with black yarn to avoid choking hazards. Start stuffing the head.
Round 7: *( 1sc in next st, dec across next 2 sts). (16 sc)
Round 8: *( 1sc in next st, dec across next 2 sts). Fasten off with a long tail. (11 sc)
Use a tapestry needle and whip stitch through the front loops of all 11 sts, add more stuffing as needed, pull to close the hole, trim the tail, knot, and hide the tail inside the stuffing.
Attaching the Head to the Body
Position the head at the head marker and sew it onto the bottom lime green half of the body using green yarn. Finally, make tiny stitches going through the edge of the top blue shell to make sure the head does not hang down. Knot and hide the tails inside the stuffing. Enjoy!
Pin it for later: