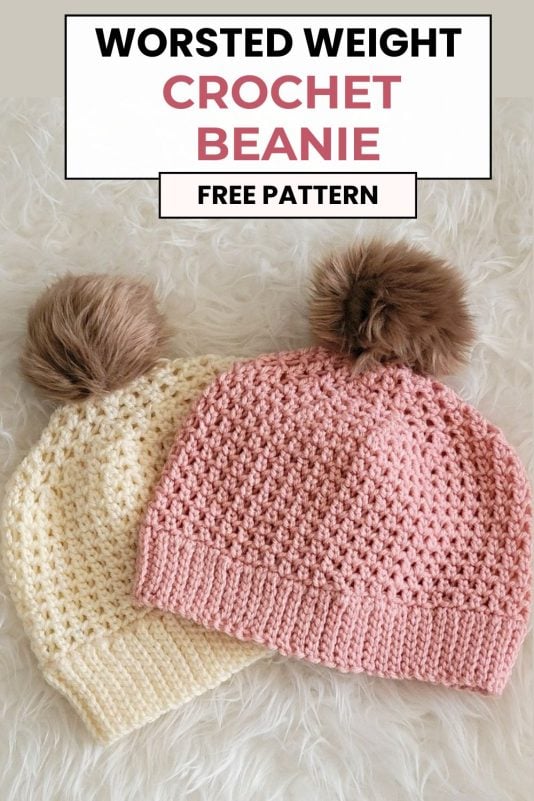
Worsted Weight Crochet Hat Pattern, Brooklyn Beanie
Crochet Hat Pattern with Worsted Weight Yarn- 4 sizes.

This worsted weight crochet beanie can be made in 4 sizes. It is worked bottom up with decreases at the top.


It is designed using Vanna’s Choice yarn that is easily available in all the stores. They come in a wide range of beautiful colors.

Since we are using worsted weight yarn, this hat works up pretty quickly. It will take you just 1 skein and make great gifts.

Worsted Weight Crochet Hat Pattern
Materials
1. Worsted weight (size 4) yarn. Lion Brand Vanna’s Choice in colors Pink and Fisherman were used for the sample hats.
2. H (5mm) hook
3. Tapestry needle to weave in the ends
4. A stitch marker
5. Fur pom pom (optional)
Finished Sizes
Toddler: 7″ tall and 18″ in circumference
Child: 7.5″ tall and 20″ in circumference
Adult Small: 8″ tall and 21″ in circumference
Adult Large: 8″ tall and 22″ in circumference
Yardage
125 yards for Toddler and Child sizes, and 140 yards for Adult sizes
Stitch Abbreviations
The pattern is in standard American terms.
sc: single crochet
esc: extended single crochet
sl st: slip stitch
ch: chain
sk: skip
Stitch Explanations
Working in Back Loops only(BLO): You work your stitch inserting your hook not under both the loops of your stitch but only the back loops (See pic below).

Extended Single crochet (esc): Insert your hook into the next st and pull up a loop, yarn over and pull through one loop, yarn over again and pull through the remaining 2 loops on your hook.—–1 esc completed
esc2tog: It is 2 esc sts joined together. Insert your hook into the next st and pull up a loop, yarn over and pull through one loop, keeping the remaining 2 loops on your hook, pull up a loop in the next st, yarn over and pull through one loop, yarn over and pull through the remaining 3 loops on the hook.——–esc2tog completed
Gauge
9 esc+9 chs= 4″
Pattern Notes
1. The hat is worked bottom up starting from the brim.
2. Stitch counts for bigger sizes are given in the order Toddler (Child, Adult Small, Adult Large)

Joining the Two Sides of the Hatband

Bring the second shorter end closer from behind as shown in the pic above, take your hook out of the loop, and flip so that the foundation chain side is facing up.

4. On the foundation ch side, insert your hook close to the braid while sl stitching the ends of the band together (shown in a thicker yarn for clarity)
Insert your hook through the foundation chain side, grab the loop on the other side and start sl stitching through both the layers by inserting your hook through the foundation chain side and the BLO of the last row of sl sts. When inserting your hook into the foundation chain side, insert the hook a little deeper, closer to the first ridge or braid, and not at the very edge (see pic above). This will give a seamless band once you turn it inside out.
Turn your hatband inside out to hide the seam. Pass your skein through the hatband to bring it to the other side if needed. You are now ready to start the crown.
How to Crochet the Crown
Pattern Notes:
1. The rest of the hat is worked in the round.
2. To distribute the first round of sc evenly around the ribbing, you can use stitch markers to divide the ribbing into 4 equal parts and work approximately 1/4 of your stitches into each section. For example, to distribute 94 sc sts, work 23, 23, 24, and 24 sts into each of the 4 sections.
3. While working Round 1 into the ribbing, I did not insert my hook at the very edge but a little below it to avoid leaving holes.
Row 1: Ch 1 at the seam and work 81 (89, 93, 97)sc sts evenly distributed around the ribbing, sl st to the first sc, do not turn.——-81 (89, 93, 97)sc

Decrease Rounds for Shaping
Toddler
Decrease Round 1: 1 esc in marked st, move the marker up into the esc you just made, ch 1, (1 esc in next esc, ch 1)2 times, esc2tog across next 2 esc sts, ch1, * (1 esc in next esc, ch 1)3 times, esc2tog across next 2 esc sts, ch 1, repeat from * to last esc, 1 esc in last esc, ch 1, do not sl st and do not turn.———— 33 esc (each esc2tog is counted as one esc)
Decrease Round 2: 1 esc in marked st, move the marker up into the esc you just made, ch 1, 1 esc in next esc, ch 1, esc2tog across next 2 esc sts, ch1, *(1 esc in next esc, ch 1)2 times, esc2tog across next 2 esc sts, ch 1, repeat from * to last esc, 1 esc in last esc, ch 1, do not sl st and do not turn.——25 esc
Decrease Round 3: 1 esc in marked st, move the marker up into the esc you just made, ch 1, *(1 esc in next esc, ch 1), repeat from * till you reach back near the marked st. Do not sl st and do not turn.———–25 esc
Decrease Round 4: 1 esc in marked st, move the marker up into the esc you just made, ch 1, esc2tog across next 2 esc sts, ch 1,* (esc in next st, ch 1, esc2tog across next 2 esc sts, ch 1,), repeat from * to last esc, 1 esc in last esc, ch 1, do not sl st and do not turn.———— 17 esc
Round 5: 1 esc in marked st, move the marker up into the esc you just made, do not ch 1, work 1 esc in each esc across without making ch 1 in between them, sl st to marked st and fasten off with a long tail.—-17 esc
Round 6: Ch 1, 1 sc in each st around, sl st to first sc, fasten off with a long tail.
Finishing
1. Turn the hat inside out. Thread the tail at the top through a yarn needle, go in and out through the sts at the top, and pull and cinch the top shut. Knot and securely weave in the remaining tail left.
2. Weave in the beginning tail.
3. Attach the fur pom pom.
Child
Decrease Round 1: 1 esc in marked st, move the marker up into the esc you just made, ch 1, (1 esc in next esc, ch 1)2 times, esc2tog across next 2 esc sts, ch1, * (1 esc in next esc, ch 1)3 times, esc2tog across next 2 esc sts, ch 1, repeat from * to end, do not sl st and do not turn.———— 36 esc (each esc2tog is counted as one esc)
Decrease Round 2: 1 esc in marked st, move the marker up into the esc you just made, ch 1, 1 esc in next esc, ch 1, esc2tog across next 2 esc sts, ch1, *(1 esc in next esc, ch 1)2 times, esc2tog across next 2 esc sts, ch 1, repeat from * to end, do not sl st and do not turn.—27 esc
Decrease Round 3: 1 esc in marked st, move the marker up into the esc you just made, ch 1, (1 esc in next esc, ch 1)2 times, esc2tog across next 2 esc sts, ch1, * (1 esc in next esc, ch 1)3 times, esc2tog across next 2 esc sts, ch 1, repeat from * to last 2 esc, 1 esc in next esc, ch 1, 1 esc in last esc, ch 1, do not sl st and do not turn.——22 esc
Decrease Round 4: 1 esc in marked st, move the marker up into the esc you just made, ch 1, *(1 esc in next esc, ch 1), repeat from * till you reach back near the marked st. Do not sl st and do not turn.———–22 esc
Decrease Round 5: 1 esc in marked st, move the marker up into the esc you just made, ch 1, esc2tog across next 2 esc sts, ch 1,* (esc in next st, ch 1, esc2tog across next 2 esc sts, ch 1,), repeat from * to last esc, 1 esc in last esc, ch 1, do not sl st and do not turn. .——–15 esc
Round 6: 1 esc in marked st, move the marker up into the esc you just made, ch 1, *(1 esc in next esc, ch 1), repeat from * till you reach back near the marked st. Do not sl st and do not turn.———–15 esc
Round 7: 1 esc in marked st, move the marker up into the esc you just made, do not ch 1, work 1 esc in each esc across without making ch 1 in between them, sl st to marked st and fasten off with a long tail.
Finishing
1. Turn the hat inside out. Thread the tail at the top through a yarn needle, go in and out through the sts at the top, and pull and cinch the top shut. Knot and securely weave in the remaining tail left.
2. Weave in the beginning tail.
3. Attach the fur pom pom.
Adult Small
Decrease Round 1: 1 esc in marked st, move the marker up into the esc you just made, ch 1, (1 esc in next esc, ch 1)2 times, esc2tog across next 2 esc sts, ch1, * (1 esc in next esc, ch 1)3 times, esc2tog across next 2 esc sts, ch 1, repeat from * to last 2 esc, 1 esc in next esc, ch 1, 1 esc in last esc, ch 1, do not sl st and do not turn.———— 38 esc (each esc2tog is counted as one esc)
Decrease Round 2: 1 esc in marked st, move the marker up into the esc you just made, ch 1, 1 esc in next esc, ch 1, esc2tog across next 2 esc sts, ch1, *(1 esc in next esc, ch 1)2 times, esc2tog across next 2 esc sts, ch 1, repeat from * to last 2 esc, 1 esc in next esc, ch 1, 1 esc in last esc, ch 1, do not sl st and do not turn.—29 esc
Decrease Round 3: 1 esc in marked st, move the marker up into the esc you just made, ch 1, (1 esc in next esc, ch 1)2 times, esc2tog across next 2 esc sts, ch1, * (1 esc in next esc, ch 1)3 times, esc2tog across next 2 esc sts, ch 1, repeat from * to last esc, 1 esc in last esc, ch 1, do not sl st and do not turn.——24 esc
Decrease Round 4: 1 esc in marked st, move the marker up into the esc you just made, ch 1, *(1 esc in next esc, ch 1), repeat from * till you reach back near the marked st. Do not sl st and do not turn.———–24 esc
Decrease Round 5: 1 esc in marked st, move the marker up into the esc you just made, ch 1, esc2tog across next 2 esc sts, ch 1,* (esc in next st, ch 1, esc2tog across next 2 esc sts, ch 1,), repeat from * to end.——–16 esc
Round 6: 1 esc in marked st, move the marker up into the esc you just made, ch 1, *(1 esc in next esc, ch 1), repeat from * till you reach back near the marked st. Do not sl st and do not turn.———–16 esc
Round 7: 1 esc in marked st, move the marker up into the esc you just made, do not ch 1, work 1 esc in each esc across without making ch 1 in between them, sl st to marked st and fasten off with a long tail.
Finishing
1. Turn the hat inside out. Thread the tail at the top through a yarn needle, go in and out through the sts at the top, and pull and cinch the top shut. Knot and securely weave in the remaining tail left.
2. Weave in the beginning tail.
3. Attach the fur pom pom.
Adult Large
Decrease Round 1: 1 esc in marked st, move the marker up into the esc you just made, ch 1, (1 esc in next esc, ch 1)2 times, esc2tog across next 2 esc sts, ch1, * (1 esc in next esc, ch 1)3 times, esc2tog across next 2 esc sts, ch 1, repeat from * to last esc, 1 esc in last esc, ch 1, do not sl st and do not turn.———-40 esc (each esc2tog is counted as one esc)
Decrease Round 2: 1 esc in marked st, move the marker up into the esc you just made, ch 1, 1 esc in next esc, ch 1, esc2tog across next 2 esc sts, ch1, *(1 esc in next esc, ch 1)2 times, esc2tog across next 2 esc sts, ch 1, repeat from * to end, do not sl st and do not turn.—30 esc
Decrease Round 3: 1 esc in marked st, move the marker up into the esc you just made, ch 1, (1 esc in next esc, ch 1)2 times, esc2tog across next 2 esc sts, ch1, * (1 esc in next esc, ch 1)3 times, esc2tog across next 2 esc sts, ch 1, repeat from * to end, do not sl st and do not turn.——24 esc
Round 4: 1 esc in marked st, move the marker up into the esc you just made, ch 1, *(1 esc in next esc, ch 1), repeat from * till you reach back near the marked st. Do not sl st and do not turn.———–24 esc
Round 5: 1 esc in marked st, move the marker up into the esc you just made, ch 1, esc2tog across next 2 esc sts, ch 1,* (esc in next st, ch 1, esc2tog across next 2 esc sts, ch 1,), repeat from * to end.——–16 esc
Round 6: 1 esc in marked st, move the marker up into the esc you just made, ch 1, *(1 esc in next esc, ch 1), repeat from * till you reach back near the marked st. Do not sl st and do not turn.———–16 esc
Round 7: 1 esc in marked st, move the marker up into the esc you just made, do not ch 1, work 1 esc in each esc across without making ch 1 in between them, sl st to marked st and fasten off with a long tail.
Finishing
1. Turn the hat inside out. Thread the tail at the top through a yarn needle, go in and out through the sts at the top, and pull and cinch the top shut. Knot and securely weave in the remaining tail left.
2. Weave in the beginning tail.
3. Attach the fur pom pom.
Worsted Weight Crochet Hat Pattern, Brooklyn Beanie


Oh, this is such a nice hat, love the pattern.
Easy for my old hands………
Thanks
Merry Christmas and Happy Healthy 2023🎄❄️🎄❄️🎄❄️🎄❄️