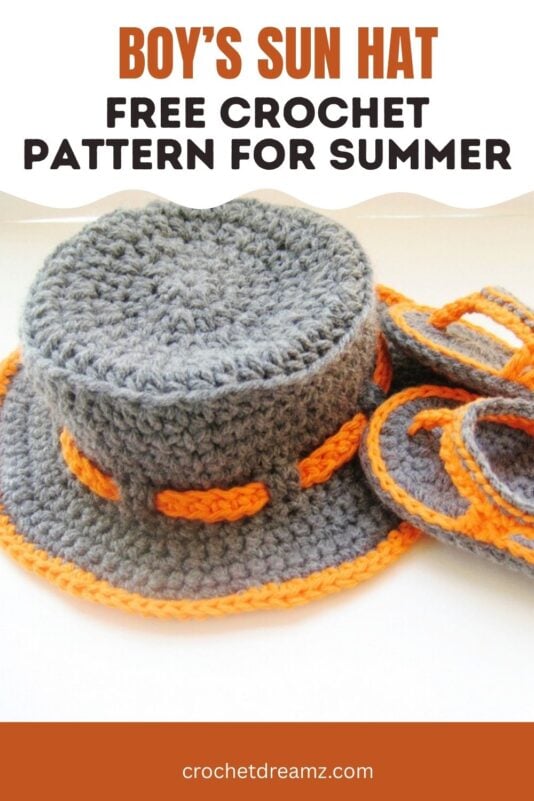
Free Crochet Sun Hat for Boys
This adorable free crochet sun hat pattern for boys is an easy pattern that is perfect for summer.


Free Crochet Sun Hat for Boys
Materials
1. Worsted weight yarn (Size 4 medium) in the main color and in a coordinating bright color for the band.
2. Hook G (4.25mm) for the hat in size 6-12 months. Hook H (5 mm) for the hat in all the other sizes.
Use any size hook to attain gauge. The contrasting band is made using hook F (3.75mm) for 0-3 months and G (4.25mm) for all the other sizes.
3. Yarn needle to weave in the tails.
Finished Size
Note: The hat is not meant to fit very snugly like a beanie.
0-3 months: 14″ in circumference and 4″ tall
3-6 months: 16″ in circumference and 4-1/2″ tall
6-12 months: 18″ in circumference and 5″ tall
1-3 Years: 19″ in circumference and 5-1/2″ tall
3-10 Years: 21″ in circumference and 6″ tall
Gauge
Start working your hat following the pattern. Once you have completed the first 5 rounds and have 40 stitches, your circle should measure 4 ½ inches in diameter if you are using an H hook and 4 ¼ inches in diameter if you are using a G Hook.
Switch to a bigger or smaller hook to attain gauge. To ensure proper sizing I am giving the diameter of the circle after the last increase round for each size below as an additional reference point.
Diameter after Last Increase Round
0-3 months: After the 5th Round, the circle measures 4-1/2″
3-6 months: After the 6th Round, the circle measures 5″
6-12 months: After the 7th Round, the circle measures 5-3/4″
1-3 years: After the 7th Round, the circle measures 6″
3 to 10 years: After the 8th Round, the circle measures 6-1/2″
Yardage
0-3 months: 85 Yards
3-6 months: 105 Yards
6-12 months: 135 Yards
1-3 Years: 140 Yards
3-10 Years: 155 Yards
Stitch Abbreviations
The pattern is in standard American terms.
sc– single crochet
hdc– half double crochet
sl st– slip stitch
ch– chain
sk– skip
st– stitch
Stitch Explanation
Work in Back Loops only: When you are asked to work in back loops only, you work by inserting your hook through only the back loops of the stitch leaving the front loops free as shown below.

Pattern Notes
1. Make the number of rounds specified and check your gauge.
2. The hat is worked in a spiral without turning or slip stitching at the end of each round unless specified otherwise. See pic 1 below to learn how to count your stitches when working in a spiral.
3. You mark the first stitch of each round. You can use store-bought stitch markers or you can pull a piece of contrasting color yarn through the stitch to mark it.
4. You can increase or decrease the hat height by adding or deleting rows.
5. If working in the back loops is leaving holes in your work, I suggest you insert your hook into the back loops as well as one more loop that is hiding behind the back loop. The best way to do this is to insert your hook vertically down through the back loop and it will get both the loops on your hook.
6. Pictures given below apply to all sizes.


0-3 Months
With H hook, ch 4 and sl st to the first ch to form a chain ring.
Round 1: Ch 2 (Does not count as a stitch), 1 hdc into chain ring, place a marker on the first hdc you just made to indicate the beginning of the round, 7 hdc in the ring. See Pic 2 above.———8 hdc
Round 2: Do not turn, 2 hdc in the marked stitch of the previous round as shown in Pic 3 above, move the marker to the first hdc you just made into the marked stitch, 2 hdc in each of the next 7 stitches ending in the stitch just before the marked one. ———16 hdc
Round 3: Do not turn, 1 hdc in marked stitch of previous round, move the marker into the stitch you just made, *(2hdc in next st, 1 hdc in next), repeat from * till you end in the stitch just before the marked one.————–24 hdc
Round 4: Do not turn, 1 hdc in marked st, move marker up into the stitch you just made, 1 hdc in next st, * (2hdc in next st, 1 hdc in next 2 stitches), repeat from * till you end in the st right before the marked one. ——————32 hdc
Round 5: Do not turn, 1 hdc in marked st, move marker up into the stitch you just made, 1 hdc in next 2 stitches, * (2hdc in next st, 1 hdc in next 3 stitches), repeat from * till you end in the st right before the marked one. ———-40 hdc
This is where you measure the diameter for checking the gauge.
Note: All the stitches of the next round are worked into the back loops only to leave a ring of free loops on the hat as shown in Pic 4 above.
Round 6: Do not turn, 1 sc into the marked st, sl st into next stitch to even out the edges, ch 2 (does not count as a hdc), 1 hdc into back loop of the next st, move marker up into the hdc you just made, 1 hdc in back loop of each stitch till you reach ch 2, 1 hdc in the same st as ch 2———-40 hdc
From here all rounds are worked into both the loops as usual.
Round 7: Do not turn, 1 hdc in marked stitch, move marker up into the stitch you just made, 2 hdc in the next st, 1 hdc in each of the next 19 stitches, 2 hdc in next st, 1 hdc in each of the remaining stitches till you end in the stitch right before the marked one————-42 hdc
Round 8: Do not turn, 1 hdc in marked stitch, move marker up into the stitch you just made, 1 hdc in each of the next 9 st, 2 hdc in next st, 1 hdc in each of the next 21 stitches, 2 hdc in next, 1 hdc in each st till one st is left before the marked st, 1 sc in next, sl st to marked st to even out the edges.————-44 st
Round 9: Do not turn, ch 2 ( does’t count as a st), 1 hdc in same st as ch 2, 1 hdc in each remaining st of the round, sl st to 1st hdc————44 hdc
Round 10: Do not turn, ch 1 ( does not count as a st), 1 sc in same st as ch 1, 1 sc in each remaining st of the round, sl st to 1st sc————44 st
Now your hat height should be around 4 inches from the top and your hat circumference should be 14 inches.
BRIM
Note: For the brim, you will turn at each round starting from the second round. You don’t work in a spiral and you slip stitch to the 1st sc at the end of each round. So ch 1 is not counted as a stitch. You also don’t have to mark your first stitch for the brim rounds.
Round 1: Ch 1, 1sc in same st as ch 1, 1 sc in next 3 st, 2 sc in next, * (1 sc in next 4 st, 2 sc in next) repeat from * till you have 4 st left, 1 sc in last 4 st, sl st to 1st sc; turn———52 sc
Round 2: Ch 1, 1sc in same st as ch 1, 1 sc in next 4 st, 2 sc in next, * (1 sc in next 5 st, 2 sc in next) repeat from * till you have 4 st left, 1 sc in last 4 st, sl st to 1st sc; turn———-60 sc
Round 3: Ch 1, 1sc in same st as ch 1, 1 sc in next 7 st, 2 sc in next, * (1 sc in next 8 st, 2 sc in next) repeat from * till you have 6 st left, 1 sc in last 6 st, sl st to 1st sc; turn———-66 sc
Round 4: Ch 1, 1sc in same st as ch 1, 1 sc in next st, 1 sc in each st around, sl st to 1st sc; turn———66 sc
Round 5: Ch 1, 1sc in same st as ch 1, 1 sc in next 8 st, 2 sc in next, * (1 sc in next 9 st, 2 sc in next) repeat from * till you have 6 st left, 1 sc in last 6 st, sl st to 1st sc; Fasten off———-72 sc
Round 6 (Last Round): With the right side of the hat facing up and contrasting color yarn, sl st to join near the fasten off st and ch 1, 1sc in same st as ch 1, 1 sc in each stitch around, sl st to 1st sc; Fasten off.————72 sc
Making the band: Using F Hook and the bright color yarn, Ch 63, 1 sc in to the 2nd chain from hook, 1 sc in each chain across, fasten off leaving a long tail. Weave in one of the tails leaving the other for sewing.
Finishing
1. Weave in all the yarn tails.
2. Through the hdc round right on top of the brim, insert the band in and out as shown in pic 5 above. You will be inserting the band under two hdc stitches for every 5 or 4 stitches. Overlap the ends and sew for a neat finish.
3. You can sew on a piece of elastic to go around the chin to make the hat stay in place. Alternatively, you can also sl st to the inside of the hat on both sides and make a long chain for a tie.
3-6 Months
With H hook , ch 4 and sl st to the first ch to form a chain ring.
Round 1: Ch 2 (Does not count as a stitch), 1 hdc into chain ring, place a marker on the first hdc you just made to indicate the beginning of the round, 7 hdc in the ring. See Pic 2 above.———8 hdc
Round 2: Do not turn, 2 hdc in the marked stitch of the previous round as shown in Pic 3 above, move the marker to the first hdc you just made into the marked stitch, 2 hdc in each of the next 7 stitches ending in the stitch just before the marked one. ———16 hdc
Round 3: Do not turn, 1 hdc in marked stitch of previous round, move the marker into the stitch you just made, *(2hdc in next st, 1 hdc in next), repeat from * till you end in the stitch just before the marked one.————–24 hdc
Round 4: Do not turn, 1 hdc in marked st, move marker up into the stitch you just made, 1 hdc in next st, * (2hdc in next st, 1 hdc in next 2 stitches), repeat from * till you end in the st right before the marked one. ——————32 hdc
Round 5: Do not turn, 1 hdc in marked st, move marker up into the stitch you just made, 1 hdc in next 2 stitches, * (2hdc in next st, 1 hdc in next 3 stitches), repeat from * till you end in the st right before the marked one. ———-40 hdc
This is where you measure the diameter for checking the gauge.
Round 6: Do not turn, 1 hdc in marked st, move marker up into the stitch you just made, 1 hdc in next 3 stitches, * (2hdc in next st, 1 hdc in next 4 stitches), repeat from * till you end in the st right before the marked one. ——————48 hdc
Note: All the stitches of the next round are worked into the back loops only to leave a ring of free loops on the hat as shown in Picture 4 above.
Round 7: Do not turn, 1 sc into marked st, sl st in to next stitch to even out the edges, ch 2 ( does not count as a hdc), 1 hdc in to back loop of next st, move marker up in to the hdc you just made, 1 hdc in back loop of each stitch till you reach ch 2, 1 hdc in the same st as ch 2 ———-48 hdc
From here all rounds are worked into both the loops as usual.
Round 8: Do not turn, 1 hdc in marked stitch, move marker up into the stitch you just made, 2 hdc in the next st, 1 hdc in each of the next 23 stitches, 2 hdc in next st, 1 hdc in each of the remaining stitches till you end in the stitch right before the marked one————-50 hdc
Round 9: Do not turn, 1 hdc in marked stitch, move marker up into the stitch you just made, 1 hdc in each of the next 11 st, 2 hdc in next st, 1 hdc in each of the next 23 stitches, 2 hdc in next, 1 hdc in each of the remaining stitches till you end in the stitch right before the marked one————-52 hdc
Round 10: Do not turn, 1 hdc in marked stitch, move marker up into the stitch you just made, 1 hdc in each st till one st is left before the marked st, 1 sc in next, sl st to marked st to even out the edges———52st
Round 11: Do not turn, ch 2 (doesn’t count as a st), 1 hdc in same st as ch 2, 1 hdc in each remaining st of the round, sl st to 1st hdc————52 hdc
Round 12: Do not turn, ch 1 ( does not count as a st), 1 sc in same st as ch 1, 1 sc in each remaining st of the round, sl st to 1st sc. ————52 sc
Now your hat height should be 4 ½ inches from the top and your hat circumference should be 16 inches.
BRIM
Note: For the brim, you will turn at each round starting from the second round. You don’t work in a spiral and you slip stitch to the 1st sc at the end of each round. So ch 1 is not counted as a stitch. You also don’t have to mark your first stitch for the brim rounds.
Round 1: Ch 1, 1sc in same st as ch 1, 1 sc in next 3 st, 2 sc in next, * (1 sc in next 4 st, 2 sc in next) repeat from * till you have 2 st left, 1 sc in last 2 st, sl st to 1st sc; turn———-62 sc
Round 2: Ch 1, 1sc in same st as ch 1, 1 sc in next 4 st, 2 sc in next, * (1 sc in next 5 st, 2 sc in next) repeat from * till you have 2 st left, 1 sc in last 2 st, sl st to 1st sc; turn———-72 sc
Round 3: Ch 1, 1sc in same st as ch 1, 1 sc in next 7 st, 2 sc in next, * (1 sc in next 8 st, 2 sc in next) repeat from * till you reach the end of the round, sl st to 1st sc; turn———-80 sc
Round 4: Ch 1, 1sc in same st as ch 1, 1 sc in next 8 st, 2 sc in next, * (1 sc in next 9 st, 2 sc in next) repeat from * till the end of the round, sl st to 1st sc; turn———-88 sc
Round 5: Ch 1, 1sc in same st as ch 1, 1 sc in next 9 st, 2 sc in next, * (1 sc in next 10 st, 2 sc in next) repeat from * till you reach the end of the round, sl st to 1st sc; Fasten off.————96 sc
Round 6 (Last Round): With the right side of the hat facing up and contrasting color yarn, sl st to join near the fasten off st and ch 1, 1 sc in same st as ch 1,1 sc in next 10 st, 2 sc in next, * (1 sc in next 11 st, 2 sc in next) repeat from * till the end of the round, sl st to 1st sc; Fasten off.————104 sc
Making the band: Using G Hook and the bright color yarn, Ch 66, 1 sc into the 2nd chain from hook, 1 sc in each chain across, fasten off leaving a long tail. Weave in one of the tails leaving the other one for sewing.
Finishing
1. Weave in all the yarn tails.
2. Through the hdc round right on top of the brim, insert the band in and out as shown in pic 5 above. You will be inserting the band under two hdc stitches for every 5 or 4 stitches. Overlap the ends and sew for a neat finish.
3. You can sew on a piece of elastic to go around the chin to make the hat stay in place. Alternatively, you can also sl st to the inside of the hat on both sides and make a long chain for a tie.
——————————-
6-12 Months & 1-3 Years
Note: A bigger hook is intentionally used for 6-12 months even if it is smaller than 1-3 years.
With H hook for 1-3 Years and G hook for 6-12 months, ch 4 and sl st to the first ch to form a chain ring.
Round 1: Ch 2 (Does not count as a stitch), 1 hdc into chain ring, place a marker on the first hdc you just made to indicate the beginning of the round, 7 hdc in the ring. See Pic 2 above.———8 hdc
Round 2: Do not turn, 2 hdc in the marked stitch of the previous round as shown in Pic 3 above, move the marker to the first hdc you just made into the marked stitch, 2 hdc in each of the next 7 stitches ending in the stitch just before the marked one. ———16 hdc
Round 3: Do not turn, 1 hdc in marked stitch of previous round, move the marker into the stitch you just made, *(2hdc in next st, 1 hdc in next), repeat from * till you end in the stitch just before the marked one.————–24 hdc
Round 4: Do not turn, 1 hdc in marked st, move marker up into the stitch you just made, 1 hdc in next st, * (2hdc in next st, 1 hdc in next 2 stitches), repeat from * till you end in the st right before the marked one. ——————32 hdc
Round 5: Do not turn, 1 hdc in marked st, move marker up into the stitch you just made, 1 hdc in next 2 stitches, * (2hdc in next st, 1 hdc in next 3 stitches), repeat from * till you end in the st right before the marked one. ———-40 hdc
This is where you measure the diameter for checking the gauge.
Round 6: Do not turn, 1 hdc in marked st, move marker up into the stitch you just made, 1 hdc in next 3 stitches, * (2hdc in next st, 1 hdc in next 4 stitches), repeat from * till you end in the st right before the marked one. ——————48 hdc
Round 7: Do not turn, 1 hdc in marked st, move marker up into the stitch you just made, 1 hdc in next 4 stitches, * (2hdc in next st, 1 hdc in next 5 stitches), repeat from * till you end in the st right before the marked one. ——————56 hdc
Note: All the stitches of the next round are worked into the back loops only to leave a ring of free loops on the hat as shown in Picture 4 above.
Round 8: Do not turn, 1 sc into marked st, sl st in to next stitch to even out the edges, ch 2 ( does not count as a hdc), 1 hdc in to back loop of next st, move marker up into the hdc you just made, 1 hdc in back loop of each stitch till you reach ch 2, 1 hdc in the same st as ch 2 ———-56 hdc
From here all rounds are worked into both the loops as usual.
Round 9: Do not turn, 1 hdc in marked stitch, move marker up into the stitch you just made, 2 hdc in the next st, 1 hdc in each of the next 27 stitches, 2 hdc in next st, 1 hdc in each of the remaining stitches till you end in the stitch right before the marked one————-58 hdc
Round 10: Do not turn, 1 hdc in marked stitch, move marker up into the stitch you just made, 1 hdc in each of the next 12 st, 2 hdc in next st, 1 hdc in each of the next 27 stitches, 2 hdc in next, 1 hdc in each of the remaining stitches till you end in the stitch right before the marked one————-60 hdc
Round 11: Do not turn, 1 hdc in marked stitch, move marker up into the stitch you just made, 1 hdc in each st till one st is left before the marked st, 1 sc in next, sl st to marked st to even out the edges———60st
Round 12: Do not turn, ch 2 ( doesn’t count as a st), 1 hdc in same st as ch 2, 1 hdc in each remaining st of the round, sl st to 1st hdc————60 hdc
Round 13: Do not turn, ch 1 ( does not count as a st), 1 sc in same st as ch 1, 1 sc in each remaining st of the round, sl st to 1st sc. ————60 sc
Now your hat height should be 5 inches from the top and your hat circumference 18 inches if you are making the 6-12 months size.
Now your hat height should be 5 ½ inches from the top and hat circumference 19 inches if you are making a 1-3 years size.
BRIM
Note: For the brim, you will turn at each round starting from the second round. You don’t work in a spiral and you slip stitch to the 1st sc at the end of each round. So ch 1 is not counted as a stitch. You also don’t have to mark your first stitch for the brim rounds.
Round 1: Ch 1, 1 sc in same st as ch 1, 1 sc in next 5 st, 2 sc in next, * (1 sc in next 6 st, 2 sc in next) repeat from * till you have 4 st left, 1 sc in last 4 st, sl st to 1st sc; turn———-68 sc
Round 2: Ch 1, 1 sc in same st as ch 1, 1 sc in next 6 st, 2 sc in next, * (1 sc in next 7 st, 2 sc in next) repeat from * till you have 4 st left, 1 sc in last 4 st, sl st to 1st sc; turn———-76 sc
Round 3: Ch 1, 1 sc in same st as ch 1, 1 sc in next 8 st, 2 sc in next, * (1 sc in next 9 st, 2 sc in next) repeat from * till you have 6 st left, 1 sc in last 6 st, sl st to 1st sc; turn———-83 sc
Round 4: Ch 1, 1 sc in same st as ch 1, 1 sc in next 9 st, 2 sc in next, * (1 sc in next 10 st, 2 sc in next) repeat from * till you have 6 st left, 1 sc in last 6 st, sl st to 1st sc; turn———-90 sc
Round 5: Ch 1, 1 sc in same st as ch 1, 1 sc in next st, 1 sc in each st around, sl st to 1st sc.———90 sc
Round 6: Ch 1, 1 sc in same st as ch 1, 1 sc in next 10 st, 2 sc in next, * (1 sc in next 11 st, 2 sc in next) repeat from * till you have 6 st left, 1 sc in last 6 st, sl st to 1st sc 1; turn———-97 sc
Round 7: Ch 1, 1 sc in same st as ch 1, 1 sc in next st, 1 sc in each st around, sl st to 1st sc.————-97 sc
Last Round (Only for 6-12 months)
Round 8: Fasten off the main color. With the right side of the hat facing up and contrasting color yarn, sl st to join near the fastened off st and ch 1, 1 sc in same st as ch 1, 1 sc in next 7 st, 2 sc in next, * (1 sc in next 7 st, 2 sc in next) repeat from * till the end of the round, sl st to 1st sc; Fasten off.————109 st
Round 8 (Only for 1-3 Years): Ch 1, 1 sc in same st as ch 1,1 sc in next 11 st, 2 sc in next, * (1 sc in next 12 st, 2 sc in next) repeat from * till you have 6 st left, 1 sc in last 6 st, sl st to 1st sc; Fasten off———-104 sc
Last Round for 1-3 Years
Round 9: With the right side of the hat facing up and contrasting color yarn, sl st to join near the fastened off st and ch 1, 1sc in same st as ch 1, 1 sc in next 4 st, 2 sc in next, * (1 sc in next 5 st, 2 sc in next) repeat from * till 2 st left, 1 sc in last 2 st, sl st to 1st sc; Fasten off.————121 st
Making the band : Using G Hook and the bright color yarn, chain 68 for 6-12 months and chain 75 for 1-3 Years, 1 sc into the 2nd chain from hook, 1 sc in each chain across, fasten off leaving a long tail. Weave in one of the tails leaving the other tail for sewing.
Finishing
1. Weave in all the yarn tails.
2. Through the hdc round right on top of the brim, insert the band in and out as shown in pic 5 above. You will be inserting the band under two hdc stitches for every 5 or 4 stitches. Overlap the ends and sew for a neat finish.
3. You can sew on a piece of elastic to go around the chin to make the hat stay in place. Alternatively, you can also sl st to the inside of the hat on both sides and make a long chain for a tie.
3-10 Years
With H hook, ch 4 and sl st to the first ch to form a chain ring.
Round 1: Ch 2 (Does not count as a stitch), 1 hdc into chain ring, place a marker on the first hdc you just made to indicate the beginning of the round, 7 hdc in the ring. See Pic 2 above.———8 hdc
Round 2: Do not turn, 2 hdc in the marked stitch of the previous round as shown in Pic 3 above, move the marker to the first hdc you just made into the marked stitch, 2 hdc in each of the next 7 stitches ending in the stitch just before the marked one. ———16 hdc
Round 3: Do not turn, 1 hdc in marked stitch of previous round, move the marker into the stitch you just made, *(2hdc in next st, 1 hdc in next), repeat from * till you end in the stitch just before the marked one.————–24 hdc
Round 4: Do not turn, 1 hdc in marked st, move marker up into the stitch you just made, 1 hdc in next st, * (2hdc in next st, 1 hdc in next 2 stitches), repeat from * till you end in the st right before the marked one. ——————32 hdc
Round 5: Do not turn, 1 hdc in marked st, move marker up into the stitch you just made, 1 hdc in next 2 stitches, * (2hdc in next st, 1 hdc in next 3 stitches), repeat from * till you end in the st right before the marked one. ———-40 hdc
This is where you measure the diameter for checking the gauge.
Round 6: Do not turn, 1 hdc in marked st, move marker up into the stitch you just made, 1 hdc in next 3 stitches, * (2hdc in next st, 1 hdc in next 4 stitches), repeat from * till you end in the st right before the marked one. ——————48 hdc
Round 7: Do not turn, 1 hdc in marked st, move marker up into the stitch you just made, 1 hdc in next 4 stitches, * (2hdc in next st, 1 hdc in next 5 stitches), repeat from * till you end in the st right before the marked one. ——————56 hdc
Round 8: Do not turn, 1 hdc in marked st, move marker up into the stitch you just made, 1 hdc in next 12 stitches, * (2hdc in next st, 1 hdc in next 13 stitches), repeat from * till you end in the st right before the marked one. ——————60 hdc
Note: All the stitches of the next round are worked into the back loops only to leave a ring of free loops on the hat as shown in Pic 4 above.
Round 9: Do not turn, 1 sc into marked st, sl st into next stitch to even out the edges, ch 2 ( does not count as a hdc), 1 hdc into back loop of next st, move marker up into the hdc you just made, 1 hdc in back loop of each stitch till you reach ch 2, 1 hdc in the same st as ch 2———-60 hdc
From here all rounds are worked into both the loops as usual.
Round 10: Do not turn, 1 hdc in marked stitch, move marker up into the stitch you just made, 2 hdc in the next st, 1 hdc in each of the next 29 stitches, 2 hdc in next st, 1 hdc in each of the remaining stitches till you end in the stitch right before the marked one————-62 hdc
Round 11: Do not turn, 1 hdc in marked stitch, move marker up into the stitch you just made, 1 hdc in each of the next 14 st, 2 hdc in next st, 1 hdc in each of the next 30 stitches, 2 hdc in next, 1 hdc in each of the remaining stitches till you end in the stitch right before the marked one————-64 hdc
Round 12: Do not turn, 1 hdc in marked stitch, move marker up into the stitch you just made, 1 hdc in each st till one st is left before the marked st, 1 sc in next, sl st to marked st to even out the edges———–64 st
The next round will be a dc round to pass the band through and you will slip st at end of the round.
Round 13: Do not turn, Ch 3 ( not counted as a st), 1 dc in same st as ch 3, move marker up into the stitch you just made, 1 dc in each stitch of the round, sl st to the 1st dc———64 dc
Round 14: Do not turn, Ch 1, 1 sc in the same st as ch 1, 1 sc in each stitch of the round sl st to the 1st sc. ————64 st
Now your hat height should be almost 6 inches from the top and your hat circumference should be 21 inches.
BRIM
Note: For the brim, you will turn at each round starting from the second round. You don’t work in a spiral and you slip stitch to the 1st sc at the end of each round. So ch 1 is not counted as a stitch. You also don’t have to mark your first stitch for the brim rounds.
Round 1: Ch 1, 1 sc in same st as ch 1, 1 sc in next 6 st, 2 sc in next, * (1 sc in next 7 st, 2 sc in next) repeat from * till the end of the round, sl st to 1st sc; turn———-72 sc
Round 2: Ch 1, 1 sc in same st as ch 1,1 sc in next 7 st, 2 sc in next, * (1 sc in next 8 st, 2 sc in next) repeat from * till the end of the round, sl st to 1st sc; turn———-80 sc
Round 3: Ch 1, 1 sc in same st as ch 1,1 sc in next 9 st, 2 sc in next, * (1 sc in next 10 st, 2 sc in next) repeat from * till you have 3 st left, 1 sc in last 3 st, sl st to 1st sc; turn———-87 sc
Round 4: Ch 1, 1 sc in same st as ch 1,1 sc in next 10 st, 2 sc in next, * (1 sc in next 11 st, 2 sc in next) repeat from * till you have 3 st left, 1 sc in the last 63st, sl st to 1st sc; turn———-94 sc
Round 5: Ch 1, 1 sc in same st as ch 1,1 sc in next st, 1 sc in each st around, sl st to 1st sc; turn———94 sc
Round 6: Ch 1,1 sc in same st as ch 1, 1 sc in next 11 st, 2 sc in next, * (1 sc in next 12 st, 2 sc in next) repeat from * till you have 3 st left, 1 sc in last 3 st, sl st to 1st sc; turn———-101 sc
Round 7: Ch 1, 1 sc in same st as ch 1,1 sc in next st, 1 sc in each st around, sl st to 1st sc; turn———101 sc
Round 8: Ch 1, 1 sc in same st as ch 1, 1 sc in next 12 st, 2 sc in next, * (1 sc in next 13 st, 2 sc in next) repeat from * till you have 3 st left, 1 sc in last 3 st, sl st to 1st sc; Fasten off.———-108 sc
Round 9 (Last Round): With the right side of the hat facing up and contrasting color yarn, sl st to join near the fastened off st and ch 2, 1 hdc in same st as ch 2, 1 hdc in next 6 st, 2 hdc in next, *( 1 hdc in next 7 st, 2 hdc in next), repeat from * till 4 st left, 1 hdc in last 4 st, sl st to 1st hdc; fasten off————–121 st
Making the band: Using G Hook and the bright color yarn, chain 77, 1 hdc into the 2nd chain from hook, 1 hdc in each chain across, fasten off leaving a long tail. Weave in one of the tails leaving the other tail for sewing.
Finishing
1. Weave in all the yarn tails.
2. Through the dc round right on top of the brim, insert the band in and out as shown in pic 5 above. You will be inserting the band under two dc stitches for every 5 or 4 stitches. Overlap the ends and sew for a neat finish.
More free baby or toddler patterns:


I made this hat for my 8 year old today! Easy pattern and turned out perfect! Thank you!