All In One Crochet Hook Case (Free Pattern)

This is a pattern for a case that will hold all your crochet hooks and more. No more searching under the sofa and between the cushions! Just make one for yourself in a single color or in any two colors you choose and never lose your hooks again. It has 10 narrow pockets to hold the hooks and one broad one to hold your measuring tape and stitch markers. When I started to make this I hadn’t envisioned the pocket for holding the measuring tape and stitch markers. It was an afterthought and so I had to sew down the bottom of it. But in the pattern here I have added it in such a way that the slip stitch around the crochet case will close all the pockets at once. If unlike me who uses just pieces of scrap yarn as stitch markers, you use the ready made ones then it can be hooked anywhere on to the inside of the crochet case and don’t have to be put in the pocket. Keep your yarn needle pinned onto the tape measure pocket and you have your all in one crochet kit. It closes like a book and is secured by a snap button flap.
PATTERN
Overview It is worked using Hooks I and H and worsted weight yarn. I used Red heart super saver. The case is worked in two layers, one inner layer with the hook pockets and one outer layer to add thickness. The inner layer is worked in the back loops and front loops (to see working into front loops or back loops click here) alternately to leave one loop of each stitch free. You will be working the hook pockets into these free loops.
Inner layer
Using Hook I , ch 25 or chain as long as the chain measures about an inch more than your tallest crochet hook.
You will get 24 st in every row as ch 1 and ch2 is not considered a stitch and no stitch is worked into the turning chain of the previous round.
Row 1:1 sc in the 2nd ch from hook, 1 sc in each ch across, turn.
Row 2 & 3: Ch 1, 1 sc in the same st as ch 1, 1 sc in each st across, turn.
Row 4: working in front loops only , ch2, 1 hdc in the same st as ch 2, 1 hdc in each st across, turn.
Row 5: working in back loops only, ch2, 1 hdc in the same st as ch 2, 1 hdc in each ch across, turn.
Rows 6 t0 11: Repeat Rows 4 and 5 for 9 more rows till you make in total 11 hdc rows. Turn.
Row 11 you just made and row 12 will form the folding middle part of your crochet case. So we do the 12 th row in such a way that the case will bend easily at the middle.
Row 12: Working only in front loops, ch 2, 1 hdc in same st, 1 hdc in each st across, turn. This will leave a row of free loops on the outside of your work and facilitate inward folding.
Row 13: Working in the front loops only, ch2, 1 hdc in the same st as ch 2, 1 hdc in each st across. Turn.
Row 14: working in back loops only, ch2, 1 hdc in the same st as ch 2, 1 hdc in each ch across, turn.
Repeat Rows 13 and 14 until you complete a total of 22 hdc rows counting from the 1st hdc row made.
The next 3 rows will be sc rows.
Row 26: Working in front loops only, ch 1, 1 sc in the same st as ch 1, 1 sc in each st across, turn.
Row 27 and 28:Working in both the loops ch 1, 1 sc in the same st as ch 1, 1 sc in each st across. Fasten off.
Hook pockets
I used color gold for the hook pockets but you can use the same color as your inner layer too.
Each hook pocket is worked using 1 row of hdc, 1 row of sc and sl st to the next free row of loops.
First hook pocket
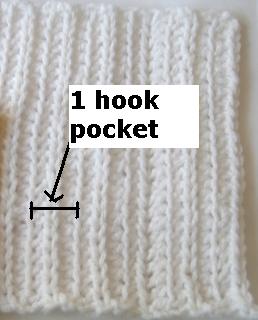
Row 1: Using hook H, sl st into the 15th free loop on the right side of your work and ch 2, 1 hdc in the same st, 1 hdc in each of the remaining 14 loops till you reach the last loop on the edge. Turn.—— 15 hdc
Row 2: ch 1, 1 sc in the same st, 1 sc in each of the remaining 14 loops.——15 sc


Row 3: Sl st to the next visible row of free loops ( If needed, take the hook out, insert it through the free loop and sl st). To sl st fold the inner layer down and hold. Sl st into all 15 of the remaining free loops till you reach the end of the case.————-15 sl st
2nd Hook pocket
Starting from this hook pocket all the hdc rows are worked in one of the loops as specified. This adds less bulk to your pockets and leaves free loops to work additional layer of pockets if you wish.
Row 1: Working in back loops of the previous sc row , ch 2 , 1 hdc in the same st, 1 hdc in each of the remaining 14 stitches, turn———15 st
Row 2: ch1 , 1 sc in the same st, 1 sc in each of the remaining 14 hdc———–15 st
Row 3: Sl st to the next visible row of free loops.—–15 sl st
3rd hook pocket
Row 1: Working in front loops of the previous sc row , ch 2 , 1 hdc in the same st, 1 hdc in each of the remaining 14 stitches, turn———15 st
Row 2: ch1 , 1 sc in the same st, 1 sc in each of the remaining 14 hdc———–15 st
Row 3: Sl st to the next visible row of free loops.—–15 sl st
Repeat Rows for 2nd hook pocket and 3 rd hook pocket till you finish 11 hook pockets in all. The middle one will be for folding and won’t be used for keeping a hook.
Tape Measure pocket
Row 1: On one side of your case ( not in the folding middle) , counting from the base of the hook pockets , sl st to the 11th free loop on the hook pocket, ch 1 , 1 sc i the same st, 1 sc in each free loop till the end of the case, turn.
Row 2 to 5: ch 2, 1 hdc in the same st, 1 hdc in each st sc across, turn———11 hdc
Row 6: Sl st to the next visible row of free loops. This spreads over 3 hook pockets.
Outer Layer
The entire outer layer is worked in both the loops but 1 extra row of hdc is added to make it big enough to wrap around the inner layer.
Row 1: Ch 25 or equal to your initial chain, 1 sc in the 2nd ch, 1 sc in each chain across. Turn.—24 sc
Rows 2 & 3: ch 1, 1 sc in the same st, 1 sc in each st across.Turn.————–24 sc
Rows 4 to 26: ch2, 1 hdc in the same st, 1 hdc in each st across, turn————24 hdc
Rows 27 to 29: ch1, 1 sc in the same st, 1 sc in each st across, fasten off———-24 sc
Binding the two layers and closing the hook pockets
Now place the inner layer over the outer layer
1. Do a row of single crochet around and through both the layers. Start from one of the shorter side and when you reach each corner do 3sc into the corner.
2. Once one shorter side is done , align the other shorter sides and pin them in place. This is because the outer layer is 1 hdc wider than the inner layer and you have to incorporate that into the longer sides without affecting the alignment of the shorter sides.
3. When you reach the bottom of the hook pockets, go in through the hook pockets and the 2 layers as well. This will automatically close all your hook pockets.
4. Keep doing sc around and 3 sc into each corner. On the wider sides you will be working across row ends and won’t have any stitches you can stick your hook into. So just try to keep your sc uniformly placed.
Snap Button Flap
Stitch explanation
sc2 tog : insert hook into the 1st st ( or same st as ch 1 if doing in the beginning of the row) and pull up a loop, insert hook into the next st and pull up a loop, Yarn over and pull through all the loops on the hook.
Row 1: Mark the center 6 st on the front edge of your case. Sl st to the 1st marked st, 1 sc in the same st, 1 sc in next 5 st, turn————6sc.
Row 2 to 6: ch 1 , 1 sc in the same st, 1 sc in each st across——-6sc.
Row 7: sc2tog, 1 sc in next 2 st, sc2 tog, turn———4 sc.
Row 8: sc2tog (twice), fasten off———2sc.
Sew on the snap button in place. Your hook case is ready for use.
If you are the sewing type then you can even make the layer for the hook pockets separately as wide as you want and sew it on along the free loops instead of doing crochet.


I am having trouble sc because I am used to dc w/ 4 loops of yarn from the cst is sc 3 or 2loops from the cst
I am sorry, I didn't get your question. Can you email me using the contact me form?
I am struggling with after row 14 it says to repeat 12 and 13 which are the same…also when I make it like the directions say the second half has the loops on the opposite side as the first half
I am sorry,repeat rows 13 and 14. I have edited it. Thank you for bringing this to my notice.