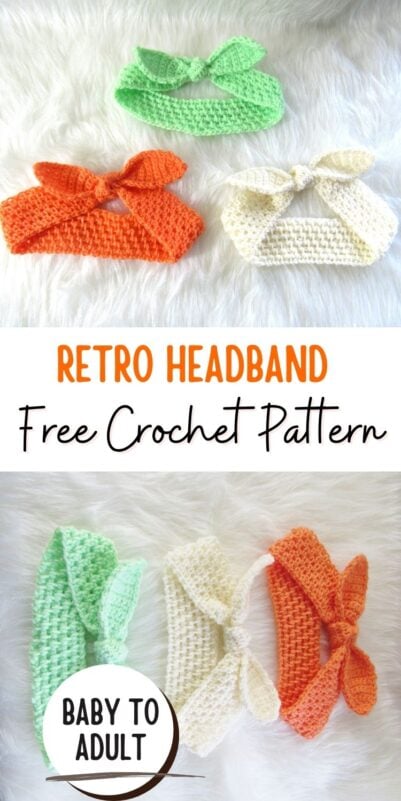
Knot Me Up Headband, Free Crochet Pattern

Use this knot headband crochet pattern to make a retro style headband. Who wouldn’t look cute in a crocheted headband like this? The pattern includes instructions for different sizes from the smallest babies to adult size. This easy headband would make a darling baby shower gift!


This easy crochet headband is worked using the same stitch as my popular Brooklyn mittens pattern, the extended single crochet. There is no right side, both the front and back of the stitch look equally good. It is completely up to you which side you want to tie the bow on.
This is a great project for any skill level using basic crochet stitches and very little yarn. This simple headband makes a perfect gift. I hope you enjoy crocheting this fun headband.
Pin it for later: https://www.pinterest.com/pin/51087777004616140/
Knot Headband Crochet Pattern
Materials
1. DK weight (size 3) yarn. Snuggly Wuggly from Loops and Threads was used for gauge. You can use any yarn colors you like.
2. Hook size H(5mm)
3. Tapestry needle to weave in the ends.
Size
You can make it for any head size head, see table below. The chart below gives the approximate measurements for each age group. The headband will look small when finished, but it will stretch to fit. If you want to adjust the size, the initial chain is any multiple of 2.
| Age | Fits Head Circumference (inches) |
| 0-3 Months | 13 |
| 3-6 Months | 15 |
| 6-12 Months | 17 |
| 1-3 Yrs | 18 |
| 3-7 Yrs | 19 |
| 7-15 Yrs | 19 1/2 |
| Adult | 21 |
Stitch Abbreviations
ch: chain
sk: skip
st: stitch
sc: single crochet
sl st: slip stitch
esc: extended single crochet
Stitch Explanation
Sc2tog: It is a decrease that joins two sts into one. Insert your hook into the first st and pull up a loop, insert your hook into the next st and pull up a loop, YO and pull through all the 3 loops on your hook.
Extended Single crochet (esc): Insert your hook into the next st and pull up a loop, yarn over and pull through one loop, yarn over again and pull through the remaining 2 loops on hook.—–1 esc completed
Gauge
With H hook, 10 esc sts alternating with 9 chains= 4 inches.
This gauge was measured without stretching the band at all.
Pattern
Note: Stitch counts are given in the order 0-3mos(3-6 mos, 6-12 mos, 1-3 Yrs, 3-7 Yrs, 7-15 Yrs, Adult)
Chain 50 (58, 66, 70, 72, 74, 82), sl st to the first ch to form a ch ring.
Round 1: Ch 3(counts as first esc and ch 1), skip 1 st, *(1 esc in next st, ch 1, skip 1 st), repeat from * till end of the round. Do not turn.————-25(29, 33, 35, 36, 37, 41)esc

Note: Esc is the stitch right before it to the right and not the one right on top of it. See pic above to find out where to insert your crochet hook to make an esc.
Round 2 to End: Work 1 esc into top of beginning chain 2 of previous round, ch 1, *(1 esc in next esc, ch 1), repeat from * in a spiral without turning or slip stitching at the end of rounds until your headband is 2 inches wide and you are 1/2 inch away from the beginning tail of your work, sc in next esc, sl st in next esc. Fasten off with an 8-inch tail.

Use the beginning and ending tails to wind around your headband to gather it and get it ready for the tie. Make a couple of knots to secure, trim the tails. This part will be concealed under the tie and you do not have to waste your time weaving in the tails.
Making the Tie
First Bunny Ear
Note: The beginning ch 1 is not counted as a st and you should work it before turning your work.

Row 1: Ch 2, 1 sc in 2nd ch from hook, ch 1 and turn.——-1 sc
Row 2: 2 sc in the same st as ch 1, ch 1 and turn.——-2 sc
Row 3: 2 sc in same st as ch 1, 2 sc in next st, ch 1 and turn.——-4 sc
Row 4: 1 sc in same st as ch 1, 2 sc in next, 1 sc in next 2 sts, ch1 and turn.——–5 sc
Row 5: 1 sc in same st as ch 1, 1 sc in next, 2 sc in next, 1 sc in last 2 sts, ch 1 and turn.——-6 sc
Row 6: 1 sc in same st as ch 1, 1 sc in next 2sts, 2 sc in next, 1 sc in last 2 sts, ch 1 and turn.—-7 sc
Rows 7-10: 1 sc in same st as ch 1, 1 sc in each st across, ch 1 and turn.———7 sc
Row 11: 1 sc in same st as ch 1, 1 sc in next 2 sts, sc2tog, 1 sc in last 2 sts, ch 1 and turn.——–6 sc
Row 12: 1 sc in same st as ch 1, 1 sc in each st across, ch 1 and turn.———6 sc
Row 13: 1 sc in same st as ch 1, 1 sc in next st, sc2tog, 1 sc in last 2 sts, ch 1 and turn.——–5 sc
Row 14: 1 sc in same st as ch 1, 1 sc in each st across, ch 1 and turn.———5 sc
Row 15: 1 sc in same st as ch 1, 1 sc in next st, sc2tog, 1 sc in last st, ch 1 and turn.——–4 sc
Note: Place a marker on any st of the row you just made. Place it around the post of a sc, so it won’t obstruct you from working into the “V” of the stitches.
Row 16: 1 sc in same st as ch 1, 1 sc in each st across, ch 1 and turn.———4 sc

Repeat row 16 until the part from your marked row measures 3 1/2 inches. This part is for the knot.

Row 1: 1 sc in same st as ch 1, 2 sc in next, 1 sc in next 2 sts, ch1 and turn.——-5 sc
Row 2: 1 sc in same st as ch 1, 1 sc in each st across, ch 1 and turn.———5 sc
Row 3: 1 sc in same st as ch 1, 1 sc in next, 2 sc in next, 1 sc in last 2 sts, ch 1 and turn.——-6 sc
Row 4: 1 sc in same st as ch 1, 1 sc in each st across, ch 1 and turn.———6 sc
Row 5: 1 sc in same st as ch 1, 1 sc in next 2sts, 2 sc in next, 1 sc in last 2 sts, ch 1 and turn.—-7 sc
Row 6-9: 1 sc in same st as ch 1, 1 sc in each st across, ch 1 and turn.———7 sc
Row 10: 1 sc in same st as ch 1, 1 sc in next 2 sts, sc2tog, 1 sc in last 2 sts, ch 1 and turn.——6 sc
Row 11: 1 sc in same st as ch 1, 1 sc in next st, sc2tog, 1 sc in last 2 sts, ch 1 and turn.——–5 sc
Row 12: 1 sc in same st as ch 1, 1 sc in next st, sc2tog, 1 sc in last st, ch 1 and turn.——–4 sc
Row 13: Sc2tog, sc2tog, ch 1 and turn.———2 sc
Row 14: Sc2tog, do not fasten off.——1 sc.
Ch 1 and work a round of sl st all around your tie. Keep your sl sts loose. You can switch to a bigger hook if you want.

Finishing

Weave in the tails on your tie and use it to tie a knot where you gathered your headband.
Check out my 15 minute Knit-Look Ear Warmers here.
—————
Pin it for later:


This is so adorable! I only have the band and half the tie done, but I can already tell it's going to be super cute. I think, after making this one for a 4 year old, I'll be making myself one. Once I read through the pattern and got started, it made perfect sense. Before this I didn't even know the esc existed but now I think it's my new favorite.
I am so glad you like the pattern. Thank you for visiting my blog.
How do you tie the tie? I know that probably sounds like a dumb question haha… but I cannot get it to tie all cute like the picture
Do not make the knot too tight. Keep it a little loose, arrange the tie to your liking and then gently tighten it. Hope that helps.
I signed up to get the pdf version… but never got it. Can't find it. I really would like this pattern. Could it be emailed to me?
I am sorry the instant download didn't work for you. Please let me know your email. I won't publish your email so you don't have to worry about spammers.
I love this pattern but finding it is sometimes hard to do and I don’t see any instant download option. Can you please help me?
At the bottom of the blog post, there is a box where you can give your email and get the pdf.
I also am having difficulty with starting .the, bunny ear. I having been crochrting for years and it makes no sense to me. Could you please post pics of the first couple of stitches as you do them.
Hi Christine, I just added a collage showing the different stages of making the bunny ear. Please take a look.
Ive been sitting here all day trying to make the bunny ears ! And its a total fail for me ! It just will not come out ! Can you do a video of it ???
Hi Karina,
Please take a good look at the step by step pictures provided. Are you a beginner? Then please look up how to work single crochet increases and decreases(sc2tog) on Youtube.
Done and dusted… am going to make a few in each size… Loooove it 😊
Thank you. I am really glad you like the pattern.
Thanks for your free patterns. My daughter love it so much
I just finished my first one and I see many more in my future. Thank you for the great pattern.
Im working on second tie. Why are instructions different? Do I start it off like the first one?
Did you mean the second bunny ear? It is different because while the first one is started from the tip, the second one is worked from the base to the tip.
Thank you for this awesome pattern and clear instructions! I have made a few already.
Yay! I am so glad to hear that. Thank you for visiting my blog :).