Knot Me Up Headband, Free Crochet Pattern

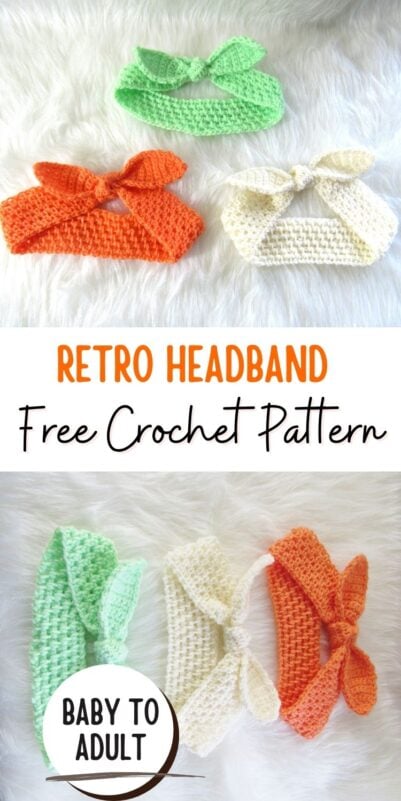
Use this knot headband crochet pattern to make a retro style headband. Who wouldn’t look cute in a crocheted headband like this? The pattern includes instructions for different sizes from the smallest babies to adult size. This easy headband would make a darling baby shower gift!


This easy crochet headband is worked using the same stitch as my popular Brooklyn mittens pattern, the extended single crochet. There is no right side, both the front and back of the stitch look equally good. It is completely up to you which side you want to tie the bow on.
This is a great project for any skill level using basic crochet stitches and very little yarn. This simple headband makes a perfect gift. I hope you enjoy crocheting this fun headband.
Pin it for later: https://www.pinterest.com/pin/51087777004616140/
Knot Headband Crochet Pattern
Materials
1. DK weight (size 3) yarn. Snuggly Wuggly from Loops and Threads was used for gauge. You can use any yarn colors you like.
2. Hook size H(5mm)
3. Tapestry needle to weave in the ends.
Size
You can make it for any head size head, see table below. The chart below gives the approximate measurements for each age group. The headband will look small when finished, but it will stretch to fit. If you want to adjust the size, the initial chain is any multiple of 2.
| Age | Fits Head Circumference (inches) |
| 0-3 Months | 13 |
| 3-6 Months | 15 |
| 6-12 Months | 17 |
| 1-3 Yrs | 18 |
| 3-7 Yrs | 19 |
| 7-15 Yrs | 19 1/2 |
| Adult | 21 |
Stitch Abbreviations
ch: chain
sk: skip
st: stitch
sc: single crochet
sl st: slip stitch
esc: extended single crochet
Stitch Explanation
Sc2tog: It is a decrease that joins two sts into one. Insert your hook into the first st and pull up a loop, insert your hook into the next st and pull up a loop, YO and pull through all the 3 loops on your hook.
Extended Single crochet (esc): Insert your hook into the next st and pull up a loop, yarn over and pull through one loop, yarn over again and pull through the remaining 2 loops on hook.—–1 esc completed
Gauge
With H hook, 10 esc sts alternating with 9 chains= 4 inches.
This gauge was measured without stretching the band at all.
Pattern
Note: Stitch counts are given in the order 0-3mos(3-6 mos, 6-12 mos, 1-3 Yrs, 3-7 Yrs, 7-15 Yrs, Adult)
Chain 50 (58, 66, 70, 72, 74, 82), sl st to the first ch to form a ch ring.
Round 1: Ch 3(counts as first esc and ch 1), skip 1 st, *(1 esc in next st, ch 1, skip 1 st), repeat from * till end of the round. Do not turn.————-25(29, 33, 35, 36, 37, 41)esc

Note: Esc is the stitch right before it to the right and not the one right on top of it. See pic above to find out where to insert your crochet hook to make an esc.
Round 2 to End: Work 1 esc into top of beginning chain 2 of previous round, ch 1, *(1 esc in next esc, ch 1), repeat from * in a spiral without turning or slip stitching at the end of rounds until your headband is 2 inches wide and you are 1/2 inch away from the beginning tail of your work, sc in next esc, sl st in next esc. Fasten off with an 8-inch tail.

Use the beginning and ending tails to wind around your headband to gather it and get it ready for the tie. Make a couple of knots to secure, trim the tails. This part will be concealed under the tie and you do not have to waste your time weaving in the tails.
Making the Tie
First Bunny Ear
Note: The beginning ch 1 is not counted as a st and you should work it before turning your work.

Row 1: Ch 2, 1 sc in 2nd ch from hook, ch 1 and turn.——-1 sc
Row 2: 2 sc in the same st as ch 1, ch 1 and turn.——-2 sc
Row 3: 2 sc in same st as ch 1, 2 sc in next st, ch 1 and turn.——-4 sc
Row 4: 1 sc in same st as ch 1, 2 sc in next, 1 sc in next 2 sts, ch1 and turn.——–5 sc
Row 5: 1 sc in same st as ch 1, 1 sc in next, 2 sc in next, 1 sc in last 2 sts, ch 1 and turn.——-6 sc
Row 6: 1 sc in same st as ch 1, 1 sc in next 2sts, 2 sc in next, 1 sc in last 2 sts, ch 1 and turn.—-7 sc
Rows 7-10: 1 sc in same st as ch 1, 1 sc in each st across, ch 1 and turn.———7 sc
Row 11: 1 sc in same st as ch 1, 1 sc in next 2 sts, sc2tog, 1 sc in last 2 sts, ch 1 and turn.——–6 sc
Row 12: 1 sc in same st as ch 1, 1 sc in each st across, ch 1 and turn.———6 sc
Row 13: 1 sc in same st as ch 1, 1 sc in next st, sc2tog, 1 sc in last 2 sts, ch 1 and turn.——–5 sc
Row 14: 1 sc in same st as ch 1, 1 sc in each st across, ch 1 and turn.———5 sc
Row 15: 1 sc in same st as ch 1, 1 sc in next st, sc2tog, 1 sc in last st, ch 1 and turn.——–4 sc
Note: Place a marker on any st of the row you just made. Place it around the post of a sc, so it won’t obstruct you from working into the “V” of the stitches.
Row 16: 1 sc in same st as ch 1, 1 sc in each st across, ch 1 and turn.———4 sc

Repeat row 16 until the part from your marked row measures 3 1/2 inches. This part is for the knot.

Row 1: 1 sc in same st as ch 1, 2 sc in next, 1 sc in next 2 sts, ch1 and turn.——-5 sc
Row 2: 1 sc in same st as ch 1, 1 sc in each st across, ch 1 and turn.———5 sc
Row 3: 1 sc in same st as ch 1, 1 sc in next, 2 sc in next, 1 sc in last 2 sts, ch 1 and turn.——-6 sc
Row 4: 1 sc in same st as ch 1, 1 sc in each st across, ch 1 and turn.———6 sc
Row 5: 1 sc in same st as ch 1, 1 sc in next 2sts, 2 sc in next, 1 sc in last 2 sts, ch 1 and turn.—-7 sc
Row 6-9: 1 sc in same st as ch 1, 1 sc in each st across, ch 1 and turn.———7 sc
Row 10: 1 sc in same st as ch 1, 1 sc in next 2 sts, sc2tog, 1 sc in last 2 sts, ch 1 and turn.——6 sc
Row 11: 1 sc in same st as ch 1, 1 sc in next st, sc2tog, 1 sc in last 2 sts, ch 1 and turn.——–5 sc
Row 12: 1 sc in same st as ch 1, 1 sc in next st, sc2tog, 1 sc in last st, ch 1 and turn.——–4 sc
Row 13: Sc2tog, sc2tog, ch 1 and turn.———2 sc
Row 14: Sc2tog, do not fasten off.——1 sc.
Ch 1 and work a round of sl st all around your tie. Keep your sl sts loose. You can switch to a bigger hook if you want.

Finishing

Weave in the tails on your tie and use it to tie a knot where you gathered your headband.
Check out my 15 minute Knit-Look Ear Warmers here.
—————
Pin it for later:


What colors did you use for this pattern? A friend of mine wanted me to make these for her employee’s baby shower and she really likes the colors that you made yours in.
Hi Rebecca, I don’t remember the color names, but the mint and white were from Snuggy Wuggly by Loops and threads and the peach from Sweet Delight Baby yarn from Hobby Lobby. I hope that helps.
Maybe it’s common knowledge but I’d rather ask and do it right …. are we supposed to slip stitch and chain or anything after Finishing the first round of esc ?
I’m sorry I think I figured it out. Thank you for the pattern.
Do you have a video tutorial on how to work the bunny ears.
Hi Ruth, I will be shooting a video for this headband in spring.
Did you shoot the tutorial for this headband yet. I am kind of a beginner and could really use a video. Thanks
I am sorry, I haven’t found the time to make a video yet.
Is there a link to click on to print this crochet pattern? If so, could you send me a copy? I would appreciate it so much! Thank you for sharing this pattern. I’m going to try to make some of these headbands for my granddaughter!
Thanks again and God bless,
Roxanne
Hi Roxanne, the pdf is for sale in my Ravelry store here: https://www.ravelry.com/patterns/library/knot-me-up-headband
I don’t understand how to tie the ears so they sit horizontally instead of vertically.
First, tie the knot loose and align the ears the way you want before you tighten the knot.
Hi! I am an advanced crocheter and there is definitely something amiss between rows 2-3 of the first bunny ear. In row 2, if you crochet twice in the first chain, chain 1, and turn, as it says, you wind up with two triangles as you leaving two stitches flapping in the wind. Might there be a typo, specifically in row 2? Are you really supposed to leave two stitches blank in that row?
At the end of Row 1, you only have 1 st and in Row 2, you work 2 sc into that single st to get 2 sts. There are no extra sts to work into. Hope that helps.