
How to Make Easy Crochet Slippers, Shell Slipper
I wanted to design a free crochet slipper pattern as it has been requested by my readers many times before. So I came up with these quick crochet slippers that are simple and elegant at the same time.


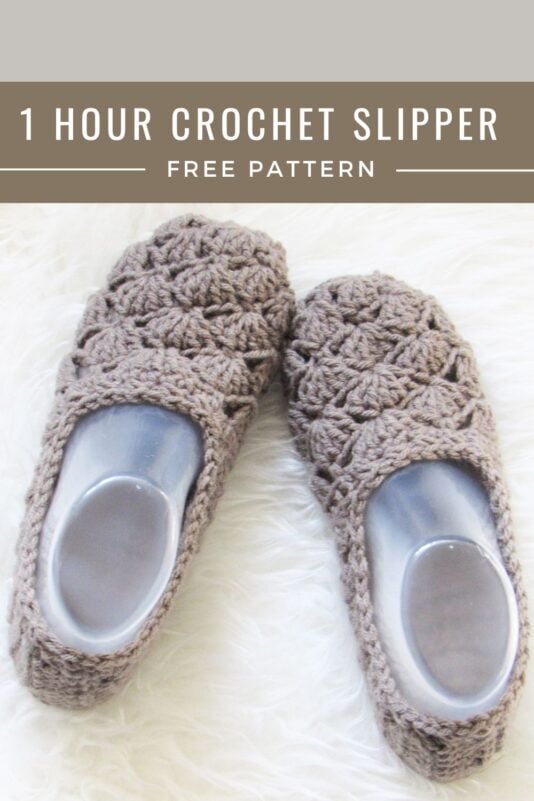
You can pin it for later here.
Now that the holiday gifting rush is over you can make these warm slippers for yourself. Some self-love won’t hurt, will it? I hope they keep you warm and comfy.
This is an easy slipper pattern that is worked in one piece. Once you make one, I bet everyone in your family would want one too.
Free Crochet Slipper Pattern
Materials
1. Worsted weight yarn. Caron United in color Soft Grey Heather was used for the sample.
2. Hook 7 (4.5 mm)
Size
Small (Fits US sizes 5& 6): Slipper is 9 inches long
Medium (Fits US sizes 7 & 8): Slipper is 9 1/2 inches long
Large(Fits US sizes 9 & 10): Slipper is 10 inches long
Gauge
Working in hdc crochet, 16 sts and 8 1/2 Rows= 4 inches
Stitch Abbreviations
The pattern is written in standard American terms.
ch- chain
sc-single crochet
dc- double crochet
sl st- slip st
sk- skip
Stitch Explanation
Shell: 5 dc worked into the same st.
sc2tog ( single crochet decrease): This will join 2 sts into one. To work a sc2tog, [insert your hook into the next st and pull up a loop]2 times, yarn over and pull through all the loops on your hook.
Pattern
Note: Sizes Small and Medium are grouped together and size Large is given separately.
Sizes Small and Medium

Toe Top
Round 1: Ch 6, 1 sc in 2nd ch from hook, 1 sc in next 3sts, 4 sc in last st, pivot your work to work along the other side of the foundation chain, 1 sc in next 3 free loops of the foundation ch, 2 sc in last free loop, sl st to first ch. Do not turn.——14 sts

Note: The end of the round stitch counts include the chains between the stitches as well.
Round 2: Ch 3(counts as a dc here and throughout), 2 dc in same st as ch 3, ch 1, sk 1, 1 sc in next, *(ch 1, sk 1, 3 dc in next, ch 1, sk 1, 1 sc in next), repeat from * 2 times until you end with a sc in the same st as beginning ch-3, ch 1, sl st to the top of beginning ch-3. Do not turn.———-24 sts
Round 3: 1 sc in next dc, place a marker in the sc you just made, *(ch 1, sk the next dc and ch 1, 3 dc in next sc, ch 1, 1 sc in the middle dc of the next 3dc group, ch 1, sk next dc and ch 1, 4 dc in next sc, ch 1, 1 sc in the middle dc of the next 3dc group), repeat from * and after you work 4dc in the last sc st, ch 1, sl st to first marked sc. Do not turn.——-26sts
Note: You will be skipping dc sts to work a shell into the sc.
Round 4: Ch 3, 4 dc in same st as ch-3, ch 1, 1 sc in middle dc of next 3dc group, ch 1, shell in next sc, ch 1, 1 sc in 3rd dc of next 4 dc group, ch 1, shell in next sc, ch 1, 1 sc in middle dc of next 3dc group, ch 1, shell in next sc, ch 1, 1 sc in 3rd dc of next 4 dc group, ch 1, sl st to top of beginning ch 3. Do not turn.————32 sts (4 shells)
Round 5: Sl st into next dc, 1 sc in next, place a marker in the sc you just made, ch 1, shell in next sc, *(ch 1, 1 sc in middle dc of next shell, ch 1, shell in next sc), repeat from * and after shell in the last sc, ch 1, sl st to first marked sc. Do not turn——32 sts(4 shells)
Round 6: Ch 3, 4 dc in same st as ch-3, *(ch 1, 1 sc in middle dc of next shell, ch 1, shell in next sc), repeat from * and after 1 sc in 3rd dc of the last shell, ch 1, sl st to top of beginning ch 3. Do not turn.————32 sts (4 shells)
Round 7: Repeat Round 5.
Round 8: Repeat Round 6. Do not turn and do not fasten off.
Middle and Back of the Slipper

Notes
1. This part is worked in rows and then the backside is seamed to close the slipper.
2. The beginning ch2 does not count as a stitch in the following rows.
Row 1: Working in back loops only, ch 2, 1 hdc in same st as ch 2, 1 hdc in next 20 sts, turn.——21 sts
Row 2: Working in front loops only, ch 2, 1 hdc in same st as ch 2, 1 hdc in next 20 sts, turn.——21 sts

Repeat the above 2 rows until your shoe measures 6 1/2 inches for size Small and 7 inches for size Medium.
Increase Rows
Note: Maintain the sequence of working into the back and front loops. On the right side of the shoe, you will work in back loops, and on the wrong side, you will work into the front loops.
Increase Row 1:Ch 2, 1 hdc in same st as ch 2, 2 hdc in next, 1 hdc in each st until 2 sts are left, 2 hdc in next, 1 hdc in last st. turn.——23 sts
Repeat the above increase row 2 more times to end in 27 sts and turn.
Next Row: Ch 2, 1 hdc in same st as ch 2, 1 hdc in next 26 sts, turn.——27 sts
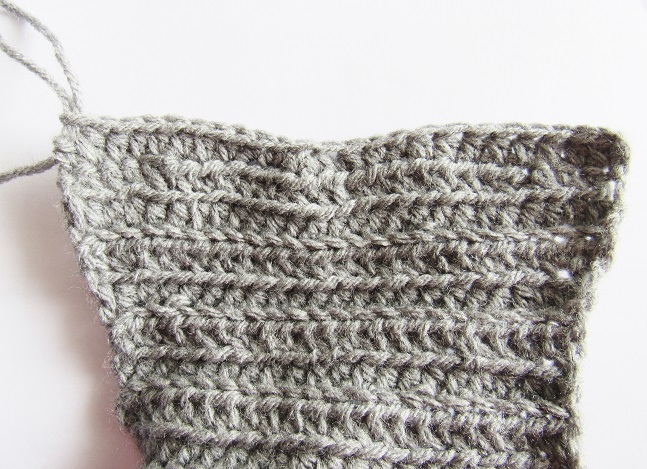
Last Row: Ch 1, 1 sc in same st as ch 1, 1 sc in next 3 sts, 1 hdc in next 4 sts, 1 sc in next 2 sts, (sc2tog)3 times, 1 sc in next 2 sts, 1 hdc in next 5 sts, 1 sc in last 4 sts.——24 sts.

Now fold and seam the backside of the slipper with sl sts. Fasten off. The seam should be worked inside the slipper.
Border Around the Slipper
You will now work 2 rounds around the opening of the slipper with a few decreases thrown in. This will make your slippers snug and keep it from falling off your feet. You will be working across row ends for the most part and will have to distribute your sc as evenly as possible.

Round 1: Sl st to the back seam, ch 1, sc2tog, work sc evenly around the slipper with 5 decreases (sc2tog), 1 at the back, 1 on either side and 1 at each of the corners of the toe top as shown. Sl st to the 1st sc, do not turn.——-48(52) sts
Round 2: Ch 1, 1 sc in same st as ch 1, *(sk 1 st, 1 sc in next, 1 sc in the previous skipped st), repeat from * to end and sl st to the first sc. Fasten off and weave in the tails.
Your slipper is now ready to keep you warm and comfy!
Size Large
Note: Please take a look at the pictures given for the smaller sizes before you start.
Round 1: Ch 8, 1 sc in 2nd ch from hook, 1 sc in next 5 sts, 4 sc in last st, pivot your work to work along the other side of the foundation chain, 1 sc in next 5 free loops of the foundation ch, 2 sc in last free loop, sl st to first ch. Do not turn.——18 sts

Note: The end of the round stitch counts include the chains between the stitches as well.
Round 2: Ch 3(counts as a dc here and throughout), 2 dc in same st as ch 3, ch 1, sk 1, 1 sc in next, *(ch 1, sk 1, 3 dc in next, ch 1, sk 1, 1 sc in next), repeat from *3 times until you end with a sc in the same st as beginning ch-3, ch 1, sl st to the top of beginning ch-3. Do not turn.———-30 sts
Round 3: 1 sc in next dc, place a marker in the sc you just made, *(ch 1, sk the next dc and ch 1, 3 dc in next sc, ch 1, 1 sc in the middle dc of the next 3dc group), repeat from * and after you work 3dc in the last sc st, ch 1, sl st to first marked sc. Do not turn.——-30sts
Note: You will be skipping dc sts to work shell into the sc.
Round 4: Ch 3, 4 dc in same st as ch-3, *(do not ch 1, 1 sc in middle dc of next 3dc group, ch 1, shell in next sc), repeat from * and after 1 sc in middle dc of last 3 dc group, ch 1, sl st to top of beginning ch 3. Do not turn.————35 sts (5 shells)
Round 5: Sl st into next dc, 1 sc in next, place a marker in the sc you just made, ch 1, shell in next sc, *(do not ch 1, 1 sc in middle dc of next shell, ch 1, shell in next sc), repeat from * and after shell in the last sc, do not ch 1, sl st to first marked sc. Do not turn——35 sts(5 shells)
Round 6: Ch 3, 4 dc in same st as ch-3, *(do not ch 1, 1 sc in middle dc of next shell, ch 1, shell in next sc), repeat from * and after 1 sc in middle dc of last shell, ch 1, sl st to the top of beginning ch 3. Do not turn.————35 sts (5 shells)
Round 7: Repeat Round 5.
Round 8: Repeat Round 6. Do not turn and do not fasten off.
Middle and Back of the Slipper
Notes
1. This part is worked in rows and then the backside is seamed to close the slipper.
2. The beginning ch2 does not count as a stitch in the following rows.
Row 1: Sl st in next dc, working in back loops only, ch 2, 1 hdc in same st as ch 2, 1 hdc in next 22 sts, turn.——23 sts
Row 2: Working in front loops only, ch 2, 1 hdc in same st as ch 2, 1 hdc in next 22 sts, turn.——23 sts
Repeat the above 2 rows until your shoe measures 7 inches.
Increase Rows
Note: Maintain the sequence of working into the back and front loops. On the right side of the shoe, you will work in back loops, and on the wrong side, you will work into the front loops.
Increase Row 1: Ch 2, 1 hdc in same st as ch 2, 2 hdc in next, 1 hdc in each st until 2 sts are left, 2 hdc in next, 1 hdc in last st. turn.——25 sts
Repeat the above increase row 2 more times to end in 29 sts and turn.
Next Row: ch 2 1 hdc in same st as ch 2, 1 hdc in next 26 sts, turn.——29 sts
Repeat the above row one more time.
Last Row: Ch 1, 1 sc in same st as ch 1, 1 sc in next 3 sts, 1 hdc in next 5 sts, 1 sc in next 2 sts, (sc2tog)3 times, 1 sc in next 2 sts, 1 hdc in next 6 sts, 1 sc in last 4 sts.——26 sts.
Now fold and seam the backside of the slipper with sl sts. Fasten off. The seam should be worked inside the slipper.
Border Around the Slipper
You will now work 2 rounds around the opening of the slipper with a few decreases thrown in. This will make your slippers snug and keep it from falling off your feet. You will be working across row ends for the most part and will have to distribute your sc as evenly as possible.
Round 1: Sl st to the back seam, ch 1, sc2tog, work sc evenly around the slipper with 7 decreases (sc2tog), 1 at the back, 2 on either side and 1 at each of the corners of the toe top as shown ( see pic for smaller sizes). Sl st to the 1st sc, do not turn.——-57 sts
Round 2: Ch 1, 1 sc in same st as ch 1, *(sk 1 st, 1 sc in next, 1 sc in the previous skipped st), repeat from * to end and sl st to first sc. Fasten off and weave in the tails.
Your slipper is now ready to keep you warm and comfy!
Pin it for later here.
You can see the most popular Boots pattern on my blog here.
See the full collection of patterns here: Pattern Gallery.





I’m sorry to be such a pest. I still don’t know where the INCREASES come in. You went from 24 stitches to 48 stitches. Some where I have to 2 sc in every stitch, is that right? Please forgive my ignorance.
After the 24 stitches, you seam the back side and fasten off. The 48 stitches are then worked around the opening of the slipper. You are not increasing 24 to 48 here. Makes sense?
I think a little light bulb may have gone off in my head! By Jove, I believe I got it!!!!Thanks for being so patient with me. The slipper is beautiful and I really want to make some. Again, thanks for all your help. When I finish a pair is there somewhere I can post it so you can see them?
No problem, Pat. I am glad I could help. You can tag me on Instagram, #crochetdreamz. Thank you.
These look great, I can’t wait to make a pair or two! Any suggestions on what I can use on the bottom to make them no slip? Thanks so much!!
A few dots and squiggles with puffy paint is said to work.
Hello. These are lovely slippers and I would like to make a pair for my elderly aunt. However I have a question. Is there a way to make them a little taller so they go a little bit higher near the ankle?
Perhaps adding more rows? Please advise.
Hi Carol, You can add more increases to the rows near the ankle to make it taller. It will get clear once you start making one.
Thank you so much! Ready to begin these slippers. They will be a lovely birthday gift for my 95 year old Aunt!
Hi can you please sent me a copy of the patron and help me with an xl patreon for size 13 foot please thank you
Jacqueline
Hello I am writing to ask a question about the first part about getting 14 stitches I am only counting 13
The first chain also counts as a st.
Hi, I really love these slippers. Could you please tell me to make them larger? I need to make in a U. S. size 13. Thank you so much!
Hi Sherry, I am sorry, I haven’t tested these in bigger sizes and they are not easy to adjust. My best advice would be to use a thicker yarn.
Is there a video tutorial for this slipper
Hi Danielle, I am sorry, I do not have a video. If you need any clarification, please email me.
Still trying to get free pattern for pot holders. Can’t get the pattern.