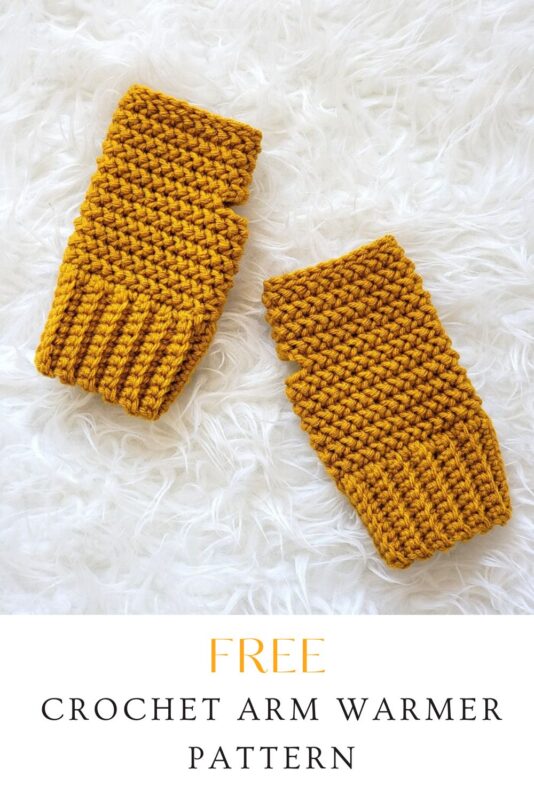
Crochet Arm Warmer Pattern, Avery Arm Warmers
This crochet arm warmer pattern is simple yet elegant. The stitch used gives it a knit look.

The arm warmers are worked from the bottom up. The ribbed cuff gives it a nice fit.

I wanted to design these easy wrist warmers in smaller sizes too but I couldn’t find a size chart with all the measurements I need. When I find one, I will be adding more sizes.

These arm warmers are really snug and toasty. You can wear them in your office to keep your arms warm and still work on your phone or the computer.

It takes just around 120 yards of yarn for a pair. I hope you will enjoy making these for yourself or for gifting them to friends and family.
Crochet Arm Warmer Pattern
Materials
1. Medium worsted weight, size 4 yarn
Caron One Pound yarn in Off White and Loops and Threads Impeccable yarn in color Gold were used for the sample mittens.
2. Hook G(4.25mm) for the ribbing and Hook H(5mm) for the rest of the arm warmers
3. A stitch marker. I prefer locking ones so they don’t fall off.
4. A tapestry needle to weave in the ends.
Finished Size
4 inches at the widest part and 7 inches tall
Yardage
120 yards for a pair
Stitch Abbreviations
The pattern is written in US terms.
ch: chain
st: stitch
sc: single crochet
hhdc: herringbone half double crochet
sl st: slip stitch
sk: skip
YO: yarn over
Stitch Explanations
Herringbone half double crochet (hhdc): YO, insert your hook into the next st, pull up a loop through the st and the first loop on your hook, 2 loops left on your hook, YO and pull through the remaining 2 loops on your hook.
Herringbone half double crochet 2 together (hhdc2tog): This is a decrease that joins 2 sts into one. YO, insert your hook into the next st, pull up a loop through the st and the first loop on your hook, 2 loops left on your hook, YO, insert your hook into the next st, pull up a loop through the st and the first loop on your hook, YO and pull through all the 3 remaining loops on your hook.

Gauge
Using H(5mm) hook, 13 hhdc= 4″
Crochet Pattern
Ribbing

Pattern Note
While working the ribbing, the first and the last sc are worked into both loops and the rest of the sts are worked into the back loop only.
With the smaller G hook, ch 13.
Row 1: 1 sc in 2nd ch from hook and each ch across to end, turn.——12 sc
Row 2: 1 sc in the same st as ch 1, 1 sc in the back loop only of the next 10 stitches, 1 sc in the last st, turn——— 12 sc
Repeat Row 2 until you have completed a total of 26 rows in total, do not fasten off.
Joining the Ribbing for Arm Warmers

Now fold the ribbing in the middle and slip stitch the 2 shorter ends together inserting your hook through the front loops of the stitches on your last row and the free loops on the very first row to form a circular band.
See Stitch’s explanation for working in front loops only. I got 13 ridges in the band including the ridge formed by slip-stitching the ends together. Do not fasten off.
The palm of the Arm Warmer
Pattern Note
1. The rest of the mittens is worked in the round
2. We will use a stitch marker to keep track of our rounds.
3. Each ridge on the ribbing is made up of 2 sc rows.
4. When working the first round of sc, if you see a hole, unravel the stitch and insert the hook a little deeper.

Round 1: Switch to the bigger H(5mm) hook, ch 1 (not counted as a st), working over the yarn tail, work a round of 26 sc by working 1 sc into each row end, sl st to the first sc. Do not turn. ——26 sc
Round 2: Ch 1 (does not count as a st), 1 hhdc in the same st as ch 1, 1 hhdc in each st across to the last st, hhdc2tog across the last st and the base of the beginning ch, do not sl st and do not turn.——–26 sts
Round 3: Directly work a hhdc in the next st, place a marker in this st to indicate the first st of the round, 1 hhdc in each st across to the marked st, do not sl st and do not turn.——26 sts
Round 4: Directly work a hhdc in the next marked st, move the marker up into the st you just made, 1 hhdc in each st across to the marked st, do not sl st and do not turn.——26 sts
Repeat Round 4 three more times. You will now have a total of 6 hhdc rounds.
Continue for Right Arm Warmer

Round 8: Directly work a hhdc in the next marked st, move the marker up into the st you just made, 1 hhdc in the next 16 sts, ch 4, sk 5 sts, 1 hhdc in remaining 4 sts to the marked st, do not sl st and do not turn.—–21 sts+ 4 chs
Round 9: Directly work a hhdc in the next marked st, move the marker up into the st you just made, 1 hhdc in the next 16 sts, (1 hhdc, hhdc2tog, 1 hhdc)all in the next ch-4 space, 1 hhdc in remaining 4 sts to the marked st, do not sl st and do not turn.——-24 sts
Round 10: Directly work a hhdc in the next marked st, move the marker up into the st you just made, 1 hhdc in each st across to the marked st, do not sl st and do not turn.——24 sts
Round 11: Repeat Round 10.
Round 12: Directly work a hhdc in the next marked st, move the marker up into the st you just made, 1 hhdc in the next 18 sts, hhdc2tog across the next 2 sts, hhdc in next st, 1 sc in next st, sl st in next st, sl st in the marked st, move the marker into the first sl st you made, sl st in each st across to marked sl st and trim your yarn. Pull the yarn tail out and finish with an invisible join to the first sl st. You can see how to work an invisible join here.
Continue for Left Arm Warmer
Round 8: Directly work a hhdc in the next marked st, move the marker up into the st you just made, 1 hhdc in the next 3 sts, ch 4, sk 5 sts, 1 hhdc in remaining 17 sts to the marked st, do not sl st and do not turn.—–21 sts+ 4 chs
Round 9: Directly work a hhdc in the next marked st, move the marker up into the st you just made, 1 hhdc in the next 3 sts, (1 hhdc, hhdc2tog,1 hhdc)all in the next ch-4 space, 1 hhdc in remaining 17 sts to the marked st, do not sl st and do not turn.——-24 sts
Round 10: Directly work a hhdc in the next marked st, move the marker up into the st you just made, 1 hhdc in each st across to the marked st, do not sl st and do not turn.——24 sts
Round 11: Repeat Round 10.
Round 12: Directly work a hhdc in the next marked st, move the marker up into the st you just made, 1 hhdc in the next 18 sts, hhdc2tog across the next 2 sts, hhdc in next st, 1 sc in the next st, sl st in next st, sl st in the marked st, move the marker into the first sl st you made, sl st in each st across to marked sl st and trim your yarn. Pull the yarn tail out and finish with an invisible join to the first sl st. You can see how to work an invisible join here.
Finishing the Arm Warmer Pattern
Weave in any tails left inside the crochet mittens and trim the excess yarn.