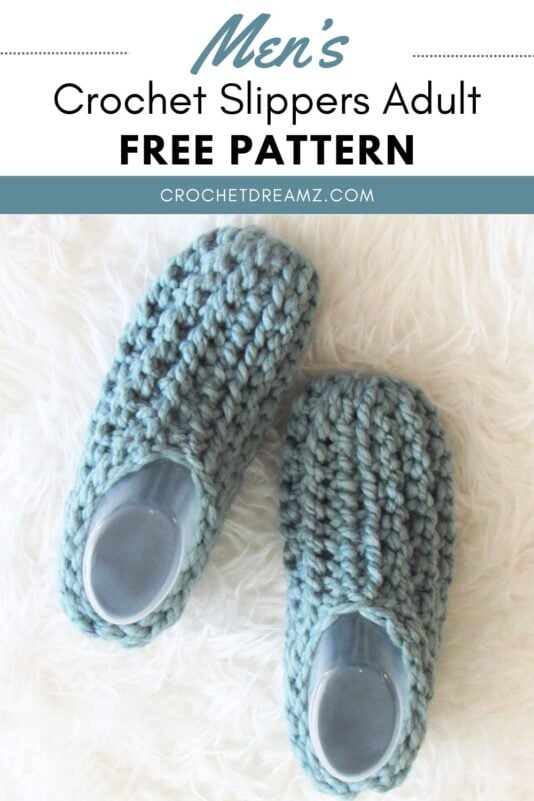
Crochet Men’s Slippers Free Pattern, Everyday Slippers
Free Crochet Men’s Slipper Pattern- You can make it in woman’s sizes too.

The idea for this slipper came from a knit slipper that I tried several years ago. I was working off a book and had no idea what I was making until I finished.

I was fascinated to see a flat piece turn magically into a slipper. It was probably a very common vintage pattern that was reinvented.

With its simple construction, beginner crocheters will find these easy crochet men’s slippers delightful. You can now make a pile of them as gifts.

These crochet men’s slippers free pattern was designed to have a knit look. The chunky yarn makes it so squishy and toasty that your men would want to wear them every day.

The pattern includes 8 sizes for men and even includes crochet men’s slippers size 13 and 14. Women’s come in 8 sizes ranging from 5 to 12.
So without further ado, let’s get making.
Crochet Pattern
Pin it for later
Materials
- Size 6 Super Bulky yarn. I used Lion Brand Wool-Ease Thick and Quick yarn
- A size N/P(10mm) crochet hook
- Tapestry needle to weave in the ends
Finished Sizes for Men’s Crochet Slippers
| US Shoe Size | Length of Rectangle | Width of Rectangle |
|---|---|---|
| 7 | 9-3/4" | 7" |
| 8 | 10-1/4" | 7-1/2" |
| 9 | 10-1/2" | 7-3/4" |
| 10 | 11" | 8" |
| 11 | 11-1/4" | 8" |
| 12 | 11-1/2" | 8-1/4" |
| 13 | 12" | 8-1/2" |
| 14 | 12-1/2" | 8-1/2" |
Finished Sizes for Woman’s Shoe
| US Shoe Size | Length of Rectangle | Width of Rectangle |
|---|---|---|
| 5 | 8-3/4" | 6-1/2" |
| 6 | 9-1/4" | 6-1/2" |
| 7 | 9-1/2 | 7" |
| 8 | 9-3/4" | 7" |
| 9 | 10-1/4" | 7-1/2" |
| 10 | 10-1/2" | 7-1/2" |
| 11 | 10-3/4" | 8" |
| 12 | 11-1/4" | 8" |
Stitch Abbreviations
ch- chain
sl st- slip stitch
BLO- back loop only
FLO- front loop only
Stitch Explanations

Sl st in the BLO( Slip Stitch in the Back Loop Only): Work a sl st inserting your hook just under the back loop of your stitch.
Sl st in the FLO( Slip Stitch in the Front Loop Only): Work a sl st inserting your hook just under the front loop of your stitch.
Gauge
8.5 sl sts alternating in FLO and BLO= 4 inches
If you cannot meet my gauge, try to switch hooks. The rectangle should be a 1/4 inch longer than your feet.
Yardage
Men’s Crochet Slipper Pattern Yardage
Sizes 7 and 8 take only 1 skein or less than 105 yards of super bulky weight yarn.
Sizes 9 to 14 take 1-1/2 skeins of Lion Brand Wool-Ease Thick and Quick. Sizes 9, 10 and 11 take around 120 yards and size 12, 13, and 14 take around 145 yards of super bulky yarn if you want to substitute with any other yarn brand.
Yardage for Woman’s Sizes
Sizes 5 to 9 take only 1 skein or less than 105 yards.
Sizes 10, 11, and 12 take a little more than one skein of Lion Brand Wool-Ease Thick and Quick or around 120 yards of super bulky yarn.
Pattern Notes
- Woman’s sizes are listed separately at the bottom.
- The slipper is made as a flat rectangle and then seamed into a slipper.
More slipper patterns
Slippers from a Rectangle Piece
Crochet Men’s Slippers Free Pattern
Pattern Notes
1. Stitch counts for different sizes are given in the order 7(8, 9, 10) (11, 12, 13, 14)
2. You should keep your sl sts loose. To work your sl st loose, pull up the loop on your hook to make it bigger before inserting your hook into the next st to work your sl st. After you do it intentionally a few times it will come naturally to you.
Chain 22(23, 24, 25) (26, 26, 27, 28) sl sts
Row 1: Sl st in the 2nd ch from hook and each ch across to end, turn. —–21(22, 23, 24) (25, 25, 26, 27) sl sts
For sizes 7, 9, 11, 12, and 14 only
Row 2: Ch 1(does not count as a st here and throughout), 1 sl st in the FLO of the first st, *(1 sl st in the BLO of the next st, 1 sl st in the FLO of the next st), repeat from * to end. Your last st will be a sl st in the FLO, turn.
Repeat Row 2 until the width is 7″ for size 7, 7-3/4″ for size 9, 8″ for size 11, 8-1/4″ for size 12, and 8-1/2″ for size 14. Do not fasten off. Proceed to ‘Shaping the Slipper’.
For Sizes 8, 10 and 13
Row 2: Ch 1(does not count as a st here and throughout), 1 sl st in the FLO of the first st, 1 sl st in the BLO of the next st, *(1 sl st in the FLO of the next st, 1 sl st in the BLO of the next st), repeat from * to end. Your last st will be a sl st in the BLO, turn.
Row 3: Ch 1(does not count as a st here and throughout), 1 sl st in the BLO of the first st, 1 sl st in the FLO of the next st, *(1 1 sl st in the BLO of the next st, 1 sl st in the FLO of the next st), repeat from * to end. Your last st will be a sl st in the FLO, turn.
Repeat rows 2 and 3 until the width is 7-1/2″ for size 8, 8″ for size 10, and 8-1/2″ for size 13. Do not fasten off. Proceed to ‘Shaping the Slipper’.
Shaping the Slipper
Shaping the Heel Side
Now fold the width of your rectangle in half, take the hook out of the loop, insert your hook through the opposite corner near you, grab the loop and pull through.

Now continue to sl st the 2 layers together going through the very edge of your work. Once you reach near the base, make 2 slanted sl sts to make the heel part curved and not pointy as shown in pic 2 above. Fasten off.
Shaping the Toe Side


Turn the slipper inside out so the back seam is now inside the slipper. Using a 1-1/2 yard strand of yarn and a tapestry needle, weave in and out along the very edge of the toe side as shown. Pull to gather. The tail on one side only needs to be 6-7″ and the remaining length should be on the other side. Make 2 tight knots to secure. See pics 3 and 4 above.

Weave in the shorter tail along the side of the slipper taking care not to pull on the toe side when weaving in (see pic 5 above). Now weave in the tails on the heel side as well or it will get difficult once the slipper is finished.
Weave it along the sides of the slipper and not along the bottom or you will feel the bulk when you walk.

Using the long tail left we will now seam the top shut ( see pic 6 above). Make whip sts going through the back loop of the last row and the free loop of the foundation chain side until you sew 2/3rd of the slipper shut. Make the last whip stitch going under both the loops of the last row and 2 loops on the foundation chain side( catch any extra loop), bring the yarn tail inside the slipper, make a couple of knots and weave in the tail along the top or side of the slipper.
Woman’s Pattern
Pattern Notes
1. Stitch counts for different sizes are given in the order 5(6, 7, 8) (9, 10, 11, 12)
2. You should keep your sl sts loose. To work your sl st loose, pull up the loop on your hook to make it bigger before inserting your hook into the next st to work your sl st. After you do it intentionally a few times it will come naturally to you.
Chain 20(21, 22, 22) (23, 24, 25, 26)
Row 1: Sl st in the 2nd ch from hook and each ch across to end, turn. ———-19(20, 21, 21) (22, 23, 24, 25)
For Sizes 5, 7, 8, 10, and 12
Row 2: Ch 1(does not count as a st here and throughout), 1 sl st in the FLO of the first st, *(1 sl st in the BLO of the next st, 1 sl st in the FLO of the next st), repeat from * to end. Your last st will be a sl st in the FLO, turn.
Repeat Row 2 until the width is 6-1/2″ for size 5, 7″ for size 7, 7″ for size 8, 7-1/2″ for size 10, and 8″ for size 12. Do not fasten off. Follow the same steps under ‘Shaping the Slipper’ for the Men’s slippers above.
For Sizes 6, 9, and 11
Row 2: Ch 1(does not count as a st here and throughout), 1 sl st in the FLO of the first st, 1 sl st in the BLO of the next st, *(1 sl st in the FLO of the next st, 1 sl st in the BLO of the next st), repeat from * to end. Your last st will be a sl st in the BLO, turn.
Row 3: Ch 1(does not count as a st here and throughout), 1 sl st in the BLO of the first st, 1 sl st in the FLO of the next st, *(1 1 sl st in the BLO of the next st, 1 sl st in the FLO of the next st), repeat from * to end. Your last st will be a sl st in the FLO, turn.
Repeat Row 2 until the width is 6-1/2″ for size 6, 7-1/2″ for size 9, and 8″ for size 11. Do not fasten off. Follow the same steps under ‘Shaping the Slipper’ for the Men’s slippers above.
2 More Versions for the slipper
Since these slippers were really easy to work, I made 2 more versions of them as shown below. These might take a little more yarn than the basic version.
Cuff Slipper

You can make your slipper a little more snug and taller by adding a few more rounds around the opening as follows.
Rnd 1: Sl st to the back of the opening, 1 sc in the same point, 1 sc in each st around. On the foundation chain side you will only have 1 loop to work into, so take care to catch an extra loop if it leaves any hole in your work. Do not sl st at the end of the round and do not turn.
Rnd 2: Sl st into the BLO of the first sc st, sl st into the BLO of each st around until you reach the back of the slipper where you started.
Rnd 3: Sl st into the BLO of the next sl st and each sl st until you reach the back of the slipper.
Repeat Rnd 3 once more, fasten off without a sl st, pull the yarn tail in through the next sl st, and weave in the end. Sew on a wooden button for embellishment.
Boot Version

Rnd 1: Sl st to the back of the opening, 1 sc in the same point, 1 sc in each st around. On the foundation chain side you will only have 1 loop to work into, so take care to catch an extra loop if it leaves any hole in your work. Sl st to the first sc, turn.
Rnd 2 & 3: Ch 1( does not count as a st here and throughout), 1 sc in the first st, 1 sc in each st across to end, sl st to first sc, turn.
Rnd 4: Ch 1( does not count as a st here and throughout), 1 sc in the first st, 1 sc in each st until you reach the right side of the slipper, 2 sc in the next st, 1 sc in each st until you reach the left side of the slipper, 2 sc in the next st, 1 sc in each st across to end, sl st to the first sc, turn.
Rnd 5 & 6: Ch 1( does not count as a st here and throughout), 1 sc in the first st, 1 sc in each st across to end, sl st to first sc, turn.
Rnd 7: Ch 1( does not count as a st here and throughout), 2 sc in the first st, 1 sc in each st across to end, sl st to first sc, turn.
Rnd 8 to 12: Ch 1( does not count as a st here and throughout), 1 sc in the first st, 1 sc in each st across to end, sl st to first sc, turn. Fasten off and weave in the ends after Rnd 12.
If you want to make your slipper taller, just keep repeating the last round.
Final Thoughts on Free Crochet Pattern for Men’s Slippers
This men’s slipper crochet pattern is a great project for gifts. You can whip them up in 1 to 1-1/2 hours depending on the size you are making.
You might also like these slipper patterns
Pin it for later: