Crochet Ribbed Beanie, Skater Beanie
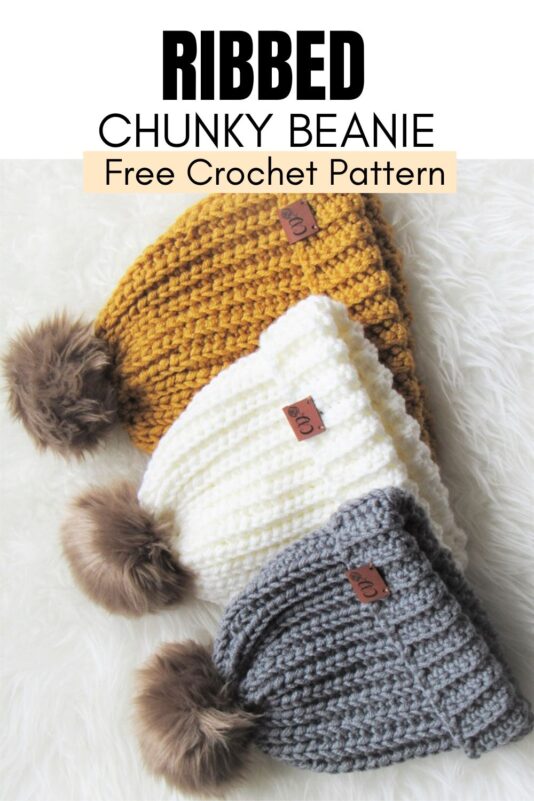
Chunky ribbed crochet hat pattern with a braided stitch.
This crochet ribbed beanie is NOT your average single crochet ribbed hat. It has a braided look that makes it unique.

Ribbed beanies are an all-time favorite that never goes out of style. The texture is classic and timeless.
Ribbed crochet hats like these are generally worked sideways, sewn into a tube, and gathered at the top making it the perfect crochet hat pattern for beginners.

The problem with that kind of shaping is your hat will have a lot of extra bulk at the top. So how did I fix it? After working the tube, I added a couple of rounds of sc to the crown before gathering it, easy peasy!

I am in love with how this hat sits on my head. It fits beautifully with no bulk on top which is rare for a bulky hat worked in rows.

This crochet ribbed beanie hat pattern includes multiple sizes and can be made for men or women, baby or child. Make one for every member of your family!
Crochet Ribbed Beanie
Materials
1. Lion Brand Color Made Easy yarn. It is a bulky size 5 yarn that is on the thinner side. I used colors Mineral yellow, Birch, and Medium Gray.
2. A size K(6.5mm) crochet hook.
3. Tapestry needle to weave in the ends.
4. Fur Pom Poms. You can learn to make your own fur pom poms here.
Crochet Ribbed Hat Sizes
| Size | Finished Height | Finished Width |
| Baby(6-12m) | 9-1/2″ | 7-1/4″ |
| Toddler | 10″ | 7-3/4″ |
| Child | 10-1/2″ | 8-1/2″ |
| Woman S/M | 11″ | 9″ |
| Woman L | 11″ | 9-1/4″ |
| Man | 11-1/2″ | 9-1/2″ |
Yardage
Every size from baby to Man can be made with just one skein of Color Made Easy yarn which comes in 247-yard skeins.
| Size | Yardage |
| Baby(6-12m) | 140 yards |
| Toddler | 160 yards |
| Child | 170 yards |
| Woman S/M | 200 yards |
| Woman L | 210 yards |
| Man | 220 yards |
Stitch Abbreviations
ch-chain
sc-single crochet
sl st– slip stitch
hslst– half double crochet slip stitch
YO-yarn over
BLO– back loop only
Stitch Explanations
1. Half double crochet slip stitch(hslst): YO, insert your hook into the next st, YO and pull through the stitch and the 2 loops on your hook. It is just like working a regular slip stitch but you YO before starting it.
2. Sc decrease(sc2tog): This is a decrease worked across 2 stitches to join them into one. To work a sc2tog, insert your hook into the st or space specified and pull up a loop, insert your hook into the next st or space specified and pull up a loop, YO and pull through all the 3 loops on your hook.
3. BLO(Back Loop only): Work in the BLO(Back Loop only) means you should work your stitch inserting your hook just under the back loop of the st and leave the front loop free. See pic.

Measuring Gauge
Pattern for Gauge Swatch
Row 1: Ch 17, 1 hslst in 2nd ch from hook and each ch across to end, turn.——-16 hslst
Row 2: Ch 1 (does not count as a st), 1 sc in BLO of first st and each st across to the end of the row, turn.——16 sc
Row 3: Ch 1 (does not count as a st), hslst in BLO of first st and each st across to end of the row, turn.
Repeat Rows 2 and 3 one more time and measure for gauge.
Gauge
12 hslst = 4 inches
Your work will have a braided design running along its length. You can count each unit of the braid as a hslst.
Related Crochet Patterns
Simple Crochet Beanie for Beginners
You might also like this crochet ribbed scarf
Ribbed Beanie Pattern-Body
Pattern Notes
1. Sizes Baby, Toddler, and Child are grouped together and sizes Woman’s S/M, Woman’s Large, and Man are grouped together.
2. Once you get through the first half of the pattern, the remaining steps are common for all the sizes. The heading will mention it when it is common for all sizes.
Sizes Baby, Toddler, and Child
Note: Stitch counts for the 3 sizes are given in the order Baby(Toddler, Child)
Ch 28(30, 31)
Row 1: 1 hslst in 2nd ch from hook and each ch across to end, turn.——-27(29, 30)hslst
Note: The sl sts in Row 2 and every repeat of Row 2 are regular sl sts and not hslsts.
Row 2: Ch 1 (does not count as a st), 1 sl st in BLO of the first st, 1 sl st in BLO of next 2(3, 3) sts, 1 sc in BLO of next st and each st across to last st, 1 sc into both loops of the braid pattern formed by the last st, turn.——3(4, 4) sl sts and 24(25, 26)sc sts
Row 3: Ch 1 (does not count as a st), hslst in BLO of first st and each st across to end of the row, turn.—–27(29, 30)hslst

Repeat Rows 2 and 3 until you complete a total of 43(45, 49) rows and your piece measures approximately 14-1/2(15-1/2, 17)inches wide at the base. Your last Row will be a hslsl row. The top will be tapering a little, so you should measure along the base as shown in pic 1 above.

If you have trouble counting the rows, know that the braid at the very edge where you have the beginning tail is your first row of hslst. The valleys between the braids is a sc row, and every braid line is a hslst row. See pic 2 above.
Your piece won’t look like a perfect trapezoid and that is perfectly fine. Once you seam and add rows to the crown it will get fixed and fit your head beautifully.
Jump to Seaming the Crochet Hat below.
Sizes Woman’s S/M, Woman’s Large and Man
Note: Stitch counts for the 3 sizes are given in the order Woman’s S/M(Woman’s Large, Man)
Ch 32(32, 33)
Row 1: 1 hslst in 2nd ch from hook and each ch across to end, turn.——-31(31, 32)hslst
Note: The sl sts in Row 2 and every repeat of Row 2 are regular sl sts and not hslsts.
Row 2: Ch 1 (does not count as a st), 1 sl st in BLO of the first st, 1 sl st in BLO of next 4(4, 5) sts, 1 sc in BLO of next st and each st across to last st, 1 sc into both loops of the braid pattern formed by the last st, turn.——5(5, 6) sl sts and 26(26, 26)sc sts
Row 3: Ch 1 (does not count as a st), hslst in BLO of first st and each st across to end of the row, turn.——-31(31, 32)hslst
Repeat Rows 2 and 3 until you complete a total of 53(55, 57) rows and your piece measures approximately 18(18-1/2, 19)inches wide at the base. Your last Row will be a hslsl row. The top will be tapering a little, so you should measure along the base (see pic 1 above)
If you have trouble counting the rows, know that the braid at the very edge where you have the beginning tail is your first row of hslst. The valleys between the braids is a sc row, and every braid line is a hslst row. See pic 2 above.
Your piece won’t look like a perfect trapezoid and that is perfectly fine. Once you seam and add rows to the crown it will fit your head beautifully.
Seaming the Crochet Hat -All Sizes

Fold the hat with the wrong side out. The wrong side is where you CANNOT see the braid pattern.
Your hook will now be at the crown part where your hat tapers, take your hook out of the loop, insert it through the corner of the foundation chain where you have the beginning tail, and grab and pull the loop through from the other side. You are now ready to sl st the sides together to form a tube.
You will work sl sts going through both the layers. For a seamless join, insert your hook under the free loops of the foundation chain and the BLO of the last row and complete a regular sl st. When you insert your hook through the foundation chain side you will dig a little deeper to go under 2 loops so that the hook emerges close to the braid on the right side. See pic 3 above.
Once you work sl sts through all the sts, make one last sl st at the end to finish your row. Fasten off.
Shaping the Crown-All Sizes
Note: We will now add a few sc decrease(sc2tog) rows to the top to shape our hat and avoid forming bulk at the top.
Round 1: Sl st to the top of the seam where you have the beginning tail, work a sc2tog across the seam, and the next braided line. When inserting your hook through the braided line, insert your hook into the first braid design. If you go through the very edge, it will leave holes.
Continue to work sc2tog across the end of each valley(sc row) and each braid(hslsl row) across to end, sl st to the first sc, do not turn.
Round 2: Ch 1(does not count as a st), *(sc2tog across next 2 sts, 1 sc in next st), repeat from * to end, sl st to first sc, do not turn. Fasten off with a long tail if you are making the baby or Toddler size and proceed to Gathering the Hat below.
Round 3(Only for sizes Child and Up): Repeat Round 2 to taper your hat even more. Fasten off with a long tail.
Gathering the Hat-All Sizes
Thread the tail through a yarn needle and working inside the hat, go in and out through the top edge of the hat, pull to gather, knot to secure, and weave in the ends.
Finishing the Crochet Ribbed Hat-All Sizes
I bet you will agree that this free crochet ribbed beanie pattern is not only fun to work, but will also look great on your head. Weave the tails left on the crown area into the wrong side or inside of your hat. As for the tail left near the brim, you should weave this in along the right side along the bottom 1-1/2 inches. Why? Because once you fold the brim up it will be the wrong side that shows outside. Attach the fur pom poms to your hat for embellishment. You can watch a video below.
Pin it for later here:
Related Simple Crochet Hat Patterns
Slouchy Crochet Beanie Pattern


How would you compensate to make this using Lion Brand super bulky (6)? Wanted to use Wool-Ease Thick & Quick.
Definitely chain less and use a big hook. How much? That would depend on your gauge.
I really love your detailed descriptions and diagrams. So very helpful! All my questions have been answered. Thank you so much!
For the gauge you said 12 hslst is 4 inches?? I did 3 and it’s already 2 inches! (I did rows 1-3 of the gauge and then repeated row 2&3 once). Am I doing something wrong or just need to change my hook size?
Might be just your gauge or the thickness of your yarn. Yes, switching hooks will help.
Hi. My finished hat twists/pulls in one direction. So the rows are slanted. Im not sure why.
Sl stitch patterns generally have a tendency to do that especially if you slip stitch tight. Try to block it gently before you seam it.
Very nice I love it I am making my second one now thank you