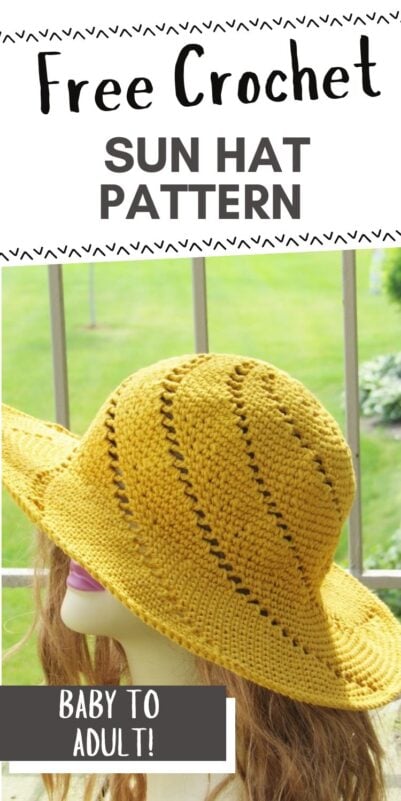
Simple Crochet Summer Hat, Sunsational Sun Hat
Free crochet summer hat pattern for adults- make a statement!


Simple Crochet Summer Hat Pattern
Materials
1. Worsted weight (Size 4) cotton yarn. Bernat Handicrafter Cotton Delux yarn in colors Olive and Seaspray were used for the samples.
2. Hook – 4.5 mm
3. 1 1/2 yards Millinery wire of gauge 19 and a Joiner. The brim holds up well even without the wire if you make a brim up to 3 ½ inches wide, but adding the wire is recommended. You can purchase the wire and joiner here: www.judithm.com
4. A pair of pliers if using the wire.
5. Yarn needle to weave in the ends.
Size


Baby (6-12 Months): 16 ½ inch circumference and 6 inches high
Toddler- 18-inch circumference and 6 ½ inches high
Child – 19 ½ inch circumference and 7 inches high
Adult – 21 ½ inch circumference and 7 ½ inches high
Gauge
You will start working the pattern and measure the diameter of your circle after round 9. It should be 5 1/2 inches. The pattern for each size also mentions the diameter after the last increase round for the crown. Use any size hook to attain gauge.
Yardage
230 yards for size Baby and Toddler
280 yards for sizes Child and Adult.
Stitch Abbreviations
The pattern is written in standard American terms.
st- stitch
sc- single crochet
sl st- slip stitch
ch- chain
sk- skip
You might also like these summer hat patterns:
Summer Hat Crochet Pattern
Pattern Notes
1. Make the number of rounds specified for each size and check your gauge.
2. The hat is worked without turning at the end of rounds.
3. Starting from Round 4 you place a marker in the first stitch of each round.
Round 1: Make a magic circle, ch 1, work 7 sc into the circle, pull yarn tail to close the hole, sl st to the first sc.. ——-7 sc
Round 2: *(Ch 3, 1 sc in next sc), repeat from * a total of 7 times. Your last sc will be in same st as the beginning ch-3.——7 loops
Round 3: *(1 sc into the next loop, ch 3, 1 sc in next sc ), repeat from * a total of 7 times——7 loops
Note: The st you skip in the following rounds will be squished and continuous with the ch-3 preceding it.
Round 4: 1 sc in next st, place a marker in this st to indicate the beginning of the round, *(2 sc into the next loop, ch 3, sk the next st, 1 sc into next st ), repeat from * until you end with a sc in the marked st, remove the marker.——–3 sc in each of the sc patches

Round 5: 1 sc in next st, mark this st to indicate the first stitch of the round, 1 sc in next st, *( 2sc into the next loop, ch 3, sk next st, 1 sc in next 2 sts), repeat from * until only 1 ch loop is left, 2 sc into the loop, ch 3, sk next st, 1 sc into the marked st, remove the marker. ——–4 sc in each of the sc patches
Round 6: 1 sc in next st, mark this st, 1 sc in next 2 sts, *( 2sc into the next loop, ch 3, sk next st, 1 sc in next 3 sts), repeat from * until only 1 ch loop is left, 2 sc into the loop, ch 3, sk next st, 1 sc into the marked st, remove the marker. ————-5 sc in each of the sc patches
Round 7: 1 sc in next st, mark this st, 1 sc in next 3 sts, *( 2sc into the next loop, ch 3, sk next st, 1 sc in next 4 sts), repeat from * until only 1 ch loop is left, 2 sc into the loop, ch 3, sk next st, 1 sc into the marked st, remove the marker. ————-6 sc in each of the sc patches
Round 8: 1 sc in next st, mark this st, 1 sc in next 4 sts, *( 2sc into the next loop, ch 3, sk next st, 1 sc in next 5 sts), repeat from * until only 1 ch loop is left, 2 sc into the loop, ch 3, sk next st, 1 sc into the marked st, remove the marker. ————-7 sc in each of the sc patches
Round 9: 1 sc in next st, mark this st, 1 sc in next 5 sts, *( 2sc into the next loop, ch 3, sk next st, 1 sc in next 6 sts), repeat from * until only 1 ch loop is left, 2 sc into the loop, ch 3, sk next st, 1 sc into the marked st, remove the marker. ————-8 sc in each of the sc patches
Your circle should measure 5 1/2 inches in diameter now. For size Baby, stop here and jump to “Side of the Hat” below.
Round 10: 1 sc in next st, mark this st, 1 sc in next 6 sts, *( 2sc into the next loop, ch 3, sk next st, 1 sc in next 7 sts), repeat from * until only 1 ch loop is left, 2 sc into the loop, ch 3, sk next st, 1 sc into the marked st, remove the marker. ————-9 sc in each of the sc patches
Your circle should measure 6 inches in diameter now. For size Toddler, stop here and jump to “Side of the Hat” below.
Round 11: 1 sc in next st, mark this st, 1 sc in next 7 sts, *( 2sc into the next loop, ch 3, sk next st, 1 sc in next 8 sts), repeat from * until only 1 ch loop is left, 2 sc into the loop, ch 3, sk next st, 1 sc into the marked st, remove the marker. ————-10 sc in each of the sc patches
Your circle should measure 6 1/2 inches in diameter now. For size Child, stop here and jump to “Side of the Hat” below.
Round 12: 1 sc in next st, mark this st, 1 sc in next 8 sts,*( 2sc into the next loop, ch 3, sk next st, 1 sc in next 9 sts), repeat from * until only 1 ch loop is left, 2 sc into the loop, ch 3, sk next st, 1 sc into the marked st, remove the marker. ————-11 sc in each of the sc patches
Your circle should measure 7 inches in diameter now. For size Adult, stop here and jump to “Side of the Hat” below.
Side of the Hat ( All Sizes)
Notes
1. The decreases are intentionally staggered to give a smoother finish.
2.The stitch counts at the end of the rounds will remain the same until the brim starts. The decreases only cancel out the increases that are automatically added due to the nature of the stitch pattern.
3. Stitch counts for bigger sizes are given in brackets in the order Baby (Toddler, Child, Adult)
Round 10 (11, 12, 13): 1 sc in next st, place a marker in this st, 1 sc in next 3 (1, 4, 4) sts, sc2tog, 1 sc in next 1 ( 4, 2, 3) sts, *[ 2sc into the next loop, ch 3, sk next st, 1 sc in next 4 (2, 5, 5) sts, sc2tog, 1 sc in next 1 (4, 2, 3)sts ], repeat from * until only 1 ch loop is left, 2 sc into the loop, ch 3, sk next st, 1 sc into the marked st, remove the marker. ————-8 (9, 10, 11) sc in each of the sc patches
Note: For Baby size, 1 sc in next “0” st means you skip that step and directly work sc2tog.
Round 11 (12, 13, 14): 1 sc in next st, place a marker in this st, 1 sc in next 0 ( 4, 1, 1) sts, sc2tog, 1 sc in next 4 (1, 5, 6) sts, *[ 2sc into the next loop, ch 3, sk next st, 1 sc in next 1 (5, 2, 2)sts, sc2tog, 1 sc in next 4 (1, 5, 6) sts], repeat from * until only 1 ch loop is left, 2 sc into the loop, ch 3, sk next st, 1 sc into the marked st, remove the marker. ————-8 (9, 10, 11) sc in each of the sc patches
Keep repeating the above 2 rounds until your hat is 6 (6 1/2, 7, 71/2) inches tall and proceed to make the brim.
Adding the Brim
Notes
1. Work the brim with a tight gauge.
2. In the next round, 2 increases will be added to each sc patch. One of the increases will be added automatically due to the stitch pattern.
Round 1: 1 sc in next st, place a marker in this st, 1 sc in next 2 ( 3, 3, 4) sts, 2sc in next, 1 sc in next 3 ( 3, 4, 4) sts,*[ 2sc into the next loop, ch 3, sk next st, 1 sc in next 3 ( 4, 4, 5) sts, 2sc in next, 1 sc in next 3 (3, 4, 4 )sts], repeat from * until only 1 ch loop is left, 2 sc into the loop, ch 3, sk next st, 1 sc into the marked st, remove the marker.————-10 (11, 12, 13) sc in each of the sc patches.
Round 2: 1 sc in next st, place a marker in this st, 1 sc in each sc until you reach the next ch loop, *( 2sc into the loop, ch 3, sk next st, 1 sc in each st until you reach the next ch loop), repeat from * until only 1 ch loop is left, 2 sc into the loop, ch 3, sk next st, 1 sc into the marked st, remove the marker.———11( 12, 13,14) sc in each of the sc patches
For a 3 ½ inch brim, repeat Round 2, 9 more times, sl st to the next st, and fasten off. The number of sts in each sc patch will go up by 1 every round. ——– 20 (21, 22, 23) sc in each sc patch
For a 4 inch brim, repeat Round 2, 11 more times, sl st to the next st, and fasten off. The number of sts in each sc patch will go up by 1 every round.——— 22 (23, 24, 25) sc in each sc patch
Adding Wire to the Brim

Notes
1. Before adding the wire, gently steam iron the crown part of your hat once along the direction of the spiral as shown in pic above. This will make it more even. Ensure that you keep the holes wide while ironing and do not iron the brim part. Do not keep repeating the process or your hat will become loose. Use steam iron only if your yarn is 100% cotton.
2. All the stitches of the following round are worked encircling the wire. If you don’t plan to add wire to the brim, just follow the same pattern without the wire.

Sl st yarn to the left side of a sc patch. Place the wire near the sl st, leaving about 2 ½ to 3 inches free. It should extend beyond the middle of the sc patch, see Pic 5 above. Work sc sts encircling the wire until you reach the next ch loop, *(2 sc into the ch loop, sk next st, 1 sc in each sc across until you reach the next ch loop), repeat from * until you have about 2 inches of the brim left.


Use your hands to even out the stitches on the wire brim. Using a pair of pliers, cut the wire on the right side at the level of the middle of the sc patch, see Pic 6. Peel the rayon covering and insert the joiner as shown in pic 7 above.


Now trim the wire on the left side leaving just enough to be inserted into the joiner, a little more than ½ inch, Pic 8. Insert it into the joiner and crimp the joiner on both sides with the plier so the wire ends won’t come out. Crochet over the joint until you reach the first sc, sl st to 1st sc. Fasten off.
Crochet Summer Hat Pattern- Finishing
Weave in any tails left. I hope you will enjoy making this lovely crochet summer hat for women this summer.
Pin it for later here:
Related Crochet Summer Hat Patterns
Free crochet sun hat pattern, Lady Jane sun hat


