
Free Crochet Scarf Pattern, Rose Petals Scarf
I had accidentally published this crochet scarf pattern yesterday while editing it. I apologize if any emails were accidentally sent to whoever is following me.


This crochet scarf is designed with the same 3D stitch as the Falling petals Afghan, The Rose Petals Scarf! All of you loved the stitch, so I decided to design another project with it. I hope you like it.


This one is a triangle scarf. If anyone is interested in an infinity scarf in the same stitch pattern, just let me know. I will be happy to write it up.
The Design Process
I did not want to make a regular scarf with this stitch as I thought it could look like a blanket wrapped around your neck. So I decided to go for a triangle scarf on which the texture would look great.
Converting the stitch pattern into a triangle wasn’t that hard but once my triangle grew, I hit a roadblock. It was getting too long but not wide enough to wrap around your neck.
I first thought I might have to turn it into a triangle cowl but then it struck me! You will find out how I worked around this when you make the scarf :). Enjoy!
You can pin it for later here.
More Scarf Patterns
Free Crochet Scarf Pattern with Pockets
Crochet Scarf Pattern
Materials
-
Worsted weight yarn. I used Lion Brand Wool-Ease in color Gold.
-
Hook H(5 mm).
-
Tapestry needle to weave in the ends.
-
A piece of cardboard to make tassels.
Finished Size
The triangle is 55 inches wide and 25 inches high.
Gauge
6 Pattern Repeats= 7 inches
Yardage
Around 700 Yards including the tassels
Stitch Abbreviations
ch-chain
dc-double crochet
fpdc-front post double crochet
Stitch Explanations
V st: (1 dc, ch 2, 1 dc) worked into the same st.
Shell St: (3 dc, ch 2, 3dc) worked into the same ch-2 space.
Front post double crochet (fpdc): You can see a tutorial here.
Pattern

Row 1: Ch 5 (counts as 1 dc+2 ch here), 1 dc in the 5th ch from hook. ——1 V-st

Row 2: Ch 3 (counts as a dc here and throughout), shell into the ch space of the V-st, 1 dc into the same ch space.——–1 Shell+ 2 dc

Note: For the following V- st rows, instead of working a beginning ch 3 for a dc, a ch 4 is worked as that seemed better for the drape of the scarf.
Row 3: Ch 6( counts as 1 dc and ch 2 here and throughout), 1 dc in the same st as ch 6 (first V-st made), 1 V-st in the ch-2 space of the shell, 1 V-st on top of beginning ch-3, turn. ——-3 V-sts

Row 4: Ch 3 (counts as a dc here and throughout), shell in the next ch-2 space, 1 fpdc in the next dc (the second leg of the V-st), 1 fpdc in the next dc, shell in the next ch-2 space, 1 fpdc in the next 2 dc, shell in the next ch-2 space, 1 more dc into the same ch-2 space, turn.——– 3 Shells

Row 5: Ch 6, 1 dc in the same st as ch 6 ( first V-st made), 1 V-st in the ch-2 space of the next shell and each shell across to end, 1 V-st on top of beginning ch-3. You will be skipping a lot of stitches to work your V’s and that is what makes your shell stitches pop and look like petals.———5 V-sts
Row 6: Ch 3, shell in the next ch-2 space, 1 fpdc in the next dc (the second leg of the V-st), *(1 fpdc in the next dc, shell in the next ch-2 space, 1 fpdc in the next dc), repeat from * until 1 V-st is left, 1 fpdc in next dc, shell in the next ch-2 space, 1 more dc into the same ch-2 space, turn.——– 5 Shells
Repeat Rows 5 and 6 until you have completed 17 shell rows or total 34 rows. The number of V-sts and shells will increase by 2 every row.


Note: In the next row, you will add an extension to both ends of the triangle. This is to add to the width of the triangle without adding more height.
Row 35: Ch 14, 1 dc in 7th ch from hook (1 V-st made), sk 3 ch, V- st in next ch, sk 3 ch, 1 V-st in the first dc, 1 V-st in the ch-2 space of the next shell and each shell across to end, 1 dc on top of beginning ch-3, ch 5, sl st to the top of the beginning ch-3 at the same point where your worked the dc, see pic 7 above ( a V-st completed with working yarn at base of the V-st), ch 14, turn, work 1 dc in 7th ch from hook (1 V-st made), sk 3 ch, V- st in next ch, sk 3 ch, sl st to the top of the ch-3 of the next V-st (Pic 8), do not turn, fasten off.———39 V-sts

Row 36: Working on the same side, sl st into the first V-st, ch 3 (counts as a dc), shell in ch-space of the V-st, 1 fpdc in next dc, *(1 fpdc in the next dc, shell in the next ch-2 space, 1 fpdc in the next dc), repeat from * until 1 V-st is left, 1 fpdc in next dc, shell in the next ch-2 space, 1 more dc into the same ch-2 space, turn. ———-39 shells
Repeat Rows 35 and 36 one more time. ——45 shells
Row 39: Ch 3, 1 V-st in the ch-2 space of the next shell and each shell across to end, 1 dc on top of beginning ch 3.——–45 V-sts +2 dc
Row 40(Last Row): ch 1, 1 sc in the same st as ch 1, 4 sc into the ch-2 space of each V-st across to end, 1 sc on top of beginning ch-3, fasten off.
Making the Tassels


Finishing
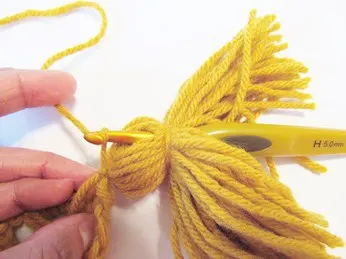
2. Attach the tassels to the three corners. Use the tails left to tie them on to the scarf, pull the tails through the tassel and then trim it to the size of the rest of the strands.
You can find another one of my popular scarf patterns made from Caron Cakes here.
Pin it for later:


This is such a nice scarf. I love the texture. Will definitely give it a try this season. Thank you for sharing!! x
You are very welcome, Ivonne. I am glad you like it.
Love this! I would love to know how to make it into an infinity scarf! Also any tips you have for adapting this stitch into other kinds of pieces. I just love the texture!
What a lovely scarf. I love the stitch that you used. Thanks for sharing your talents with us. I hope to make some very soon.
Thank you, I am glad you like the scarf.
I have included this lovely textured shawl on my To Do list (which is rather lengthy right now), so maybe next year.
Thank you, I am glad you like it.
GORGEOUS! 😍 How many yards/skeins of yarn did you use?
It took me about 700 yards of yarn.
Is there a video tutorial for this? I’m not really good at reading patterns, but can follow a video!
Thank you for your interest in my designs. I plan to record one in the future but it might take me a while as I am busy with writing and testing other patterns.
Thank you. We do look forward to a video tutorial. Please 🙂
I prefer infinity scarves to triangular ones. How can I get the pattern?
I will be publishing an infinity scarf in this same stitch in a week or two.
I purchased this beautiful pattern, and I’m making it now. I’m using a “thinner” worsted weight yarn and I’ve had to go beyond the 34 rows to make it big enough. My question is, the pattern says the finished size is 25″ high- does that include the tassel? I’m at 21″ now…
No, it does not include the tassel.
When I made this scarf it was to short idk what I did wrong
Did you check your gauge? You should have gone up a hook size or two. Alternatively, you could also have repeated the rows to make it bigger.
I figured out what I did wrong
Sam, can I ask what you figured out for the shortness? Mine is coming out short also. Thanks
Rose
Hi there! The note below confused me where it says “either”. Do we not extend both sides?
Note: In the next row, you will add an extension to either side of the triangle. This is to add to the width of the triangle without adding more height.
I am sorry for the confusion. Yes, you extend both sides. I have edited the sentence now.
I would love the infinity scarf pattern please,
I published the infinity scarf pattern last week :). You can find it here: https://crochetdreamz.com/crochet-cowl.html