
Free Crochet Scarf Pattern, Rose Petals Scarf
I had accidentally published this crochet scarf pattern yesterday while editing it. I apologize if any emails were accidentally sent to whoever is following me.


This crochet scarf is designed with the same 3D stitch as the Falling petals Afghan, The Rose Petals Scarf! All of you loved the stitch, so I decided to design another project with it. I hope you like it.


This one is a triangle scarf. If anyone is interested in an infinity scarf in the same stitch pattern, just let me know. I will be happy to write it up.
The Design Process
I did not want to make a regular scarf with this stitch as I thought it could look like a blanket wrapped around your neck. So I decided to go for a triangle scarf on which the texture would look great.
Converting the stitch pattern into a triangle wasn’t that hard but once my triangle grew, I hit a roadblock. It was getting too long but not wide enough to wrap around your neck.
I first thought I might have to turn it into a triangle cowl but then it struck me! You will find out how I worked around this when you make the scarf :). Enjoy!
You can pin it for later here.
More Scarf Patterns
Free Crochet Scarf Pattern with Pockets
Crochet Scarf Pattern
Materials
-
Worsted weight yarn. I used Lion Brand Wool-Ease in color Gold.
-
Hook H(5 mm).
-
Tapestry needle to weave in the ends.
-
A piece of cardboard to make tassels.
Finished Size
The triangle is 55 inches wide and 25 inches high.
Gauge
6 Pattern Repeats= 7 inches
Yardage
Around 700 Yards including the tassels
Stitch Abbreviations
ch-chain
dc-double crochet
fpdc-front post double crochet
Stitch Explanations
V st: (1 dc, ch 2, 1 dc) worked into the same st.
Shell St: (3 dc, ch 2, 3dc) worked into the same ch-2 space.
Front post double crochet (fpdc): You can see a tutorial here.
Pattern

Row 1: Ch 5 (counts as 1 dc+2 ch here), 1 dc in the 5th ch from hook. ——1 V-st

Row 2: Ch 3 (counts as a dc here and throughout), shell into the ch space of the V-st, 1 dc into the same ch space.——–1 Shell+ 2 dc

Note: For the following V- st rows, instead of working a beginning ch 3 for a dc, a ch 4 is worked as that seemed better for the drape of the scarf.
Row 3: Ch 6( counts as 1 dc and ch 2 here and throughout), 1 dc in the same st as ch 6 (first V-st made), 1 V-st in the ch-2 space of the shell, 1 V-st on top of beginning ch-3, turn. ——-3 V-sts

Row 4: Ch 3 (counts as a dc here and throughout), shell in the next ch-2 space, 1 fpdc in the next dc (the second leg of the V-st), 1 fpdc in the next dc, shell in the next ch-2 space, 1 fpdc in the next 2 dc, shell in the next ch-2 space, 1 more dc into the same ch-2 space, turn.——– 3 Shells

Row 5: Ch 6, 1 dc in the same st as ch 6 ( first V-st made), 1 V-st in the ch-2 space of the next shell and each shell across to end, 1 V-st on top of beginning ch-3. You will be skipping a lot of stitches to work your V’s and that is what makes your shell stitches pop and look like petals.———5 V-sts
Row 6: Ch 3, shell in the next ch-2 space, 1 fpdc in the next dc (the second leg of the V-st), *(1 fpdc in the next dc, shell in the next ch-2 space, 1 fpdc in the next dc), repeat from * until 1 V-st is left, 1 fpdc in next dc, shell in the next ch-2 space, 1 more dc into the same ch-2 space, turn.——– 5 Shells
Repeat Rows 5 and 6 until you have completed 17 shell rows or total 34 rows. The number of V-sts and shells will increase by 2 every row.


Note: In the next row, you will add an extension to both ends of the triangle. This is to add to the width of the triangle without adding more height.
Row 35: Ch 14, 1 dc in 7th ch from hook (1 V-st made), sk 3 ch, V- st in next ch, sk 3 ch, 1 V-st in the first dc, 1 V-st in the ch-2 space of the next shell and each shell across to end, 1 dc on top of beginning ch-3, ch 5, sl st to the top of the beginning ch-3 at the same point where your worked the dc, see pic 7 above ( a V-st completed with working yarn at base of the V-st), ch 14, turn, work 1 dc in 7th ch from hook (1 V-st made), sk 3 ch, V- st in next ch, sk 3 ch, sl st to the top of the ch-3 of the next V-st (Pic 8), do not turn, fasten off.———39 V-sts

Row 36: Working on the same side, sl st into the first V-st, ch 3 (counts as a dc), shell in ch-space of the V-st, 1 fpdc in next dc, *(1 fpdc in the next dc, shell in the next ch-2 space, 1 fpdc in the next dc), repeat from * until 1 V-st is left, 1 fpdc in next dc, shell in the next ch-2 space, 1 more dc into the same ch-2 space, turn. ———-39 shells
Repeat Rows 35 and 36 one more time. ——45 shells
Row 39: Ch 3, 1 V-st in the ch-2 space of the next shell and each shell across to end, 1 dc on top of beginning ch 3.——–45 V-sts +2 dc
Row 40(Last Row): ch 1, 1 sc in the same st as ch 1, 4 sc into the ch-2 space of each V-st across to end, 1 sc on top of beginning ch-3, fasten off.
Making the Tassels


Finishing
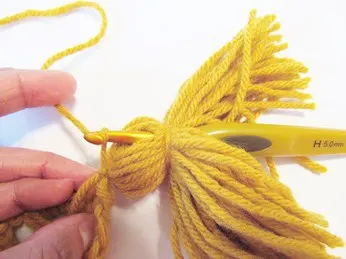
2. Attach the tassels to the three corners. Use the tails left to tie them on to the scarf, pull the tails through the tassel and then trim it to the size of the rest of the strands.
You can find another one of my popular scarf patterns made from Caron Cakes here.
Pin it for later:
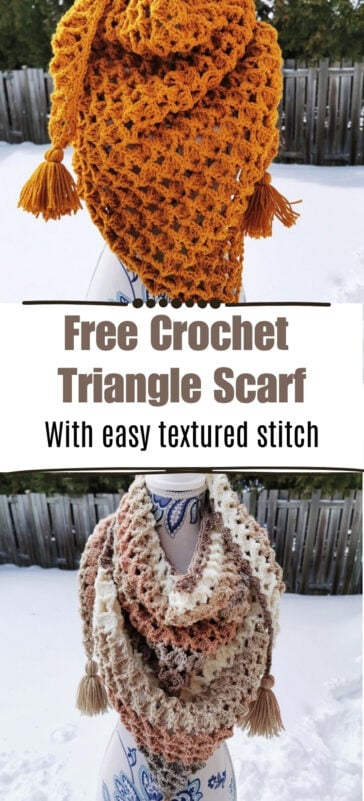




I would love to have this stitch as an infinity scarf. Have you written this up as one yet?
Yes, it is already on my blog. You can find it here: https://crochetdreamz.com/crochet-cowl.html
I’m having a problem with row 2-3. Do you have a video tutorial?
I have just finished crocheting three of these scarves in three different colours…for my sisters. Your pattern is so easy to follow and the scarf falls so beautifully when draped around the neck. Your instructions are beautifully and consisely written. Thanks so much… more please!
Hi Barbara, I am really glad to hear this. Thank you so much for leaving your feedback. You just made my day :).
Is there any way possible to complete this pattern using multiple colors?
Absolutely! You can change colors at the end of the rows or use a variegated yarn.
Also, will this pattern work if I use 4 medium yarn?
Never mind figured it out
I just finished the 17th Shell row and from top to bottom I am getting 16 and a 1/2 in. Do I just keep adding shell and V’s until I get the right height? And how would this affect the extensions on the side? Would I need to make them bigger? I really don’t want to have to start over
Yes, you can repeat the shell and V-st rows to get the right height. The way the pattern is written, adding the extension shouldn’t be a problem. The extension has 2 shell rows, so take into account the height that will be added by the extension.
Thanks so much!
please do a you tube video
very pretty pattern! it would be great if it comes with a video demonstration. Thank you.
Love this scarf! Mine is working up beautifully. Question – did you block? Thanks again!
No, I did not block mine.
Hello, are you able to send me a link for your infinity scarf. For some reason I can’t find it anymore, I had it last time on my phone but I lost it. Thank you in advance. This is a great pattern!
Here it is: https://crochetdreamz.com/crochet-cowl.html
Thank you for this wonderful pattern!! I am working on my second scarf because this is the most satisfying mindless pattern I’ve ever tried. The scarf works up quickly and the stitch is beautiful, it boggles my mind that the stitch repeat is so simple. A great project to do while watching tv !!!