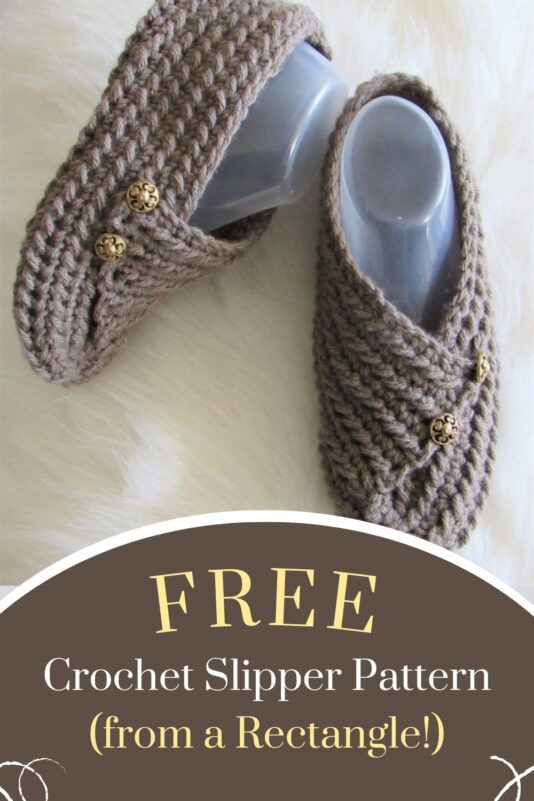
Crochet Slippers Free Pattern with Video, Magic Slippers
This crochet slippers free pattern is shaped from a simple rectangle. The transformation is almost magical and hence the name Magic Slippers.

These slippers are really easy and beginner-friendly, no increasing or decreasing. Once you repeat two rows to make a rectangle, all you have to do is fold and shape the slippers.


I was inspired by knit slippers I saw on YouTube, but I honestly didn’t expect it to turn out looking so good. I think the ribbing effect of the stitch makes all the difference and adds the much-needed pizzazz to this simple design.

When you try this crochet slippers free pattern, you will also learn a new stitch called the half double crochet slip stitch. I have included a video at the end of the blog post to make it easy for visual learners.

Crochet Slippers Free Pattern
Note: There is a full video tutorial at the end of this blog post.
Materials
1. Size 4 worsted weight yarn. Loops and Threads Impeccable yarn in colors Putty and Barley were used for the sample slippers.
2. Size J(6mm) hook
3. Tapestry needle to weave in the end and shape the slippers
4. Four 3/4-inch metal buttons for embellishment
The plastic feet can be purchased from my affiliate link here: https://amzn.to/3hzGsiW
You can read my full Disclosure Policy here.
Finished Size
Note: Sizes are based on US shoe sizes.
Size 5: 8-1/4 inches long
Size 6: 8-3/4 inches long
Size 7: 9 inches long
Size 8: 9-1/4 inches long
Size 9: 9-3/4 inches long
Size 10: 10 inches long
Yardage
Around 160-200 Yards depending on the size you are making.
Stitch Abbreviations
ch-chain
sc-single crochet
hslst- half double crochet slip stitch
YO-yarn over
Gauge
12.5 hslst= 4 inches
Stitch Explanations
Half double crochet slip stitch(hslst): YO, insert your hook into the next st, YO and pull through the stitch and the 2 loops on your hook. You can watch the video at the end of this post.
Crochet Pattern
Note: Stitch counts are given in the order Size 5(6, 7, 8, 9, 10). Alternate numbers have been highlighted for ease.
Ch 26(27, 28, 30, 32, 33)
Row 1: 1 sc in 2nd ch from hook and each ch across to end, turn.——-25(26, 27, 29, 31, 32) sts
Row 2: Ch 1 (does not count as a st here and throughout), hslst in same st as ch 1, hslst in each st across to end, turn.—–25(26, 27, 29, 31, 32) sts
Row 3: Ch 1 (does not count as a st here and throughout), 1 sc in same st as ch 1, 1 sc in each st across to end, turn.——-25(26, 27, 29, 31, 32) sts
Keep repeating Rows 2 and 3 until your rectangle measures 8( 8, 8-1/2, 8-1/2, 9, 9) inches, fasten off with a 1-1/2 yard tail for sewing.
Shaping the Crochet Slippers

Pattern Notes
- The side where you have 2 tails hanging will form the ankle side and the opposite side will form the toe side.
- The textured side is the right side of the slipper.
Left Slipper- Cinching Toe Side
Note: You can see the video given at the end.
Keep the rectangle textured side up. The toe side should be at the top.

For the left slipper, from the right edge, fold in a little more than 1/3rd of the rectangle and place a marker. Open the fold, use a 2-yard strand of yarn and make a running stitch along the very edge of the marked part taking care to catch only one loop.
Pull both ends to cinch. Do not cinch too tight or you will feel a lump in your slipper. Tie both ends to hold it in place and sew any opening shut working through the very edge and catching only 1 loop at a time, knot to secure.
Sew back to get your yarn near the marker, do not trim the excess yarn. We will come back to this part later after sewing the ankle side.
Right Slipper-Cinching Toe Side
Keep the rectangle textured side up. The toe side should be at the top.

For the right slipper, from the left edge, fold in a little more than 1/3rd of the rectangle and place a marker. Cinch the left side this time and seam it just like you did with your left slipper.
Seaming the Ankle- Left and Right Slippers


Note: When you seam the ankle side or the back of your slipper, the seam will be worked 1/2 inch inwards along the top half to make it snug.
Fold the ankle side in the middle, align the top edges, using the yarn tail left, start seaming the ankle working 1/2 inch inside, work along a slanting line to hit the middle, and from there work along the very edge to join the 2 layers.
Make a couple of knots. The ankle seam will be a little to the side because of the way these slippers are shaped.
Closing the Toe Side- Left and Right Slipper
Turn the slipper right side out. The flap will fold to the right for the right slipper and to the left for the left slipper.
Now insert your foot into the slipper. If you are making it for someone else and the slipper is too small to fit, just insert the front of your foot.

Fold the flap over as far as possible and sew in place using the yarn tail left at the toe side. You can use a running stitch. Since tapestry needle is blunt you don’t have to worry about poking your foot.
Finishing the Crochet Slipper
1. Sew on 2 or 3 buttons to the edge of the flap for embellishment. Repeat with the other slipper.
2. Weave in any tails left along the inner side of the slipper.
You might also like my quick Free One Hour Crochet Slippers and my Spa Day Slippers which is perfect for spring.
You can find more free crochet slipper patterns on Allfreecrochet.
Watch a web story on these crochet slippers here.
Pin it for later:


These are really cute for being so simply designed. The texture definitely makes it stand out. Been trying for months to find a basic slipper that was still cute, and too lazy to design LOL..
Thanks so much!
I am wondering if the sizes are for women or men. I am trying to find a pattern for slippers for my father-in-law. I want something that closes with Velcro so it can be adjustable. He has swollen feet from edema and the swelling goes up and down. This is the first pattern I’ve seen that might be possible to use a Velcro closing. He needs Velcro because bending over to button something is difficult for him. Also is there a way to make the wrap part longer so he can loosen or tighten it.
I appreciate any help you can give me
Thanks
Make it a 1/4 inch less than the length of his foot. The length of the wrap part depends on how many rows you crochet, so I’m hoping you will be able to adjust that easily. Good luck!
Oh my gosh I totally love these slippers! Can’t wait to make them. My question is, about how long should these take? Is it something I should easily be able to do on a weekend? Thanks so much for sharing this pattern! Again, I love it!
Yes, absolutely! You can easily do it on a weekend.
Wow! Thanks for the super speedy reply! I’ll be whipping these babies up this weekend then. Thanks so much.
When I tried this pattern the rectangle didn’t come out right. It was lop sided. Not like the picture. What am I doing wrong?
Maybe you slip stitch too tight. You can tug on the rectangle to shape it or slightly block it.
These are such cute slippers, they reminds me of my comfy moccasins; if the had soles, I would wear them outside lol. I cannot read a pattern to save my life, but I think even I can makw these. Thank you for making the video as well, I learn by watching, y’all that do videos are god sends 😊
My daughter are 9 and 10 years old and want to do some crafting. These are perfect to start them off and it’s something they can use.
I love your slipper pattern and am going to make a pair for my Mother. I read the comment about using velcro for slippers for someone with edema. That was a concern of mine also.
I saw the plastic feet in your demo. I would like to know if you sell them or where I can purchase some. Do they come in different sizes?
Thank you,
Debra
I got the plastic feet from Amazon. I think they come only in Medium size.
It would be nice to have both length and width dimensions.
The pattern does tell you the length and width of the rectangle. The length is listed under the finished sizes and the pattern tells you how wide to crochet the rectangle after Row 3.
Where is the video
Scroll down to the end of the post.
I,d like to be able to print the pattern. Can I buy a pattern ?
You can purchase it here: https://www.ravelry.com/patterns/library/magic-slippers-4
Hello, I love your video! I find it very easy to follow but I am confused how to make a size 8. I chained 30 but it looks too short for my foot. Can you clarify the chain for my size, please? 🙂
Your rectangle should be a 1/4 inch less than the length of your foot.
So I’ve read the other comments and it says the rectangle should be 1/4 inch less than the length of your foot. I was wondering if this pattern was easily adaptable? I wear a women’s US size 12 if that helps. Does the width of the pattern change much and how would I determine it?
You can make the rectangle and wrap it around your foot to determine the width.
Very cool pattern. I intend to make a few pair for family from stash yarn for Christmas gifts. Thank you for sharing.
I really like this pattern as it is stylish and so easy to create . Thank you for sharing it.
Joyce
What is the plastic shoe form called that you use. I can’t find online? Thanks!
You can purchase it from Amazon here(my affiliate link): https://amzn.to/3efREiK
I’ve tried this and I can not get the square to be straight. I followed the pattern as per video.
Any suggestions?
Thank you
It will be a little lopsided due to the nature of the slip stitch. Just tug to make it straight and you will be fine.