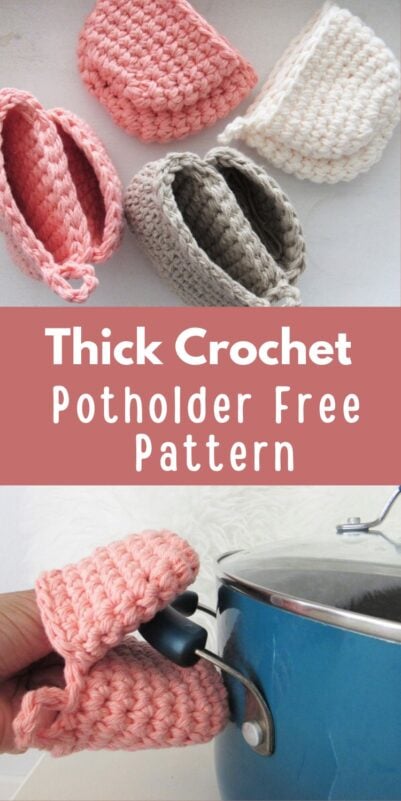
The Best Crochet Potholder Pattern, Mini Mitts Potholder
Thick Potholder Crochet Pattern for Your kitchen- A unique design!
This mitts style potholder is the best crochet potholder pattern for my kitchen as regular potholders catch fire way too often for me. Sad but true!

This thick potholder crochet pattern is worked with 2 strands held together making it quick to work up. The 2 strands add the needed thickness to protect your hands.

While almost all free crochet potholder patterns are worked as a flat piece, this one is unique and different. I hope you will enjoy making a few for your kitchen.

Disclosure: This post might contain affiliate links and I might earn a small commission at no extra cost to you.


When I saw these Silicone mitt potholders online, I decided to try it in crochet. I feel like I have now found my perfect potholder!
Mini Mitts Potholder
You can pin it for later here.
Materials
1. 100% cotton worsted weight (size 4) yarn. Lily Sugar ‘n Cream 100% cotton yarn in colors Tea Rose, Jute, or Ecru were used for the samples.
2. Tapestry needle to weave in the ends.
3. A size J(6mm) crochet hook. Clover Hooks are the best!
Finished Size
The potholder is made by attaching 2 pockets, one for your thumb and one for the rest of the fingers. Their sizes are as follows.
Big Pocket: 3-3/8 inches tall and 4-3/8 inches wide.
Small Pocket: 2-3/4 inches tall and 3-1/2 inches wide
Yardage
It takes around 80 yards to make one potholder.
Stitch Abbreviations
The pattern is written in US terms.
ch- chain
sc-single crochet
sl st- slip stitch
Related Patterns:
Easy Peasy Crochet Potholder Pattern
The Best Crochet Potholder Pattern
SMALL POCKET
Pattern Notes
1. Do not work over the beginning tail to weave it in. We will be using it to close any hole in the first round.
2. Work the first 2 rounds tight.

Round 1: Using 2 strands held together, ch 5 tightly, 1 sc in 2nd ch from hook, 1 sc in next 2 chs, 3 sc in last ch, do not turn, continue to work into the free loops of the foundation chain as shown in pic 1 above, 1 sc in next 2 free loops, 2 sc in last free loop, sl st to first sc, do not turn.——-10 sc.
Round 2: Ch 1 (does not count as a stitch), 2 sc in next st, place a marker in the first sc you just made, 2 sc in each st across to end. Do not sl st at the end of the round.—–20 sc
Note: Now before you proceed, use the beginning tail to close any holes in Round 1 and fasten off the rest of the tail. It will get harder once your pocket gets deeper.

Round 3 to End: 1 sc in marked st, now start working in a spiral, work a sc in each sc around until your pocket is 2-3/4 inches tall. Sl st to the side and fasten off as shown in pic 2 above. Weave in the tail inside the pocket.
BIG POCKET
Round 1: Using 2 strands held together, ch 5 tightly, 1 sc in 2nd ch from hook, 1 sc in next 2 chss, 3 sc in last ch, do not turn, continue to work into the free loops of the foundation chain, 1 sc in next 2 free loops, 2 sc in last free loop, sl st to first sc, do not turn.——-10 sc.
Round 2: Ch 1, 2 sc in next st, place a marker in the first sc you just made, 2 sc in each st across to end, sl st to marked st.—–20 sc
Note: Now before you proceed, use the beginning tail to close any holes in Round 1 and fasten off the rest of the tail. It will get harder once your pocket gets deeper.
Round 3: Ch 1, 1 sc in next st, place a marker in this st, 1 sc in next 2 sts, 2 sc in next *(1 sc in next 3 sts, 2 sc in next), repeat from * 3 more times to end, do not sl st at the end of the round.——25 sc
Round 4 to End: 1 sc in marked st, now start working in a spiral, work a sc in each sc around until your pocket is approximately 3.5 inches tall. Sl st to the side but do not fasten off this time.
Assembling the Thick Potholder Crochet Pattern


Place the small pocket in the middle of the big one aligning the openings. Continuing with the yarn attached to the big pocket, sl st to the next st on the big pocket to reach the small pocket, now work sl sts through the top layer of the big pocket and the bottom layer of the small pocket to join them. You can find a video below.
Once you reach the other corner of the small pocket, continue to work only into the big pocket, work a sl st into the next st on the big pocket, ch 6 for the hanging loop, sl st into the next st, sl st into each st on the bottom layer of the big pocket until you reach the corner where you started, sl st to next sl st, fasten off.
Finishing the Perfect Potholder
Weave in any tails left. You can make one more to make a matching pair.
More Crochet Potholder Patterns for your Kitchen:
Super Easy Thick Crochet Potholder Pattern
Perfect Potholder for the Modern Kitchen
You can also check out this free crochet potholder pattern at thesprucecrafts.com
Pin it for later:


Yes! Yes! Yes! That’s the ticket !!! The Ultimate “Stash Buster” I detest tossing even teeny tiny bits of yarn. I even use “Speckle” sized pieces! How? For Mosaics! Nice, good quality backing/canvas, Glue, Sprinkle on Bits, Wahoo ! Classy Pictures. People do it with Sand all the time, and pasta, and seasonings, and cereal. Choose any picture, use carbon paper to trace it to the surface, and Glue! Use “Aleene’s OK to Wash It” glue, and you can even glue yarn bits to crochet toys for hair or tiny accents.
I am really glad you like these potholders. Thank you.
Thank you so much for sharing these Pot Holders. I not only burn my fingers but the skin between thumb and fingers takes a beating, too.
I am glad you like these crochet potholders and I am relieved to know I am not the only one whose potholders catch fire, lol!
Would these work for taking out hot food, out of the microwave?
I think these mini crochet potholders are best suited for holding the handles of woks and dutch ovens while cooking. It is not meant to lift oven-proof ceramic cookware with no handles.
Thanks so much for the pattern! These turned out great and are very helpful for getting your inner pot out of the InstaPot, because it has such a small edge to be able to grab hold of! 😊 For me, I think just one thickness of the cotton yarn is enough, but to be safe most probably should do the double thickness! Blessings and thanks again!
My mitt is not shaping like yours, it’s more like a bowl rather than a cup, a video of the complete process?
I am sorry, I don’t have a video. You must be accidentally adding increase which is making it widen out.