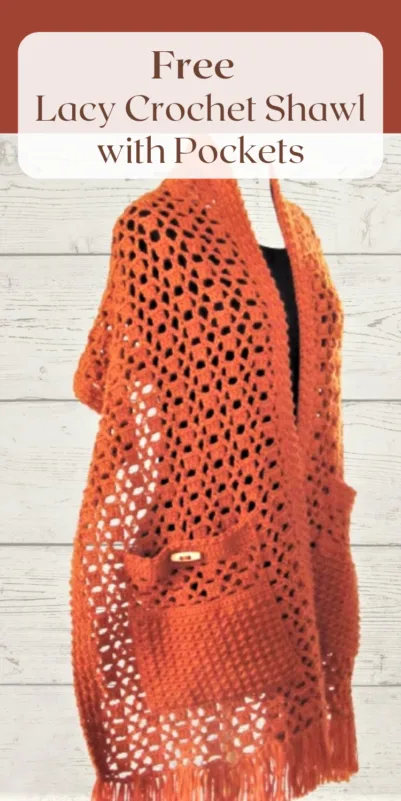
Lacy Crochet Pocket Shawl- an easy pattern.


This crochet pocket shawl with pockets and fringe is for ladies who don’t look heavy stuff. It is a light and comfortable piece that will keep you warm


The Pumpkin color I used here is one of my favorites for winter wear along with neutral shaded like cream and gray. I hope you will enjoy making this shawl as much as I did.


Crochet Shawl with Pockets and Fringe
Pin it for later here: Pin it!
Materials
1. Worsted weight, size 4 yarn. Lion Brand Wool-Ease yarn in color Pumpkin was used for the sample shawl.
2. Hooks I( 5.5mm) for the lacy part and pockets and hook H(5mm) for the border.
3. Tapestry needle to weave in the ends.
4. Two Toggle buttons or any wooden 1-1/4 inch button of your choice.
Yardage
5 skeins of Lion Brand Wool-Ease were used for the shawl. Each skein has 197 yards.
Finished Size
16 inches wide and 60 inches long before adding the fringes.
Stitch Abbreviations
The pattern is written in US terms.
ch- chain
sc- single crochet
hdc- half double crochet
dc- double crochet
sl st- slip stitch
sk- skip
Gauge
Pattern for Gauge Swatch
Ch 50 and follow the pattern for the shawl until you complete 4 dc rows. Then measure for gauge as shown.


1. Measure across repeats for gauge
With I hook, 3 pattern repeats= 5-1/2 inches
Crochet Shawl Pattern
Pattern notes
1. The scarf is worked widthwise. The length of your foundation chain will determine the width of your scarf.
2. After you finish working on the lacy part, you will add the textured border to the long sides of the shawl. The bottom of your shawl will have no border.
3. I prefer the no-fringe look for my shawl but you are free to add fringes to yours if you like.
Chain 66. You can chain any multiple of 8+10 to make your shawl wider. The border on either side will add a total of 2.5 inches to the total width of your shawl.
Row 1: 1 sc in 2nd ch from hook, ch 1, sk 1, 1 sc in next, *(ch 3, sk 3, 1 sc in next), repeat from * to last 2 chs, sk next ch, 1 sc in last ch, turn.———15 ch-3 loops


2. Row 2 completed
Row 2: Ch 1, 1 sc in same st as ch 1, *(ch 3, 3 dc in next ch-3 space, ch-3, 1 sc in next ch-3 space), repeat from * until you work 3 dc in the last ch-3 space, ch 3, 1sc on top of the last sc, turn.———-8 3-dc groups


3. Row 3 completed
Row 3: Ch 5, 1 sc in the ch right before the next 3-dc group, *(ch 3, 1 sc in the ch right after the 3-dc group, ch 3, 1 sc in the ch right before the next 3-dc group), repeat from * until only 1 3-dc group is left, ch 3, 1 sc in the ch right after the 3-dc group, ch 1, 1 dc in last sc( this sc will be at a lower level), turn.——15 ch-3 loops
Row 4: Ch 1, 1 sc in same st as ch 1, *(ch 3, 3 dc in next ch-3 space, ch-3, 1 sc in next ch-3 space), repeat from * until you work 3 dc in the last ch-3 space, ch 3, sk next sc and 1 ch, 1 sc in next ch, turn.———-8 3-dc groups
Repeat Rows 3 and 4 until your shawl is 60 inches long and you end in a repeat of Row 3, and fasten off. The shawl started out being 15-1/4 inches wide but shrunk to 13-1/2 inches wide under the weight of the stitches. The border added the extra 2-1/2 inches to make it 16 inches wide.
Border
1. The first row of the border is worked on the Right Side of the shawl(the side where you worked your dc rows).
2. The border is only worked along the sides of the shawl and not along the bottom edges.
3. Go down to H(5mm) hook for the border.


4. Distribute sc sts along row ends
Row 1: On the Right Side of the shawl, sl st to the corner, work sc sts along the side of the shawl. To distribute your sc sts evenly, work 3 sc across the chain row ends and 1 sc in the sc as shown in the picture above, turn.
Row 2: Ch 1 ( counts as a sl st), (1 hdc in next st, 1 sl st in next st), repeat from * across to end of the row, if you are short one st, just sl st into the corner and turn.
Note: In the next sc row, don’t forget to work a sc in the turning ch at the end of the row. It won’t be visible but just poke your hook into the corner and work a sc.
Row 3: Ch 1, 1 sc in the same st as ch-1, 1 sc in each st across, end with a sc on top of the turning ch, turn.
Repeat Row 2 and 3 one more time.
Row 6(Last Row): Switch back to I(5.5mm) hook and repeat Row 2. This will make your last textured row more prominent.
Pockets( Make 2)
Pattern Notes
The finished pocket is 8-1/2 inches wide and 9 inches tall after you stretch the lacy part. It is worked bottom up.
With I(5.5mm) hook, ch 34.
Row 1: 1 sc in the 2nd ch from hook, 1 sc in each ch across to end, turn.—–33 sc
Row 2: Ch 1( counts as a sl st), (1 hdc in next st, 1 sl st in next st), repeat from * to end of the row, turn.—33 sts
Note: In the next sc row, don’t forget to work a sc in the turning ch at the end of the row. It won’t be visible but just poke your hook into the corner and work a sc.
Row 3: Ch 1( does not count as a st here and throughout), 1 sc in the same st as ch 1, 1 sc in each st across, 1 sc on top of turning ch, turn.—–33 sc
Repeat Rows 2 and 3 until you have completed a total of 23 rows.
Rows 24 and 25: Repeat Row 3 to add 2 more sc rows.
Row 26: Ch 1( does not count as a st), 1 sc in the same st as ch 1, ch 1, sk 1 st, 1 sc in next, *(ch 3, sk 3 sts, 1 sc in next st), repeat from * to last 2 sts, ch 1, sk 1, 1 sc in last st, turn.——–7 ch-3 loops
Row 27: Ch 1, 1 sc in same st as ch 1, *(ch 3, 3 dc in next ch-3 space, ch-3, 1 sc in next ch-3 space), repeat from * until you work 3 dc in the last ch-3 space, ch 3, 1sc on top of the last sc, turn.———-4 3-dc groups
Row: 28: Ch 5, 1 sc in the ch right before the next 3-dc group, *(ch 3, 1 sc in the ch right after the 3-dc group, ch 3, 1 sc in the ch right before the next 3 dc group), repeat from * until only 1 3-dc group is left, ch 3, 1 sc in the ch right after the 3-dc group, ch 1, 1 dc in last sc( this sc will be at a lower level), turn.——7 ch-3 loops
Repeat Rows 27 and 28 one more time.
Note: When you work sc sts into the ch-3 loop you are working into the chains and not into the chain space. The first ch of each ch-3 loop will be tight and small, so don’t miss to work sc into it.
Row 31: Ch 1(does not counts as a st), 1 sc in same st as ch 1, 1 sc in adjacent ch-1 space, 1 sc in next sc, *(1 sc in each of the next 3 chs, 1 sc in next sc), repeat from * and after you have worked sc sts into the 3 chains of the last ch-3 loop, 1 sc in next sc, 1 sc in next 2 chs of beginning ch, turn——–33 sc
Row 32: Ch 1(does not counts as a st), 1 sc in same st as ch 1, 1 sc in each st across to end, turn.—–33sc
Row 33(Buttonhole Row): Ch 1(does not counts as a st), 1 sc in same st as ch 1, 1 sc in next 14 sts, ch 3 tightly, sk 3 sts,1 sc in remaining 15 sts to end of the row, turn.——–30 sts and 3 chs
Row 34: Ch 1(does not counts as a st), 1 sc in same st as ch 1, 1 sc in next 14 sts, 3 sc in the next ch-3 space, 1 sc in remaining 15 sts to end of the row, turn.——–33 sts
Row 35: Ch 1(does not counts as a st), 1 sc in same st as ch 1, 1 sc in each st across to end, turn.—–33sc
Row 36( Last Row): Ch 1(counts as first sl st), *(hdc in next st, 1 sl st in next), repeat from * to end. Fasten off.
Attaching the Pockets to your Shawl
1. Weave in the tails on your pocket to finish them.


5. Position pockets above 3rd row from bottom and middle of shawl.
2. Place the pocket on top of the 3rd dc row from the bottom edge of the shawl. The top edge should be aligned along the top of the 9th dc row counted from where we placed the bottom of the pocket as shown above.
3. The pocket should also be in the middle of the shawl. The edges of the pockets should run along the middle of the 2nd double crochet row from the sides(see pic above).
4. We are now ready to sew the pockets onto the shawl. Read the full instructions before you start.
Thread a 70-inch piece of yarn and start whip stitching the pocket to the shawl. The lacy part will have to be stretched to make it straight while you sew.
When whip stitching, at some places you won’t have any fabric under the pocket as the shawl is lacy with gaps, then just continue whip stitching through the top layer until you reach the point where you have fabric underneath.
When whip stitching, make sure to reinforce the top 2 corners and the bottom corners of the pocket with at least 3 sts. Once you complete whip stitching the pocket to the shawl, pull the remaining yarn behind, make a couple of knots and weave in the rest.
Attach the second pocket in the same manner.
Adding Fringes to your Lacy Pocket Shawl
Fringes will add the final finishing touch to your shawl. Use a cardboard piece that is 4-1/4 inches long, wrap yarn around it multiple times, and cut on one end to get yarn strands 8-1/2 inches long.
Take 2 strands, fold at the middle of the strands and pull through your scarf to get a loop, yarn over grabbing all the strands and pull through the loop. Tighten the knot. Repeat the steps to attach fringes all along the bottom edges of the shawl. Trim as needed to level them.
Finishing the Shawl
Sew on the toggle button at the point behind the buttonhole you made on the pocket. Enjoy!
Pin it for later: