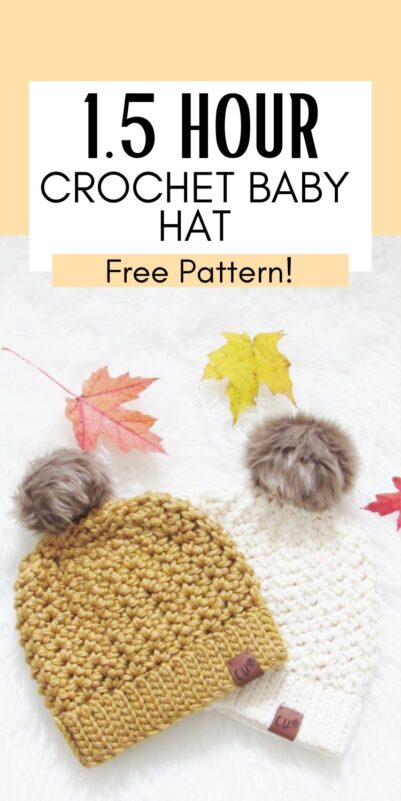
How to Crochet a Beanie with Video, 1.5 Hour Beanie
Learn how to crochet a beanie in just one and a half hours. Chunky and stylish, this crochet hat will keep you warm this winter.


The crochet hat pattern is designed using a stitch that resembles the star stitch but is very easy to work and perfect for beginners.


You can make this crochet beanie pattern to build your craft fair inventory as the hats work up very fast. You can even make them as a gift for the upcoming holidays.

I plan to design a chunky scarf to match once I get some more bulky yarn in different colors. I think a matching hat and scarf set would look lovely. Won’t they?
Crochet Beanie Pattern
You can pin it for later here.
You can find a video at the end of this post.
Materials
- Super Bulky size 6 yarn. I used the yarn Loops and Threads Cozy Wool in color Golden Rod and Bernat Softee Chunky in color Natural
- An 8 mm and a K (6.5mm) crochet hook
- Yarn needle with a big eye
- 2 Fur pom poms. You can make your own for under a dollar using my free tutorial here.
- Sewing needle and matching thread to attach your pom poms
- A stitch marker
Finished Size
Toddler– Fits 19-inch head and is 7 1/2 inches tall
Child– Fits 21-inch head and is 8 inches tall
Adult Small– Fits 22-inch head and is 8 1/2 inches tall
Adult Large– Fits 23-inch head and is 9 inches tall
Yardage
1 skein of Loops and Threads Cozy Wool( 90 yards) for sizes Toddler, Child, and Adult Small.
Adult Small took me the entire skein with no yarn left over. So buy 2 skeins if you want to be on the safer side.
150 yards for size Adult Large.
Stitch Abbreviations
The pattern is written in US terms.
ch- chain
sl st- slip stitch
sc- single crochet
st- stitch
sk-skip
BL- back loops only ( see explanation below).
Stitch Explanations
Working in Back Loops only(BL): You work your stitch inserting your hook not under both the loops of your stitch but only the back loops (See pic below).

Sc2tog: Insert your hook into the next st and pull up a loop, insert your hook into the next st and pull up another loop, yarn over and pull through all the 3 loops on your hook.
Gauge
With 8mm hook, 8 sc sts=4 inches
How to Crochet a Beanie
Note: Stitch counts for bigger sizes are written in the order Toddler(Child, Adult Small, Adult Large).
Hat Ribbing
Leave an 8-inch tail, and with K(6.5mm) hook, chain 6(6, 7, 7).
Row 1: Sl st in 2nd ch from hook and each ch across to end, turn.—5(5, 6, 6)sls sts
Row 2: Ch 1, 1 sl in the BL of the same st as ch 1, 1 sl st in BL of the remaining 4(4, 5, 5)sts, turn.——5(5, 6, 6)sl sts
Repeat Row 2 until the ribbing is 15(16-1/2, 18, 18-1/2) inches without stretching. The ribbing is elastic and will stretch to fit.

Bring the two shorter ends together and sl st through both the layers, insert hook through the back loop of the last row of sl sts and the free loops of the foundation chain side. When inserting hook into the foundation chain side, insert a little deeper, closer to the first ridge, and not at the very edge (see pic above). DO NOT fasten off.
Hat Crown Pattern
Note: For Round 1, work into the valleys between the ridges and not the ridges themselves as it will be hard to stick your hook into them as shown in pic 2 below.

Round 1: Switch to the 8mm hook. Ch 1 at the seam and work 32(34, 36, 38)sc sts evenly distributed around the ribbing. You can add a few sc2tog to adjust the stitch count if your ribbing seems bigger for your number of stitches. Sl st to the 1st sc, do not turn. ——–32(34, 36, 38)sc
Note: You would have reached the end of a round when you reach back near the marked ch-2 loop.
Round 2: Ch 3 (counts as 1 sc + ch 2), place a marker in this ch-2 loop to indicate the first repeat, 1 sc in the same st as ch 3, sk the next st, *(sc, ch 2, sc)in next st, sk the next st, repeat from * to end of the round. Do not sl st and do not turn.—–16(17, 18, 19) ch-2 loops
Note: You can easily find out where to work your repeats by looking at the peaks as shown in pic 3 below.

Round 3: Directly work a (sc, ch 2, sc) in the next marked ch-2 space, move the marker up into the ch-2 space you just made, *(sc, ch 2, sc)in each ch-2 space across to end of the round. Do not sl st and do not turn.
Keep repeating Round 3 in a spiral until your hat is 6(6-1/2, 7, 7-1/2) inches tall including the ribbing, and work the decrease rounds below.
Shaping the Crown of your Hat
Decrease Round 1: 1 sc in the marked ch-2 space, move the marker up into this sc, 1 sc in each ch-2 space across to end.—–16(17, 18, 19) sc
Decrease Round 2: 1 sc in marked st, move the marker up, 1 sc in each st across to end.
Decrease Round 3: Sc2tog across marked st and next st, *(1 sc in next, sc2tog in next), repeat from * to end and fasten off with a 12-inch tail for sewing. You will have a small opening at the top now.
Finishing Your Crochet Beanie
1. Turn the hat inside out. Thread the tail at the top through a yarn needle, go in and out along the edge of the top hole, pull and cinch the top shut. Securely weave in the remaining tail left.
2. Before weaving in the beginning tail at the ribbing, use it to conceal any ragged edge at the seam and then weave the rest in.
3. Attach the fur pom pom to the top of your hat.
You might also like my Crochet Ribbed Beanie Pattern, Autumn Harvest Beanie Crochet Pattern , and my Beginner Beanie Crochet Pattern.
How to Crochet a Beanie in 1.5 Hours Story
Pin it for later:
You can find more such free beanie hat patterns on Allfreecrochet.com.


I would to buy 2 of your patterns, but my paypal account has an email address I only use for paypal. I was wondering if you could email them to another email address. Please let me know if this is possible.
Hi Peggy, yes, I can email it to another id.
Beautiful beanie and great tutorial. This is going to my “To Do List”, that’s for sure. I also pinned it! Have a great crocheting weekend! ☕🍁💮🧶
Thank you so much for pinning it. I appreciate your support.
Gorgeous will be definitely making this thankyou do much xx
Love this pattern, can you please tell me what yarn I would need to use here in UK, would it be chunky or super chunky? Also how many grams would I need. Looking forward to trying this as reasonably new to crochet. Thanks
You will need around 120-130 gms of super chunky, size 6 yarn.
Can those fur pompoms be purchased somewhere and what about the cute leather square tag?
You can purchase pom poms on Etsy and get tags custom made for your brand from Etsy stores too. I got mine from this Etsy shop: https://www.etsy.com/shop/EngraveMeTreasures?ref=simple-shop-header-name&listing_id=677017568
Thanks, I love this pattern!
When you measure from the edge of the ribbing do you mean from the bottom of the ribbing or from where you start to make the rounds for the hat? (so is it the hat and the ribbing or just the hat part?)
You measure the hat and the ribbing together.
Thank You! I figured as much, but wanted to make sure!
How long would you suggest a brim for a baby hat rather than toddler?
1-1/2 inches should be good.
I’m struggling with the illustrations: white yarn on white background. Am I to Sl st the band together? Then start the hat part from that? Thank you.
Yes, you are right.
There is also a video for this pattern.
What does the sc2tog mean???
It is a single crochet decrease that joins 2 sts into one.
I love this pattern going to make but want to make top with hair rubbers to create hole for ones that have very long hair worn in pointy tails at work they are nurses ,wind er ing if could incorporate into top instead of pompom.Thanks Clem
You can try adding the hairband in the first decrease row at the crown of the hat by working the stitches around it.