Chunky Crochet Cardigan Pattern Free, The Marilyn Cardi
If you’re looking for a quick and cozy crochet project, this chunky crochet cardigan pattern free tutorial might be just what you need.

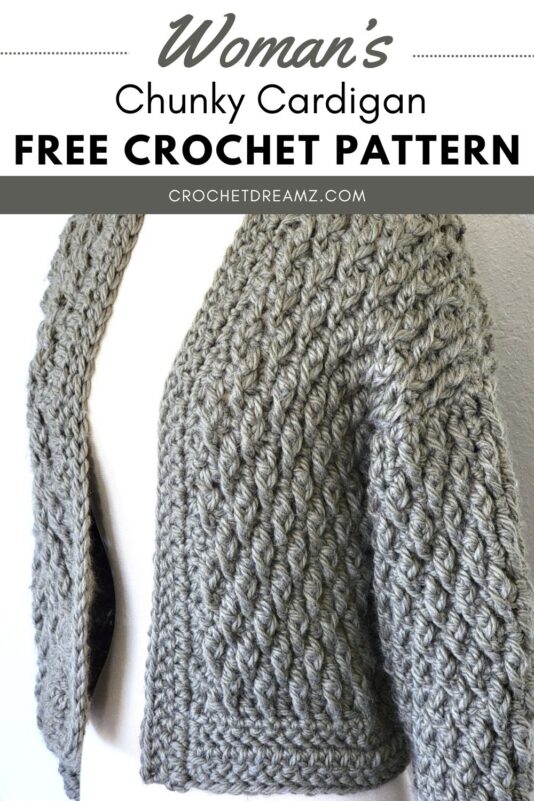
Made with the beautifully textured Alpine Stitch, it’s warm, stylish, and perfect for layering. This pattern is designed to be simple, with minimal shaping, making it a great choice for beginners or anyone wanting a relaxing project.

The chunky yarn works up quickly, so you’ll have your cardigan ready to wear in no time. The fit is casual and comfy, making it a versatile addition to your wardrobe.

Whether you’re lounging at home or heading out, this cardigan will keep you snug. You’ll enjoy how the Alpine Stitch adds a bit of texture without being too complicated. Grab your yarn and hook, and let’s get started!

Chunky Crochet Cardigan Pattern Free
You can work from the free pattern below or purchase an ad-free PDF for $3.99 here. You will receive a download link once you make payment and click “Return to Merchant”.
Materials
1. Lion Brand Re-Spun Thick and Quick yarn in color Olive Branch. It is size 6 Super Buky yarn.
2. N/P (10mm) hook
3. Tapestry needle to weave in the ends.
Finished Sizes
The measurements for different sizes are written in the order XS (S, M, L) (XL, 2XL, 3XL)
Finished Chest: 34 (38, 42, 45) (49, 53, 56)”
Back Width: 17 (19, 21, 22.5) (24.5, 26.5, 28)”
Finished Length: 19 (19, 19, 21.5) (21.5, 24, 24)”
Armhole Depth: 7 (7, 7, 8) (8, 9, 9)”
Sleeve Length: 17.5 (17.5, 17.5, 18) (18, 18.5, 18.5)” including the cuff
Yardage
Each skein is 223 yards.
XS: 3 skeins
S: 3-1/2 skeins
M: 4 skeins
L: 4-1/2 skeins
XL: 4-1/2 skeins
2XL: 5-1/2 skeins
3XL: 5-1/2 skeins
Stitch Abbreviations
The pattern is written in US terms.
st: stitch
ch: chain
sc: single crochet
dc: double crochet
sk: skip
fpdc: front post double crochet
RS- Right side
WS– Wrong side
Stitch Explanations
Front post double crochet (fpdc): See a tutorial for front post double crochet on my blog here: Front Post and Back Post Double Crochet Tutorial.
sc2tog: Pull up a loop in the 2 sts specified, YO, and pull through all the 3 loops on your hook to complete a sc2tog.
hhdc (Herringbone Half Double Crochet): YO, insert your hook into the next st, pull up a loop through the st and the first loop on your hook, 2 loops left on your hook, YO and pull through the remaining 2 loops on your hook.
Gauge
Pattern for Gauge Swatch
Chain 23 and follow Rows 1 to 5 for the back panel below. Your stitch count at the end of every row will be 21. Keep repeating Rows 2 to 5 until your piece measures 4 inches. Then measure for gauge.
Gauge
Using N/P (10mm) Hook,
8 sts in pattern stitch (4 dc sts alternating with 4 fpdc)= 4.5″
Use any size hook to attain the gauge.
Crochet Cardigan Pattern
Pattern Notes
1. The back panel is first worked as a rectangle. The front panels are then worked as a continuation of the back panel.
2. Stitch counts for bigger sizes are given in the order XS (S, M, L) (XL, 2XL, 3XL)
Back Panel
Ch 33 (37, 41, 43) (47, 51, 53). The initial chain is an odd number.
Row 1: Working into the back bumps of the foundation ch throughout, 1 dc in the 4th ch from hook (3 skipped chs counts as a dc), 1 dc in each remaining ch across to end, turn.——-31 (35, 39, 41) (45, 49, 51)sts
Row 2: Ch 1 (does not count as a st), 1 sc in first st, and each st across to beginning ch-3, 1 sc on top of beginning ch-3, turn. ——-31 (35, 39, 41) (45, 49, 51)sts
Note: The fpdc sts in this stitch pattern are worked into the dc sts one row below.
Row 3: Ch 3 (counts as a dc), *(1 fpdc in dc below next sc, skip the sc st behind this fpdc, then work 1 dc in the next sc), repeat from * to end of the row. You will end with a dc in the very last st, turn. ——-31 (35, 39, 41) (45, 49, 51)sts
Row 4: Ch 1 (does not count as a st), 1 sc in first st, and each st across to beginning ch-3, 1 sc on top of beginning ch-3, turn. ——-31 (35, 39, 41) (45, 49, 51)sts
Notes
1. In the next row, the fpdc sts will be worked into the regular dc sts between the fpdc sts of Row 3.
2. Row 5 begins and ends with 2 dc sts.
Row 5: Ch 3 (counts as a dc), 1 dc in next sc, *(1 fpdc in next regular dc between fpdc sts one row below, skip the sc st behind this fpdc and work 1 dc in the next sc), repeat from * to last st, 1 dc in last st, turn.
Repeat Rows 2 to 5 until you have completed 15 (15, 15, 19) (19, 23, 23) fpdc rows. To count the fpdc rows, count every raised stitch row. Your last row will be a repeat of Row 3. Do not fasten off. Your piece will measure approximately 17.5 (17.5, 17.5, 19) (19, 21.5, 21.5)” long. See pic 1 below for the finished back panel.

First Front Panel
Row 1: Ch 1 (does not count as a st), 1 sc in first st and next 12 (14, 16, 17) (19, 21, 22)sts, turn.———13 (15, 17, 18) (20, 22, 23)sts
Row 2: Ch 3 (counts as a dc), 1 dc in next sc, *(1 fpdc in next regular dc between fpdc sts one row below, skip the sc st behind this fpdc and work 1 dc in the next sc), repeat from * to last st, 1 dc in last st, turn.——13 (15, 17, 18) (20, 22, 23) sts
Row 3: Ch 1 (does not count as a st), 1 sc in first st, and each st across to beginning ch-3, 1 sc on top of beginning ch-3, turn.——-13 (15, 17, 18) (20, 22, 23) sts
Row 4: Ch 3 (counts as a dc), *(1 fpdc in dc below next sc, skip the sc st behind this fpdc, work 1 dc in the next sc), repeat from * to end of the row. You will end with a dc in the very last st, turn. ——-13 (15, 17, 18) (20, 22, 23) sts
Repeat Rows 1 to 4 until you have completed 15 (15, 15, 19) (19, 23, 23) fpdc rows on the front panel. If you count from the beginning of the back panel, you will have double the number of fpdc rows. For example, instead of 15, you will have 30 fpdc rows. Fasten off.
Second Front Panel

Row 1: Skip 5 sts from the first front panel (as shown in pic 2 above) and sl st into the next st, 1 sc in same st, 1sc in next 12 (14, 16, 17) (19, 21, 22) sts, turn.———13 (15, 17, 18) (20, 22, 23) sts
Row 2: Ch 3 (counts as a dc), 1 dc in next sc, *(1 fpdc in next regular dc between fpdc sts one row below, make sure you skip a sc st behind this fpdc and work 1 dc in the next sc), repeat from * to last st, 1 dc in last st, turn.——13 (15, 17, 18) (20, 22, 23) sts
Row 3: Ch 1 (does not count as a st), 1 sc in first st, and each st across to beginning ch-3, 1 sc on top of beginning ch-3, turn.——-13 (15, 17, 18) (20, 22, 23) sts
Row 4: Ch 3 (counts as a dc), *(1 fpdc in dc below next sc, make sure you skip the sc st behind this fpdc, then work 1 dc in the next sc), repeat from * to end of the row. You will end with a dc in the very last st, turn. ——-13 (15, 17, 18) (20, 22, 23) sts
Repeat Rows 1 to 4 until you have completed 15 (15, 15, 19) (19, 23, 23) fpdc rows on the front panel. If you count from the beginning of the back panel, you will have double the number of fpdc rows. For example, instead of 15, you will have 30 fpdc rows. Fasten off.

Seaming the Sides
Place your cardigan flat with the textured side facing up, and fold the front panels over the back panel. Align the hem, leave a 7 ( 7, 7, 8) (8, 9, 9)inch gap for the armhole, and seam the sides with a whip stitch as shown in pic 4 below.

Adding the Sleeves
Note: The sleeves are worked onto the cardigan’s Right or textured side. So turn it right side out first.
Round 1: Sl st to the base of the armhole. ch 2 (does not count a s a st), distribute 26 (26, 26, 30) (30, 34, 34)dc sts around the armhole, sl st to 1st dc, turn.——–26 (26, 26, 30) (30, 34, 34)dc
Round 2: Ch 1 (does not count as a st), 1 sc in next st and each st across to end, sl st to 1st sc, turn.——–26 (26, 26, 30) (30, 34, 34)sts
Note: To identify the st into which you work your fpdc, once you have your first fpdc, sk 1 st after it and work fpdc into the next st 1 row below.
Round 3: Ch 3 (counts a s a dc), 1 fpdc in dc below next sc, *(1 dc in next st, 1 fpdc in dc below next sc), repeat from * to end, sl st to beginning ch-3, turn.——–26 (26, 26, 30) (30, 34, 34)sts
Round 4: Ch 1 (does not count as a st), 1 sc in 1st st and each st across to end, turn.——–26 (26, 26, 30) (30, 34, 34)sts
Round 5: Ch 1 (does not count as a st), 1 fpdc in beginning ch-3 one row below, 1 dc in next st, *(1 fpdc in dc below next sc (the dc between 2 fpdc), 1 dc in next st), repeat from * to end, sl st to first fpdc, turn. ——–26 (26, 26, 30) (30, 34, 34)sts
Round 6: Ch 1 (does not count as a st), 1 sc in 1st st and each st across to end, turn.——–26 (26, 26, 30) (30, 34, 34)sts
Round 7: Ch 3 (counts as a dc), 1 fpdc in dc below next sc (the dc between 2 fpdc), *( 1 dc in next st, 1 fpdc in dc below next sc), repeat from * to end, sl st to beginningch-3, turn. ——–26 (26, 26, 30) (30, 34, 34)sts
Round 8: Ch 1 (does not count as a st), 1 sc in 1st st and each st across to end, turn.——–26 (26, 26, 30) (30, 34, 34)sts
Repeat Row 5 to 8 until your sleeve is 15-1/2 (15-1/2, 15-1/2, 16) (16, 16-1/2, 16-1/2) inches long. Do not fasten off.
Cuff
Round 1: Ch 1, *(sc2tog across next 2 sts), repeat from * to end, turn if you are on the RS of the sleeve and do not turn if you are on the WS.—————-13 (13, 13, 15) (15, 17, 17)sts
Round 2: Ch 1 (does not count as a st), 1 hhdc in each st across to end, sl st to first hhdc, do not turn.———13 (13, 13, 15) (15, 17, 17)sts
Round 3: Ch 1, 1 hhdc in each st across to end, sl st to first hhdc, do not turn.——–13 (13, 13, 15) (15, 17, 17)sts
Round 4: Repeat the above round and fasten off.
Follow the same pattern to make the second sleeve.
Hem

Row 1: Working on the WS (inside) of the cardigan, sl st to the bottom right corner of the hem as shown in pic 5 above, 1 sc in 1st st and each st across to end, turn. ——–57 (61, 65, 71) (75, 83, 85) sts
Row 2: Ch 1 ( does not count as a st), 1 hhdc in 1st st and each st across to end, turn.——57 (61, 65, 71) (75, 83, 85) sts
Rows 3 & 4: Repeat Row 2 but do not fasten off after Row 4.
Collar

Row 1: Ch 1 at the corner and distribute sc sts evenly along the front opening of the cardigan as shown in pic 6 above, turn.
Rows 2 & 3: Ch 1 ( does not count as a st), 1 hhdc in 1st st and each st across to end, turn. Fasten off after Row 3.
Finishing
Weave in any tails left on the WS of the cardigan. Enjoy!
Pin it for later: