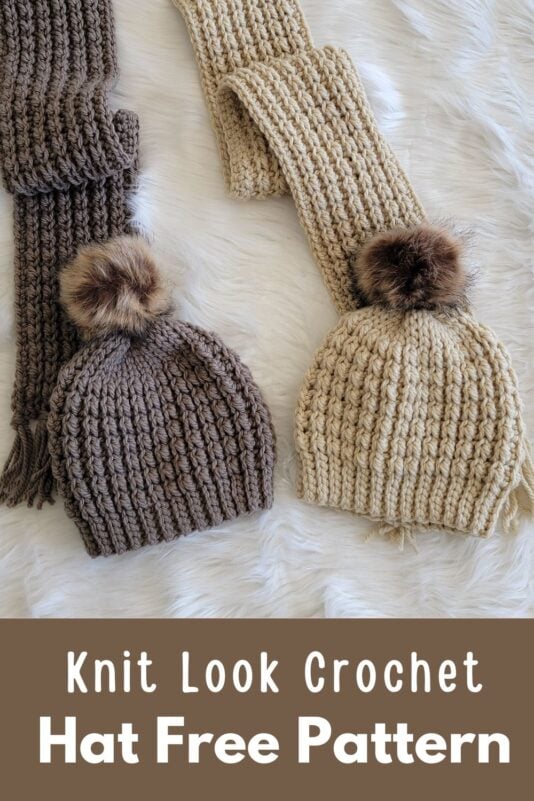
Knit Look Crochet Beanie Pattern, The Not Knit Beanie
Discover the perfect knit look crochet beanie pattern! This easy crochet hat for beginners creates a stylish knit look crochet hat without knitting needles.

Our free crochet beanie pattern features a simple construction to achieve a cozy ribbed crochet texture. Ideal for those seeking easy crochet hat patterns or a quick simple crochet beanie pattern.


To complete the look, check out my site for a matching Knit Look Scarf Pattern. They’ll make excellent gifts this season.

Knit Look Crochet Beanie Pattern
Materials
1. Bernat Softee Chunky in colors Taupe Gray or Linen. It is a size 6 super bulky yarn
2. An 8mm hook
3. Tapestry needle to weave in the ends
4. A fur pom pom
Finished Sizes
The hat will stretch to fit.
Toddler: 7-1/2″ tall and 17″ in circumference
Child:– 8-1/2″ tall and 18″ in circumference
Woman Small: 9″ tall and 18-1/2″ in circumference
Woman Medium/Large: 9″ tall and 19″ in circumference
Yardage
Toddler: 100 yards
Child: 130 yards
Woman Small: 150 yards
Woman Medium/Large: 170 yards
Stitch Abbreviations
ch: chain
st: stitch
sc: single crochet
sl st: slip stitch
hdc: half double crochet
sk: skip
YO: yarn over
RS: Right Side of Crochet Beanie
Stitch Explanations
Back Loop Only (BLO): Insert your hook under the loop away from you and work your hdc or sl st as shown in the pic below.

Gauge
Ch 21 and start working on the Toddler size pattern below. After 6 rows, it should measure 7-3/4″ in length.
Related Crochet Beanie Patterns
Pattern
Pattern Notes
The hat is worked sideways in rows. The sides are then sewn shut and the top cinched.

Toddler
Ch 21. Since the beanie is worked sideways, the longer your foundation chain, the taller your beanie will be.
Row 1: 1 sl st in the 2nd ch from hook, 1 sl st in next 3 chs, * (1 hdc in next ch, 1 sl st in next ch), repeat from * to last 4 chs, 1 sl st in last 4 chs, place a marker on this side of the fabric to indicate the RS, and turn.-——–20 sts
Row 2: Ch 1 (does not count as a st), 1 sl st in BLO of the first st and next 3 sts, *(1 sl st in BLO of next sl st, 1 hdc in BLO of next hdc), repeat from * 5 more times until 4 sts are left, 1 sl st in BLO of last 4 sts, turn.——20 sts
Row 3: Ch 1 (does not count as a st), 1 sl st in BLO of first st and next 3 sts, *(1 hdc in BLO of next hdc, 1 sl st in BLO of next sl st), repeat from * 5 more times until 4 sts are left, 1 sl st in BLO of last 4 sts, turn.——20 sts
Repeat Rows 2 and 3 until your work measures approximately 17 inches wide. Your last Row should be a repeat of Row 2.
Seaming the Side
Now fold the hat with the RS (the side on which you placed the marker) inside. Take your hook out from the loop at the last row, insert it at the corner of the foundation chain edge, and pull the loop through, now start to sl st the 2 sides together by inserting your hook under the free loops of the foundation chain and the BLO of the last row to the end. Fasten off with a long tail for cinching the top of the beanie.
Cinching the Top
Thread the long yarn tail through a tapestry needle and run it in and out through every alternate ribbed line on the beanie. You must go under just 1 loop at the top of each ribbed line. Gently tug to tighten the top, and sew to close if any tiny hole is left. When you sew, go under just 1 loop at a time to prevent your needle from getting stuck in the yarn fibers. Turn the hat inside out.
Finishing
1. Weave in any remaining tails on the inner side of your beanie.
2. Attach the fur pom pom to the top of the hat.
Child & Adult
Pattern Note
Stitch counts for the 2 sizes are given in the order Child (Adult).
Ch 23 (25). Since the beanie is worked sideways, the longer your foundation chain, the taller your beanie will be.
Row 1: 1 sl st in the 2nd ch from hook, 1 sl st in next 3 (4) chs, * (1 hdc in next ch, 1 sl st in next ch), repeat from * to last 4 (5) chs, 1 sl st in last 4 (5) chs, place a marker on this side of the fabric to indicate the RS, and turn.-——–22 (24) sts
Row 2: Ch 1 (does not count as a st), 1 sl st in BLO of the first st and next 3 (4) sts, *(1 sl st in BLO of next sl st, 1 hdc in BLO of next hdc), repeat from * 6 (6) more times until 4 (5) sts are left, 1 sl st in BLO of last 4 (5) sts, turn.——22 (24) sts
Row 3: Ch 1 (does not count as a st), 1 sl st in BLO of first st and next 3 (4) sts, *(1 hdc in BLO of next hdc, 1 sl st in BLO of next sl st), repeat from * 6 (6) more times until 4 (5) sts are left, 1 sl st in BLO of last 4 (5) sts, turn.——22 (24) sts
Repeat Rows 2 and 3 until your work measures approximately 18″ inches wide for Child size, 18-1/2″ wide for Adult Small, and 19″ wide for Adult large. Your last Row should be a repeat of Row 2.
Seaming the Side
Now fold the hat with the RS (the side on which you placed the marker) inside. Take your hook out from the loop at the last row, insert it at the corner of the foundation chain edge, and pull the loop through, now start to sl st the 2 sides together by inserting your hook under the free loops of the foundation chain and the BLO of the last row to the end. Fasten off with a long tail for cinching the top of the beanie.
Cinching the Top
Thread the long yarn tail through a tapestry needle and run it in and out through every alternate ribbed line on the beanie. You must go under just 1 loop at the top of each ribbed line. Gently tug to tighten the top, and sew to close if any tiny hole is left. When you sew, go under just 1 loop at a time to prevent your needle from getting stuck in the yarn fibers. Turn the hat inside out.
Finishing the Knit Look Crochet Hat
1. Weave in any remaining tails on the inner side of your beanie.
2. Attach the fur pom pom to the top of the hat.
More Crochet Beanie Patterns
Pin it for later: