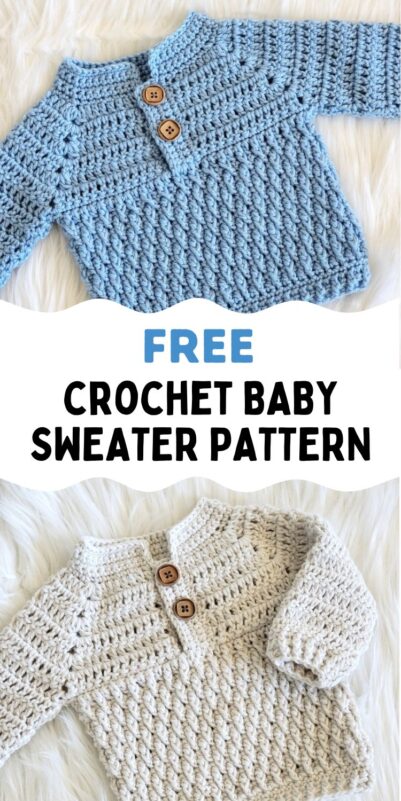
Textured Crochet Baby Boy Sweater, The Hudson Sweater
Textured Baby Boy Sweater Crochet Pattern, Baby to Toddler

Introducing the Little Hudson Sweater, a charming crochet creation designed to keep your tiny prince warm and stylish. Try it in red for a holiday sweater.

The henley-style collar adds a touch of sophistication that sets this sweater apart from ordinary baby boy sweaters. The textured stitch looks stunning and provides extra warmth and visual interest.


Perfect for special occasions and everyday wear, this crochet sweater will surely become a cherished piece in any little boy’s wardrobe. The pattern is sized for newborns to 4T, ensuring you can create multiple versions as your little one grows.

Textured Crochet Baby Boy Sweater
Materials
1. Worsted weight (size 4) yarn. Lion Brand Basic Stitch yarn in Baby Blue and Vintage colors were used for the sample crochet baby boy sweaters.
2. A H (5mm) hook for the Yoke and ribbing, and an I (5.5 mm) hook for the body.
3. Yarn needle to weave in the ends
4. 3/4”(19mm) wooden buttons. You will need 2 buttons for 0-3, 3-6 months, 6-12 months, and 3 buttons for all the bigger sizes.
Finished Size of Crochet Baby Boy Sweater
This sweater has been designed with 3 to 4-inch positive ease. The finished measurements are as follows:
0-3 months: 9 inches chest and 11 inches long
3-6 months: 9 1/2 inches chest and 12 inches long
6-12 months: 10 1/2 inches chest and 13 inches long
12-24 months: 11 inches chest and 14 inches long
2T: 12 inches chest and 14-1/2 inches long
3T/4T: 13 inches chest and 15 inches long
Yardage
Each skein of Lion Brand Basic Stitch yarn is 185 yards long.
0-3 Months: 1-1/2 skein
3-6 Months: 2 skeins
6-12 months: 2-1/2 skeins
12-24 months: 3 skeins
2T: 3-1/2 skeins
3T/4T: 4 skeins
Stitch Abbreviations
This pattern is written in US terms.
WS-Wrong Side of Sweater (inside)
RS- Right Side of Sweater (outside)
ch-chain
sl st-slip st
sc-single crochet
dc– double crochet
cl– cluster (explained below)
YO– yarn over
sp-space
sk- skip
Gauge
With H (5mm) hook, 13-1/2 dc sts= 4 inches
Stitch Explanations
Cluster (cl): YO, insert your hook into the st or chain space indicated and pull up a loop, YO and pull through 2 loops, YO again and insert hook into the same st or chain space, pull up a loop, YO and pull through 2 loops, YO and pull through the remaining 3 loops on your hook.
hdc2tog: It is a hdc decrease worked across 2 sts to join them into 1. YO, insert your hook into the first st and pull up a loop, 3 loops on your hook, YO and pull up a loop in the next st, YO and pull through all the 5 loops on your hook.
sc2tog: It is a sc decrease worked across 2 sts to join them into one. Pull up a loop in the next 2 sts, YO, and pull through all the 3 loops on your hook.
front post half double crochet (fphdc) and back post half double crochet (bphdc): You can see a tutorial on front and back post double crochet here. The front and back post hdc sts are worked inserting the hook similarly. Just replace the dc sts with hdc sts.
front post single crochet (fpsc) and back post single crochet (bpsc): Work like you work a fphdc or bphdc but replace the hdc st with sc sts.
Related Sweater Patterns
Crochet baby sweater for beginners
Toddler crochet cardigan pattern
Crochet a baby Sweater with easy shaping
Crochet Baby Boy Sweater Pattern
Pattern Notes
1. Sizes 0-3 months and 3-6 months are grouped together. Sizes 6-12 and 12-24 months are grouped together and size 2T and 3/4T are grouped together. The headings are color-coded for each group.
0-3 and 3-6 MONTHS
YOKE- Both Sizes

Pattern Notes
The yoke for both the 0-3 and 3-6 months starts with the same number of chains and follows the same pattern except for the last couple of rows.
Row 1: Ch 51 with the smaller H (5mm) hook, 1 dc in 4th ch from hook (the beginning ch 3 counts as the first dc here), 1 dc in next 5 chs, (cl, ch 2, cl) in next ch, 1 dc in next 7 chs, (cl, ch 2, cl) in next ch, 1 dc in next 17 chs, (cl, ch 2, cl) in next, 1 dc in next 7 chs, (cl, ch 2, cl) in next ch, 1 dc in remaining 7 chs, place a marker on this side of the fabric to indicate the RS of the crochet toddler sweater, turn.——–45 dc + 8 cl+8 chs
Row 2: Ch 2 (does not count as a dc here and for the rest of the yoke rows), 1 dc in the same st as ch 2, 1 dc in next 7 sts, (cl, ch 2, cl) in next ch-2 sp, 1 dc in next 9 sts, (cl, ch 2, cl) in next ch-2 sp, 1 dc in next 19 sts, (cl, ch 2, cl) in next ch-2 sp, 1 dc in next 9 sts, (cl, ch 2, cl) in next ch-2 sp, 1 dc in next 7 sts, 1 dc on top of beginning ch 3, turn. ——-53 dc + 8 cl+ 8 ch
Row 3: Ch 2, 1 dc in the same st as ch 2, 1 dc in next 8 sts, (cl, ch 2, cl) in next ch-2 sp, 1 dc in next 11 sts, (cl, ch 2, cl) in next ch-2 sp, 1 dc in next 21 sts, (cl, ch 2, cl) in next ch-2 sp, 1 dc in next 11 sts, (cl, ch 2, cl) in next ch-2 sp, 1 dc in next 9 sts, turn. ——-61 dc + 8 cl+ 8 ch
Row 4: Ch 2, 1 dc in the same st as ch 2, 1 dc in next 9 sts, (cl, ch 2, cl) in next ch-2 sp, 1 dc in next 13 sts, (cl, ch 2, cl) in next ch-2 sp, 1 dc in next 23 sts, (cl, ch 2, cl) in next ch-2 sp, 1 dc in next 13 sts, (cl, ch 2, cl) in next ch-2 sp, 1 dc in next 10 sts, turn. ——-69 dc + 8 cl+ 8 ch
Row 5: Ch 2, 1 dc in the same st as ch 2, 1 dc in next 10 sts, (cl, ch 2, cl) in next ch-2 sp, 1 dc in next 15 sts, (cl, ch 2, cl) in next ch-2 sp, 1 dc in next 25 sts, (cl, ch 2, cl) in next ch-2 sp, 1 dc in next 15 sts, (cl, ch 2, cl) in next ch-2 sp, 1 dc in next 11 sts, turn. ——-77 dc + 8 cl+ 8 ch
Row 6: Ch 2, 1 dc in the same st as ch 2, 1 dc in next 11 sts, (cl, ch 2, cl) in next ch-2 sp, 1 dc in next 17 sts, (cl, ch 2, cl) in next ch-2 sp, 1 dc in next 27 sts, (cl, ch 2, cl) in next ch-2 sp, 1 dc in next 17 sts, (cl, ch 2, cl) in next ch-2 sp, 1 dc in next 12 sts, turn. ——-85 dc + 8 cl+ 8 ch
0-3 Months Only

Note: In the next row, we will close the chest and skip stitches to form the armholes. See pic 2 above.
Row 7: Ch 1, 1 sc in the same st as ch 1, 1 sc in next 12 sts, 1 sc in the ch-2 space between the clusters, sk all the 19 sts up to the next ch-2 loop (pic 2), 1 sc in the next ch-2 space between clusters, 1 sc in next 29 sts, 1 sc in the next ch-2 space, sk next 19 sts up to the next ch-2 loop, 1 sc in the ch-2 space, 1 sc in next 13 sts, DO NOT turn and DO NOT fasten off. ——-59 sc
0-3 Months Button Band

Pattern Notes
1. Both the button band and the buttonhole band are worked on the RS. So, make sure the sweater is RS out (the side where we placed the marker on the first row) before you proceed.
2. The button band is worked from the bottom up along the left side of the front opening as shown in pic 3 above.
Row 1: Ch 1 at the corner where you have your working yarn and work along the edge of the opening, evenly distribute sc sts all the way up to the neck, and turn.
Row 2: Ch 1 (does not count as a st), 1 sc in the same st as beginning ch1, 1 sc in each st across to end, turn.
Row 3 & 4: Repeat Row 2 and fasten off.
0-3 Months Buttonhole Band
The buttonhole band is worked on the right side of the front opening from the neck downwards.
Row 1: Sl st to the top right corner of the front opening at the neck, evenly distribute sc sts all the way down and turn.
Row 2: Ch 1 (does not count as a st), 1 sc in the same st as beginning ch1, 1 sc in each remaining st across to end, turn.
Row 3: Ch 1 (does not count as a st), 1 sc in the same st as beginning ch1, ch 1 for buttonhole, sk 1 st, 1 sc in each st until 1/2 the length of the band is covered, ch 1 for buttonhole, sk 1, 1 sc in remaining sts to end, turn.
Row 4: Ch 1 (does not count as a st), 1 sc in the same st as beginning ch1, 1 sc in each st and ch across to end. Fasten off. Jump to Sleeves.
3-6 Months Only-Yoke Continued
Row 7: Ch 2, 1 dc in the same st as ch 2, 1 dc in next 12 sts, (cl, ch 2, cl) in next ch-2 sp, 1 dc in next 19 sts, (cl, ch 2, cl) in next ch-2 sp, 1 dc in next 29 sts, (cl, ch 2, cl) in next ch-2 sp, 1 dc in next 19 sts, (cl, ch 2, cl) in next ch-2 sp, 1 dc in next 13 sts, turn. ——-93 dc + 8 cl+ 8 ch
Note: In the next row, we will close the chest and skip stitches to form the armholes. See pic 2 above.
Row 8: Ch 1, 1 sc in the same st as ch 1, 1 sc in next 13 sts, 1 sc in the next ch-2 space between clusters, sk next 21 sts up to the next ch-2 loop as shown in pic 2, 1 sc in the next ch-2 space, 1 sc in the next 31 sts, 1 sc in the next ch-2 space, sk 21 sts up to the next ch-2 loop, 1 sc in the ch-2 space, 1 sc in the next 14 sts, fasten off. ——-63 sc
3-6 Months Button Band
Pattern Notes
1. Both the button band and the buttonhole band are worked on the RS. So, make sure the sweater is RS out (the side where we placed the marker on the first row) before you proceed.
2. The button band is worked from the bottom up along the left side of the front opening as shown in pic 3 above.
Row 1: Sl st to the left bottom corner of the front opening and work upwards along the edge of the opening, evenly distribute sc sts all the way up to the neck and turn.
Row 2: Ch 1 (does not count as a st), 1 sc in the same st as beginning ch 1, 1 sc in each remaining st across to end, turn.
Row 3 & 4: Repeat Row 2 and fasten off.
3- 6 Months Buttonhole Band
The buttonhole band is worked on the right side of the front opening from the neck downwards.
Row 1: Sl st to the top right corner of the front opening at the neck, evenly distribute sc sts all the way down and turn.
Row 2: Ch 1 (does not count as a st), 1 sc in the same st as beginning ch1, 1 sc in each remaining st across to end, turn.
Row 3: Ch 1 (does not count as a st), 1 sc in the same st as beginning ch1, ch 1 for buttonhole, sk 1 st, 1 sc in each st until 1/2 the length of the band is covered, ch 1 for buttonhole, sk 1, 1 sc in each remaining st to end, turn.
Row 4: Ch 1 (does not count as a st), 1 sc in the same st as beginning ch1, 1 sc in each st and ch across to end. Fasten off.
Sleeves- Both Sizes
Pattern Notes
1. The stitch count for size 3-6 months is given in brackets in the order 0-3 months (3-6 months).
2. The sleeves are worked directly onto the sweater.

Round 1: Sl st to the base of the armhole, ch 1 (does not count as a st), 1 dc at the same point in the armhole, 1 dc in adjacent ch space or gap, 1 dc in next 19 (21) sts, 1 dc in the next ch space or gap near the base of the armhole, 1 dc at the base of the armhole, sl st to first dc, turn.———23 (25) sts
Round 2: Ch 2 (does not count as a dc here and for the rest of the sleeve rounds), 1 dc in the same st as beginning ch2, 1 dc in each remaining st across to end, sl st to 1st dc, turn.——-23 (25) sts
Repeat Round 2 until your sleeve is 4.5 (5) inches long from the base of the armhole.
Next Round: Ch 2 (does not count as a hdc here), 1 hdc in the same st as beginning ch 2, 1 hdc in each st across to last 2 sts, hdc2tog across last 2 sts, sl st to 1st hdc, turn.——-22 (24) sts
Note: The last 2 rounds should be worked on the RS of your sleeve, so if you are on the RS, work on the same side. If you are on the wrong side, turn and work the last 2 rounds on the RS.
Ribbing Round 1: Ch 2 (counts as a bphdc), 1 fphdc in the next st, *(1 bphdc in next st, 1 fphdc in next st), repeat from * until you end with a fphdc in the last st, sl st to top of beginning ch 2, do not turn.——22 (24) sts
Ribbing Round 2: Ch 1 (counts as a bpsc), 1 fpsc in next fphdc, *(1 bpsc in next bphdc, 1 fpsc in next fphdc), repeat from * to end, sl st to top of beginning ch-1, fasten off.
Collar-Both Sizes

Row 1: Sl st to the top of the button band between the 3rd and 4th row of the band, about 3/4 inch away from the edge, 1 sc in the same point, 1 sc on top of the 4th row of the band, distribute sc sts, one for each st at the neck and each time you reach a ch space, sc2tog across the space and the next point. Continue like this and stop at the top of the buttonhole band between the 3rd and the 4th row, about 3/4th inch away from the edge, turn.
Row 2: Ch 1 (does not count as a st), 1 sc in same st as ch 1 and each st across to end, turn.
Keep repeating Row 2 until the collar is as high as you want and fasten off. I worked a total of 5 sc rows for the collar.
Finishing the Collar-Both Sizes

Starting from the bottom left corner of the button band, sl st all the way up along the side of the button band, continue to sl st along the edge of the collar and down along the edge of the buttonhole band all the way to the bottom of it. Fasten off.
Body of the Sweater-Both Sizes
Pattern Notes
1. The stitch count for size 3-6 months is given in brackets in the order 0-3 months (3-6 months).
2. The body is worked with the I (5.5 mm) hook and we will switch to the smaller hook only for the bottom ribbing.
3. The odd-numbered rounds are always worked on the outside or right side of the crochet sweater (RS) and the even-numbered rounds are on the WS (wrong side or inside).
Round 1: With the bigger I (5.5mm) hook, sl st under the left armhole on the RS, ch 2 (counts as a dc), and work toward the front opening, 1 dc in each st until you reach the button band, overlap the buttonhole band over the button band and work 4 dc going through both the layers, 1 dc in the junction of the band and sweater, 1 dc in each st across to end, sl st to beginning ch-2, turn.—–64 (68) dc
Count your stitches and make sure you have 64 (68) sts at the end of Round 1.
Round 2: Ch 1 (does not count as a st), 1 sc in first st which will be tight, and each st across to end, sl st to first sc, turn.——–64 (68) sc
Note: In the next and all odd rows, the fpdc sts are worked into the dc sts one row below giving it a drop-down effect.
Round 3: Ch 2 (counts as a dc), *( 1 fpdc in dc below next sc st, sk 1 st behind the fpdc you just made, 1 dc in the next st of the current row), repeat from * to end and after last fpdc, sl st to beginning ch-2. turn.——-64 (68) sts
Round 4: Ch 1 (does not count as a st), 1 sc in first st which will be tight, and each ast across to end, sl st to first sc, turn.——–64 (68) sc
Round 5: Ch 1 (does not count as a st), 1 fpdc in beginning ch-2 one row below, 1 dc in next sc on top of fpdc, *[1 fpdc in next dc 1 row below (it will be between 2 fpdc sts), sk 1 st behind the fpdc you just made, 1 dc in next sc on top of fpdc), repeat from * and after working your last dc, sl st to first fpdc of this round, turn.——–64 (68) sts
Round 6: Ch 1 (does not count as a st), 1 sc in first st and each ast across to end, sl st to first sc, turn.——–64 (68) sc
Round 7: Ch 2 (counts as a dc), *(1 fpdc in dc below next sc st (it will be between 2 fpdc sts), sk 1 st behind the fpdc you just made, 1 dc in the next sc on top of fpdc), repeat from * to end and after last fpdc, sl st to beginning ch-2. turn.——-64 (68) sts
Repeat rounds 4 to 7 until your sweater is approximately 10 (11) inches long and you end in a fpdc round. Switch back to H (5mm) hook and make the bottom ribbing below.
Bottom Ribbing-Both Sizes
Note: All the rounds of the bottom ribbing are worked on the RS.
Base Round: With the smaller H (5mm) hook, ch 1 (does not count as a st), 1 sc in first st and each ast across to end, sl st to first sc, do not turn.——–64 (68) sc
Round 1: Ch 2 ( counts as a hdc), 1 hdc in next st and each st across to end, sl st to beginning ch-2, do not turn.——–64 (68) hdc
Ribbing Round 2: Ch 2 (counts as a bphdc), 1 fphdc in next hdc, *(1 bphdc in next hdc, 1 fphdc in next hdc), repeat from * to end, sl st to top of beginning ch-2, fasten off. ——–64 (68) sts
Finishing-Both Sizes
1. Weave in any tails left.
2. Sew on the buttons corresponding to the buttonholes.
6-12 and 12-24 MONTHS
YOKE- Both Sizes
Row 1: Ch 56 with the H (5mm) hook, 1 dc in 4th ch from hook (the beginning ch 3 counts as a dc), 1 dc in next 6 chs, (cl, ch 2, cl) in next ch, 1 dc in next 8 chs, (cl, ch 2, cl) in next, 1 dc in next 18 chs, (cl, ch 2, cl) in next ch, 1 dc in next 8 chs, (cl, ch 2, cl) in next, 1 dc in remaining 8 chs, place a marker on this side of the fabric to indicate the right side, turn.———50 dc+ 8 cl+ 8 chs
Row 2: Ch 2 (does not count as a dc here and in the rest of the yoke rows), 1 dc in the same st as ch 2, 1 dc in next 8 sts, (cl, ch 2, cl) in next ch-2 sp, 1 dc in next 10 sts, (cl, ch 2, cl) in next ch-2 sp, 1 dc in next 20 sts, ( cl, ch 2, cl) in next ch-2 sp, 1 dc in next 10 sts, (cl, ch 2, cl) in next ch-2 sp, 1 dc in next 8 sts, 1 dc on top of beginning ch 3, turn.———58 dc+ 8 Cl+ 8 ch
Row 3: Ch 2, 1 dc in the same st as ch 2, 1 dc in next 9 sts, (cl, ch 2, cl) in next ch-2 sp, 1 dc in next 12 sts, (cl, ch 2, cl) in next ch-2 sp, 1 dc in next 22 sts, (cl, ch 2, cl) in next ch-2 sp, 1 dc in next 12 sts, (cl, ch 2, cl) in next ch-2 sp, 1 dc in remaining 10 sts, turn.———66 dc+ 8 cl+ 8 chs
Row 4: Ch 2, 1 dc in the same st as ch 2, 1 dc in next 10 sts, (cl, ch 2, cl) in next ch-2 sp, 1 dc in next 14 sts, (cl, ch 2, cl) in next ch-2 sp, 1 dc in next 24 sts, ( cl, ch 2, cl) in next ch-2 sp, 1 dc in next 14 sts, (cl, ch 2, cl) in next ch-2 sp, 1 dc in remaining 11 sts, turn.———74 dc+ 8 cl+ 8 chs
Row 5: Ch 2, 1 dc in the same st as ch 2, 1 dc in next 11 sts, (cl, ch 2, cl) in next ch-2 sp, 1 dc in next 16 sts, (cl, ch 2, cl) in next ch-2 sp, 1 dc in next 26 sts, ( cl, ch 2, cl) in next ch-2 sp, 1 dc in next 16 sts, (cl, ch 2, cl) in next ch-2 sp, 1 dc in remaining 12 sts, turn.———82 dc+ 8 cl+ 8 chs
Row 6: Ch 2, 1 dc in the same st as ch 2, 1 dc in next 12 sts, (cl, ch 2, cl) in next ch-2 sp, 1 dc in next 18 sts, (cl, ch 2, cl) in next ch-2 sp, 1 dc in next 28 sts, ( cl, ch 2, cl) in next ch-2 sp, 1 dc in next 18 sts, (cl, ch 2, cl) in next ch-2 sp, 1 dc in remaining 13 sts, turn.———90 dc+ 8 cl+ 8 chs
Row 7: Ch 2, 1 dc in the same st as ch 2, 1 dc in next 13 sts, (cl, ch 2, cl) in next ch-2 sp, 1 dc in next 20 sts, (cl, ch 2, cl) in next ch-2 sp, 1 dc in next 30 sts, ( cl, ch 2, cl) in next ch-2 sp, 1 dc in next 20 sts, (cl, ch 2, cl) in next ch-2 sp, 1 dc in remaining 14 sts, turn.———98 dc+ 8 cl+ 8 chs
Row 8: Ch 2, 1 dc in the same st as ch 2, 1 dc in next 14 sts, (cl, ch 2, cl) in next ch-2 sp, 1 dc in next 22 sts, (cl, ch 2, cl) in next ch-2 sp, 1 dc in next 32 sts, (cl, ch 2, cl) in next ch-2 sp, 1 dc in next 22 sts, (cl, ch 2, cl) in next ch-2 sp, 1 dc in remaining 15 sts, turn.———106 dc+ 8 cl+ 8 chs
6-12 Months Only
Note: In the next row, we will close the chest and skip sts to form the armholes. See pic 8 above.
Row 9: Ch 1, 1 sc in the same st as ch 1, 1 sc in the next 15 sts, bring the next two ch-2 loops together and work just 1 sc into both the ch-2 spaces to join them. There will be 24 sts skipped to form the armhole now as shown in pic 8. 1 sc in the next 34 sts, bring the next two ch-2 loops together and work 1 sc into both the ch-2 spaces at once, 1 sc in the next 16 sts, DO NOT turn and DO NOT fasten off. ——-68 sc
6-12 Months Button Band
Pattern Notes
1. Both the button band and the buttonhole band are worked on the RS. So, make sure the sweater is RS out (the side where we placed the marker on the first row) before you proceed.
2. The button band is worked from the bottom up along the left side of the front opening as shown in pic 9 above.
Row 1: Ch 1 at the corner where you have your working yarn and work along the edge of the opening, evenly distribute sc sts all the way up to the neck, and turn.
Row 2: Ch 1 (does not count as a st), 1 sc in the same st as beginning ch1, 1 sc in each remaining st across to end, turn.
Row 3 & 4: Repeat Row 2 and fasten off.
6-12 Months Buttonhole Band
The buttonhole band is worked on the right side of the front opening from the neck downwards as shown in pic 9 above.
Row 1: Sl st to the top right corner of the front opening at the neck, evenly distribute sc sts all the way down and turn.
Row 2: Ch 1 (does not count as a st), 1 sc in the same st as beginning ch1, 1 sc in each remaining st across to end, turn.
Row 3: Ch 1 (does not count as a st), 1 sc in the same st as beginning ch1, ch 1 for buttonhole, sk 1 st, 1 sc in each st until 1/2 the length of the band is covered, ch 1 for buttonhole, sk 1, 1 sc in remaining sts to end, turn.
Row 4: Ch 1 (does not count as a st), 1 sc in the same st as beginning ch1, 1 sc in each st, and ch across to end. Fasten off. Jump to Sleeves.
12-24 Months Yoke Continued
Row 9: Ch 2 (does not count as a dc here and in the following rows), 1 dc in the same st as ch 2, 1 dc in next 15 sts, (cl, ch 2, cl) in next ch-2 sp, 1 dc in next 24 sts, (cl, ch 2, cl) in next ch-2 sp, 1 dc in next 34 sts, (cl, ch 2, cl) in next ch-2 sp, 1 dc in next 24 sts, (cl, ch 2, cl) in next ch-2 sp, 1 dc in remaining 16 sts, turn.———114 dc+ 8 cl+ 8 chs
In the next row, we will close the chest and skip sts to form the armholes. See pic 8 above.
Row 10: Ch 1, 1 sc in the same st as ch 1, 1 sc in next 16 sts, bring the next two ch-2 loops together and work just 1 sc into both the ch-2 spaces at once to join, there will be 26 sts skipped to form the armhole now as shown in pic 8, 1 sc in the next 36 sts, bring the next two ch-2 loops together and work 1 sc into both the ch-2 spaces at once, 1 sc in next 17 sts, fasten off. ——-72 sc
12-24 Months Button Band
Pattern Notes
1. Both the button band and the buttonhole band are worked on the RS. So, make sure the sweater is RS out (the side where we placed the marker on the first row) before you proceed.
2. The button band is worked from the bottom up along the left side of the front opening as shown in pic 9 above.
Row 1: Sl st to the left bottom corner of the front opening and work upwards along the edge of the opening, evenly distribute sc sts all the way up to the neck and turn.
Row 2: Ch 1 (does not count as a st), 1 sc in the same st as beginning ch 1, 1 sc in each remaining st across to end, turn.
Row 3 & 4: Repeat Row 2 and fasten off.
12-24 Months Buttonhole Band
The buttonhole band is worked on the right side of the front opening from the neck downwards as shown in pic 9 above.
Row 1: Sl st to the top right corner of the front opening at the neck, evenly distribute sc sts all the way down and turn.
Row 2: Ch 1 (does not count as a st), 1 sc in the same st as beginning ch1, 1 sc in each remaining st across to end, turn.
Row 3: Ch 1 (does not count as a st), 1 sc in the same st as beginning ch1, ch 1 for buttonhole, sk 1 st, 1 sc in each st until you are a 1/4 inch before the middle of the band, ch 1 for buttonhole, sk 1 st, 1 sc in each st to last 3 sts, ch 1 for buttonhole, sk 1 st, 1 sc in the last 2 sts, turn.
Note: Now position the buttons on top of the buttonholes and see if you like how they look. If not, unravel and reposition the buttonholes to your liking. You can use markers to indicate their position before you start. Just take care not to take into account the last st at the bottom of the band as you will be working the first round of the body into it.
Row 4: Ch 1 (does not count as a st), 1 sc in the same st as beginning ch1, 1 sc in each st and ch across to end. Fasten off.
Sleeves- Both Sizes
Pattern Notes
1. The stitch count for size 12-24 months is given in brackets in the order 6-12 months (12-24 months).
2. The sleeves are worked directly onto the sweater.

Round 1: Sl st to the base of the armhole, ch 1 (does not count as a st), 1 cl in adjacent ch space or gap, 1 dc in next 24 (26) sts, 1 cl in the next ch space or gap near the base of the armhole, sl st to first cl, turn.———26 (28) sts
Round 2: Ch 2 (does not count as a dc here and for the rest of the sleeve rounds), 1 dc in the same st as beginning ch2, 1 dc in each remaining st across to end, sl st to 1st dc, turn.——-26 (28) sts
Repeat Round 2 until your sleeve is 6 (6) inches long from the base of the armhole.
Next Round: Ch 2 (does not count as a hdc here), 1 hdc in the same st as beginning ch 2, 1 hdc in each st across to end, sl st to 1st hdc, turn.——-26 (28) sts
Note: The ribbing rounds should be worked on the RS of your sleeve, so if you are on the RS, work on the same side. If you are on the wrong side, turn and work the Ribbing rounds on the RS.
Ribbing Round 1: Ch 2 (counts as a bphdc), 1 fphdc in the next st, *(1 bphdc in next st, 1 fphdc in next st), repeat from * until you end with a fphdc in the last st, sl st to top of beginning ch 2, do not turn.——26 (28) sts
Ribbing Round 2 (Only for size 12 to 24 months): Ch 2 (counts as a bphdc), 1 fphdc in next fphdc, *(1 bphdc in next bphdc, 1 fphdc in next fphdc), repeat from * to end, sl st to top of beginning ch-2, do not turn.——–26 (28) sts
Last Round (for both sizes): Ch 1 (counts as a bpsc), 1 fpsc in next fphdc, *(1 bpsc in next bphdc, 1 fpsc in next fphdc), repeat from * to end, sl st to top of beginning ch-1, fasten off.
Collar-Both Sizes
Row 1: Sl st to the top of the button band between the 3rd and 4th row of the band, about 3/4 inch away from the edge, 1 sc in the same point, 1 sc on top of the 4th row of the band, distribute sc sts, one for each st at the neck and each time you reach a ch space, sc2tog across the space and the next point. Continue like this and stop at the top of the buttonhole band between the 3rd and the 4th row, about 3/4th inch away from the edge, turn.
Row 2: Ch 1 (does not count as a st), 1 sc in same st as ch 1 and each st across to end, turn.
Keep repeating Row 2 until the collar is as high as you want and fasten off. I worked a total of 6 sc rows for the collar.
Finishing the Collar-Both Sizes
Starting from the bottom left corner of the button band, sl st all the way up along the side of the button band, continue to sl st along the edge of the collar and down along the edge of the buttonhole band all the way to the bottom of it. Fasten off.
Body of the Sweater-Both Sizes
Pattern Notes
1. The stitch count for size 12-24 months is given in brackets in the order 6-12 months (12-24 months).
2. The body is worked with the I (5.5 mm) hook and we will switch to the smaller hook only for the bottom ribbing.
3. The odd-numbered rounds are always worked on the outside or right side of the crochet sweater (RS) and the even-numbered rounds are on the WS (wrong side or inside).
Round 1: With the bigger I (5.5mm) hook, sl st under the left armhole on the RS, ch 2 (counts as a dc), and work toward the front opening, 1 dc in each st until you reach the button band, overlap the buttonhole band over the button band and work 4 dc going through both the layers, 1 dc in the junction of the band and sweater, 1 dc in each st across to end, sl st to beginning ch-2, turn.—–74 (78) sts
Count your stitches and make sure you have 74 (78) sts at the end of Round 1.
Round 2: Ch 1 (does not count as a st), 1 sc in first st which will be tight, and each st across to end, sl st to first sc, turn.——–74 (78) sts
Note: In the next and all odd rows, the fpdc sts are worked into the dc sts one row below giving it a drop-down effect.
Round 3: Ch 2 (counts as a dc), *( 1 fpdc in dc below next sc st, sk 1 st behind the fpdc you just made, 1 dc in the next st of the current row), repeat from * to end and after last fpdc, sl st to beginning ch-2. turn.——-74 (78) sts
Round 4: Ch 1 (does not count as a st), 1 sc in first st which will be tight, and each ast across to end, sl st to first sc, turn.——–74 (78) sts
Round 5: Ch 1 (does not count as a st), 1 fpdc in beginning ch-2 one row below, 1 dc in next sc on top of fpdc, *[1 fpdc in next dc 1 row below (it will be between 2 fpdc sts), sk 1 st behind the fpdc you just made, 1 dc in next sc on top of fpdc), repeat from * and after working your last dc, sl st to first fpdc of this round, turn.—-74 (78) sts
Round 6: Ch 1 (does not count as a st), 1 sc in first st and each ast across to end, sl st to first sc, turn.——–74 (78) sc
Round 7: Ch 2 (counts as a dc), *(1 fpdc in dc below next sc st (it will be between 2 fpdc sts), sk 1 st behind the fpdc you just made, 1 dc in the next sc on top of fpdc), repeat from * to end and after last fpdc, sl st to beginning ch-2. turn.——-74 (78) sts
Repeat rounds 4 to 7 until your sweater is approximately 11-1/2 (12-1/2) inches long and you end in a fpdc round. Switch back to H (5mm) hook and make the bottom ribbing below.
Bottom Ribbing-Both Sizes
Note: All the rounds of the bottom ribbing are worked on the RS.
Base Round: With the smaller H (5mm) hook, ch 1 (does not count as a st), 1 sc in first st and each ast across to end, sl st to first sc, do not turn.——–74 (78) sc
Round 1: Ch 2 ( counts as a hdc), 1 hdc in next st and each st across to end, sl st to beginning ch-2, do not turn.——–74 (78) sts
Ribbing Round 2: Ch 2 (counts as a bphdc), 1 fphdc in next hdc, *(1 bphdc in next hdc, 1 fphdc in next hdc), repeat from * to end, sl st to top of beginning ch-2, do not turn. ——–74 (78) sts
Ribbing Round 3: Ch 1 (counts as a bpsc), 1 fpsc in next fphdc, *(1 bpsc in next bphdc, 1 fpsc in next fphdc), repeat from * to end, sl st to top of beginning ch-1, fasten off.
Finishing-Both Sizes
1. Weave in any tails left.
2. Sew on the buttons corresponding to the buttonholes.
2T & 3/4T
YOKE – Both Sizes
Row 1: Ch 59 with the H (5mm) hook, 1 dc in 4th ch from hook (beginning ch 3 counts as a dc), 1 dc in next 6 ch, (cl, ch 2, cl) in next ch, 1 dc in next 9 ch, (cl, ch 2, cl), 1 dc in next 19 ch, (cl, ch 2, cl), 1 dc in next 9 ch, (cl, ch 2, cl), 1 dc in next 8 ch, place a marker on this side of the fabric to indicate the right side, turn.——-53 dc+ 8 cl+ 8 ch
Row 2: Ch 2 (does not count as a dc here and in the rest of the yoke rows), 1 dc in the same st as ch 2, 1 dc in next 8 sts, (cl, ch 2, cl) in next ch-2 sp, 1 dc in next 11 sts, (cl, ch 2, cl) in next ch-2 sp, 1 dc in next 21 sts, ( cl, ch 2, cl) in next ch-2 sp, 1 dc in next 11 sts, (cl, ch 2, cl) in next ch-2 sp, 1 dc in next 8 sts, 1 dc on top of beginning ch 3, turn.———61 dc+ 8 cl+ 8 ch
Row 3: Ch 2, 1 dc in the same st as ch 2, 1 dc in next 9 sts, (cl, ch 2, cl) in next ch-2 sp, 1 dc in next 13 sts, (cl, ch 2, cl) in next ch-2 sp, 1 dc in next 23 sts, ( cl, ch 2, cl) in next ch-2 sp, 1 dc in next 13 sts, (cl, ch 2, cl) in next ch-2 sp, 1 dc in next 10 sts, turn.———69 dc+ 8 cl+ 8 ch
Row 4: Ch 2, 1 dc in the same st as ch 2, 1 dc in next 10 sts, (cl, ch 2, cl) in next ch-2 sp, 1 dc in next 15 sts, (cl, ch 2, cl) in next ch-2 sp, 1 dc in next 25 sts, ( cl, ch 2, cl) in next ch-2 sp, 1 dc in next 15 sts, (cl, ch 2, cl) in next ch-2 sp, 1 dc in next 11 sts, turn.———77 dc+ 8 cl+ 8 ch
Row 5: Ch 2, 1 dc in the same st as ch 2, 1 dc in next 11 sts, (cl, ch 2, cl) in next ch-2 sp, 1 dc in next 17 sts, (cl, ch 2, cl) in next ch-2 sp, 1 dc in next 27 sts, ( cl, ch 2, cl) in next ch-2 sp, 1 dc in next 17 sts, (cl, ch 2, cl) in next ch-2 sp, 1 dc in next 12 sts, turn.———85 dc+ 8 cl+ 8 ch
Row 6: Ch 2, 1 dc in the same st as ch 2, 1 dc in next 12 sts, (cl, ch 2, cl) in next ch-2 sp, 1 dc in next 19 sts, (cl, ch 2, cl) in next ch-2 sp, 1 dc in next 29 sts, ( cl, ch 2, cl) in next ch-2 sp, 1 dc in next 19 sts, (cl, ch 2, cl) in next ch-2 sp, 1 dc in next 13 sts, turn.———93 dc+ 8 cl+ 8 ch
Row 7: Ch 2, 1 dc in the same st as ch 2, 1 dc in next 13 sts, (cl, ch 2, cl) in next ch-2 sp, 1 dc in next 21 sts, (cl, ch 2, cl) in next ch-2 sp, 1 dc in next 31 sts, ( cl, ch 2, cl) in next ch-2 sp, 1 dc in next 21 sts, (cl, ch 2, cl) in next ch-2 sp, 1 dc in next 14 sts, turn.———101 dc+ 8 cl+ 8 ch
Row 8: Ch 2, 1 dc in the same st as ch 2, 1 dc in next 14 sts, (cl, ch 2, cl) in next ch-2 sp, 1 dc in next 23 sts, (cl, ch 2, cl) in next ch-2 sp, 1 dc in next 33 sts, ( cl, ch 2, cl) in next ch-2 sp, 1 dc in next 23 sts, (cl, ch 2, cl) in next ch-2 sp, 1 dc in next 15 sts, turn.———109 dc+ 8 cl+ 8 ch
Row 9: Ch 2, 1 dc in the same st as ch 2, 1 dc in next 15 sts, (cl, ch 2, cl) in next ch-2 sp, 1 dc in next 25 sts, (cl, ch 2, cl) in next ch-2 sp, 1 dc in next 35 sts, ( cl, ch 2, cl) in next ch-2 sp, 1 dc in next 25 sts, (cl, ch 2, cl) in next ch-2 sp, 1 dc in next 16 sts, turn.———117 dc+ 8 Cl+ 8 ch
Size 2T Only
In the next row, we will close the chest and skip sts to form armholes. See pic 14 above.
Row 10: Ch 1, 1 sc in the same st as ch 1, 1 sc in next 16 sts, bring the next two ch-2 loops together and work 1 sc into both the ch-2 spaces at once to join them, there will be 27 sts skipped to form the armhole now as shown in pic 14, 1 more sc into the second ch space, 1 sc in next 37 sts, 1 sc in next ch-2 space, bring the next ch-2 loop close to this ch-2 loop and work 1 sc into both the ch-2 spaces at once, 1 sc in next 17 sts, fasten off.———75 sc
2T Button Band
Pattern Notes
1. Both the button band and the buttonhole band are worked on the RS. So, make sure the sweater is RS out (the side where we placed the marker on the first row) before you proceed.
2. The button band is worked from the bottom up along the left side of the front opening as shown in pic 15 above.
Row 1: Sl st to the left bottom corner of the front opening and work upwards along the edge of the opening, evenly distribute sc sts all the way up to the neck and turn.
Row 2: Ch 1 (does not count as a st), 1 sc in the same st as beginning ch 1, 1 sc in each remaining st across to end, turn.
Row 3 & 4: Repeat Row 2 and fasten off.
2T Buttonhole Band
The buttonhole band is worked on the right side of the front opening from the neck downwards.
Row 1: Sl st to the top right corner of the front opening at the neck, evenly distribute sc sts all the way down and turn.
Row 2: Ch 1 (does not count as a st), 1 sc in the same st as beginning ch1, 1 sc in each remaining st across to end, turn.
Row 3: Ch 1 (does not count as a st), 1 sc in the same st as beginning ch1, ch 1 for buttonhole, sk 1 st, 1 sc in each st until you are a 1/4 inch before the middle of the band, ch 1 for buttonhole, sk 1 st, 1 sc in each st to last 3 sts, ch 1 for buttonhole, sk 1 st, 1 sc in the last 2 sts, turn.
Note: Now position the buttons on top of the buttonholes and see if you like how they look. If not, unravel and reposition the buttonholes to your liking. You can use markers to indicate their position before you start. Just take care not to take into account the last st at the bottom of the band as you will be working the first round of the body into it.
Row 4: Ch 1 (does not count as a st), 1 sc in the same st as beginning ch1, 1 sc in each st and ch across to end. Fasten off. Jump to Sleeves.
Size 3T/4T Only
Row 10: Ch 2, 1 dc in the same st as ch 2, 1 dc in next 16 sts, (cl, ch 2, cl) in next ch-2 sp, 1 dc in next 27 sts, (cl, ch 2, cl) in next ch-2 sp, 1 dc in next 37 sts, (cl, ch 2, cl) in next ch-2 sp, 1 dc in next 27 sts, (cl, ch 2, cl) in next ch-2 sp, 1 dc in next 17 sts, turn.———125 dc+ 8 cl+ 8 ch
In the next row, we will close the chest and skip sts to form armholes. See pic 14 above.
Row 11: Ch 1, 1 sc in the same st as ch 1, 1 sc in next 17 sts, bring the next two ch-2 loops together and work just 1 sc into both the ch-2 spaces at once to join them, there will be 29 sts skipped to form the armhole now as shown in pic 14, work 1 more sc into the second ch space, 1 sc in next 39 sts, 1 sc in next ch-2 space, bring the next ch-2 loop closer and work 1 sc into both the ch-2 spaces at once, 1 sc in next 18 sts. DO NOT turn and DO NOT fasten off.———79 sc
3T/4T Button Band
Pattern Notes
1. Both the button band and the buttonhole band are worked on the RS. So, make sure the sweater is RS out (the side where we placed the marker on the first row) before you proceed.
2. The button band is worked from the bottom up along the left side of the front opening as shown in pic 15 above.
Row 1: Ch 1 at the corner where you have your working yarn and work along the edge of the opening, evenly distribute sc sts all the way up to the neck, and turn.
Row 2: Ch 1 (does not count as a st), 1 sc in the same st as beginning ch1, 1 sc in each remaining st across to end, turn.
Row 3 & 4: Repeat Row 2 and fasten off.
3T/4T Buttonhole Band
The buttonhole band is worked on the right side of the front opening from the neck downwards as shown in pic 15 above.
Row 1: Sl st to the top right corner of the front opening at the neck, evenly distribute sc sts all the way down and turn.
Row 2: Ch 1 (does not count as a st), 1 sc in the same st as beginning ch1, 1 sc in each remaining st across to end, turn.
Row 3: Ch 1 (does not count as a st), 1 sc in the same st as beginning ch1, ch 1 for buttonhole, sk 1 st, 1 sc in each st until you are a 1/4 inch before the middle of the band, ch 1 for buttonhole, sk 1 st, 1 sc in each st to last 3 sts, ch 1 for buttonhole, sk 1 st, 1 sc in the last 2 sts, turn.
Note: Now position the buttons on top of the buttonholes and see if you like how they look. If not, unravel and reposition the buttonholes to your liking. You can use markers to indicate their position before you start. Just take care not to take into account the last st at the bottom of the band as you will be working the first round of the body into it.
Row 4: Ch 1 (does not count as a st), 1 sc in the same st as beginning ch1, 1 sc in each st, and ch across to end. Fasten off.
Sleeves- Both Sizes
Pattern Notes
1. The stitch count for size 3/4T months is given in brackets in the order 2T (3/4T).
2. The sleeves are worked directly onto the sweater.

Round 1: Sl st to the base of the armhole, ch 1 (does not count as a st), 1 dc in adjacent ch space or gap, 1 dc in next 27 (29) sts, 1 cl in the next ch space or gap near the base of the armhole, sl st to first dc, turn.———29 (31) sts
Round 2: Ch 2 (does not count as a dc here and for the rest of the sleeve rounds), 1 dc in the same st as beginning ch2, 1 dc in each remaining st across to end, sl st to 1st dc, turn.——-29 (31) sts
Repeat Round 2 until your sleeve is 7-1/2 (8) inches long from the base of the armhole.
Next Round: Ch 2 (does not count as a hdc here), 1 hdc in the same st as beginning ch 2, 1 hdc in each st across to last 2 sts, hdc2tog across last 2 sts, sl st to 1st hdc, turn.——-28 (30) sts
Note: The ribbing rounds should be worked on the RS of your sleeve, so if you are on the RS, work on the same side. If you are on the wrong side, turn and work the Ribbing rounds on the RS.
Ribbing Round 1: Ch 2 (counts as a bphdc), 1 fphdc in the next st, *(1 bphdc in next st, 1 fphdc in next st), repeat from * until you end with a fphdc in the last st, sl st to top of beginning ch 2, do not turn.——28 (30) sts
Ribbing Round 2: Ch 2 (counts as a bphdc), 1 fphdc in next fphdc, *(1 bphdc in next bphdc, 1 fphdc in next fphdc), repeat from * to end, sl st to top of beginning ch-2. Do not turn.——28 (30) sts
Ribbing Rounds 3: Repeat Round 2 above.——28 (30) sts
Ribbing Round 4: Ch 1 (counts as a bpsc), 1 fpsc in next fphdc, *(1 bpsc in next bphdc, 1 fpsc in next fphdc), repeat from * to end, sl st to top of beginning ch-1, fasten off. ——28 (30) sts
Collar-Both Sizes
Row 1: Sl st to the top of the button band between the 3rd and 4th row of the band, about 3/4 inch away from the edge, 1 sc in the same point, 1 sc on top of the 4th row of the band, distribute sc sts, one for each st at the neck and each time you reach a ch space, sc2tog across the space and the next point. Continue like this and stop at the top of the buttonhole band between the 3rd and the 4th row, about 3/4th inch away from the edge, turn.
Row 2: Ch 1 (does not count as a st), 1 sc in same st as ch 1 and each st across to end, turn.
Keep repeating Row 2 until the collar is as high as you want and fasten off. I worked a total of 7 sc rows for the collar.
Finishing the Collar-Both Sizes
Starting from the bottom left corner of the button band, sl st all the way up along the side of the button band, continue to sl st along the edge of the collar and down along the edge of the buttonhole band all the way to the bottom of it. Fasten off.
Body of the Sweater-Both Sizes
Pattern Notes
1. The stitch count for size 2T is given in brackets in the order 2T (3/4T).
2. The body is worked with the I (5.5 mm) hook and we will switch to the smaller hook only for the bottom ribbing.
3. The odd-numbered rounds are always worked on the outside or right side of the crochet sweater (RS) and the even-numbered rounds are on the WS (wrong side or inside).
Round 1: With the bigger I (5.5mm) hook, sl st under the left armhole on the RS, ch 2 (counts as a dc), and work toward the front opening, 1 dc in each st until you reach the button band, overlap the buttonhole band over the button band and work 4 dc going through both the layers, 1 dc in the junction of the band and sweater, 1 dc in each st across to end, sl st to beginning ch-2, turn.———-80 (84) dc
Count your stitches and make sure you have 64 (68) sts at the end of Round 1.
Round 2: Ch 1 (does not count as a st), 1 sc in first st which will be tight, and each st across to end, sl st to first sc, turn.————-80 (84) sc
Note: In the next and all odd rows, the fpdc sts are worked into the dc sts one row below giving it a drop-down effect.
Round 3: Ch 2 (counts as a dc), *( 1 fpdc in dc below next sc st, sk 1 st behind the fpdc you just made, 1 dc in the next st of the current row), repeat from * to end and after last fpdc, sl st to beginning ch-2. turn.——-80 (84)sts
Round 4: Ch 1 (does not count as a st), 1 sc in first st which will be tight, and each ast across to end, sl st to first sc, turn.——–80 (84) sc
Round 5: Ch 1 (does not count as a st), 1 fpdc in beginning ch-2 one row below, 1 dc in next sc on top of fpdc, *[1 fpdc in next dc 1 row below (it will be between 2 fpdc sts), sk 1 st behind the fpdc you just made, 1 dc in next sc on top of fpdc), repeat from * and after working your last dc, sl st to first fpdc of this round, turn.——–80 (84) sts
Round 6: Ch 1 (does not count as a st), 1 sc in first st and each ast across to end, sl st to first sc, turn.——–80 (84) sc
Round 7: Ch 2 (counts as a dc), *(1 fpdc in dc below next sc st (it will be between 2 fpdc sts), sk 1 st behind the fpdc you just made, 1 dc in the next sc on top of fpdc), repeat from * to end and after last fpdc, sl st to beginning ch-2. turn.——-80 (84) sts
Repeat rounds 4 to 7 until your sweater is approximately 12 (13) inches long and you end in a fpdc round. Switch back to H (5mm) hook and make the bottom ribbing below.
Bottom Ribbing-Both Sizes
Note: All the rounds of the bottom ribbing are worked on the RS.
Base Round: With the smaller H (5mm) hook, ch 1 (does not count as a st), 1 sc in first st and each ast across to end, sl st to first sc, do not turn.——–80 (84) sc
Round 1: Ch 2 ( counts as a hdc), 1 hdc in next st and each st across to end, sl st to beginning ch-2, do not turn.——–80 (84) hdc
Ribbing Round 2: Ch 2 (counts as a bphdc), 1 fphdc in next hdc, *(1 bphdc in next hdc, 1 fphdc in next hdc), repeat from * to end, sl st to top of beginning ch-2, do not turn. ——–80 (84) sts
Ribbing Round 3: Repeat the above round. ——–80 (84) sts
Ribbing Round 4: Ch 1 (counts as a bpsc), 1 fpsc in next fphdc, *(1 bpsc in next bphdc, 1 fpsc in next fphdc), repeat from * to end, sl st to top of beginning ch-1, fasten off.
Finishing-Both Sizes
1. Weave in any tails left.
2. Sew on the buttons corresponding to the buttonholes.
Related Sweater Patterns
Crochet baby sweater with collar
Toddler crochet cardigan pattern for boys
How to crochet a baby Sweater with easy shaping
Pin it for later